
Popular categories
Looking for a yarn?


|
|||||||
Snowfall |
|||||||
|
|
|||||||
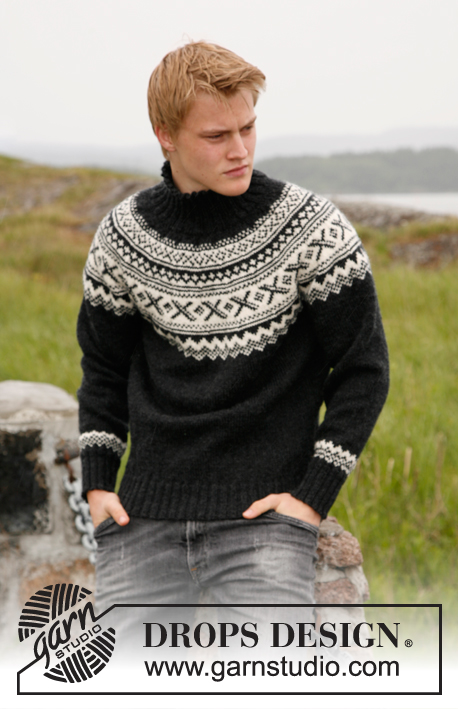
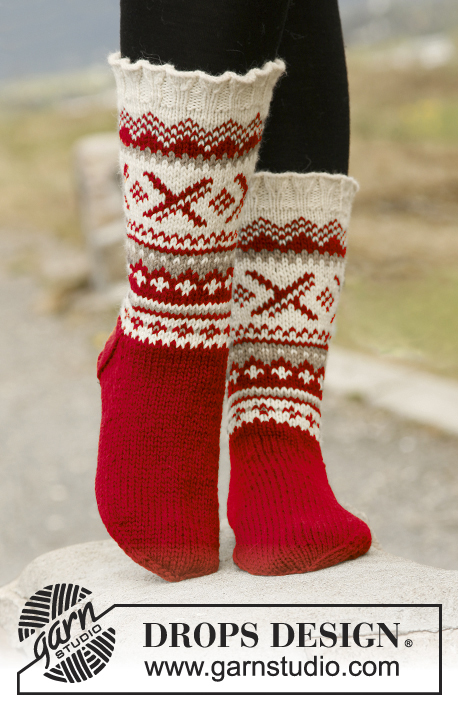
Knitted socks for men, with Nordic pattern in DROPS Fabel.
DROPS 135-8 |
|||||||
|
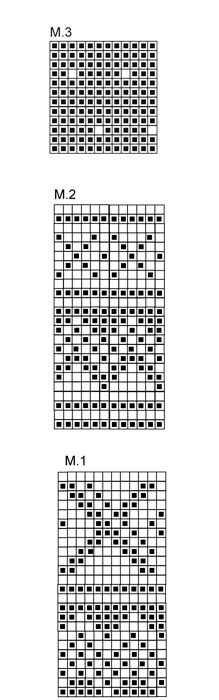
PATTERN: See diagram M.1, M.2 and M.3, all diagrams are worked in stockinette st. DECREASE TIP: Dec as follows before marker: K 2 tog. Dec as follows after marker: K 2 twisted tog (i.e. work in back loop of st instead of front). HEEL DECREASE: 1st row (= RS): Work until 9-10-10-11 sts remain, K 2 twisted tog (i.e. work in back loop of st instead of front), turn piece. 2nd row (= WS): Work until 9-10-10-11 sts remain, P 2 tog, turn piece. 3rd row (= RS): Work until 8-9-9-10 sts remain, K 2 twisted tog, turn piece. 4th row (= WS): Work until 8-9-9-10 sts remain, P 2 tog, turn piece. Continue dec like this with 1 st less before working 2 sts tog until 14-14-16-16 sts remain on needle. ---------------------------------------------------------- ---------------------------------------------------------- SOCK: Worked in the round on double pointed needles. Cast on 100-108-112-120 sts on double pointed needles size 2.5 mm / US 1or2 with gray. Work rib = K 2/P 2 for 10 cm / 4". K 1 round while at the same time dec 16-12-16-12 sts evenly = 84-96-96-108 sts. Continue with diagram M.1. REMEMBER THE GAUGE! Continue with diagram M.2 – at the same time on first and last round in diagram M.2, dec 6 sts evenly = 72-84-84-96 sts. Piece now measures approx. 24 cm / 9½", insert a marker at beg of round. Continue with diagram M.3 – AT THE SAME TIME on 5th round, dec 1 st on each side of marker – SEE DECREASE TIP. Repeat dec every 5th round a total of 6-10-8-12 times. NOTE: Pattern will no fit mid back when decreasing but make sure that pattern fits around the sock otherwise. After all dec are done there are 60-64-68-72 sts on needle. When piece measures 42-44-46-48 cm / 16½"-17¼"-18"-19", keep the first 15-16-17-18 sts on needle for heel, slip the next 30-32-34-36 sts on a stitch holder (= mid upper foot) and keep the last 15-16-17-18 sts on needle for heel. Finish piece with gray. Continue in stockinette st back and forth over the 30-32-34-36 heel sts for 5-5½-6-6½ cm / 2"-2¼"-2⅜"-2½" - insert a marker. Then work HEEL DECREASE - see explanation above! After heel dec, knit up 13-14-15-16 sts along each side of heel and slip the 30-32-34-36 sts from stitch holder back on needle = 70-74-80-84 sts. Insert a marker on each side of the middle 30-32-34-36 sts on upper foot. Continue in stockinette st in the round while AT THE SAME TIME dec in each side as follows: K tog the last 2 sts BEFORE marker on mid upper foot twisted (i.e. work in the back loop of st instead of front) and K tog the first 2 sts AFTER last marker on upper foot. Repeat dec every other round a total of 9-9-10-10 times = 52-56-60-64 sts. Continue until piece measures 18-20-22-25 cm / 7"-8"-8¾"-9¾" from marker on heel (= approx. 4-4-5 cm / 1½"-1½"-2"-2" remain). Insert a marker in each side so that there are 26-28-30-32 sts on upper foot and 26-28-30-32 sts under foot. Continue working stockinette st while AT THE SAME TIME dec for toes on each side of both markers as follows: Work until 3 sts remain before marker, K 2 tog, K 2 (marker is between these 2 sts), K 2 twisted tog. Repeat dec on every other round a total of 4-3-5-5 times and then on every round a total of 7-9-8-9 times = 8 sts remain on needle. Cut the yarn and pull it through the remaining sts, tighten tog and fasten. |
|||||||
Diagram explanations |
|||||||
|
|||||||
|
|||||||
|
Have you made this or any other of our designs? Tag your pictures in social media with #dropsdesign so we can see them! Do you need help with this pattern?You'll find tutorial videos, a Comments/Questions area and more by visiting the pattern on garnstudio.com. © 1982-2024 DROPS Design A/S. We reserve all rights. This document, including all its sub-sections, has copyrights. Read more about what you can do with our patterns at the bottom of each pattern on our site. |
|||||||


With over 40 years in knitting and crochet design, DROPS Design offers one of the most extensive collections of free patterns on the internet - translated to 17 languages. As of today we count 304 catalogs and 11422 patterns - 11417 of which are translated into English (US/in).
We work hard to bring you the best knitting and crochet have to offer, inspiration and advice as well as great quality yarns at incredible prices! Would you like to use our patterns for other than personal use? You can read what you are allowed to do in the Copyright text at the bottom of all our patterns. Happy crafting!
Comments / Questions (29)
Für Größe 46 hat man nach der ersten Abnahme unter dem Bündchen 108 Maschen und nicht 180. Bitte korrigieren Sie den Tipfehler um Verwirrung zu verhindern.
29.12.2023 - 22:07Tolles Muster! Ich habe eine Frage zu den Abnahmen in M3: Es heisst, das Muster gehe dann aufgrund der Abnahmen nicht auf - wie empfehlen Sie es zu stricken, damit es dennoch möglichst gleichmässig ist? Danke und liebe Grüsse :)
27.12.2023 - 14:25DROPS Design answered:
Liebe Nadine, M.3 muss immer in der Höhe stimmen, dh wegen den Abnahmen wird der Anfang der Runde nicht mehr die 1. Masche in M.3 aber dann die 2., 3. usw. So wird das Muster nicht mehr in der Runde stimmen aber die Pünktchen sollen immer genauso wie im M.3 aussehen. Viel Spaß beim stricken!
02.01.2024 - 08:46Snowfall Strikker Setesdalsokker til dame og herre i DROPS Fabel. Nå jeg kommer til lusene på sokken blir sokken mye tynnere da jeg ikke drar med det hvite garnet i omganger med grunnfargen. Blir det feil? Skal garnet tas med også på omganger uten lus for at tykkelsen på sokken skal bli lik? Og hva så med foten så da kun skal strikkes i en farge? Da blir jo den viktigste delen ikke så varm som der mønsteret her. Er det beregnet garn til at jeg strikker med dobbelt tråd ?
27.11.2023 - 14:20DROPS Design answered:
Hei Cathrine. Blir bittelitt tynnere når man bare strikker med en farge, det er sånn det skal være, ingen feil. Ikke ta med tråden når det ikke strikkes lus. Det er ikke beregnet garnmengde til dobbelt tråd. mvh DROPS Design
27.11.2023 - 14:31Bonjour, Je souhaiterais tricoter cette paire de chaussette en pointure 50 (je ne trouve pas de chaussettes adaptées à cette pointure) et pour pieds large. Vous serait il possible de me dire combien de mailles je dois monter en sachant que le monsieur a des mollets larges. ( après un essai avec vos conseils je ferais un essai puis j adapterais). Je vous remercie par avance et merci pour vos jolis modèles
18.12.2021 - 15:12DROPS Design answered:
Bonjour Angevine, nous ne sommes malheureusement pas en mesure de pouvoir adapter chacun de nos modèles à chaque demande; contactez votre magasin, un forum spécialisé ou demandez de l'aide à d'autres tricoteuses via notre groupe DROPS Workshop. Merci pour votre compréhension. Bon tricot!
20.12.2021 - 07:27Hallo, wenn ich mit dem Muster M2 anfangen möchte. Soll ich in der 1. Runde 6 Maschen abnehmen, was ich gemacht habe. Damit habe ich 90 Maschen auf der Nadel. Das Muster M2 wird über 12 Maschen gestrickt und 90 ist nicht durch 12 teilbar. Wie soll M2 dann über 90 Maschen gestrickt werden? Vielen Dank!
28.11.2021 - 09:03DROPS Design answered:
Liebe Domenica, M.2 ist über 12 Maschen gezeichnet aber wird über 6 Maschen wiederholt, dh das Diagram wiederholen Sie insgesamt 7 Mal, dann stricken Sie die ersten 6 Maschen. Viel Spaß beim stricken!
29.11.2021 - 07:52Bonjour Excusez moi mais je ne vois pas le diagramme. Est-ce un problème venant de moi ? Merci d'avance
15.03.2021 - 15:30DROPS Design answered:
Bonjour Mme Bernard, nous avons quelques soucis d'affichage, et travaillons à une solution. Merci d'avance pour votre patience. Bon tricot!
15.03.2021 - 15:34Sæl, mig langar að spyrja hvort úrtakan komi á hlið sokks eða á aftan?
28.05.2020 - 14:56DROPS Design answered:
Blessuð Lea. Prjónamerki er sett í byrjun á umferð og lykkjum er fækkað hvoru megin við prjónamerki. ATH: Á meðan úrtaka stendur yfir, kemur mynstrið ekki til með að ganga upp við miðju að aftan, en sjáið til þess að það gangi annars upp hringinn. Gangi þér vel.
29.05.2020 - 12:29Sandra Martins wrote:
Hello Drops team, I was doing this pattern, and everything was fine until I realised the diagram is in the wrong colours, comparing to the photo. That should be changed to prevent other people doing the pattern wrong. Thanks, Sandra
14.03.2017 - 11:10Det ska vara 48 i största storleken. Man kan alltid kolla det norska originalet!
13.03.2016 - 16:32Hej! På ett ställe i mönstret står det att man ska sticka tills arbetet mäter 42-44-46 cm. Det är dock fyra olika storlekar i mönstret, så man vet inte vilket antal cm som hör till vilken storlek.
12.03.2016 - 22:57DROPS Design answered:
Hej Magdalena, Det skall stå; 42-44-46-48 cm och det är lagt in i mönstret. Lycka tll!
14.03.2016 - 09:02