DROPS Karisma
DROPS Karisma
100% Wool
from 3.00 $ /50g
Get the yarn to make this pattern from 36.00$.

The yarn cost is calculated from the pattern’s smallest size and the yarn’s cheapest product type. Looking for an even better price? You might find it on the DROPS Deals!

DROPS SS24

Nordic Night

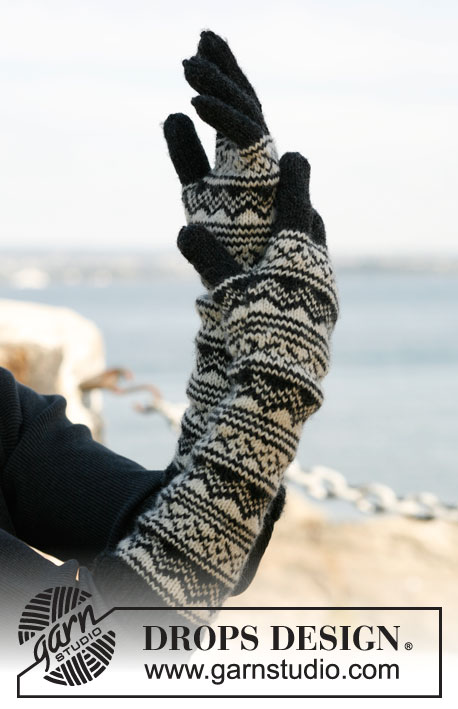
Set consists of: Knitted DROPS jumper, hat, gloves and leg warmers with Norwegian pattern in ”Karisma”. Size: S to XXXL.

DROPS 131-16
DROPS design: Pattern no U-635
Yarn group B
--------------------------------------------------------
JUMPER:
Size: S - M - L - XL - XXL - XXXL
Finished measurements:
Bust: 84-90-100-108-118-126 cm / 33"-35½"-39½"-42½"-46½"-49½"
Full length: 78-80-82-84-86-88 cm / 30¾"-31½"-32¼"-33"-33⅞"-34⅝"

Materials: DROPS KARISMA from Garnstudio
Color no 53, anthracite: 600-650-700-750-850-900 g
Color no 01, off white: 200-200-250-250-300-300 g

DROPS DOUBLE POINTED NEEDLES and CIRCULAR NEEDLE (80 cm / 32") size 4.5 mm/ US 7 - or size needed to get 20 sts x 26 rows in stockinette st = 10 x 10 cm / 4" x 4". NOTE: It is important that the knitting gauge is correct vertically to get the right shape on the round yoke.

DROPS DOUBLE POINTED NEEDLES and CIRCULAR NEEDLE (40 cm and 80 cm / 16" and 32") size 3.5 mm/ US 4 - for rib

-------------------------------------------------------

Alternative Yarn – See how to change yarns here
Yarn Groups A to F – Use the same pattern and change the yarn here
Yarn usage using an alternative yarn – Use our yarn converter here

-------------------------------------------------------

DROPS Karisma
DROPS Karisma
100% Wool
from 3.00 $ /50g
Get the yarn to make this pattern from 36.00$.

The yarn cost is calculated from the pattern’s smallest size and the yarn’s cheapest product type. Looking for an even better price? You might find it on the DROPS Deals!

Pattern instructions

NOTE: This pattern is written in American English. All measurements in charts are in cm. For conversion from inches to cm - click here. There are different terms for crocheting in American and British English. If this pattern includes crochet, click for "crochet terms" here. For this pattern in British English, please click here.
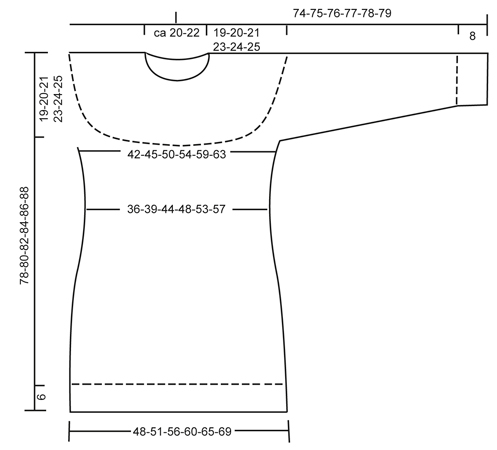
PATTERN: See diagrams M.1 to M.4, all diagrams are worked in stockinette st. Arrows in diagram M.4 are explained below.
--------------------------------------------------------

BODY:
Worked in the round on circular needle.
Cast on 224-240-260-280-300-320 sts on circular needle size 3.5 mm / US 4 with anthracite. K 1 round, continue in rib = K 2/P 2 for 6 cm / 2⅜". Switch to circular needle size 4.5 mm / US 7 and K 1 round while at the same time dec 32-36-38-40-42-44 sts evenly (K tog approx. every 6th and 7th st) = 192-204-222-240-258-276 sts. Insert a marker at beg of round and a marker after 96-102-111-120-129-138 sts (these marks the sides). Work diagram M.1 one time vertically, then repeat diagram M.2 upwards. REMEMBER THE GAUGE!
At the same time when piece measures 12 cm / 4¾", dec 1 st on each side of both markers. Repeat dec on every 6th round a total of 12 times (pattern will not fit in the sides when dec – make sure that the pattern does not shift other than in the sides). After all dec are done there are 144-156-174-192-210-228 sts on needle. When piece measures 42 cm / 16½", inc 1 st on each side of both markers. Repeat inc on every 5th round a total of 6 times – sts are gradually worked in diagram M.2 again.
After all inc are done there are 168-180-198-216-234-252 sts on needle.
When piece measures approx. 53-54-55-55-56-57 cm / 21"-21¼"-21½"-21½"-22"-22½", stop after 1 complete repetition of diagram M.2, work diagram M.3 over all sts. AT THE SAME TIME on last round in diagram M.3, bind off 8 sts in each side for armholes (i.e. 4 sts on each side of every marker) = 152-164-182-200-218-236 sts.
Piece now measures approx. 59-60-61-61-62-63 cm / 23¼"-23½"-24"-24"-24½"-24¾", put the piece aside and knit the sleeves.

SLEEVE:
Worked in the round on double pointed needles.
Cast on 52-52-56-60-60-64 sts on double pointed needles size 3.5 mm / US 4 with anthracite. K 1 round, continue in rib = K 2/P 2 for 8 cm / 3⅛". Switch to double pointed needles size 4.5 mm / US 7 and K 1 round while at the same time dec 4-4-8-6-6-4 sts evenly = 48-48-48-54-54-60 sts. Insert a marker mid under sleeve. Work diagram M.1 one time vertically, then continue with diagram M.2. AT THE SAME TIME when piece measures 12 cm / 4¾", inc 1 st on each side of marker under sleeve.
Repeat inc every 8-6-6-5-4-4 rounds a total of 9-12-12-12-15-15 times = 66-72-72-78-84-90 sts – work the inc sts gradually in diagram M.2.
When piece measures approx. 39-39-39-37-37-37 cm / 15¼"-15¼"-15¼"-14½"-14½-"14½", adjust after 1 whole repetition of diagram M.2 (inc should be done), work diagram M.3. AT THE SAME TIME on last round of diagram M.3, bind off 8 sts mid under sleeve (i.e. 4 sts on each side of marker) = 58-64-64-70-76-82 sts remain on needle.
Piece now measures approx. 45-45-45-43-43-43 cm / 17¾"-17¾"-17¾"-17"-17"-17" (shorter measurements in the larger sizes because of wider shoulder width), put piece aside and knit another sleeve.

YOKE:
Slip sleeves on to same circular needle as body where armholes were bind off = 268-292-310-340-370-400 sts. K 1 round with anthracite while AT THE SAME TIME dec 16-16-22-28-34-40 sts evenly = 252-276-288-312-336-360 sts. Continue with diagram M.4 (see diagram for size) – dec on the rounds marked with arrows in the diagram. When working a round marked with 1 arrow, work as follows:

SSIZE S:
ARROW 1: * K 9, K 2 tog, K 8, K 2 tog *, repeat from *-* = 228 sts.
ARROW 2: * K 8, K 2 tog, K 7, K 2 tog *, repeat from *-* = 204 sts.
ARROW 3: * K 7, K 2 tog, K 7, K 2 tog *, repeat from *-* = 180 sts.
ARROW 4: * K 3, K 2 tog *, repeat from *-* = 144 sts.
ARROW 5: * K 2 tog, K 1, K 2 tog, K 1, K 2 tog *, repeat from *-* = 90 sts.

SIZE M:
ARROW 1: * K 10, K 2 tog, K 9, K 2 tog *, repeat from *-* = 252 sts.
ARROW 2: * K 9, K 2 tog, K 8, K 2 tog *, repeat from *-* = 228 sts.
ARROW 3: * K 4, K 2 tog *, repeat from *-* = 190 sts.
ARROW 4: * K 3, K 2 tog, K 3, K 2 tog, K 3, K 2 tog, K 2, K 2 tog *, repeat from *-* = 150 sts.
ARROW 5: * K 2 tog, K 1, K 2 tog *, repeat from *-* = 90 sts.

SIZE L:
ARROW 1: * K 10, K 2 tog *, repeat from *-* = 264 sts.
ARROW 2: * K 9, K 2 tog *, repeat from *-* = 240 sts.
ARROW 3: * K 4, K 2 tog *, repeat from *-* = 200 sts.
ARROW 4: * K 2, K 2 tog *, repeat from *-* = 150 sts.
ARROW 5: * K 1, K 2 tog *, repeat from *-* = 100 sts.

SIZE XL:
ARROW 1: * K 11, K 2 tog *, repeat from *-* = 288 sts.
ARROW 2: * K 10, K 2 tog *, repeat from *-* = 264 sts.
ARROW 3: * K 9, K 2 tog *, repeat from *-* = 240 sts.
ARROW 4: * K 3, K 2 tog *, repeat from *-* = 192 sts.
ARROW 5: * K 2, K 2 tog *, repeat from *-* = 144 sts.
ARROW 6: * K 2, K 2 tog *, repeat from *-* = 108 sts.

SIZE XXL:
ARROW 1: * K 12, K 2 tog *, repeat from *-* = 312 sts.
ARROW 2: * K 1, K 2 tog *, repeat from *-* = 288 sts.
ARROW 3: * K 10, K 2 tog *, repeat from *-* = 264 sts.
ARROW 4: * K 9, K 2 tog *, repeat from *-* = 240 sts.
ARROW 5: * K 2, K 2 tog *, repeat from *-* = 180 sts.
ARROW 6: * K 2 tog, K 1, K 2 tog *, repeat from *-* = 108 sts.

SIZE XXXL:
ARROW 1: * K 10, K 2 tog *, repeat from *-* = 330 sts.
ARROW 2: * K 9, K 2 tog *, repeat from *-* = 300 sts.
ARROW 3: * K 8, K 2 tog *, repeat from *-* = 270 sts.
ARROW 4: * K 7, K 2 tog *, repeat from *-* = 240 sts.
ARROW 5: * K 2, K 2 tog *, repeat from *-* = 180 sts.
ARROW 6: * K 1, K 2 tog *, repeat from *-* = 120 sts.

ALL SIZES:
There are now 90-90-100-108-108-120 sts on needle. Continue with anthracite until finished measurements. K 1-4-6-2-4-6 rounds – AT THE SAME TIME on last round, dec 4-2-10-12-10-20 sts evenly = 86-88-90-96-98-100 sts.

Insert a marker mid back, work until this marker. Then work an elevation in the back as follows: K 8 sts past marker, turn, tighten yarn and P 16 sts back, turn, tighten yarn and K 24 sts, turn, continue to work 8 sts more in stockinette st for every turn until a total of 64-64-64-80-80-80 sts have been worked after last turn, turn and K 1 round over all sts until mid back again.

NECK:
Switch to circular needle size 3.5 mm / US 4. K 1 round while at the same time inc 14-16-18-16-18-20 sts evenly = 100-104-108-112-116-120 sts. Continue with rib = K 2/P 2 for 3 cm / 1⅛", then bind off with K over K and P over P.
ASSEMBLY:
Sew the openings under the sleeves tog.

---------------------------------------------------------


HAT - see pattern no: 131-13
GLOVES – see pattern no: 131-14
LEG WARMERS – see pattern no: 131-15

This pattern has been corrected.

Updated online: 05.01.2012
The dec on the Yoke are edited for sizes S, M, XL, XXL and XXXL.

Diagram

All measurements in charts are in cm.

symbols = off white
symbols = anthracite
symbols = see explanation above
diagram
diagram
Do you have a question? See a list of frequently asked questions (FAQ)

Knitting tension is what determines the final measurements of your work, and is usually measured per 10 x 10 cm. It is provided like so: number of stitches in width x number of rows in height - eg: 19 stitches x 26 rows = 10 x 10 cm.

The knitting tension is very individual; some people knit/crochet loosely while others work tightly. You adjust the knitting tension with the needle size, which is why the suggested needle size only serve as a guide! You need to adjust this (up or down) to ensure that YOUR knitting tension matches the knitting tension provided in the pattern. If you work with a different knitting tension than provided you will have a different yarn consumption, and your work will have different measurements than what the pattern suggests.

The knitting tension also determines which yarns can replace each other. As long as you achieve the same knitting tension you can replace one yarn with another.

See DROPS lesson: How to measure your tension/gauge

See DROPS video: How to make a gauge tension swatch

The required amount of yarn is provided in grams, eg: 450 g. To calculate how many balls you’ll need you first need to know how many grams are in 1 ball (25g, 50g or 100g). This information is available if you click on the individual yarn quality on our pages. Divide the amount required with the amount of each ball. For example, if each ball is 50g (the most common amount), the calculation will be as follows: 450 / 50 = 9 balls.

The important thing when changing from one yarn to another is that the knitting/crochet tension remains the same. This is so that the measurements of the finished piece will be the same as on the sketch provided. It is easier to achieve the same knitting tension using yarns from the same yarn group. It is also possible to work with multiple strands of a thinner yarn to achieve the knitting tension of a thicker one. Please try our yarn converter. We recommend you to always work a test swatch.

Please NOTE: when changing yarn the garment might have a different look and feel to the garment in the photo, due to individual properties and qualities of each yarn.

See DROPS lesson: Can I use a different yarn than the one mentioned in the pattern?

All our yarns are categorised into yarn groups (from A to F) according to thickness and knitting tension – group A contains the thinnest yarns and group F the thickest. This makes it easier for you to find alternative yarns to our patterns, should you wish to switch yarn. All yarns within the same group have a similar knitting tension and can easily replace each other. However, different yarn qualities have different structures and properties which will give the finished work a unique look and feel.

Click here for an overview of the yarns in each yarn group

At the top of all our patterns you’ll find a link to our yarn converter, which is a helpful tool should you wish to use a different yarn than suggested. By filling in the yarn quality you wish to replace, the amount (in your size) and number of strands, the converter will present good alternative yarns with the same knitting tension. Additionally it will tell you how much you’ll require in the new qualities and whether you’ll need to work with multiple strands. Most skeins are 50g (some are 25g or 100g).

If the pattern is worked with multiple colours, every colour will have to be converted separately. Similarly, if the pattern is worked with several strands of different yarns (for example 1 strand Alpaca and 1 strand Kid-Silk) you will have to find alternatives for each, individually.

Click here to see our yarn converter

Since different yarns have different qualities and textures we have chosen to keep the original yarn in our patterns. However, you can easily find options among our available qualities by using our yarn converter, or simply pick a yarn from the same yarn group.

It is possible that some retailers still have discontinued yarns in stock, or that someone has a few skeins at home that they would like to find patterns for.

The yarn converter will provide both alternative yarn as well as required amount in the new quality.

If you think it's hard to decide what size to make, it can be a good idea to measure a garment you own already and like the size of. Then you can pick the size by comparing those measures with the ones available in the pattern's size chart.

You'll find the size chart at the bottom of the pattern.

See DROPS lesson: How to read size chart

The needle size provided in the pattern serves only as a guide, the important thing is to follow the knitting tension. And since knitting tension is very individual, you will have to adjust the needle size to ensure that YOUR tension is the same as in the pattern – maybe you’ll have to adjust 1, or even 2 needle sizes, up or down to achieve the correct tension. For this, we recommend that you work test swatches.

Should you work with a different knitting tension than the one provided, the measurements of the finished garment might deviate from the measurement sketch.

See DROPS lesson: How to measure your tension/gauge

See DROPS video: How to make a gauge tension swatch

Working a garment top-down provides more flexibility and room for personal adjustment. For example it is easier to try the garment on while working, as well as making adjustments to length of yoke and shoulder caps.

The instructions are carefully explaining every step, in the correct order. Diagrams are adjusted to the knitting direction and are worked as usual.

The diagram depicts all rows/rounds, and every stitch seen from the right side. It is read from bottom to top, from right to left. 1 square = 1 stitch.

When working back and forth, every other row is worked from the right side and every other row is worked from the wrong side. When working from the wrong side, the diagram will have to be worked reversed: from left to right, knit stitches are purled, purl stitches are knit etc.

When working in the round every round is worked from the right side and the diagram are worked from right to left on all rounds.

See DROPS lesson: How to read knitting diagrams

The diagram depicts all rows/rounds, and every stitch seen from the right side. It is worked from bottom to top, from right to left.

When working back and forth every other row is worked from the right side: from right to left and every other row is worked from the wrong side: from left to right.

When working in the round, every row in the diagram are worked from the right side, from right to left.

When working a circular diagram you start in the middle and work your way outwards, counter clockwise, row by row.

The rows usually start with a given number of chain stitches (equivalent to the height of the following stitch), this will either be depicted in the diagram or explained in the pattern.

See DROPS lesson: How to read crochet diagrams

Instructions for working several diagrams after each other on the same row/round, will often be written like so: “work A.1, A.2, A.3 a total of 0-0-2-3-4 times". This means you work A.1 once, then A.2 is worked once, and A.3 is repeated (in width) the number of times provided for your size – in this case like so: S = 0 times, M = 0 times, L=2 times, XL= 3 times and XXL = 4 times.

The diagrams are worked as usual: begin with the first row in A.1, then work the first row in A.2 etc.

See DROPS lesson: How to read knitting diagrams

See DROPS lesson: How to read crochet diagrams

The total width of the garment (from wrist-to-wrist) will be larger in the larger sizes, despite the actual sleeves being shorter. The larger sizes have longer sleeve caps and wider shoulders, so there will be a good fit in all sizes.

The measurement sketch/schematic drawing provides information regarding the full length of the garment. If it’s a jumper or a jacket the length is measured from the highest point on the shoulder (usually closest to the neckline), and straight down to the bottom of the garment. It is NOT measured from the tip of shoulder. Similarly, the length of yoke is measured from the highest point on the shoulder and down to where yoke is split into body and sleeves.

See DROPS lesson: How to read a schematic drawing

Diagrams are often repeated on the round or in height. 1 repeat is the diagram the way it appears in the pattern. If it says to work 5 repeats of A.1 in the round, then you work A.1 a total of 5 times after/next to each other in the round. If it says to work 2 repeats of A.1 vertically/in height you work the entire diagram once, then begin again at the start and work the entire diagram one more time.

Chain stitches are slightly narrower than other stitches and to avoid working the cast-on edge too tight, we simply chain more stitches to begin with. The stitch count will be adjusted on the following row to fit the pattern and measurement sketch.

The rib edge is more elastic and will contract slightly compared to, for example, stocking stitch. By increasing before the rib edge, you avoid a visible difference in width between the rib edge and the rest of the body.

It’s very easy to cast off too tightly, and by making yarn overs while casting off (and simultaneously casting these off) you avoid a too tight cast off edge.

See DROPS video: How to bind off with yarn overs (yo)

To achieve an even increase (or decrease) you can increase on, for example: every 3rd and 4th row alternately, like so: work 2 rows and increase on the 3rd row, work 3 rows and increase on the 4th. Repeat this until the increase is complete.

See DROPS lesson: Increase or decrease 1 st on every 3rd and 4th row alternately

Should you prefer to work in the round instead of back and forth, you may of course adjust the pattern. You’ll need to add steeks mid-front (usually 5 stitches), and follow the instructions. When you would normally turn and work from the wrong side, simply work across the steek and continue in the round. At the end you’ll cut the piece open, pick up stitches to work bands, and cover the cut edges.

See DROPS video: How to knit steeks and cut open

Should you prefer to work back and forth instead of in the round, you may of course adjust the pattern so you work the pieces separately and then assemble them at the end. Divide the stitches for the body in 2, add 1 edge stitch in each side (for sewing) and work the front and back pieces separately.

See DROPS lesson: Can I adapt a pattern for circular needles into straight needles?

Pattern repeats can vary slightly in the different sizes, in order to get the correct proportions. If you’re not working the exact same size as the garment in the photo, yours might deviate slightly. This has been carefully developed and adjusted so that the complete impression of the garment is the same in all sizes.

Make sure to follow instructions and diagrams for your size!

If you have found a pattern you like which is available in women’s size it’s not very difficult to convert it to men’s size. The biggest difference will be the length of sleeves and body. Start working on the women size that you think would fit across the chest. The additional length will be worked right before you cast off for the armhole/sleeve cap. If the pattern is worked top-down you can add the length right after the armhole or before the first decrease on sleeve.

Regarding additional yarn amount, this will depend on how much length you add, but it is better with a skein too many than too few.

All yarns will have excess fibres (from production) that might come off as lint or shedding. Brushed yarns (ie hairier yarns) have more of these loose, excess fibres, causing more shedding.

Shedding also depends on what is worn under or over the garment, and whether this pulls at the yarn fibres. It’s therefore not possible to guarantee that there will be no shedding

Below are some tips on how to get the best result when working with hairier yarns:

1. When the garment is finished (before you wash it) shake it vigorously so the looser hairs come off. NOTE: do NOT use a lint roller, brush or any method that pulls at the yarn.

2. Place the garment in a plastic bag and put it in your freezer - the temperature will cause the fibres to become less attached to each other, and excess fibres will come off easier.

3. Leave in the freezer for a few hours before taking it out and shaking it again.

4. Wash the garment according to the instructions on the yarn label.

Pilling is a natural process that happens to even the most exclusive of fibers. It's a natural sign of wear and tear that is hard to avoid, and that is most visible in high friction areas of your garment like a sweater's arms and cuffs.

You can make your garment look as new by removing the pilling, using a fabric comb or a pill/lint remover.

Still can't find the answer you need? Then scroll down and leave your question so one of our experts can try to help you. This will be done normally within 5 to 10 working days.
In the meantime, you can read the questions and answers that others have left to this pattern or join the DROPS Workshop on Facebook to get help from fellow knitters/crocheters!

You might also like...

Post a comment to pattern DROPS 131-16

We would love to hear what you have to say about this pattern!

If you want to leave a question, please make sure you select the correct category in the form below, to speed up the answering process. Required fields are marked *.

Comments / Questions (49)

country flag Louise wrote:

Quand j’ai tricoté la ré-hausse dans le haut du dos du pull, il s’est formé des trous aux endroits où l’on serre le fil et l’on tourne pour tricoter à l’envers et ajouter 8 mailles. Est-ce normal?

06.09.2022 - 04:00

DROPS Design answered:

Bonjour Louise, pour éviter les trous, on doit bien serrer le fil (cf vidéo, si ça ne suffit pas, vous pouvez utiliser la technique des rangs raccourcis avec mailles enveloppées sur l'endroit / sur l'envers. Bon tricot!

06.09.2022 - 09:23

country flag Louise Brochu wrote:

Pour la taille Large, vous proposez pour le M1, un patron de 12 mailles. Or le nombre de mailles à diviser, 222, n’est pas un divisible de 12. Alors lorsque le rang du patron de 12 mailles est terminé, il reste 6 mailles. Qu’est-ce qu’on fait avec ces 6 mailles? Merci pour votre réponse!

28.05.2022 - 16:29

DROPS Design answered:

Bonjour Mme Brochu, M.1 se répète sur 12 mailles, ainsi, vous répétez 12 fois le diagramme et terminez le tour par les 6 premières mailles du diagramme (= soit 12.5 fois 12 mailles ou 37 fois 6 mailles). Bon tricot!

30.05.2022 - 08:04

country flag Bret Nelly wrote:

Je vous remercie d'avoir répondu aussi rapidement à ma question j'ai du mal à tricoter avec des aiguilles circulaires je vais essayer de tricoter avec des aiguilles normales votre site est génial avec de très beaux modèles merci beaucoup

15.01.2022 - 13:48

country flag Bret Nelly wrote:

Concernant le modèle 131_16 je ne comprends pas les explications au niveau des flèches cela veut il dire qu'au 1er rang je fais la flèche 1 au rang 2 je tricote flèche 2 au 3 ème rang flèche 3 etc pouvez vous m'aider ?ensuite pius je faire ce modele avec aiguilles normales et comment dois je calculer le nombre de mailles merci beaucoup

14.01.2022 - 11:46

DROPS Design answered:

Bonjour Mme Bret, les rangs de diminutions de l'empiècement sont indiqués par une flèche dans les diagrammes, autrement dit, lorsque vous tricoterez le rang avec la flèche-1, tricotez comme indiqué sous FLÈCHE 1 pour votre taille, de même pour la flèche-2 et ainsi de suite. Si vous tricotez toutes les mailles de l'empiècement sur la même aiguille (avec 1 maille lisière de chaque côté pour la couture), diminuez comme indiqué entre les mailles lisières. Bon tricot!

14.01.2022 - 16:43

country flag Bret wrote:

Sur ce modèle au niveau des flèches ex taille xl es qu'il faut tricoter 1 rang flèche 1 au 2 eme rg flèche 2 au 3 ème rang flèche 3 et je ne comprend pas et peut on faire ce modele avec des aiguilles ordinaires et comment compter le nombre de points je vous remercie de votre aide

14.01.2022 - 11:41

country flag Julien Conny wrote:

Es gibt kein Bild von dem Pullover, wo kann ich es finden, es würde mir helfen. Mit freundlichen Grüßen Conny

25.10.2021 - 19:53

country flag Sofi wrote:

Bonjour, N’y aurait-il pas un oubli d’aiguilles circulaires en 40 cm pour les manches ? Ou bien n’ai pas tout compris ?!! Merci !

08.10.2021 - 14:28

DROPS Design answered:

Bonjour Sofi, les manches se tricotent en rond sur les aiguilles doubles pointes, mais vous pouvez utiliser une aiguille circulaire de 40 cm quand vous aurez suffisamment de mailles ou bien de 80 cm et la technique du magic loop, si vous le souhaitez. Bon tricot!

08.10.2021 - 15:23

country flag Ann wrote:

Hello, I believe there is an error in this pattern in the small size. For the decreases in the yoke, on arrow 3, I believe it should read: ARROW 3: * K 7, K 2 tog, K 6, K 2 tog *, repeat from *-* = 180 sts. instead of K 7 and K 7 as it currently says. Thanks!

14.02.2021 - 03:16

country flag Manuela wrote:

Grazie infinite per la risposta ora ho visto anche le spiegazioni relative alle maniche. Scusate ma nel precedente collegamento da cui ho fatto uno screenshot delle spiegazioni non risultavano Grazie ancora

06.02.2021 - 15:27

country flag Manuela wrote:

Buongiorno Avevo chiesto indicazioni per le maniche e cortesemente mi avete risposto sul numero di maglie da impostare per quanto riguarda la T S ma avrei bisogno di sapere se dopo il bordo di 6 cm. Occorre fare diminuzioni, Como per il corpo, e gli aumenti, ogni quanto.... sopratutto a livello degli scalfi. Mancano completamente le istruzioni per le maniche. Rimango in attesa di cortese riscontro Grazie Manuela

06.02.2021 - 10:39

DROPS Design answered:

Buonasera Manuela, dopo l'avvio delle maglie deve proseguire a coste per 8 cm e lavorare seguendo le indicazioni descritte nel paragrafo MANICHE dopo il corpo. Ci può indicare in quale punto mancano le istruzioni per le maniche? Buon lavoro!

06.02.2021 - 13:35