DROPS Puddel
DROPS Puddel
94% Mohair, 6% Polyester
Discontinued
find alternatives
DROPS Alaska
DROPS Alaska
100% Wool
from 1.90 £ /50g
DROPS SS24

Montana

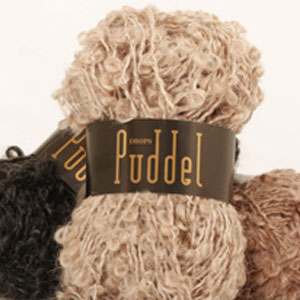
Knitted DROPS vest in ”Alaska” with collar and crochet border in ”Puddel”. Size S-XXXL.

DROPS 134-30
DROPS design: Pattern no X-370
Yarn group C and E
--------------------------------------------------------
Size: S - M - L - XL - XXL - XXXL

Materials:
DROPS ALASKA from Garnstudio
300-350-350-400-450-500 g colour no 05, dark grey
and DROPS PUDDEL from Garnstudio
100-100-100-150-150-150 g colour no 07, medium grey

DROPS STRAIGHT NEEDLES SIZE 5 mm - or size needed to get 17 sts x 22 rows in stocking st with Alaska = 10 x 10 cm.
DROPS CIRCULAR NEEDLE SIZE 8 mm - or size needed to get 9 sts x 18 rows in garter st with Puddel = 10 x 10 cm.
DROPS CROCHET HOOK SIZE 7mm - for crochet border.

DROPS ANGULAR BUFFEL HORN BUTTONS NO 538 (25 mm): 3 pieces for all sizes

-------------------------------------------------------

Alternative Yarn – See how to change yarns here
Yarn Groups A to F – Use the same pattern and change the yarn here
Yarn usage using an alternative yarn – Use our yarn converter here

-------------------------------------------------------

DROPS Puddel
DROPS Puddel
94% Mohair, 6% Polyester
Discontinued
find alternatives
DROPS Alaska
DROPS Alaska
100% Wool
from 1.90 £ /50g

Pattern instructions

NOTE: This pattern is written in British English. All measurements in charts are in cm. For conversion from cm to inches - click here. There are different terms for crocheting in British and American English. If this pattern includes crochet, click for "crochet terms" here. For this pattern in American English, please click here.
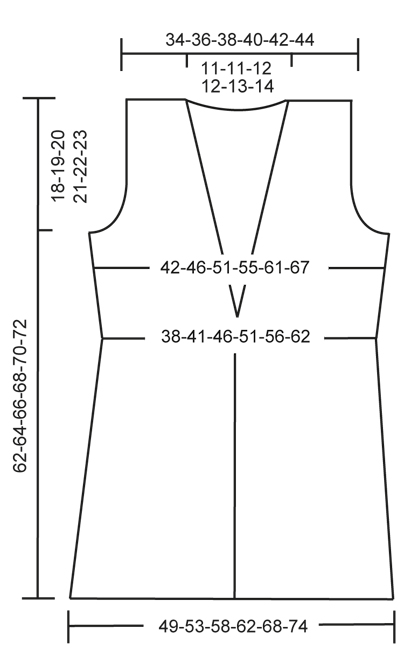
GARTER ST (back and forth on needle): K all rows.

INCREASE TIP:
Inc 1 st by making 1 YO. On next row K YO twisted, i.e. work in back loop of st instead of front, to avoid holes.

DECREASE TIP (applies to armholes and neckline):
Dec 1 st inside 4 sts in garter st along the armhole and 5 sts in garter st along the neckline.
FROM RS:
After 4 or 5 sts in garter st: Slip 1 st as if to K, K 1, psso.
Before 4 or 5 sts in garter st: K 2 tog.
FROM WS:
After 5 sts in garter st: P 2 tog.
Before 5 sts in garter st: P 2 twisted tog, i.e. work in back loop of st instead of front.

BUTTON HOLES:
Cast off for button holes on right front band.
1 button hole = cast off 4th and 5th band st from edge. On next row cast on 2 new sts over the cast off sts.
Cast off for button holes when piece measures:
SIZE S: 22, 29, 36 cm
SIZE M: 23, 30, 37 cm
SIZE L: 24, 31, 38 cm
SIZE XL: 25, 32, 39 cm
SIZE XXL: 26, 33, 40 cm
SIZE XXXL: 27, 34, 41 cm
--------------------------------------------------------

BACK PIECE:
Cast on 86-92-100-108-118-128 sts (incl 1 edge st in each side) on needle size 5 mm with Alaska. Work 4 rows in garter st - See explanation above, then work in stocking st with 1 edge st in garter st in each side until armhole beg. REMEMBER THE KNITTING TENSION!
When piece measures 4 cm, dec 1 st inside 1 edge st in each side = 2 dec sts. Repeat dec every 6-6-6-6-7-7 rows a total of 10 times = 66-72-80-88-98-108 sts. When piece measures 33-34-35-36-37-38 cm (all dec should be done), work 8 rows in garter st over all sts (1st row is from RS), then continue in stocking st with 1 edge st as before - At the same time inc 1 st - Read INCREASE TIP above - inside 1 edge st in each side on next row from RS. Repeat inc on every 4th row a total of 4 times = 74-80-88-96-106-116 sts.
When piece measures 44-45-46-47-48-49 cm, starting from RS work 2 rows in garter st over the outermost 7-7-8-9-11-13 sts in each side and work the remaining sts in stocking st as before. Then work the next 2 rows as follows: Cast off 3-3-4-5-7-9 sts at beg of row for armhole, 4 sts in garter st (= edge sts each side in garter st until finished measurement). Continue to dec 1 st inside the 4 sts in garter st in each side on every row from RS - Read DECREASE TIP above - a total of 5-6-8-9-10-12 times = 58-62-64-68-72-74 sts.
Continue in stocking st and 4 sts in garter st in each side. When piece measures 60-62-64-66-68-70 cm, cast off the middle 16-16-18-18-20-22 sts for neck and finish each shoulder separately. Continue to cast off 1 st on next row from neck = 20-22-22-24-25-25 sts remain on each shoulder. Loosely cast off all sts when piece measures 62-64-66-68-70-72 cm.

RIGHT FRONT PIECE:
Cast on 43-46-50-54-59-64 sts (incl 1 edge st in the side and 5 band sts towards mid front) on needle size 5 mm with Alaska. Work 4 rows in garter st, then work in stocking st but work the outermost 5 sts towards mid front in garter st (= band sts) until finished measurements. Continue with 5 band sts and 1 edge st in the side. When piece measures 4 cm, beg to dec in the side as on back piece = 33-36-40-44-49-54 sts. When piece measures 22-23-24-25-26-27 cm, cast off for first button hole on right front band - Read explanation above. Read all of the following section before continuing!
When piece measures 33-34-35-36-37-38 cm, work 8 rows in garter st over all sts (1st row is from RS). Work next row from RS as follows: 5 sts in garter st, dec 1 st - Read DECREASE TIP above, work in stocking st and inc 1 st before 1 edge st. Repeat dec for neck towards mid front on every 5th row a total of 9-9-10-10-11-12 times - While at the same time continuing to inc in the side as on back piece.
When piece measures 44-45-46-47-48-49 cm, starting from RS work 2 rows in garter st over the last 7-7-8-9-11-13 sts on row and work the remaining sts in stocking st as before. On next row from WS cast off the first 3-3-4-5-7-9 sts for armhole, work 4 sts in garter st (= edge sts in side in garter st until finished measurement) and work the rest of row as before.
Then dec inside 4 sts in garter st in the side as on back piece. When all dec (towards armhole and neck) are done, 20-22-22-24-25-25 sts remain on shoulder. Continue in stocking st with 4 sts in garter st towards armhole and 5 sts in garter st towards neck until piece measures 62-64-66-68-70-72 cm. Loosely cast off all sts.

LEFT FRONT PIECE:
Cast on and work as right front piece but reversed and without button holes.

ASSEMBLY:
Sew the shoulder seams. Sew the side seams inside 1 edge st. Sew the buttons on to the left front band.

COLLAR:
Worked back and forth on circular needle size 8 mm with Puddel. Insert 2 markers in the neckline approx. 7 cm above the ridges (1 ridge = 2 rows in garter st) on the chest. Knit up from RS approx. 60 to 70 sts between markers around the neckline. Work in garter st over all sts for approx. 6-6-7-7-8-8 cm. Then work from RS as follows: K the outermost 4 sts tog 2 by 2 on the next 2 rows (= 4 dec sts on every row). At beg of the next 2 rows, cast off 8-8-9-9-10-10 sts. Continue in garter st over the remaining sts until collar measures 13-13-14-14-15-15 cm. Loosely cast off all sts.

CROCHET BORDER:
Work on hook size 7 mm with Puddel and beg at the bottom of right front band as follows: * Work 1 dc, 2 ch, skip 1.5 cm *, repeat from *-* up along right front band, around the collar and down along left front band. NOTE: Make sure that the crochet border is not too tight.


Diagram

diagram measurements
Do you have a question? See a list of frequently asked questions (FAQ)

Knitting tension is what determines the final measurements of your work, and is usually measured per 10 x 10 cm. It is provided like so: number of stitches in width x number of rows in height - eg: 19 stitches x 26 rows = 10 x 10 cm.

The knitting tension is very individual; some people knit/crochet loosely while others work tightly. You adjust the knitting tension with the needle size, which is why the suggested needle size is only meant as a guide! You need to adjust this (up or down) to ensure that YOUR knitting tension matches the knitting tension provided in the pattern. If you work with a different knitting tension than provided you will have a different yarn consumption, and your work will have different measurements than what the pattern suggests.

The knitting tension also determines which yarns can replace each other. As long as you achieve the same knitting tension you can replace one yarn with another.

See DROPS lesson: How to measure your tension/gauge

See DROPS video: How to make a gauge tension swatch

The required amount of yarn is provided in grams, eg: 450 g. To calculate how many balls you’ll need you first need to know how many grams are in 1 ball (25g, 50g or 100g). This information is available if you click on the individual yarn quality on our pages. Divide the amount required with the amount of each ball. For example, if each ball is 50g (the most common amount), the calculation will be as follows: 450 / 50 = 9 balls.

The important thing when changing from one yarn to another is that the knitting/crochet tension remains the same. This is so that the measurements of the finished piece will be the same as on the sketch provided. It is easier to achieve the same knitting tension using yarns from the same yarn group. It is also possible to work with multiple strands of a thinner yarn to achieve the knitting tension of a thicker one. Please try our yarn converter. We recommend you to always work a test swatch.

Please NOTE: when changing yarn the garment might have a different look and feel to the garment in the photo, due to individual properties and qualities of each yarn.

See DROPS lesson: Can I use a different yarn than the one mentioned in the pattern?

All our yarns are categorised into yarn groups (from A to F) according to thickness and knitting tension – group A contains the thinnest yarns and group F the thickest. This makes it easier for you to find alternative yarns to our patterns, should you wish to switch yarn. All yarns within the same group have a similar knitting tension and can easily replace each other. However, different yarn qualities have different structures and properties which will give the finished work a unique look and feel.

Click here for an overview of the yarns in each yarn group

At the top of all our patterns you’ll find a link to our yarn calculator, which is a helpful tool should you wish to use a different yarn than suggested. By filling in the yarn quality you wish to replace, the amount (in your size) and number of strands, the calculator will present good alternative yarns with the same knitting tension. Additionally it will tell you how much you’ll require in the new qualities and whether you’ll need to work with multiple strands. Most skeins are 50g (some are 25g or 100g).

If the pattern is worked with multiple colours, every colour will have to be calculated separately. Similarly, if the pattern is worked with several strands of different yarns (for example 1 strand Alpaca and 1 strand Kid-Silk) you will have to find alternatives for each, individually.

Click here to see our yarn calculator

Since different yarns have different qualities and textures we have chosen to keep the original yarn in our patterns. However, you can easily find options among our available qualities by using our yarn calculator, or simply pick a yarn from the same yarn group.

It is possible that some retailers still have discontinued yarns in stock, or that someone has a few skeins at home that they would like to find patterns for.

The yarn calculator will provide both alternative yarn as well as required amount in the new quality.

If you think it's hard to decide what size to make, it can be a good idea to measure a garment you own already and like the size of. Then you can pick the size by comparing those measures with the ones available in the pattern's size chart.

You'll find the size chart at the bottom of the pattern.

See DROPS lesson: How to read size chart

The needle size provided in the pattern serves only as a guide, the important thing is to follow the knitting tension. And since knitting tension is very individual, you will have to adjust the needle size to ensure that YOUR tension is the same as in the pattern – maybe you’ll have to adjust 1, or even 2 needle sizes, up or down to achieve the correct tension. For this, we recommend that you work test swatches.

Should you work with a different knitting tension than the one provided, the measurements of the finished garment might deviate from the measurement sketch.

See DROPS lesson: How to measure your tension/gauge

See DROPS video: How to make a tension/gauge swatch

Working a garment top-down provides more flexibility and room for personal adjustment. For example it is easier to try the garment on while working, as well as making adjustments to length of yoke and shoulder caps.

The instructions are carefully explaining every step, in the correct order. Diagrams are adjusted to the knitting direction and are worked as usual.

The diagram depicts all rows/rounds, and every stitch seen from the right side. It is read from bottom to top, from right to left. 1 square = 1 stitch.

When working back and forth, every other row is worked from the right side and every other row is worked from the wrong side. When working from the wrong side, the diagram will have to be worked reversed: from left to right, knit stitches are purled, purl stitches are knit etc.

When working in the round every round is worked from the right side and the diagram are worked from right to left on all rounds.

See DROPS lesson: How to read knitting diagrams

The diagram depicts all rows/rounds, and every stitch seen from the right side. It is worked from bottom to top, from right to left.

When working back and forth every other row is worked from the right side: from right to left and every other row is worked from the wrong side: from left to right.

When working in the round, every row in the diagram are worked from the right side, from right to left.

When working a circular diagram you start in the middle and work your way outwards, counter clockwise, row by row.

The rows usually start with a given number of chain stitches (equivalent to the height of the following stitch), this will either be depicted in the diagram or explained in the pattern.

See DROPS lesson: How to read crochet diagrams

Instructions for working several diagrams after each other on the same row/round, will often be written like so: “work A.1, A.2, A.3 a total of 0-0-2-3-4 times". This means you work A.1 once, then A.2 is worked once, and A.3 is repeated (in width) the number of times provided for your size – in this case like so: S = 0 times, M = 0 times, L=2 times, XL= 3 times and XXL = 4 times.

The diagrams are worked as usual: begin with the first row in A.1, then work the first row in A.2 etc.

See DROPS lesson: How to read knitting diagrams

See DROPS lesson: How to read crochet diagrams

The total width of the garment (from wrist-to-wrist) will be larger in the larger sizes, despite the actual sleeves being shorter. The larger sizes have longer sleeve caps and wider shoulders, so there will be a good fit in all sizes.

The measurement sketch/schematic drawing provides information regarding the full length of the garment. If it’s a jumper or a jacket the length is measured from the highest point on the shoulder closest to the neckline, and straight down to the bottom of the garment. It is NOT measured from the tip of shoulder. Similarly, the length of yoke is measured from the highest point on the shoulder and down to where yoke is split into body and sleeves.

On a jacket measures are never taken along bands, unless specifically stated. Always measure inside band stitches when measuring the length.

See DROPS lesson: How to read a schematic drawing

Diagrams are often repeated on the round or in height. 1 repeat is the diagram the way it appears in the pattern. If it says to work 5 repeats of A.1 in the round, then you work A.1 a total of 5 times after/next to each other in the round. If it says to work 2 repeats of A.1 vertically/in height you work the entire diagram once, then begin again at the start and work the entire diagram one more time.

Chain stitches are slightly narrower than other stitches and to avoid working the cast-on edge too tight, we simply chain more stitches to begin with. The stitch count will be adjusted on the following row to fit the pattern and measurement sketch.

The rib edge is more elastic and will contract slightly compared to, for example, stocking stitch. By increasing before the rib edge, you avoid a visible difference in width between the rib edge and the rest of the body.

It’s very easy to cast off too tightly, and by making yarn overs while casting off (and simultaneously casting these off) you avoid a too tight cast off edge.

See DROPS video: How to bind off with yarn overs (yo)

To achieve an even increase (or decrease) you can increase on, for example: every 3rd and 4th row alternately, like so: work 2 rows and increase on the 3rd row, work 3 rows and increase on the 4th. Repeat this until the increase is complete.

See DROPS lesson: Increase or decrease 1 st on every 3rd and 4th row alternately

Should you prefer to work in the round instead of back and forth, you may of course adjust the pattern. You’ll need to add steeks mid-front (usually 5 stitches), and follow the instructions. When you would normally turn and work from the wrong side, simply work across the steek and continue in the round. At the end you’ll cut the piece open, pick up stitches to work bands, and cover the cut edges.

See DROPS video: How to knit steeks and cut open

Should you prefer to work back and forth instead of in the round, you may of course adjust the pattern so you work the pieces separately and then assemble them at the end. Divide the stitches for the body in 2, add 1 edge stitch in each side (for sewing) and work the front and back pieces separately.

See DROPS lesson: Can I adapt a pattern for circular needles into straight needles?

Pattern repeats can vary slightly in the different sizes, in order to get the correct proportions. If you’re not working the exact same size as the garment in the photo, yours might deviate slightly. This has been carefully developed and adjusted so that the complete impression of the garment is the same in all sizes.

Make sure to follow instructions and diagrams for your size!

If you have found a pattern you like which is available in women’s size it’s not very difficult to convert it to men’s size. The biggest difference will be the length of sleeves and body. Start working on the women size that you think would fit across the chest. The additional length will be worked right before you cast off for the armhole/sleeve cap. If the pattern is worked top-down you can add the length right after the armhole or before the first decrease on sleeve.

Regarding additional yarn amount, this will depend on how much length you add, but it is better with a skein too many than too few.

All yarns will have excess fibres (from production) that might come off as lint or shedding. Brushed yarns (ie hairier yarns) have more of these loose, excess fibres, causing more shedding.

Shedding also depends on what is worn under or over the garment, and whether this pulls at the yarn fibres. It’s therefore not possible to guarantee that there will be no shedding

Below are some tips on how to get the best result when working with hairier yarns:

1. When the garment is finished (before you wash it) shake it vigorously so the looser hairs come off. NOTE: do NOT use a lint roller, brush or any method that pulls at the yarn.

2. Place the garment in a plastic bag and put it in your freezer - the temperature will cause the fibres to become less attached to each other, and excess fibres will come off easier.

3. Leave in the freezer for a few hours before taking it out and shaking it again.

4. Wash the garment according to the instructions on the yarn label.

Pilling is a natural process that happens to even the most exclusive of fibers. It's a natural sign of wear and tear that is hard to avoid, and that is most visible in high friction areas of your garment like a sweater's arms and cuffs.

You can make your garment look as new by removing the pilling, using a fabric comb or a pill/lint remover.

Still can't find the answer you need? Then scroll down and leave your question so one of our experts can try to help you. This will be done normally within 5 to 10 working days.
In the meantime, you can read the questions and answers that others have left to this pattern or join the DROPS Workshop on Facebook to get help from fellow knitters/crocheters!

Post a comment to pattern DROPS 134-30

We would love to hear what you have to say about this pattern!

If you want to leave a question, please make sure you select the correct category in the form below, to speed up the answering process. Required fields are marked *.

Comments / Questions (49)

country flag Edith wrote:

Ik heb de eerste 4 naalden in ribbelsteek gebreid, maar nu krult dat heel erg om. Wat kan ik daaraan doen?

03.02.2022 - 02:50

DROPS Design answered:

Dag Edith

Als je het werkstuk klaar hebt kun je de rand in ribbelsteek heel voorzichtig oppersen. Je legt dan een natte theedoek op het werk en drukt daar voorzichtig om met een strijkijzer. Doe dit heel voorzichtig, zodat je de textuur van het breiwerk niet vernielt. Op deze manier gaat het omkrullen weg.
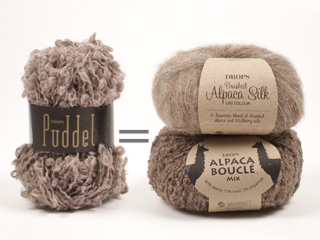
11.02.2022 - 15:18

country flag Isabell wrote:

Vad kn man ersätta Puddel med, för att få motsvarande utseende?

13.12.2020 - 21:08

DROPS Design answered:

hej Isabell. Du kan ersätta med dubbel tråd DROPS Alpaca Bouclé för att få ett motsvarande utseende. Mvh DROPS Design

14.12.2020 - 09:34

Ebrul wrote:

Die Weste ist auch in der grössten Grösse schnell gestrickt und sitzt perfekt... Traumhaft schön...

20.10.2014 - 19:07

country flag ChristianeS wrote:

Die ist super geworden! Habe allerdings die Weste nach meinen Massen angepasst. Gr. 38 oder Gr. 40 wäre an manchen Stellen zu eng, an anderen dafür zu weit gewesen. Aber durch die Anpassung an meine Maße sitzt die jetzt wie angegossen u. wird immer wieder bewundert!

01.03.2013 - 10:02

country flag Anna wrote:

Buongiorno a tutte, in riferimento al modello 134-30, chiedo un'alternativa al filato Puddle, non reperibile on line, che dia lo stesso effetto 'pelliccia'. Avevo pensato all,Aloaca Bouclè, ma non so se l'effetto sarà simile e inoltre necessita dei ferri piû piccoli e non saprei come apportare questa modifica sul modello..... Grazie mille

24.09.2012 - 14:56

DROPS Design answered:

Buongiorno, ha provato a visitare tutti i rivenditori italiani? Il nuovo rivenditore Fiordilana che aprirà ad ottobre dovrebbe avere Puddel. Può scrivere una mail. Alpaca Bouclé è un po' più sottile e non da lo stesso effetto pellicca. Potrebbe eventualmente utilizzare DROPS Symphonie oppure doppio Vivaldi o Vienna.

25.09.2012 - 11:39

country flag Drops Design wrote:

For size XXL you have 106 sts. Bind off 7 sts each side = 92 sts. Then bind of 1 st 10 times each side = - 20 = 72 sts. XL has 96 sts to start out with, then bind off 5 each side, and then 1 9 times each side = 68 sts.

06.01.2012 - 21:09

country flag Amy Licata wrote:

Please help. I'm working on the top of the back in XL. I started armholes with 106 stitches. I bind off 5 each side = 96 stitches. I decrease 1 each side 9 times = 78 stitches. Where do the last 10 stitches go to get to the 68 sts? I'm just sick, as I've made this all in one piece,, and I'm done the front, and the back looks 2.25 inches too big.

06.01.2012 - 05:51

country flag Sandra wrote:

"fårskinnsväst"

30.07.2011 - 21:20

country flag Patricia wrote:

Zeer mooi model heb de wol besteld

27.07.2011 - 18:07

country flag Jona wrote:

Zeer mooie vest! Tijdloos en mooi gecentreerd. De moeite waard!

16.07.2011 - 13:44