
Popular categories
Looking for a yarn?


|
|
DROPS 77-6 |
|
|
|
|
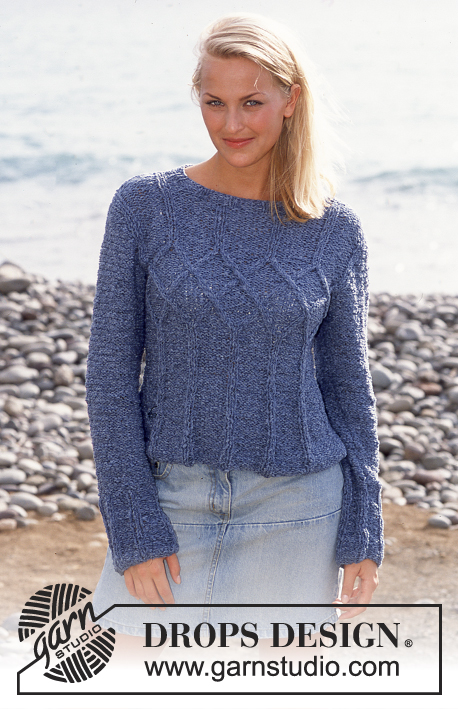
DROPS Jumper in "Paris" with slit mid front on stomach and ¾ -length sleeves.
DROPS 77-6 |
|
|
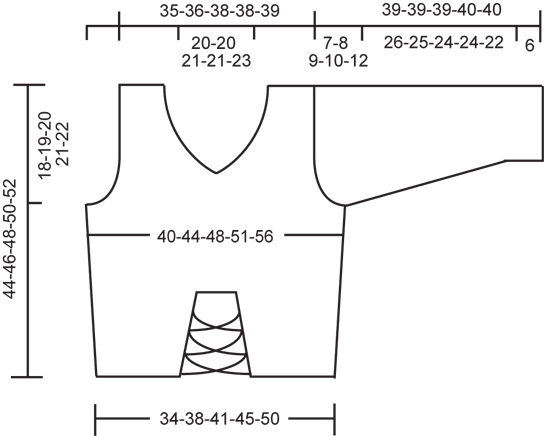
Ridge (back and forth on needle): 1 ridge = 2 rows: 1st row: K, 2nd row: K. Front piece - First part: Cast on 17-19-21-24-27 sts (incl 1 edge st towards side) with needle size 4.5 mm and Paris. Work 1 ridge, change to needle size 5.5 mm and continue with stocking st. Remember knitting tension! At the same time, after the ridge inc 1 st towards mid front every 3rd row in total 8-9-10-10-11 times. To mark where to crochet ch-cross insert a marker thread towards mid front every 3.5-4-4-4.5-4.5 cm in total 3 times. At the same time when the piece measures 5-6-7-8-9 cm inc 1 st towards the side every 4th cm in total 3 times. After all the inc, there are 28-31-34-37-41 sts on needle. When the piece measures 14-15-16-17-18 cm put it to one side. Front piece - second part: Work as for first part but reversed. Front piece: Place the 2 parts on the same needle size 5.5 mm, so that the sides with the most increases are towards each other, in addition cast on 6 sts between the two parts = 62-68-74-80-88 sts. When the piece measures 17-18-19-20-21 cm inc 1 st in each side, repeat the inc when the piece measures 21-22-23-24-25 cm = 66-72-78-84-92 sts. Read all of the next paragraphs before continuing! Armholes: When the piece measures 26-27-28-29-30 cm cast off for the armholes in each side every 2nd row: 3 sts 1-1-1-1-2 times, 2 sts 0-1-2-3-3 times and 1 st 2-2-2-3-3 times. Neckline: At the same time when the piece measures 28-29-30-31-32 cm divide the piece mid front and put half the sts put on a thread. First part: Continue to cast off towards the neck every row: 1 st 6 times and then every 2nd row: 1 st 10-10-11-11-12 times = 12-13-13-13-13 sts remain on shoulder. Cast off when the piece measures 44-46-48-50-52 cm. Second part: Put the sts from the thread back on needle and work as for first part but reversed. NOTE: 1st row is worked from mid front. Start by picking up 1 st in the first st from the other side and work it tog with first st on needle. This is done so that there will not be hole at the bottom of the V-neck. Back piece: Cast on 56-62-68-74-82 sts (incl 1 edge st in each side) with needle size 4.5 mm and Paris. Work 1 ridge, change to needle size 5.5 mm and continue with stocking st. When the piece measures 5-6-7-8-9 cm, inc 1 st in each side every 4th cm in total 5 times = 66-72-78-84-92 sts. When the piece measures 26-27-28-29-30 cm cast off for the armholes in each side as for front piece = 56-58-60-60-62 sts. When the piece measures 41-43-45-47-49 cm work 1 row P (seen from RS) over the middle 30-30-32-32-34 sts, then cast off these sts for the neck. Continue to cast of 1 st on next row towards neck = 12-13-13-13-13 sts remain on each shoulder. Cast off when the piece measures 44-46-48-50-52 cm. Sleeves: Cast on 40-42-44-46-48 sts (incl 1 edge st in each side) with needle size 4.5 mm and Paris. Work 1 ridge, change to needle size 5.5 mm and continue with stocking st. At the same time when the piece measures 6 cm inc 1 st in each side every 4-3.5-3-2.5-2.5 cm in total 7-7-8-9-9 times = 54-56-60-64-66 sts. When the sleeve measures 32-31-30-30-28 cm cast off for the sleeve cap in each side every 2nd row: 4 sts 1 time, 2 sts 2-3-3-3-3 times and 1 st 0-0-1-2-5 times, continue to cast off 2 sts in each side until the piece measures 38-38-38-39-39 cm, then cast off 3 sts 1 time in each side. The piece measures approx. 39-39-39-40-40 cm, cast off the remaining sts. Assembly: Sew shoulder seams. Sew in the sleeves. Sew sleeve and side seams in one inside the 1 edge st. Work ch loops with hook size 4 mm across the opening mid front. Start by the top marker thread in one side, work across to the middle marker thread on the other side, slant back to the bottom marker thread on the first side and finally across to the cast-on edge on the other side, cut strand. Repeat on the other side in the same way: from the top marker and down on the other side to make crosses over mid front. |
|
|
|
|
Have you made this or any other of our designs? Tag your pictures in social media with #dropsdesign so we can see them! Do you need help with this pattern?You'll find tutorial videos, a Comments/Questions area and more by visiting the pattern on garnstudio.com. © 1982-2024 DROPS Design A/S. We reserve all rights. This document, including all its sub-sections, has copyrights. Read more about what you can do with our patterns at the bottom of each pattern on our site. |


With over 40 years in knitting and crochet design, DROPS Design offers one of the most extensive collections of free patterns on the internet - translated to 17 languages. As of today we count 304 catalogues and 11422 patterns - 11422 of which are translated into English (UK/cm).
We work hard to bring you the best knitting and crochet have to offer, inspiration and advice as well as great quality yarns at incredible prices! Would you like to use our patterns for other than personal use? You can read what you are allowed to do in the Copyright text at the bottom of all our patterns. Happy crafting!
Comments / Questions (2)
Does this pattern come In crochet form?
21.10.2020 - 00:28DROPS Design answered:
Dear Tina, we are sorry, but though we do have a number of crocheted tops in our collections this exact modell does not have a crocheted version, but we are sure you will find something else. Happy Crafting!
21.10.2020 - 03:54Bonjour, Je pense qu'il doit y avoir une erreur sur le nombre de mailles pour le devant. Je réalise la taille M. J'ai monté 21 mailles, augmenté 10 x 1 maille sur le côté(= 10 m) et 3 x 1 maille de chaque côté (= 6 m), soit un total de 37 mailles et non de 34 comme indiqué. Cette base de 34 mailles est reprise pour la suite de la réalisation. Je ne suis donc pas certaine d'avoir un résultat final correct. Pourriez-vous m'indiquer ce qu'il convient de faire ? Merci beaucoup par avance !
03.08.2015 - 16:50DROPS Design answered:
Bonjour Delphine, il y avait effectivement une erreur, on ne doit augmenter que d'un seul côté les 3 x 1 m (sur le côté couture dos), les explications ont été corrigées, merci. Bon tricot!
04.08.2015 - 08:51