
Popular categories
Looking for a yarn?


|
|
DROPS 125-31 |
|
|
|
|
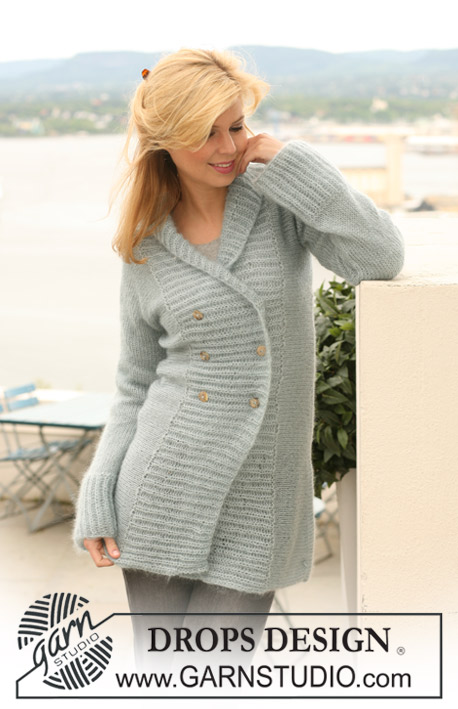
Knitted DROPS jacket in ”Polaris”. Size S - XXXL.
DROPS 125-31 |
|
|
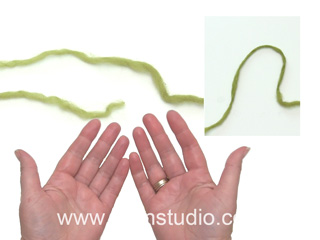
NEW BALL OF YARN TIP: When changing to a new ball of Polaris separate the old and the new thread into strands. Place the strands over one another, moisten them and twist them tog. INCREASING TIP: Inc 1 st by making 1 YO. On next row K YO into back of loop to avoid a hole. DECREASING TIP: Dec 1 st by K2 tog. GARTER ST (back and forth on needle): K all rows. MEASUREMENT TIP: Because of the weight of the yarn make all measurements while the garment is hanging, otherwise it will be too long when worn. BUTTONHOLES: Make buttonholes on right front band. 1 buttonhole = work 3rd and 4th st tog and make 1 YO. Make buttonholes when piece measures: Size S: 30, 41, 52, 63 and 74 cm. Size M: 30, 39, 48, 57, 66 and 76 cm. Size L: 30, 39, 48, 58, 68 and 78 cm. Size XL: 30, 40, 50, 60, 70 and 80 cm. Size XXL: 30, 40, 50, 60, 71 and 82 cm. Size XXXL: 30, 40, 51, 62, 73, and 84 cm. -------------------------------------------------------- BACK PIECE: Worked back and forth on circular needle. Cast on 38-42-44-48-52-56 sts on circular needle size 15 mm with Polaris. K 1 row from WS, K 1 row from RS and K 1 row from WS. Then K 1 row from RS, AT THE SAME TIME inc 3 sts evenly – See INCREASING TIP = 41-45-47-51-55-59 sts. P 1 row from WS and continue in stocking st on all sts. See NEW BALL OF YARN TIP! When piece measures 18 cm – See MEASUREMENT TIP! - dec 1 st each side – See DECREASING TIP! Repeat the dec when piece measures 44 cm = 37-41-43-47-51-55 sts. Continue until piece measures 63-64-65-66-67-68 cm. Insert a marker and now measure piece from here. Now cast on 8 new sts for sleeves each side at the end of every row a total of 2 times, then 11-10-10-9-7-6 sts 1 time each side = 91-93-95-97-97-99 sts. Continue in stocking st on all sts until piece measures 19-20-21-22-23-24 cm from marker. Now K 1 row from RS, AT THE SAME TIME cast off the middle 13-13-13-15-15-15 sts for neck = 39-40-41-41-41-42 sts left on each shoulder/sleeve. Continue in GARTER ST – see above - and complete each side separately. After 4 rows garter st cast off. Repeat on the other shoulder/sleeve. Piece measures a total of approx 84-86-88-90-92-94 cm. LEFT FRONT PIECE: Cast on 25-27-28-30-32-34 sts (includes 6 front band sts towards mid front) on circular needle size 15 mm with Polaris. K 1 row from WS, K 1 row from RS and K 1 row from WS with the 6 front band sts towards mid front in garter st until finished measurements. K 1 row from RS, AT THE SAME TIME inc 2 sts evenly = 27-29-30-32-34-36 sts (do not inc on front band). P 1 row from WS and continue in stocking st (front band in garter st as before). When piece measures 31 cm dec 1 st at the side. Repeat the dec when piece measures 57 cm = 25-27-28-30-32-34 sts. Continue until piece measures 63-64-65-66-67-68 cm. Insert a marker, and now measure piece from here. Now cast on new sts for sleeve at the side as described for back piece = 52-53-54-55-55-56 sts. Continue back and forth on all sts. When piece measures 13-14-15-16-17-18 cm from marker slip 9-9-9-10-10-10 sts towards mid front on a stitch holder. Cast off to shape the neckline at the beg of every row from WS: 2 sts 2 times = 39-40-41-41-41-42 sts on shoulder/sleeve. AT THE SAME TIME when piece measures 19-20-21-22-23-24 cm from marker work 4 rows garter st on all sts and cast off. RIGHT FRONT PIECE: Like left front piece but mirrored. Make BUTTONHOLES on right front band – see above. ASSEMBLY: Sew shoulder seams. Sew in outer loops of sts on cast off rows. SLEEVE EDGES: Worked back and forth on needle. Pick up approx 20 to 28 sts from RS (divisible by 2) round sleeve on needle size 15 mm. K 1 row from WS and continue in rib, K1/P1, with 1 edge st in garter st each side. Continue until rib measures approx 9 cm. Cast off with K over K and P over P. Repeat round the other sleeve. ASSEMBLY: Sew under arm and side seams. Sew in outer loops of sts to avoid a chunky seam (NOTE! when sewing sleeve edge tog sew inside 1 edge st each side). NECK: Pick up 47-47-53-53-59-59 sts (includes sts on stitch holders) round neck. K 1 row from WS and continue as follows from RS: 6 front band sts as before, * P1, K1 *, repeat from *-* and finish with P1 and 6 front band sts. Continue like this until neck measures approx 8 cm. Now inc 1 st in the middle 7 K-sections (= mid back) as seen from RS – See INCREASING TIP! K inc sts = 54-54-60-60-66-66 sts. Continue with K over K and P over P until neck measures 32-32-32-34-34-34 cm. Now cast off loosely with K over K and P over P. POCKETS: Cast on 13 sts on needle size 15 mm with Polaris. K 1 row from WS, K 1 row from RS and K 1 row from WS. Continue in stocking st with 1 garter st each side until pocket measures 13 cm. Now continue in rib as follows (from RS): 1 garter st, * K1, P1 *, repeat from *-* and finish with K1 and 1 garter st. After 5 rows rib cast off with K over K and P over P. Make 2 pockets. Sew the pockets to the jacket, approx 28-30 cm from bottom edge and 3 sts from front band. Sew buttons on left front piece. |
|

|
|
|
Have you made this or any other of our designs? Tag your pictures in social media with #dropsdesign so we can see them! Do you need help with this pattern?You'll find tutorial videos, a Comments/Questions area and more by visiting the pattern on garnstudio.com. © 1982-2024 DROPS Design A/S. We reserve all rights. This document, including all its sub-sections, has copyrights. Read more about what you can do with our patterns at the bottom of each pattern on our site. |


With over 40 years in knitting and crochet design, DROPS Design offers one of the most extensive collections of free patterns on the internet - translated to 17 languages. As of today we count 304 catalogues and 11422 patterns - 11422 of which are translated into English (UK/cm).
We work hard to bring you the best knitting and crochet have to offer, inspiration and advice as well as great quality yarns at incredible prices! Would you like to use our patterns for other than personal use? You can read what you are allowed to do in the Copyright text at the bottom of all our patterns. Happy crafting!
Comments / Questions (38)
Hej!! Så här står det: När arb mäter 13-14-15-16-17-18 cm från markören sätts 9-9-9-10-10-10 m mot mitt fram på 1 tråd. Vad menas med att det ska sättas 9 maskor mot mitt fram på 1 tråd?
25.11.2021 - 13:25DROPS Design answered:
Hej Dimi. Då sätter du de yttersta maskorna vid kanten (alltså mot halsen) på tråd. Mvh DROPS Design
25.11.2021 - 14:08Realizzare questo modello con i ferri dritti, come fare?
08.11.2021 - 14:16DROPS Design answered:
Buonasera Giusy, questo modello è lavorato in piano, può utilizzare i ferri dritti. Buon lavoro!
08.11.2021 - 23:35Esta pieza se pude hacer con hilo Snow? Cuántos serían los puntos a montar en talla Grande? Muchas Gracias!
01.12.2020 - 12:07DROPS Design answered:
Hola Tania! Tienes que trabajar con 2 hilos de DROPS Snow (juntos) y montar puntos como dicen las instrucciones del patron. Si piensas que es difícil decidir qué talla hacer, mira le leccion DROPSAQUI. Buen trabajo!
07.12.2020 - 09:18¿Qué significan LD Y LR?
26.07.2019 - 00:31DROPS Design answered:
Hola Maria. LD = lado derecho, LR = lado revés.
28.07.2019 - 20:26Der skal tages ud på kraven i retmaskerne. Må ærlig indrømme at jeg ikke lige forstår. Hvordan bliver ribben pæn efter udtagningerne.
22.03.2019 - 17:45DROPS Design answered:
Hei Laila. Du skal øke 7 masker, og du øker ved å lage 1 kast før eller etter hver av de 7 midterste rettmaskene. Dvs at vrangborden bak i nakken strikkes videre slik: 2 rett, 1 vrang, 2 rett, 1 vrang osv. God fornøyelse
26.03.2019 - 15:11Begrijp niet helemaal hoe ik dat doe met die negen steken opzetten. Moet ik dan de draad doorknippen?
13.02.2019 - 23:51DROPS Design answered:
Dag Tilly,
Bedoel je de steken die je op moet zetten voor de aangebreide mouw? Het is niet de bedoeling om dan de draad af te knippen, maar je zet steken op met de draad waarmee je aan het breien bent. In deze video wordt ook uitgelegd hoe je steken op kunt zetten aan het eind van de naald.
14.02.2019 - 13:45Es ist angegeben, mit einer Rundstricknadel Nr. 15 zu stricken . Man strickt in einem Stück , die Ärmel gleich mit dran. Und dann NUR ein Nadel Länge von 80 cm ????? Ich habe immer Längen von mindestens 120 cm . Bei so einer kurzen Länge passen doch die ganzen dicken Maschen nicht drauf.
24.11.2018 - 13:59DROPS Design answered:
Liebe Kirsten, gerne können Sie eine längere Nadel benutzen, 80 cm ist die "Standardlänge" für die klassische Rundnadel außer Sets. Viel Spaß beim stricken!
26.11.2018 - 07:57Hej. Er det muligt at lægge en opskrift på samme trøje, blot i en pind str 5? Det er den store krave der tiltaler mig. Jeg kan ikke strikke de andre komplicerede opskrifter med forholdsvis samme krave.
11.11.2017 - 17:42DROPS Design answered:
Hei Pernille. Vi har mange enkle oppskrifter der du kan bruke pinne str 5. Gå på vår nettside og skrive "Jakke" i søkeord, velg "Garngruppe C" og "Nybegynder". God Fornøyelse!
16.11.2017 - 13:23Hallo Bin gerade beim rechten Vorderteil nach 13 cm von der Markierung gegen die Mitte 9 Maschen auf einen Hilfsfaden legen.Damit komme ich nicht so richtig klar.Muss ich erst die 9 Maschen stricken und dann auf einen Hilfsfaden legen.Muss ich da die 9 Maschen wo die Blende ist und die Knöpfe ran kommen?Für Eure Hilfe würde ich mich freuen.Habe ja nur noch das linke Vorderteil.Die 9 Maschen die ich auf den Hilfsfaden für was werden die dann genommen? Liebe Grüße Claudia
01.11.2017 - 16:51DROPS Design answered:
Liebe Frau Wächtler, die 9 Maschen am Anfang der Hinreihe bei dem rechten Vorderteil können Sie zuerst stricken (so brauchen Sie nicht den Faden zu schneiden). Diese Maschen werden dann für den Hals gestrickt (siehe HALS). Viel Spaß beim stricken!
01.11.2017 - 17:22Ce modèle me tente mais c'est indiqué aiguilles n°15. Or sur la laine, on parle d'aiguille n°12. Quelle est la bonne taille à prendre ? Il y a quand même une grosse différence. Merci pour la précision.
12.09.2017 - 23:47DROPS Design answered:
Bonjour Sylvie, il faut ici un échantillon de 7 m x 8 rangs jersey = 10 x 10 cm, ajustez la taille de vos aiguilles en fonction de votre échantillon, nous avons obtenu cet échantillon avec des aiguilles 15 - pour un ouvrage plus souple qu'avec de aiguilles 12. Bon tricot!
13.09.2017 - 08:39