
Popular categories
Looking for a yarn?


|
||||||||||||||||
Pixie Dreams |
||||||||||||||||
|
|
||||||||||||||||
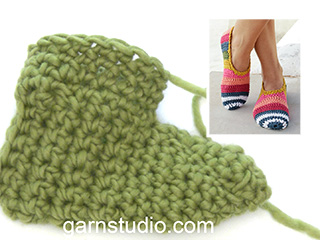
Crochet DROPS slippers in ”Nepal”.
DROPS 123-24 |
||||||||||||||||
|
CROCHET INFO: Replace first sc on round/row with ch 1. Replace first dc on round/row with ch 3. Finish each round/row with 1 sl st in 1st/3rd ch from beg of round, (in 1st/3rd ch from beg of previous row when working back and forth). PATTERN: See diagram M.1 and M.2. -------------------------------------------------------- FOOT: Beg with the toe. Crochet with hook size 4 mm / G/6 and Nepal. ROUND 1: Ch 3 and form a ring with 1 sl st in first ch. ROUND 2: 5-5-6 sc in ring – See CROCHET INFO! ROUND 3: 2 sc in each sc = 10-10-12 sc. ROUND 4: *1 sc in first sc, 2 sc in next sc*, repeat from *-* to end = 15-15-18 sc. ROUND 5-7: 1 sc in each sc. ROUND 8: *1 sc in first sc, 1 sc in 2nd sc and 2 sc in 3rd sc*, repeat from *-* to end = 20-20-24 sc. ROUND 9: *1 sc in each of the first 3 sc, and 2 sc in 4th sc*, repeat from *-* to end = 25-25-30 sc. ROUND 10: *1 sc in each of the first 4 sc, and 2 sc in 5th sc*, repeat from *-* to end = 30-30-36 sc. Continue with 1 sc in each sc until piece measures 6-6-7 cm / 2½"-2½"-2¾". Now continue in M.1 in the round. Work M.1A, then repeat M.1B and finish with 1 sl st in st from beg of round. Continue like this until piece measures approx 11-13-14 cm / 4½"-5"-5½". HEEL: Now divide piece and continue back and forth from mid upper foot in M.2, work M.2A, then repeat M.2B and finish with M.2C. When the slipper measures approx 22-24-27 cm / 8¾"-9½"-10½" place it flat and crochet tog mid back with a row of sc through both layers. Cut and fasten thread. LEG: RIGHT SLIPPER: Crochet 1 row of sc round the opening of slipper (beg mid front). When you are back at the beg ch 12 (for flap), turn and work 1 sc in each of these ch. Now continue back and forth with 1 sc in each sc until leg measures 8 cm / 3". Cut and fasten thread. LEFT SLIPPER: Beg with ch 12, then work 1 row of sc round the opening (beg mid front). When you are back at the beg turn and work 1 sc in each sc and 1 sc in each ch. Now continue back and forth with 1 sc in each sc until leg measures 8 cm / 3". Cut and fasten thread. Sew 2 decorative buttons through both layers on the flap. |
||||||||||||||||
Diagram explanations |
||||||||||||||||
|
||||||||||||||||

|
||||||||||||||||
|
Have you made this or any other of our designs? Tag your pictures in social media with #dropsdesign so we can see them! Do you need help with this pattern?You'll find tutorial videos, a Comments/Questions area and more by visiting the pattern on garnstudio.com. © 1982-2024 DROPS Design A/S. We reserve all rights. This document, including all its sub-sections, has copyrights. Read more about what you can do with our patterns at the bottom of each pattern on our site. |
||||||||||||||||


With over 40 years in knitting and crochet design, DROPS Design offers one of the most extensive collections of free patterns on the internet - translated to 17 languages. As of today we count 304 catalogs and 11422 patterns - 11417 of which are translated into English (US/in).
We work hard to bring you the best knitting and crochet have to offer, inspiration and advice as well as great quality yarns at incredible prices! Would you like to use our patterns for other than personal use? You can read what you are allowed to do in the Copyright text at the bottom of all our patterns. Happy crafting!
Comments / Questions (57)
Wenn man mit der Ferse fertig ist wie geht das weiter Wo setze ich genau an Häkel ich nicht gleich die Öffnung für den schaft Das mit der Bearbeitung für den schaft versteh ich nicht ganz
24.11.2020 - 22:07DROPS Design answered:
Liebe Akira, dieses Video zeigt am 1.55 wie man den Schaft häkelt - hier sollen Sie aber dazu 12 Luftmaschen am Ende der 1. Reihe häkeln, dh nicht in Runden dann wie im Video weiterhäkeln. Hoffentlich kann es Ihnen weiterhelfen. Viel Spaß beim häkeln!
25.11.2020 - 07:46Pagina genial
15.04.2019 - 02:37Hi there.... if I didn't want the slippers to be that hole-y could I just continue to single crochet all the way up the foot? Are there any special steps I should follow to do that?
17.09.2018 - 15:44DROPS Design answered:
Dear Kelsey, you can continue with single crochets if you rather like to, just continue adjusting to the length/number of rows required for your size. Happy crocheting!
17.09.2018 - 17:39Susan wrote:
My daughter bought her wool while on holiday so there is no hope of her going back to shop in America to ask about pattern. She is new to diagram patterns having only used worded patterns before. The M1 /M2 part has got her foxed. Not very good for her.
01.04.2018 - 23:27DROPS Design answered:
Dear Susan, you can always contact your DROPS store, even per mail or on social medias (see their profile). Whenw working diagram, each symbol is the key to one stitch/group of st. Start reading diagrams from the bottom corner on the right side towards the left from RS and from the left towards the right from WS. Happy crocheting!
03.04.2018 - 08:55Begrijp ik het goed dat je bij patroon m1a eerst 2x een tour met vaste moet haken en daarna een tour met noem maar even twee samen gestelde stokjes.
13.10.2017 - 21:48DROPS Design answered:
Hallo Marlies, Bij telpatroon M.1 is de eerste toer (dus niet de eerste 2 toeren), een toer met vasten. (= P.s.: De eerste vaste op de toer wordt vervangen door een losse (zie 'informatie voor het haken' bovenaan het patroon), deze wordt in het telptroon aangegeven met een verticaal streepje.
04.11.2017 - 14:19Hei! Jeg har problemer med og forstå diagrammet, og jeg ser jeg ikke er alene. Kan dere legge ut en bedre forklaring? I diagrammet er det en stav i slutten av første runde med st sammen, det kan vel ikke være riktig, denne står alene single st? Og i andre omg med staver sammen er det en single st som kommer hver tredje sammenhekling, slik ser det ikke ut på bildet.. Der er det to og to staver sammen rundt hele...
10.05.2016 - 20:18DROPS Design answered:
Hej Johanne. Som jeg forstaar det saa hekler du staver sammen men 1 lm mellem hver og den sidste single stav er til afslutning paa omg. (og kun der).
13.05.2016 - 12:24Salima wrote:
How we do drops by video please and thanks
09.12.2015 - 09:33DROPS Design answered:
Dear Salima, the video below shows how to work the slipper - but remember to follow the pattern at the same time, video is only showing technique and construction. Happy crocheting!
09.12.2015 - 10:12Hej! Har tittat på det här mönstret ett tag nu och har äntligen bestämt mig för att börja virka. Mitt problem är att jag har hittat ett garn som kräver en virknål i storlek 5 mm. Om jag följer beskrivningen, hur mycket kommer resultatet påverkas??
26.09.2015 - 19:59DROPS Design answered:
Hej För att få rätt storlek på dessa tofflor krävs denna stickfasthet: "DROPS VIRKNÅL NR 4 – eller den virknål du måste ha för att få 14 fm x 20 v på 10 x 10 cm." Gör en provlapp för att se så du får dessa mått. Lycka till!
30.09.2015 - 11:16Jessica wrote:
What does the 5-5-6 mean and to see crochet info? I replace the 5 with part one of crochet info? Anyone know?
19.05.2015 - 03:15DROPS Design answered:
Dear Jessica, this pattern is written in 3 sizes. In first 2 sizes you will crochet 5 sts in ch-ring, in largest size you will crochet 6 sts in ch-ring. Depending on your size follow first, 2nd or 3rd number. Happy crocheting!
19.05.2015 - 08:29Where can I go to find help with this pattern. I've try to do this pattern but confused on how to read your diagram please help I would really like to do this for my daughter. I did not buy the yarn from a yarn shop for I live in Oklahoma and the nearest yarn shop is 2 hours away so I can't go to a yarn shop to ask if you can write out the diagram for me maybe I can understand this is very confusing thank you
15.12.2014 - 15:51DROPS Design answered:
Dear Mrs Glynn, in the diagram each st/group of sts is represented by a symbol (see under diagram text), read diagram starting at the bottom corner on the right side and work towards the left every round (M.1) - or when working in rows, read RS rows from right to the left and WS rows from left to the right. You can get our yarns here in the USA, and then contact them by mail when you need assistance with a pattern. Happy crocheting!
15.12.2014 - 17:31