DROPS Alpaca
DROPS Alpaca
100% Alpaca
from 3.40 £ /50g
Get the yarn to make this pattern from 40.80£.

The yarn cost is calculated from the pattern’s smallest size and the yarn’s cheapest product type. Looking for an even better price? You might find it on the DROPS Deals!

DROPS SS24
DROPS 116-24
DROPS design: Pattern no Z-422
Size: S - M - L - XL - XXL - XXXL
Materials: DROPS ALPACA
600-650-700-750-850-900 g colour no 501, light grey

DROPS POINTED NEEDLES size 5 mm – or size needed to get 17 sts x 22 rows in stocking st with 2 threads Alpaca = 10 x 10 cm.
DROPS POINTED NEEDLES size 4.5 mm – for rib
DROPS Metal buttons no 542: 6-6-7-7-7-7 pcs.

-------------------------------------------------------

Alternative Yarn – See how to change yarns here
Yarn Groups A to F – Use the same pattern and change the yarn here
Yarn usage using an alternative yarn – Use our yarn converter here

-------------------------------------------------------

DROPS Alpaca
DROPS Alpaca
100% Alpaca
from 3.40 £ /50g
Get the yarn to make this pattern from 40.80£.

The yarn cost is calculated from the pattern’s smallest size and the yarn’s cheapest product type. Looking for an even better price? You might find it on the DROPS Deals!

Pattern instructions

NOTE: This pattern is written in British English. All measurements in charts are in cm. For conversion from cm to inches - click here. There are different terms for crocheting in British and American English. If this pattern includes crochet, click for "crochet terms" here. For this pattern in American English, please click here.
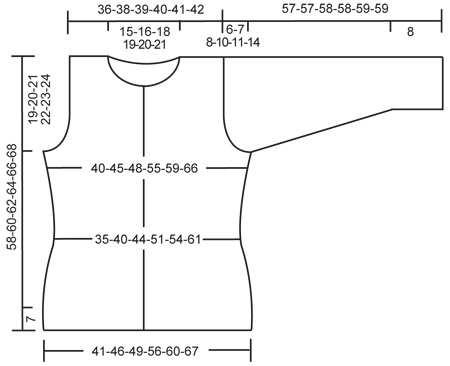
GARTER ST (back and forth on needle):
K all rows.
BUTTONHOLES:
Make buttonholes on right front piece. 1 BUTTONHOLE = K tog 4th and 5th st from mid front and make 1 YO.
Make buttonholes when piece measures:
Size S: 7, 15, 23, 31, 40 and 49 cm
Size M: 7, 15, 24, 33, 42, and 51 cm
Size L: 7, 14, 22, 30, 38, 46 and 53 cm
Size XL: 7, 14, 22, 30, 38, 46 and 54 cm
Size XXL: 7, 15, 23, 31, 39, 47 and 56 cm
Size XXXL: 7, 15, 23, 31, 40, 49 and 58 cm
--------------------------------------------------------

BACK PIECE:
Worked back and forth on needle. Cast on 71-77-83-95-101-113 sts (includes 1 edge st each side) on needle size 4.5 mm with 2 threads Alpaca. P 1 row from WS, and continue as follows from RS: 1 edge st, * K3/P3 *, repeat from *-* and finish with K3 and 1 edge st. Continue in rib like this until piece measures 7 cm. Change to needle size 5 mm, work 1 row stocking st, AT THE SAME TIME inc 1-3-3-3-3-3 sts evenly = 72-80-86-98-104-116 sts. Continue in stocking st. REMEMBER THE KNITTING TENSION! When piece measures 8 cm dec 1 st each side, and repeat the dec on every 2.5 cm a total of 5 times = 62-70-76-88-94-106 sts. When piece measures 24 cm inc 1 st each side, and repeat the inc on every 4-4-4-5-5-5 cm a total of 4 times = 70-78-84-96-102-114 sts. When piece measures 39-40-41-42-43-44 cm cast off for armhole each side: 3 sts 0-1-1-2-2-3 times, 2 sts 1-1-1-2-3-4 times and 1 st 2-2-4-4-4-4 times = 62-64-66-68-70-72 sts. When piece measures 50-52-54-55-57-59 cm complete piece in GARTER ST – see above. AT THE SAME TIME when piece measures 56-58-60-62-64-66 cm cast off the middle 22-24-26-28-30-32 sts for neck and complete each shoulder separately. Cast off 1 st on neckline on next row = 19 sts left on shoulder for all sizes. Cast off when piece measures 58-60-62-64-66-68 cm.

RIGHT FRONT PIECE:
Cast on 45-45-51-57-57-63 sts (includes 1 edge st at the side and 8 front band sts towards mid front) on needle size 4.5 mm with 2 threads Alpaca. P 1 row from WS, and continue as follows from RS: 8 GARTER STS (= front band), rib K3/P3 and finish with 1 edge st at the side. Work rib like this until piece measures 7 cm. Change to needle size 5 mm, and P 1 row from WS, AT THE SAME TIME inc 0-3-0-0-3-3 sts evenly = 45-48-51-57-60-66 sts. Remember BUTTONHOLES – see above. Continue as follows from RS: 8 garter sts, stocking st on the next 36-39-42-48-51-57 sts and finish with 1 edge st. When piece measures 8 cm dec at the side as described for back piece = 40-43-46-52-55-61 sts. When piece measures 24 cm inc at the side as described for back piece = 44-47-50-56-59-65 sts. When piece measures 39-40-41-42-43-44 cm cast off for armhole at the side as described for back piece = 40-40-41-42-43-44 sts. When piece measures 50-52-54-55-57-59 cm complete piece in garter st, AT THE SAME TIME slip 13 sts towards mid front on a stitch holder. Cast off to shape the neckline at the beg of every row from mid front: 2 sts 2 times and 1 st 4-4-5-6-7-8 times. After all dec are complete there are 19 sts left on shoulder for all sizes. Cast off when piece measures 58-60-62-64-66-68 cm.

LEFT FRONT PIECE:
Cast on and work like right front piece, but mirrored and without buttonholes.

SLEEVE:
Worked back and forth on needle. Cast on 42-42-46-46-50-50 sts (includes 1 edge st each side) on needle size 4.5 mm with 2 threads Alpaca. P 1 row from WS, and continue in garter st with 1 edge st each side. When piece measures 8 cm change to needle size 5 mm and now complete piece in stocking st. When piece measures 10 cm inc 1 st each side, and repeat the inc on every 5-4-4-3-2.5-2 cm a total of 8-10-10-12-13-15 times = 58-62-66-70-76-80 sts. When piece measures 51-50-50-48-48-45 cm (less for the larger sizes because of longer sleeve cap and wider shoulder) cast off for sleeve cap each side at the beg of every row: 3 sts 1 time, 2 sts 3 times, 1 st 0-2-4-5-6-8 times, then 2 sts each side until piece measures 56-56-57-57-58-58 cm, now cast off 3 sts 1 time each side, and cast off remaining sts. Sleeve measures approx 57-57-58-58-59-59 cm.

ASSEMBLY:
Sew shoulder seams. Set in sleeves. Sew sleeve and side seams inside 1 edge st. Sew buttons to left front piece.

HOOD:
Pick up 96 to 120 sts round the neck (incl sts on stitch holder) on needle size 4.5 mm with 2 threads Alpaca . Work garter st on all sts back and forth on needle until hood measures approx 37-37-38-38-39-39 cm, cast off. Fold hood double and sew tog at the top from RS.

Diagram

diagram measurements
Do you have a question? See a list of frequently asked questions (FAQ)

Knitting tension is what determines the final measurements of your work, and is usually measured per 10 x 10 cm. It is provided like so: number of stitches in width x number of rows in height - eg: 19 stitches x 26 rows = 10 x 10 cm.

The knitting tension is very individual; some people knit/crochet loosely while others work tightly. You adjust the knitting tension with the needle size, which is why the suggested needle size is only meant as a guide! You need to adjust this (up or down) to ensure that YOUR knitting tension matches the knitting tension provided in the pattern. If you work with a different knitting tension than provided you will have a different yarn consumption, and your work will have different measurements than what the pattern suggests.

The knitting tension also determines which yarns can replace each other. As long as you achieve the same knitting tension you can replace one yarn with another.

See DROPS lesson: How to measure your tension/gauge

See DROPS video: How to make a gauge tension swatch

The required amount of yarn is provided in grams, eg: 450 g. To calculate how many balls you’ll need you first need to know how many grams are in 1 ball (25g, 50g or 100g). This information is available if you click on the individual yarn quality on our pages. Divide the amount required with the amount of each ball. For example, if each ball is 50g (the most common amount), the calculation will be as follows: 450 / 50 = 9 balls.

The important thing when changing from one yarn to another is that the knitting/crochet tension remains the same. This is so that the measurements of the finished piece will be the same as on the sketch provided. It is easier to achieve the same knitting tension using yarns from the same yarn group. It is also possible to work with multiple strands of a thinner yarn to achieve the knitting tension of a thicker one. Please try our yarn converter. We recommend you to always work a test swatch.

Please NOTE: when changing yarn the garment might have a different look and feel to the garment in the photo, due to individual properties and qualities of each yarn.

See DROPS lesson: Can I use a different yarn than the one mentioned in the pattern?

All our yarns are categorised into yarn groups (from A to F) according to thickness and knitting tension – group A contains the thinnest yarns and group F the thickest. This makes it easier for you to find alternative yarns to our patterns, should you wish to switch yarn. All yarns within the same group have a similar knitting tension and can easily replace each other. However, different yarn qualities have different structures and properties which will give the finished work a unique look and feel.

Click here for an overview of the yarns in each yarn group

At the top of all our patterns you’ll find a link to our yarn calculator, which is a helpful tool should you wish to use a different yarn than suggested. By filling in the yarn quality you wish to replace, the amount (in your size) and number of strands, the calculator will present good alternative yarns with the same knitting tension. Additionally it will tell you how much you’ll require in the new qualities and whether you’ll need to work with multiple strands. Most skeins are 50g (some are 25g or 100g).

If the pattern is worked with multiple colours, every colour will have to be calculated separately. Similarly, if the pattern is worked with several strands of different yarns (for example 1 strand Alpaca and 1 strand Kid-Silk) you will have to find alternatives for each, individually.

Click here to see our yarn calculator

Since different yarns have different qualities and textures we have chosen to keep the original yarn in our patterns. However, you can easily find options among our available qualities by using our yarn calculator, or simply pick a yarn from the same yarn group.

It is possible that some retailers still have discontinued yarns in stock, or that someone has a few skeins at home that they would like to find patterns for.

The yarn calculator will provide both alternative yarn as well as required amount in the new quality.

If you think it's hard to decide what size to make, it can be a good idea to measure a garment you own already and like the size of. Then you can pick the size by comparing those measures with the ones available in the pattern's size chart.

You'll find the size chart at the bottom of the pattern.

See DROPS lesson: How to read size chart

The needle size provided in the pattern serves only as a guide, the important thing is to follow the knitting tension. And since knitting tension is very individual, you will have to adjust the needle size to ensure that YOUR tension is the same as in the pattern – maybe you’ll have to adjust 1, or even 2 needle sizes, up or down to achieve the correct tension. For this, we recommend that you work test swatches.

Should you work with a different knitting tension than the one provided, the measurements of the finished garment might deviate from the measurement sketch.

See DROPS lesson: How to measure your tension/gauge

See DROPS video: How to make a tension/gauge swatch

Working a garment top-down provides more flexibility and room for personal adjustment. For example it is easier to try the garment on while working, as well as making adjustments to length of yoke and shoulder caps.

The instructions are carefully explaining every step, in the correct order. Diagrams are adjusted to the knitting direction and are worked as usual.

The diagram depicts all rows/rounds, and every stitch seen from the right side. It is read from bottom to top, from right to left. 1 square = 1 stitch.

When working back and forth, every other row is worked from the right side and every other row is worked from the wrong side. When working from the wrong side, the diagram will have to be worked reversed: from left to right, knit stitches are purled, purl stitches are knit etc.

When working in the round every round is worked from the right side and the diagram are worked from right to left on all rounds.

See DROPS lesson: How to read knitting diagrams

The diagram depicts all rows/rounds, and every stitch seen from the right side. It is worked from bottom to top, from right to left.

When working back and forth every other row is worked from the right side: from right to left and every other row is worked from the wrong side: from left to right.

When working in the round, every row in the diagram are worked from the right side, from right to left.

When working a circular diagram you start in the middle and work your way outwards, counter clockwise, row by row.

The rows usually start with a given number of chain stitches (equivalent to the height of the following stitch), this will either be depicted in the diagram or explained in the pattern.

See DROPS lesson: How to read crochet diagrams

Instructions for working several diagrams after each other on the same row/round, will often be written like so: “work A.1, A.2, A.3 a total of 0-0-2-3-4 times". This means you work A.1 once, then A.2 is worked once, and A.3 is repeated (in width) the number of times provided for your size – in this case like so: S = 0 times, M = 0 times, L=2 times, XL= 3 times and XXL = 4 times.

The diagrams are worked as usual: begin with the first row in A.1, then work the first row in A.2 etc.

See DROPS lesson: How to read knitting diagrams

See DROPS lesson: How to read crochet diagrams

The total width of the garment (from wrist-to-wrist) will be larger in the larger sizes, despite the actual sleeves being shorter. The larger sizes have longer sleeve caps and wider shoulders, so there will be a good fit in all sizes.

The measurement sketch/schematic drawing provides information regarding the full length of the garment. If it’s a jumper or a jacket the length is measured from the highest point on the shoulder closest to the neckline, and straight down to the bottom of the garment. It is NOT measured from the tip of shoulder. Similarly, the length of yoke is measured from the highest point on the shoulder and down to where yoke is split into body and sleeves.

On a jacket measures are never taken along bands, unless specifically stated. Always measure inside band stitches when measuring the length.

See DROPS lesson: How to read a schematic drawing

Diagrams are often repeated on the round or in height. 1 repeat is the diagram the way it appears in the pattern. If it says to work 5 repeats of A.1 in the round, then you work A.1 a total of 5 times after/next to each other in the round. If it says to work 2 repeats of A.1 vertically/in height you work the entire diagram once, then begin again at the start and work the entire diagram one more time.

Chain stitches are slightly narrower than other stitches and to avoid working the cast-on edge too tight, we simply chain more stitches to begin with. The stitch count will be adjusted on the following row to fit the pattern and measurement sketch.

The rib edge is more elastic and will contract slightly compared to, for example, stocking stitch. By increasing before the rib edge, you avoid a visible difference in width between the rib edge and the rest of the body.

It’s very easy to cast off too tightly, and by making yarn overs while casting off (and simultaneously casting these off) you avoid a too tight cast off edge.

See DROPS video: How to bind off with yarn overs (yo)

To achieve an even increase (or decrease) you can increase on, for example: every 3rd and 4th row alternately, like so: work 2 rows and increase on the 3rd row, work 3 rows and increase on the 4th. Repeat this until the increase is complete.

See DROPS lesson: Increase or decrease 1 st on every 3rd and 4th row alternately

Should you prefer to work in the round instead of back and forth, you may of course adjust the pattern. You’ll need to add steeks mid-front (usually 5 stitches), and follow the instructions. When you would normally turn and work from the wrong side, simply work across the steek and continue in the round. At the end you’ll cut the piece open, pick up stitches to work bands, and cover the cut edges.

See DROPS video: How to knit steeks and cut open

Should you prefer to work back and forth instead of in the round, you may of course adjust the pattern so you work the pieces separately and then assemble them at the end. Divide the stitches for the body in 2, add 1 edge stitch in each side (for sewing) and work the front and back pieces separately.

See DROPS lesson: Can I adapt a pattern for circular needles into straight needles?

Pattern repeats can vary slightly in the different sizes, in order to get the correct proportions. If you’re not working the exact same size as the garment in the photo, yours might deviate slightly. This has been carefully developed and adjusted so that the complete impression of the garment is the same in all sizes.

Make sure to follow instructions and diagrams for your size!

If you have found a pattern you like which is available in women’s size it’s not very difficult to convert it to men’s size. The biggest difference will be the length of sleeves and body. Start working on the women size that you think would fit across the chest. The additional length will be worked right before you cast off for the armhole/sleeve cap. If the pattern is worked top-down you can add the length right after the armhole or before the first decrease on sleeve.

Regarding additional yarn amount, this will depend on how much length you add, but it is better with a skein too many than too few.

All yarns will have excess fibres (from production) that might come off as lint or shedding. Brushed yarns (ie hairier yarns) have more of these loose, excess fibres, causing more shedding.

Shedding also depends on what is worn under or over the garment, and whether this pulls at the yarn fibres. It’s therefore not possible to guarantee that there will be no shedding

Below are some tips on how to get the best result when working with hairier yarns:

1. When the garment is finished (before you wash it) shake it vigorously so the looser hairs come off. NOTE: do NOT use a lint roller, brush or any method that pulls at the yarn.

2. Place the garment in a plastic bag and put it in your freezer - the temperature will cause the fibres to become less attached to each other, and excess fibres will come off easier.

3. Leave in the freezer for a few hours before taking it out and shaking it again.

4. Wash the garment according to the instructions on the yarn label.

Pilling is a natural process that happens to even the most exclusive of fibers. It's a natural sign of wear and tear that is hard to avoid, and that is most visible in high friction areas of your garment like a sweater's arms and cuffs.

You can make your garment look as new by removing the pilling, using a fabric comb or a pill/lint remover.

Still can't find the answer you need? Then scroll down and leave your question so one of our experts can try to help you. This will be done normally within 5 to 10 working days.
In the meantime, you can read the questions and answers that others have left to this pattern or join the DROPS Workshop on Facebook to get help from fellow knitters/crocheters!

Post a comment to pattern DROPS 116-24

We would love to hear what you have to say about this pattern!

If you want to leave a question, please make sure you select the correct category in the form below, to speed up the answering process. Required fields are marked *.

Comments / Questions (44)

country flag Mandy wrote:

Gibt es zu den angegebenen Größen eine Maßtabelle, an der ich mich orientieren kann? Also wie breit wird die Jacke in Größe n, wie lang usw.

11.12.2023 - 20:56

DROPS Design answered:

Liebe Mandy, ja sicher, am Ende der Anleitung finden Sie eine Maßskizze mit allen Breiten/Längen für jede Größe; messen Sie eine ähnliche Jacke, die Sie gerne tragen und vergleichen Sie diese Maßnahmen um die passende Größe zu finden. Hier lesen Sie mehr. Viel Spaß beim stricken!

12.12.2023 - 08:56

country flag Christine wrote:

I do not understand the directions for decreasing at the under arms on the back nor the decreasing for the underarm shaping for the sleeve. I would appreciate your explanation. Thank you.

13.01.2021 - 20:45

DROPS Design answered:

Dear Christine, on back piece you cast off the stitches for armhole at the beginning of each row on each side (= both from right side and from wrong side): : 3 sts 0-1-1-2-2-3 times (= 3 sts at the beg of next 0-2-2-4-4-6 rows), 2 sts 1-1-1-2-3-4 times (= 2 sts at the beg of next 2-2-2-4-6-8 rows) and 1 st 2-2-4-4-4-4 times (= 1 st at the beg of next 4-4-8-8-8-8 rows). Happy knitting!

14.01.2021 - 07:52

country flag Fallecker wrote:

Modèle 116 24 Bonjour Je suis au niveau des devants droit et gauche au niveau des encolures glisser les 13 mailles du milieu devant lesquelles .? à partir de la bande de boutonnage donc les 8 mailles mousse de la bande plus 5 m et après je commence les diminutions de l encolure..je vous remercie pour une réponse

10.06.2020 - 08:18

DROPS Design answered:

Bonjour Mme Fallecker, tout à fait, ces mailles correspondent aux mailles de bordure devant + les mailles suivantes et seront reprises ensuite pour la capuche. Vous commencez ensuite à rabattre/diminuer pour l'encolure au début du rang suivant qui commence par le côté encolure (milieu devant du gilet). Bon tricot!

10.06.2020 - 12:27

country flag Willemijn wrote:

Is de hoogte van 8 cm inclusief boord van 7 cm. Dus maw na 1 cm tricot steek minderen. Of is het exclusief cm boord maw na 8 cm tricotsteek minderen.

03.08.2018 - 20:04

DROPS Design answered:

Dag Willemijn, Ja hoor, dit is inclusief de boord, dus vanaf de opzetrand gemeten.

06.08.2018 - 10:03

country flag Michela wrote:

Buongiorno. Ho realizzato questo modello seguendo passo passo le indicazioni della taglia s. Al momento di assemblare le varie parti mi sono accorta che la circonferenza della cuffia della manica é più corta rispetto allo scalvo dove va inserita di circa 10 cm. La circonfenza della manica mi risulta infatti 34 cm, mentre quella dello scalvo della maglia 44 cm. Voi cosa mi suggerite di fare? Grazie Michela

12.02.2016 - 17:17

country flag Annita Van Betuw wrote:

Bij capuchon: moet ik dan alle steken incl op hulpdraden opnemen (=ca 95 St)? Toch staat er ook dat ik aan t eind capuchon dubbel moet vouwen en samen moet naaien? toch in 2 delen? Heel graag uw reactie, hartelijke groet, Annita van Betuw

12.01.2016 - 20:00

DROPS Design answered:

Hoi Annita. Ja, je breit de capuchon in één deel, maar je moet de naald aan de bovenkant sluiten. Dus als je klaar bent, vouw je de capuchon dubbel en sluit de naad aan de bovenkant

13.01.2016 - 15:27

country flag Annita wrote:

Rechtervoorpand: vanaf hoogte 55 cm (XL) moet ik dan van de 42 st. de 10 steken aan de kant vd ribbelbies afkanten heen en weer breiend, terwijl de middelste 13 st op een hulpdraad (blijven) staan op hoogte 55 cm en na t afkanten de laatste 19 St tot aan 64 cm hoogte breien?

14.12.2015 - 21:32

DROPS Design answered:

Hoi Anita. Ja, dat klopt. Je zet de st van de hulpdraad later terug op de nld bij het breien van de capuchon en je neemt verder st op rond de hals

15.12.2015 - 15:57

country flag Raffaella wrote:

Grazie :)

30.01.2015 - 16:37

country flag Raffaella wrote:

Ho difficoltà nell'interpretazione di questo passaggio : " trasferire 13 m. verso il centro davanti su un fermamaglie " Quali 13 maglie devo trasferire, le prime o le seconde 13 per poter eseguire lo scollo ? E nel caso cosa ottengo ? Un incrocio ? Non si comprende bene anche perché nella foto la giovinetta posiziona la mano proprio a coprire il punto del passaggio incriminato. Grazie Raffaella

29.01.2015 - 16:48

DROPS Design answered:

Buonasera Raffaella. Le 13 m che deve trasferire sul ferma maglie sono quelle più vicino allo scollo, quindi per il davanti destro, le prime 13 m sul ferro. Per modellare la scollatura dovrà poi intrecciare, all’inizio dei ferri che iniziano vicino allo scollo: 2 m 2 volte e 1 m 4-4-5-6-7-8 volte a seconda della taglia che sta lavorando. Buon lavoro!

29.01.2015 - 17:32

country flag Саша wrote:

Ho fatto questo modello :))) è bellissimo !!!!

19.01.2015 - 07:02