
Popular categories
Looking for a yarn?


|
||||||||||||||||||||||
Little Ivy |
||||||||||||||||||||||
|
|
||||||||||||||||||||||
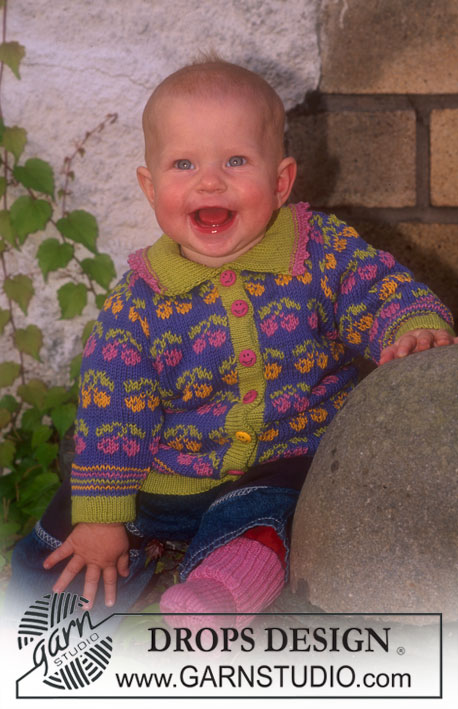
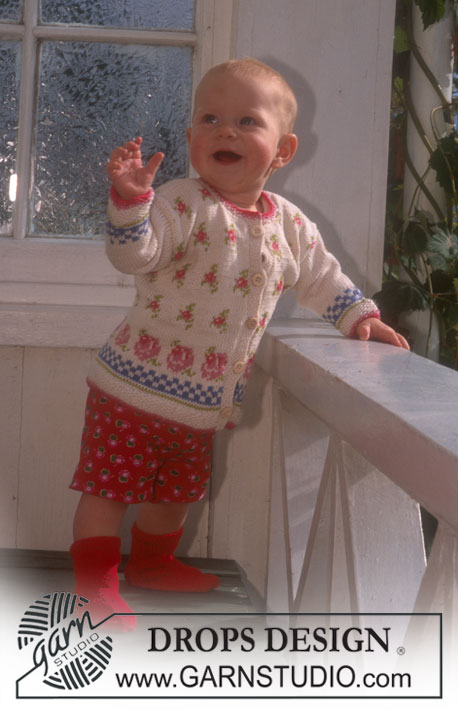
Sweater, shorts, socks and summer hat in Safran
DROPS Baby 6-6 |
||||||||||||||||||||||
|
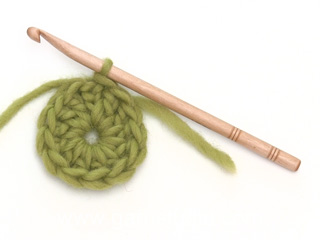
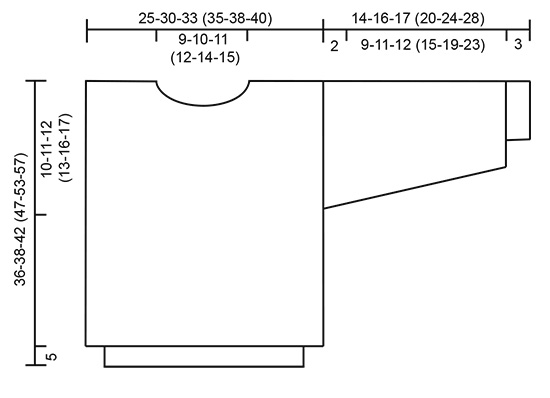
SWEATER Finished measurements: 50-56-62 (72-76-80) cm DROPS 2.5 mm and 3 mm circular needles and double pointed needles, or size to obtain gauge. 2 SMILY-buttons (orange). Gauge: 24 sts and 32 rows on larger needle in stockinette st = 10 x 10 cm . Garter Stitch, when knitting flat: Knit all sts, all rows. Garter Stitch, when knitting in the round: *Rnd 1, knit. Rnd 2, purl *. Repeat from * - *. Pattern: See charts. (1 chart = 1 repeat). The patterns are shown from the right side. Pattern 2 is knit entirely in stockinette st. Body: Cast on 240-288-312 (336-360-384) sts on larger circular needles with orange; join and place a marker at the join. Knit 4 rows garter st, then knit Pattern 1 (ruffle). 120-144-156 (168-180-192) sts remain on the needles. Now knit Pattern 2 to finished dimensions. When the work measures 26-27-30 (34-37-40) cm , divide the work into front and back. Front and back each have 60-72-78 (84-90-96) sts. Knit each part separately. Front: = 60-72-78 (84-90-96) sts. When the work measures 32-33-37 (41-47-50) cm , bind off the center 10-12-12 (10-14-16) sts for the neck. Bind off at the neck edge every other row: 3 sts 1 time, 2 sts 1-1-1 (2-2-2) times, 1 st 1-1-2 (2-3-3) times. Bind off all sts when the work measures 36-38-42 (47-53-57) cm . Back: = 60-72-78 (84-90-96) sts. 3 smallest sizes: When the work measures 30-31-34 cm, bind off the center 4 sts for a split and knit each part separately. 3 largest sizes: When the work measures 45-51-55 cm, bind off the center (24-30-32) sts for the neck. All sizes: Bind off at the neck edge every other row: 7-8-9 (2-2-2) sts 1 time, 2 sts 1-1-1 (0-0-0) time. Bind off all sts when the work measures 36-38-42 (47-53- 57) cm . Sleeves: Cast on 36-36-38 (42-42-46) sts on smaller double pointed needles with orange; join and place a marker at the join. Knit 4 rows garter st, 2 rows stockinette st, 4 rows garter st, 2 rows stockinette st. Change to larger double pointed needles and knit Pattern 3 to finished dimensions and inc 1 st each side of marker 6-9-10 (10-17-18) times: Sizes 0/3 mos. + 2 years: every 4th row Sizes 6/9 mos. + 5/6 years: alternately every 3rd and 4th row Sizes 12/18 mos. + 3/4 years: every 3rd row = 48-54-58 (62-76-82) sts. When the work measures 12-14-15 (18-22-26) cm , bind off 5 sts each side of marker and knit the rest back and forth on the needles. Bind off for sleeve caps on each side every other row: 5-6-7 (7-10-11) sts 2 times, bind off all sts. The sleeve measures approx. 14-16-17 (20-24-28) cm . Assembly: Sew shoulder seams. 3 smallest sizes: pick up approx. 10-12-14 sts along the left side of the split in the back on smaller needle with orange and knit garter st for 1.5 cm , bind off. Repeat along the right side of the split, but after 0.5 cm make 1 buttonhole in the center of the placket (1 buttonhole = bind off 2 sts and cast on 2 new sts over the bound off sts on the next row), bind off all sts. Sew sts together at the bottom of the split. Pick up approx. 65-75 sts around the neck and over the placket in the back on smaller needle with orange. Knit 4 rows garter st, 2 rows stockinette st, 4 rows garter st, 2 rows stockinette st, but at the same time make 1 buttonhole after the first 2 garter st "ridges" on the right side positioned over the other buttonhole, bind off all sts. Sew on sleeves and buttons. 3 largest sizes: Pick up approx. 75-85 sts around the neck on smaller needle with orange; join and place a marker at the join. Knit 4 rows garter st, 2 rows stockinette st, 4 rows garter st, 2 rows stockinette st, bind off all sts. Sew on sleeves. ________________________________________ SHORTS Pattern: (1 chart = 1 repeat). The pattern is knit entirely in stockinette st and is seen from the right side. Garter Stitch, when knitting flat: Knit all sts, all rows. Garter Stitch, when knitting in the round: *Rnd 1, knit. Rnd 2, purl *. Repeat from * - *. Border: 3 cm stockinette st, Purl 1 row (= folding-edge), 3 cm stockinette st. Right leg: Cast on 64-64-72 (78-84-86) sts on smaller double pointed needles with orange; join and place a marker at the join. Knit 4 rows garter st. Change to larger double pointed needles and knit Pattern 3. At the same time inc 1 st on each side of marker every 1-2-2 (2-3-4) cm 2 times = 68-68-76 (82-88-90) sts. Knit the increased sts into Pattern 3. When the work measures 4-5-6 (5-9-10) cm , divide the work at the marker and knit the work back and forth on the rows. Inc 1 st on each side for the seam = 70-70-78 (84-90-92) sts. When the work measures 7-8-9 (9-10-11) cm , bind off 3 sts on each side = 64-64-72 (78-84-86) sts. Put the work aside. Left leg: Knit like the right. Pant: Put both legs on the same circular needles = 128-128-144 (156-168-172) sts. Put a marker between each leg (center front and center back). Knit 3 rows stockinette st, then inc 1 st each side of the center back marker (make the increase 2 sts away from the marker) 5 times every other row, then 1 st every 4th row 2 times. At the same time dec 1 st on each side of the front marker (make the decreases 1 st away from the marker) 7-7-9 (11-12-12) times every other row, then 1 st 2 times every 4th row. Decrease as follows: Before the marker: K 2 tog After the marker: slip 1, K 1, psso = 124-124-136 (144-154-158) sts. When the work measures 24-27-30 (31-33-35) cm , change to smaller circular needles and knit Border, bind off all sts. Assembly: Sew together the split on the inside of each leg up to the bound off sts and then sew shut the opening between the legs from the center front to the center back on the pant. Fold the border edge over double against the wrong side and sew. Pull an appropriate length of elastic through the waistband. ________________________________________ SOCKS: Sock's foot length: 10-11-12 (14-15-17) cm DROPS 2.5 mm and 3 mm double-pointed needles, or sizes needed to obtain correct gauge. Gauge: 24 sts and 32 rows on larger needle in stockinette st = 10 x 10 cm . Rib: *knit 1, purl 1*. Repeat from * - *. Socks: Cast on 38-40-42 (42-44-48) sts on smaller needle; join and place a marker at the join. Knit 1.5-1.5-1.5 (2-2-2) cm rib. Change to larger needle and knit stockinette st until the work measures 12-13-13 (13-14-14) cm . Dec 0-2-2 (0-0-4) sts evenly distributed over the next row = 38-38-40 (42-44-44) sts. Heel: Knit 3-3.5-4 (4.5-5-5) cm stockinette st back and forth over 18 sts in the center of the back. Turning the heel (work 1st row from right side): 1st row: K 10, K 2 tog into back of st, K 1, turn the work 2nd row: Sl 1, P 4, P 2 tog, P 1, turn the work 3rd row: Sl 1, K 5, K 2 tog into back of st, K 1, turn the work 4th row: Sl 1, P 6, P 2 tog, P 1, turn the work 5th row: Sl 1, K 7, K 2 tog into back of st, K 1, turn the work 6th row: Sl 1, P 8, P 2 tog, P 1, turn the work 7th row: K 2 tog, K 8, K 2 tog into back of st = 10 sts on the needles. Pick up 8-9-10 (11-12-12) sts on each side of the heel and set all sts on the needles = 46-48-52 (56-60-60) sts. Dec 1 st on each side of the uppermost 20-20-22 (22-24-24) sts which are knit in stockinette st (these sts centered on top of the foot can also be knit in rib to make the sock more elastic) every row 3-4-4 (6-6-6) times = 40-40-44 (44-48-48) sts. When the foot measures 7-8-9 (10-11-13) cm from the start of the heel turning, shape the toe: Knit stockinette st, put 4 markers evenly distributed around the toe, dec 1 st by knitting the 2 sts before each marker together (= 4 bound off sts per row), every row 8-8-9 (9-9-9) times = 8-8-8 (8-12-12) sts. Pull the a double strand of yarn through the last sts and sew shut. CROCHETED HAT: SIZES: 0/3-6/9- 12/18 months, (2-3/4-5/6) years. Circumference: 35-37-38 (42-45-47) cm. MATERIALS: DROPS Safran from Garnstudio. 50-50-100 (100-100-100) g. Colour 06, jeans blue DROPS Crochet hook size 2.5 mm. CROCHET TENSION: 24 double crochets in width = 10 cm. Remember hook size is only a guide! HAT The hat is worked with DROPS Safran and hook size 2.5 mm. Work 4 chain stitches and form them into a ring with 1 slip stitch in the first chain stitch. Begin all rounds with 1 chain stitch, which replaces the first double crochet and finish all rounds with 1 slip stitch. Work 6 double crochets around the chain-stitch ring. Then work 2 double crochets in each stitch = 12 stitches. On the next round work as follows: * 2 double crochets in the first stitch, 1 double crochet in the next stitch *, repeat from *-* to the end of the round = 6 increases = 18 stitches. Work the next round as follows: * 2 double crochets in the first stitch, 1 double crochet in the next 2 stitches *, repeat from *-* to the end of the round. Continue increasing like this, with 1 more double crochet between each increase every round. Continue to increase until the hat measures 4-4-5 (5-6-6) cm from the middle. Now increase every 2nd round until the piece measures 7.5-8.5-9 (10.5-10.5-11) cm from the middle. Continue without further increases until the hat measures 16-17-18 (18-19-19) cm from the middle. Now work the brim as follows: Round 1: * 2 double crochets, 2 double crochets in the next stitch *, repeat from *-* to the end of the round. Rounds 2 - 4: Work without increasing. Repeat rounds 1 – 4 until the brim measures 6 cm or to desired length. Finish with 1 slip stitch in the first stitch (finish after either round 3 or 4 for a neat brim!). Cut and fasten the strand. |
||||||||||||||||||||||
Diagram explanations |
||||||||||||||||||||||
|
||||||||||||||||||||||

|
||||||||||||||||||||||
|
||||||||||||||||||||||
|
Have you made this or any other of our designs? Tag your pictures in social media with #dropsdesign so we can see them! Do you need help with this pattern?You'll find tutorial videos, a Comments/Questions area and more by visiting the pattern on garnstudio.com. © 1982-2024 DROPS Design A/S. We reserve all rights. This document, including all its sub-sections, has copyrights. Read more about what you can do with our patterns at the bottom of each pattern on our site. |
||||||||||||||||||||||


With over 40 years in knitting and crochet design, DROPS Design offers one of the most extensive collections of free patterns on the internet - translated to 17 languages. As of today we count 304 catalogues and 11422 patterns - 11422 of which are translated into English (UK/cm).
We work hard to bring you the best knitting and crochet have to offer, inspiration and advice as well as great quality yarns at incredible prices! Would you like to use our patterns for other than personal use? You can read what you are allowed to do in the Copyright text at the bottom of all our patterns. Happy crafting!
Comments / Questions (10)
Hallo, ich kann mit verschiedenen Farben in der Runde stricken, aber ich verstehe nicht, wie man das Muster im Brust-und Rückenbereich Stricken soll dort wo die Armlöcher sind? Also , es steht in Vorder und Rückenteil aufteilen, aber dann steht nicht mehr wie man das Muster stricken soll, dabei ist auf dem Foto auch in dem Bereich das Muster zu sehen ? Vielen Dank für eure Hilfe !!
17.11.2023 - 22:00DROPS Design answered:
Liebe Ramona, das Diagram stricken Sie weiter wie zuvor, damit das Muster in der Höhe weiter fortsetzt. Markieren Sie im Diagram die erste/letzte Maschen vom beiden Vorderteile und Rückenteil, dann wissen Sie genau wie Sie die Diagramme fortsetzen. Viel Spaß beim stricken!
20.11.2023 - 09:32Le diagramme M2 montre deux bandes de fleurs, la photo du modèle en montre cinq ! Que convient -il de faire ? En tenant compte que j'ai acheté le nombre de pelotes indiqué (je ne fais que le pull en taille 2 ans) soit 150 gr Orange, 100 gr Bleu, 50 gr Pistache et 50 gr Corail. Merci
17.01.2019 - 16:21DROPS Design answered:
Bonjour Mme Tamisier, vous répétez M.2 en hauteur jusqu'à la fin, en fonction de la taille, vous pourrez avoir un nombre différent de fleurs. Bon tricot!
18.01.2019 - 08:05Päivi Alison wrote:
I’ve just come to the back (neck) of Little Ivy pattern size 5/6. Strangely it tells me to bind if the middle stitches at 40cm while at the front it was at 50cm. Surely that is a mistake - the front can’t be 10cm higher than the back? My plan is to make a size 12/18mths jumper as well and that tells me to split the back at 34cm while the front is at 37cm. So in both you’d have the neck at the front coming high up with back opening much much lower; 10cm for the bigger size!
15.05.2018 - 02:22DROPS Design answered:
Dear Mrs Päivi, middle sts for neck should be bound off on back piece when piece measures 45-51-55 cm in the 3 largest sizes, ie 55 cm in larger size and not 40 cm, pattern will be edited asap. Happy knitting!
15.05.2018 - 08:58Hvor finder jeg diagrammet?
27.12.2016 - 19:52DROPS Design answered:
Hej Dorte. Vi skal faa tilföjet det danske efter juleferien. Indtil da kan du bruge diagrammet paa den norske opskrift her
30.12.2016 - 12:27Namnförslag till modellen: Tutti frutti /Susanne
12.02.2016 - 17:51Hej! Jag tycker att det är svårt att förstå förklaringen till ökningarna efter att man fått 18 fm. Sedan förstår jag inte. Hur många fm har man efter nästa ökning? Ni får gärna förklara om ni vill, men jag kommer att prova mig fram. /Susanne
12.02.2016 - 15:59Hallo, Gelten die cm-Angaben bei der Mütze ab der Mitte oder ist die gesamte Breite (Durchmesser) gemeint? Vielen Dank
18.05.2015 - 21:30DROPS Design answered:
Die cm-Angaben beziehen sich immer auf die Mitte. Das wird in der Anleitung gleich ergänzt. Viel Spaß beim Häkeln und gutes Gelingen!
18.05.2015 - 23:34Lena Wik wrote:
Började virka hatten, men hur många maskor skall jag ha/varv när jag ökat färdigt. Finns inget angivet i mönstret.
14.04.2013 - 18:43DROPS Design answered:
Det finnes ikke i mønstret. Men virkar du med den rette stickfasthet til 7,5-8,5-9 (10,5-10,5-11) fra midten så kommer storlekan også til at passe
03.05.2013 - 16:38Hei! Dette er en gammel oppskrift og jeg finner ingen rettelser på denne. Maskeantallet skal derfor være riktig. Det beste jeg kan anbefale deg er å sjekke at du overholder strikkefastheten og evt. prøve deg frem med tynnere pinner. Lykke til! Med vennlig hilsen Garnstudio AS / Drops Design
28.06.2007 - 14:41Kan det være feil på maskeantallet på størrelsene,det blir for stort selv om jeg går ned på pinnetykkelse
27.06.2007 - 20:42