DROPS Karisma
DROPS Karisma
100% Wool
from 2.30 £ /50g
Get the yarn to make this pattern from 23.00£.

The yarn cost is calculated from the pattern’s smallest size and the yarn’s cheapest product type. Looking for an even better price? You might find it on the DROPS Deals!

DROPS SS24

Keira

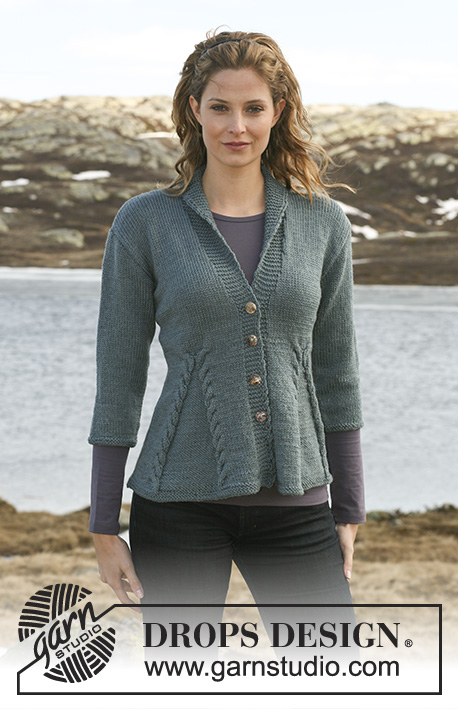
Knitted DROPS Jacket with cables in ”Karisma” with 3/4 or long sleeves. Size S – XXXL.

DROPS 115-1
DROPS design: Pattern no U-585.

Size: S - M - L - XL - XXL - XXXL
Materials: DROPS KARISMA from Garnstudio
Colour no 50, green mix:
3/4- sleeves:
400-450-500-550-600-650 g
Long sleeves:
500-550-600-650-700-750 g

DROPS POINTED NEEDLES size 4 mm – or size needed to get 21 sts x 28 rows in stocking st = 10 x 10 cm.
DROPS Mother-of-pearl buttons w/hole no 522: 4 pcs.
DROPS CROCHET HOOK size 4 mm – for crochet border.

-------------------------------------------------------

Alternative Yarn – See how to change yarns here
Yarn Groups A to F – Use the same pattern and change the yarn here
Yarn usage using an alternative yarn – Use our yarn converter here

-------------------------------------------------------

DROPS Karisma
DROPS Karisma
100% Wool
from 2.30 £ /50g
Get the yarn to make this pattern from 23.00£.

The yarn cost is calculated from the pattern’s smallest size and the yarn’s cheapest product type. Looking for an even better price? You might find it on the DROPS Deals!

Pattern instructions

NOTE: This pattern is written in British English. All measurements in charts are in cm. For conversion from cm to inches - click here. There are different terms for crocheting in British and American English. If this pattern includes crochet, click for "crochet terms" here. For this pattern in American English, please click here.
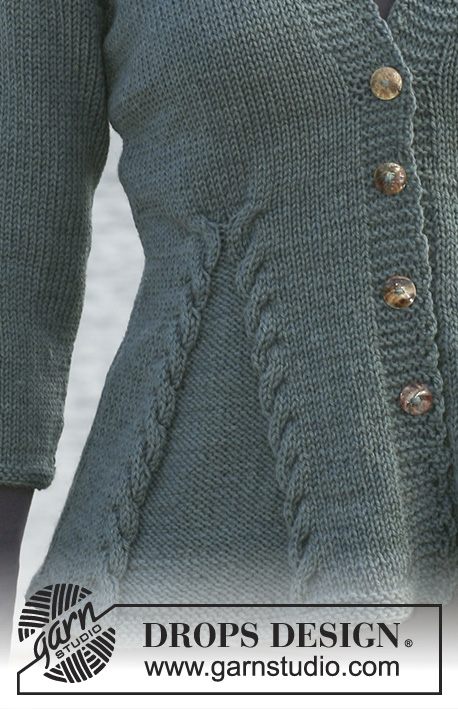
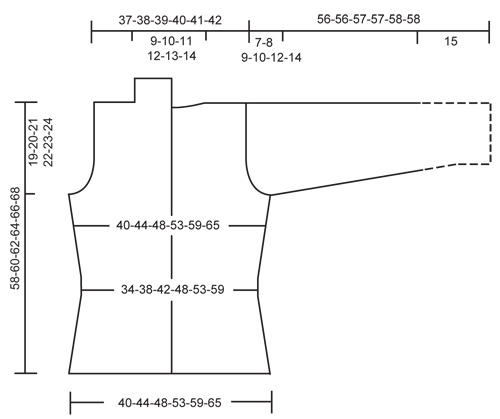
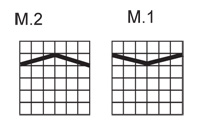
GARTER ST (back and forth on needle): K all rows.

PATTERN: See diagram M.1 and M.2. Diagram shows the pattern from RS.

BUTTONHOLES: Make buttonholes on right front band. 1 BUTTONHOLE = cast off 3rd st from mid front and cast on 1 new st on return row.
Make buttonholes when piece measures:
SIZE S: 12, 18, 24 and 30 cm.
SIZE M: 12, 18, 24 and 31 cm.
SIZE L: 12, 18, 25 and 32 cm.
SIZE XL: 12, 19, 26, 33 cm.
SIZE XXL: 12, 19, 27 and 34 cm
SIZE XXXL: 12, 19, 27 and 35 cm


BACK PIECE:
Worked back and forth on needle. Cast on 86-94-102-114-126-138 sts (includes 1 edge st each side) on needle size 4 mm with Karisma. Work 6 rows GARTER ST – see above – and continue in stocking st. REMEMBER THE KNITTING TENSION! When piece measures 6 cm dec 1 st each side, and repeat the dec on every 2.5 cm a total of 6 times = 74-82-90-102-114-126 sts. When piece measures 24 cm inc 1 st each side, and repeat the inc on every 2.5-2.5-2.5-3-3-3 cm a total of 6 times = 86-94-102-114-126-138 sts. When piece measures 39-40-41-42-43-44 cm cast off for armhole each side at the beg of every row: 3 sts 1 time, 2 sts 0-1-2-4-6-8 times and 1 st 1-2-3-4-5-6 times = 78-80-82-84-86-88 sts. When piece measures 56-58-60-62-64-66 cm cast off the middle 16-18-20-22-24-26 sts for neck, and complete each shoulder separately. Cast off 1 st on neckline on next row = 30 sts left on shoulder for all sizes. Cast off when piece measures 58-60-62-64-66-68 cm.

RIGHT FRONT PIECE:
Worked back and forth on needle. Cast on 65-69-73-79-85-91 sts (includes 1 edge st at the side and 6 front band sts towards mid front) on needle size 4 mm with Karisma. Work 6 rows garter st and continue as follows – from mid front and RS: 6 garter sts, K 11-13-15-18-21-24, M.1 (= 6 sts), P 23, M.2 (= 6 sts), K 12-14-16-19-22-25 and finish with 1 edge st in garter st.
Next row from WS: 1 edge st in garter st, P 12-14-16-19-22-25, M.2, K23, M.1, P 11-13-15-18-21-24, 6 garter sts.
Continue in pattern like this, AT THE SAME TIME when piece measures 4 cm dec 1 st each side of the 23 sts between cables – dec from RS by P2 tog each side – and repeat the dec on every 2 cm a total of 11 times = 43-47-51-57-63-69 sts. Remember BUTTONHOLES – see above.
READ ALL OF THE FOLLOWING SECTION BEFORE CONTINUING!
After all dec between cables piece measures approx 24 cm. Continue in stocking st on all sts with front band as before. AT THE SAME TIME inc 1 st at the side as described for back piece = 49-53-57-63-69-75 sts. AT THE SAME TIME when piece measures 31-32-33-34-35-36 cm work 1 st extra st into front band (i.e. number of sts remain the same, but no of front band sts inc and no of stocking sts dec), and repeat on every 1.5 cm a total of 15-16-17-18-19-20 times. AT THE SAME TIME when piece measures 34-36-38-40-42-44 cm inc 1 st towards mid front – work inc st in garter st - and repeat the inc on every 8 cm a total of 3 times. AT THE SAME TIME when piece measures 39-40-41-42-43-44 cm cast off for armhole at the side as described for back piece. When all inc and dec are complete there are 48-49-50-51-52-53 sts on needle. When piece measures 58-60-62-64-66-68 cm cast off 30 sts from shoulder towards neckline = 18-19-20-21-22-23 sts left on collar. Continue with shortened rows on collar, beg from RS, as follows: * work 2 rows garter st on all sts, work 2 rows garter st on the 9-10-10-11-11-12 sts towards mid front only *, repeat from *-*. Cast off when collar measures 6-7-7-8-8-9 cm (measured where shortest) from shoulder.

LEFT FRONT PIECE:
Like right front piece but mirrored and without buttonholes. Work first pattern row as follows – from the side and RS: 1 edge st, K 12-14-16-19-22-25, M.1 (= 6 sts), P 23, M.2 (= 6 sts), K 11-13-15-18-21-24, 6 garter sts.

3/4 -SLEEVE:
Worked back and forth on needle. Cast on 56-58-60-62-64-66 sts (includes 1 edge st each side) on needle size 4 mm. Work 4 rows garter st and continue in stocking st. When piece measures 5 cm inc 1 st each side, and repeat the inc on every 3.5-3-2.5-2-1.5-1.5 cm a total of 8-9-10-13-14-16 times = 72-76-80-88-92-98 sts. When piece measures 34-33-33-32-31-29 cm (less for the larger sizes because of longer sleeve cap and wider shoulder) cast off for sleeve cap each side at the beg of every row: 3 sts 1 time, 2 sts 4-4-4-4-4-5 times, 1 st 0-1-3-4-5-6 times, then 2 sts each side until piece measures 40-40-41-41-42-42 cm, now cast off 3 sts 1 time each side, and cast off remaining sts of. Piece measures approx 41-41-42-42-43-43 cm.

LONG SLEEVE:
Worked back and forth on needle. Cast on 50-52-54-56-58-60 sts (includes 1 edge st each side) on needle size 4 mm. Work 4 rows garter st and continue in stocking st. When piece measures 8 cm inc 1 st each side, and repeat the inc on every 3.5-3-3-2-2-1.5 cm a total of 11-12-13-16-17-19 times = 72-76-80-88-92-98 sts. When piece measures 49-48-48-47-46-44 cm (less for the larger sizes because of longer sleeve cap and wider shoulder) cast off for sleeve cap each side at the beg of every row: 3 sts 1 time, 2 sts 4-4-4-4-4-5 times, 1 st 0-1-3-4-5-6 times, then 2 sts each side until piece measures 55-55-56-56-57-57 cm, now cast off 3 sts 1 time each side, and cast off remaining sts of. Piece measures approx 56-56-57-57-58-58 cm.

ASSEMBLY:
Sew shoulder seams. Set in sleeves. Sew side and sleeve seams inside 1 edge st. Sew collar tog mid back and sew collar to neckline. Sew on buttons to fit buttonholes.

CROCHET BORDER: Crochet a border along front bands and collar with Karisma and crochet hook size 4 mm as follows: * 1 dc, 3 ch, skip approx 1-1.5 cm *, repeat from *-* and finish with 1 dc.

This pattern has been corrected.

Updated online: 08.01.2010
Long sleeves:
500-550-600-650-700-750 g

Diagram

symbols = K from RS, P from RS
symbols = Slip 3 sts on cable needle behind piece, k3, K3 from cable needle
symbols = Slip 3 sts on cable needle in front of piece, k3, K3 from cable needle
diagram
diagram

Each of our patterns has specific tutorial videos to help you.

Do you have a question? See a list of frequently asked questions (FAQ)

Knitting tension is what determines the final measurements of your work, and is usually measured per 10 x 10 cm. It is provided like so: number of stitches in width x number of rows in height - eg: 19 stitches x 26 rows = 10 x 10 cm.

The knitting tension is very individual; some people knit/crochet loosely while others work tightly. You adjust the knitting tension with the needle size, which is why the suggested needle size is only meant as a guide! You need to adjust this (up or down) to ensure that YOUR knitting tension matches the knitting tension provided in the pattern. If you work with a different knitting tension than provided you will have a different yarn consumption, and your work will have different measurements than what the pattern suggests.

The knitting tension also determines which yarns can replace each other. As long as you achieve the same knitting tension you can replace one yarn with another.

See DROPS lesson: How to measure your tension/gauge

See DROPS video: How to make a gauge tension swatch

The required amount of yarn is provided in grams, eg: 450 g. To calculate how many balls you’ll need you first need to know how many grams are in 1 ball (25g, 50g or 100g). This information is available if you click on the individual yarn quality on our pages. Divide the amount required with the amount of each ball. For example, if each ball is 50g (the most common amount), the calculation will be as follows: 450 / 50 = 9 balls.

The important thing when changing from one yarn to another is that the knitting/crochet tension remains the same. This is so that the measurements of the finished piece will be the same as on the sketch provided. It is easier to achieve the same knitting tension using yarns from the same yarn group. It is also possible to work with multiple strands of a thinner yarn to achieve the knitting tension of a thicker one. Please try our yarn converter. We recommend you to always work a test swatch.

Please NOTE: when changing yarn the garment might have a different look and feel to the garment in the photo, due to individual properties and qualities of each yarn.

See DROPS lesson: Can I use a different yarn than the one mentioned in the pattern?

All our yarns are categorised into yarn groups (from A to F) according to thickness and knitting tension – group A contains the thinnest yarns and group F the thickest. This makes it easier for you to find alternative yarns to our patterns, should you wish to switch yarn. All yarns within the same group have a similar knitting tension and can easily replace each other. However, different yarn qualities have different structures and properties which will give the finished work a unique look and feel.

Click here for an overview of the yarns in each yarn group

At the top of all our patterns you’ll find a link to our yarn calculator, which is a helpful tool should you wish to use a different yarn than suggested. By filling in the yarn quality you wish to replace, the amount (in your size) and number of strands, the calculator will present good alternative yarns with the same knitting tension. Additionally it will tell you how much you’ll require in the new qualities and whether you’ll need to work with multiple strands. Most skeins are 50g (some are 25g or 100g).

If the pattern is worked with multiple colours, every colour will have to be calculated separately. Similarly, if the pattern is worked with several strands of different yarns (for example 1 strand Alpaca and 1 strand Kid-Silk) you will have to find alternatives for each, individually.

Click here to see our yarn calculator

Since different yarns have different qualities and textures we have chosen to keep the original yarn in our patterns. However, you can easily find options among our available qualities by using our yarn calculator, or simply pick a yarn from the same yarn group.

It is possible that some retailers still have discontinued yarns in stock, or that someone has a few skeins at home that they would like to find patterns for.

The yarn calculator will provide both alternative yarn as well as required amount in the new quality.

If you think it's hard to decide what size to make, it can be a good idea to measure a garment you own already and like the size of. Then you can pick the size by comparing those measures with the ones available in the pattern's size chart.

You'll find the size chart at the bottom of the pattern.

See DROPS lesson: How to read size chart

The needle size provided in the pattern serves only as a guide, the important thing is to follow the knitting tension. And since knitting tension is very individual, you will have to adjust the needle size to ensure that YOUR tension is the same as in the pattern – maybe you’ll have to adjust 1, or even 2 needle sizes, up or down to achieve the correct tension. For this, we recommend that you work test swatches.

Should you work with a different knitting tension than the one provided, the measurements of the finished garment might deviate from the measurement sketch.

See DROPS lesson: How to measure your tension/gauge

See DROPS video: How to make a tension/gauge swatch

Working a garment top-down provides more flexibility and room for personal adjustment. For example it is easier to try the garment on while working, as well as making adjustments to length of yoke and shoulder caps.

The instructions are carefully explaining every step, in the correct order. Diagrams are adjusted to the knitting direction and are worked as usual.

The diagram depicts all rows/rounds, and every stitch seen from the right side. It is read from bottom to top, from right to left. 1 square = 1 stitch.

When working back and forth, every other row is worked from the right side and every other row is worked from the wrong side. When working from the wrong side, the diagram will have to be worked reversed: from left to right, knit stitches are purled, purl stitches are knit etc.

When working in the round every round is worked from the right side and the diagram are worked from right to left on all rounds.

See DROPS lesson: How to read knitting diagrams

The diagram depicts all rows/rounds, and every stitch seen from the right side. It is worked from bottom to top, from right to left.

When working back and forth every other row is worked from the right side: from right to left and every other row is worked from the wrong side: from left to right.

When working in the round, every row in the diagram are worked from the right side, from right to left.

When working a circular diagram you start in the middle and work your way outwards, counter clockwise, row by row.

The rows usually start with a given number of chain stitches (equivalent to the height of the following stitch), this will either be depicted in the diagram or explained in the pattern.

See DROPS lesson: How to read crochet diagrams

Instructions for working several diagrams after each other on the same row/round, will often be written like so: “work A.1, A.2, A.3 a total of 0-0-2-3-4 times". This means you work A.1 once, then A.2 is worked once, and A.3 is repeated (in width) the number of times provided for your size – in this case like so: S = 0 times, M = 0 times, L=2 times, XL= 3 times and XXL = 4 times.

The diagrams are worked as usual: begin with the first row in A.1, then work the first row in A.2 etc.

See DROPS lesson: How to read knitting diagrams

See DROPS lesson: How to read crochet diagrams

The total width of the garment (from wrist-to-wrist) will be larger in the larger sizes, despite the actual sleeves being shorter. The larger sizes have longer sleeve caps and wider shoulders, so there will be a good fit in all sizes.

The measurement sketch/schematic drawing provides information regarding the full length of the garment. If it’s a jumper or a jacket the length is measured from the highest point on the shoulder closest to the neckline, and straight down to the bottom of the garment. It is NOT measured from the tip of shoulder. Similarly, the length of yoke is measured from the highest point on the shoulder and down to where yoke is split into body and sleeves.

On a jacket measures are never taken along bands, unless specifically stated. Always measure inside band stitches when measuring the length.

See DROPS lesson: How to read a schematic drawing

Diagrams are often repeated on the round or in height. 1 repeat is the diagram the way it appears in the pattern. If it says to work 5 repeats of A.1 in the round, then you work A.1 a total of 5 times after/next to each other in the round. If it says to work 2 repeats of A.1 vertically/in height you work the entire diagram once, then begin again at the start and work the entire diagram one more time.

Chain stitches are slightly narrower than other stitches and to avoid working the cast-on edge too tight, we simply chain more stitches to begin with. The stitch count will be adjusted on the following row to fit the pattern and measurement sketch.

The rib edge is more elastic and will contract slightly compared to, for example, stocking stitch. By increasing before the rib edge, you avoid a visible difference in width between the rib edge and the rest of the body.

It’s very easy to cast off too tightly, and by making yarn overs while casting off (and simultaneously casting these off) you avoid a too tight cast off edge.

See DROPS video: How to bind off with yarn overs (yo)

To achieve an even increase (or decrease) you can increase on, for example: every 3rd and 4th row alternately, like so: work 2 rows and increase on the 3rd row, work 3 rows and increase on the 4th. Repeat this until the increase is complete.

See DROPS lesson: Increase or decrease 1 st on every 3rd and 4th row alternately

Should you prefer to work in the round instead of back and forth, you may of course adjust the pattern. You’ll need to add steeks mid-front (usually 5 stitches), and follow the instructions. When you would normally turn and work from the wrong side, simply work across the steek and continue in the round. At the end you’ll cut the piece open, pick up stitches to work bands, and cover the cut edges.

See DROPS video: How to knit steeks and cut open

Should you prefer to work back and forth instead of in the round, you may of course adjust the pattern so you work the pieces separately and then assemble them at the end. Divide the stitches for the body in 2, add 1 edge stitch in each side (for sewing) and work the front and back pieces separately.

See DROPS lesson: Can I adapt a pattern for circular needles into straight needles?

Pattern repeats can vary slightly in the different sizes, in order to get the correct proportions. If you’re not working the exact same size as the garment in the photo, yours might deviate slightly. This has been carefully developed and adjusted so that the complete impression of the garment is the same in all sizes.

Make sure to follow instructions and diagrams for your size!

If you have found a pattern you like which is available in women’s size it’s not very difficult to convert it to men’s size. The biggest difference will be the length of sleeves and body. Start working on the women size that you think would fit across the chest. The additional length will be worked right before you cast off for the armhole/sleeve cap. If the pattern is worked top-down you can add the length right after the armhole or before the first decrease on sleeve.

Regarding additional yarn amount, this will depend on how much length you add, but it is better with a skein too many than too few.

All yarns will have excess fibres (from production) that might come off as lint or shedding. Brushed yarns (ie hairier yarns) have more of these loose, excess fibres, causing more shedding.

Shedding also depends on what is worn under or over the garment, and whether this pulls at the yarn fibres. It’s therefore not possible to guarantee that there will be no shedding

Below are some tips on how to get the best result when working with hairier yarns:

1. When the garment is finished (before you wash it) shake it vigorously so the looser hairs come off. NOTE: do NOT use a lint roller, brush or any method that pulls at the yarn.

2. Place the garment in a plastic bag and put it in your freezer - the temperature will cause the fibres to become less attached to each other, and excess fibres will come off easier.

3. Leave in the freezer for a few hours before taking it out and shaking it again.

4. Wash the garment according to the instructions on the yarn label.

Pilling is a natural process that happens to even the most exclusive of fibers. It's a natural sign of wear and tear that is hard to avoid, and that is most visible in high friction areas of your garment like a sweater's arms and cuffs.

You can make your garment look as new by removing the pilling, using a fabric comb or a pill/lint remover.

Still can't find the answer you need? Then scroll down and leave your question so one of our experts can try to help you. This will be done normally within 5 to 10 working days.
In the meantime, you can read the questions and answers that others have left to this pattern or join the DROPS Workshop on Facebook to get help from fellow knitters/crocheters!

Post a comment to pattern DROPS 115-1

We would love to hear what you have to say about this pattern!

If you want to leave a question, please make sure you select the correct category in the form below, to speed up the answering process. Required fields are marked *.

Comments / Questions (157)

country flag Bhuvi Jain wrote:

This is a beautiful pattern - I'm having some difficulty understanding instructions on how to complete the collar towards the end. For size M, there will be 19 stitches on the needle to start with. Do we cast off the stitches for the shorter rows or keep them on the needle till the end? How will the collar fold over like in the picture? Thanks in advance.

29.12.2022 - 04:55

DROPS Design answered:

Hello Bhuvi Jain! Stitches are cast off for shoulders and then you continue with short rows on collar stitches. At the end sew the collar ends together and sew collar to the neckline. Turn it down for wearing. Happy knitting!

30.12.2022 - 12:24

country flag Bhuvi Jain wrote:

What are the finished sizes of the garment? Is there a standard size chart which csn be used to determine what size to knit.

16.12.2022 - 06:09

DROPS Design answered:

Hi Bhuvi, You will find a size chart at the bottom of the pattern, with all the measurements for the different sizes. Happy knitting!

16.12.2022 - 07:00

country flag Ida Serena Redaelli wrote:

Buongiorno , volevo sapere se ci sono modelli di cappotti ai ferri.

04.12.2022 - 12:37

DROPS Design answered:

Buonasera Ida, può navigare tra i modelli del nostro sito per vedere se trova qualcosa di suo interesse. Buon lavoro!

05.12.2022 - 21:50

country flag Ida Serena Redaelli wrote:

Buongiorno, volevo sapere se ci sono modelli di cappotti. Grazie

04.12.2022 - 12:36

DROPS Design answered:

Buonasera Ida, può navigare tra i modelli del nostro sito per vedere se trova qualcosa di suo interesse. Buon lavoro!

05.12.2022 - 21:50

country flag Karolin Heinig wrote:

Hallo, beim rechten Vorderteil kommt das mit den ab- un aufnehmen nicht ganz hin: ich habe (für s) 65 M. Davom werden 22 M zwischen den Zöpfen abgenommen = 43 M. Wenn gleichzeitig die 6 Auf- und Abnahmen gestrickt werden, sind es im Endeffekt trotzdem wieder 43 M und nicht 49. Oder habe ich es falsch verstanden? Außerdem ist kurz davor ein Schriftfehler. Denn dort steht "auf- und aufnehmen".

24.11.2021 - 22:33

DROPS Design answered:

Liebe Frau Heinig, beim Vorderteil werden Sie nur an der Seite 6 Mal zunehmen = 49 Maschen - deutsche Anleitung wird angepasst. Viel Spaß beim stricken!

25.11.2021 - 09:05

country flag Karolin Heinig wrote:

Hallo, Für das rücken Teil steht in der Anleitung: "Nach 56-58-60-62-64-66 cm die mittleren 16-18-20-22-24-26 M. für den Hals abk. Bei der nächsten R. 1 M. gegen den Hals abk. = 30 M. auf der Nadel." Wenn ich die mittleren Maschen abgekettet habe, muss ich die Seiten neben dem Kragen einzeln stricken oder habe ich das falsch verstanden? Oder gibt es da eine andere Möglichkeit die ich vielleicht noch nicht kenne? Danke für eure schnellen Antworten!

19.11.2021 - 16:16

DROPS Design answered:

Liebe Frau Heinig, wenn die mittleren Maschen stillgelegt sind, wird jede Schulter separat gestrickt, die Maschen einer Seite stilllegen und die 1. Schulter bis zur Ende stricken und abketten, Faden abschneiden und dann die 2. Schulter genauso stricken. Viel Spaß beim stricken!

22.11.2021 - 07:11

country flag Patrica González wrote:

Muchas gracias me encantó y lo voy a realizar, espero que me quedé igual de bonito que el suyo. Gracias Me gustaría que también tuviera tutoriales completos para las que somos principiantes, un abrazo

21.10.2021 - 13:14

country flag Teresa Pimentel wrote:

É maravilhoso, vende o esquema?Obrigada teresa pimentel

04.09.2021 - 23:59

DROPS Design answered:

Olá Teresa, puedes imprimir livre el patrón aqui https://www.garnstudio.com/pattern.php?id=4139&cid=28

05.09.2021 - 17:41

country flag Rita Rutter wrote:

È possibile vedere la parte dietro del colletto per capire come deve essere cucito? La parte sembra uguale a quella del disegno, ma sono in difficoltà perché sembra non coincidere con la parte dietro. Una fotografia mi sarebbe di grande aiuto. Grazie.

12.04.2020 - 13:50

DROPS Design answered:

Buongiorno Rita. Purtroppo non abbiamo una fotografia dettagliata della parte dietro del colletto. Deve lavorare le maglie del colletto fino a raggiungere il punto centrale dello scollo sul dietro. Cucirà le due estremità tra loro e poi cucirà il colletto allo scollo. Buon lavoro!

14.04.2020 - 09:41

country flag Sylke wrote:

Die Jacke gefällt mir sehr gut. Ich würde sie aber gerne als Pullover in Gr. XXL stricken. Könnt Ihr da was machen bzw. mir helfen?

14.03.2020 - 14:28

DROPS Design answered:

Liebe Sylke, leider können wir jeder Anleitung nach jedem individuellen Frage anpassen und einzelne Modelle auf individuellen Wunsch hin umrechnen. Wenn sie Hilfe damit brauchen, wenden Sie sich bitte an dem Laden wo Sie die Wolle gekauft haben, dort hilft man Ihnen gerne weiter. Viel Spaß beim stricken!

16.03.2020 - 09:38