DROPS Merino Extra Fine
100% Wool
from 3.50 £ /50g
Get the yarn to make this pattern from 10.50£.

The yarn cost is calculated from the pattern’s smallest size and the yarn’s cheapest product type. Looking for an even better price? You might find it on the DROPS Deals!

DROPS SS24

Little Petunia

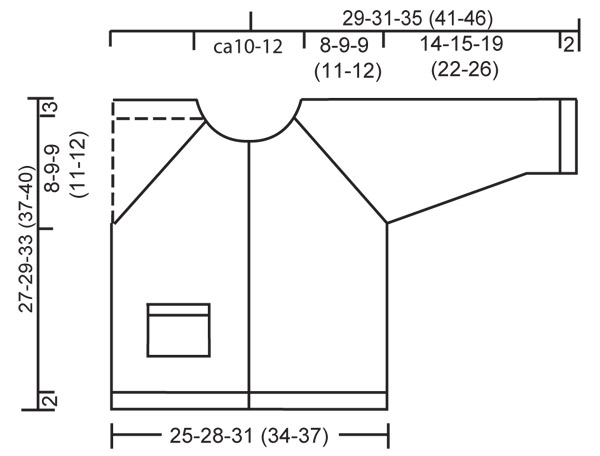
Knitted jacket with raglan sleeve for baby and children in DROPS Merino Extra Fine

DROPS Baby 17-4
Size: 1/3 - 6/9 - 12/18 months (2 - 3/4) years
Size in cm: 50/56-62/68-74/80 (86/92-98/104)
Materials: DROPS MERINO EXTRA FINE from Garnstudio
150-200-200 (250-300) g colour no 16, pink

DROPS DOUBLE POINTED AND CIRCULAR NEEDLE (60 cm) size 4.5 mm – or size needed to get 20 sts x 26 rows in stocking st = 10 x 10 cm.
DROPS DOUBLE POINTED AND CIRCULAR NEEDLE (60 cm) size 3.5 mm – for rib.
DROPS WOODEN BUTTON no 513: 5-5-5 (6-6) pcs.

-------------------------------------------------------

Alternative Yarn – See how to change yarns here
Yarn Groups A to F – Use the same pattern and change the yarn here
Yarn usage using an alternative yarn – Use our yarn converter here

-------------------------------------------------------

DROPS Merino Extra Fine
100% Wool
from 3.50 £ /50g
Get the yarn to make this pattern from 10.50£.

The yarn cost is calculated from the pattern’s smallest size and the yarn’s cheapest product type. Looking for an even better price? You might find it on the DROPS Deals!

Pattern instructions

NOTE: This pattern is written in British English. All measurements in charts are in cm. For conversion from cm to inches - click here. There are different terms for crocheting in British and American English. If this pattern includes crochet, click for "crochet terms" here. For this pattern in American English, please click here.
GARTER ST (back and forth on needle):
K all rows.

DECREASING TIP (applies to raglan):
Dec 2 sts on each side of all markers = 16 dec per round, from the RS.
Beg 5 sts before marker and dec as follows: Slip 2 sts on cable needle in front of piece, *slip first st on cable needle (st furthest to the right) as if to K, K first st on left needle, psso *, repeat from *-* 1 more time, K2 (marker sits between these 2 sts), slip 2 sts on cable needle behind piece, * K tog first st on left needle with first st on cable needle (st furthest to the right) *, repeat from *-* 1 more time.
----------------------------------------------------------
BODY PIECE: Worked back and forth on circular needle from mid front.
Cast on 124-139-154 (169-184) sts (includes 1 edge st each side towards mid front) on circular needle size 3.5 mm with Merino Extra Fine. Continue as follows from RS: 1 edge st in garter st – SEE ABOVE, * K2, P3 *, repeat from *-*, and finish with K2 and 1 edge st in garter st. Work 5 rows rib like this and on next row (= WS) dec all K3 to K2 = 100-112-124 (136-148) sts. Change to circular needle size 4.5 mm, K 1 row from RS, K 1 row from WS and continue in stocking st with 1 garter st each side. REMEMBER THE KNITTING TENSION!
When piece measures 16-17-21 (23-25) cm work next row as follows from RS: work 21-24-27 (30-33) sts = right front piece, cast off 8 sts for armhole, work 42-48-54 (60-66) sts = back piece, cast off 8 sts for armhole, work 21-24-27 (30-33) sts = left front piece. Put piece aside and knit the sleeves.

SLEEVE: Worked in the round on double pointed needles.
Cast on 40-40-45 (45-50) sts on double pointed needles size 3.5 mm with Merino Extra Fine. Work 5 rounds rib, K2/P3. On next round dec all P3 to P2 = 32-32-36 (36-40) sts. Change to needle size 4.5 mm, K 1 round and P 1 round. Insert 1 marker at beg of round = mid under arm. Continue in stocking st, AT THE SAME TIME when piece measures 5 cm inc 1 st on each side of marker, and repeat the inc on every 7-5-7 (6-7) round a total of 4-6-6 (8-8) times = 40-44-48 (52-56) sts. When sleeve measures 16-17-21 (24-28) cm cast off 8 sts mid under arm = 32-36-40 (44-48) sts left. Put piece aside and knit the other sleeve.

YOKE: Slip sleeves on the same circular needle as body piece where cast off for armholes = 148-168-188 (208-228) sts. Insert a marker in all transitions between sleeves and body piece = 4 markers. Continue back and forth on needle in stocking st with 1 garter st each side, AT THE SAME TIME on 3rd row dec 2 sts on each side of all markers – SEE DECREASING TIP, and repeat the dec on every 4th row a total of 5-6-6 (7-8) times.
NECKLINE: AT THE SAME TIME when piece measures 23-25-28 (32-35) cm cast off to shape the neckline at the beg of every row from mid front: 5-6-8 (9-10) sts 1 time and then 1 st 2 times. After all dec for raglan and neckline there are 54-56-72 (74-76) sts left on row and piece measures approx 27-29-33 (37-40) cm. Slip sts on a stitch holder.

POCKET: Cast on 12-16-16 (20-20) sts on double pointed needle size 3.5 mm and work garter st back and forth on needles for 4-5-5 (6-7) cm, AT THE SAME TIME on last row inc 4 sts evenly = 16-20-20 (24-24) sts. Work next row as follows from RS: 1 garter st, * K2, P2 *, repeat from *-*, and finish with K2 and 1 garter st. Continue in rib until pocket measures 6-7-7 (8-9) cm, cast off.

LEFT FRONT BAND: Pick up 56-60-68 (76-84) sts (divisible by 4) on needle size 3.5 mm along left front piece. K 1 row from WS, K 1 row from RS and continue in rib, K2/P2, with K2 and 1 garter st each side (as seen from RS). When front band measures 2 cm cast off in rib.
RIGHT FRONT BAND: Like left front band, but after 1 cm make 4-4-4 (5-5) buttonholes evenly distributed – place the top buttonhole approx 5 cm from neckline and the bottom one approx 1 cm from bottom edge. NOTE: the last buttonhole is made on neckline. 1 buttonhole = K2 tog and make 1 YO (K tog 2 P sts as seen from RS.

NECKLINE: Slip sts from stitch holder on circular needle size 3.5 mm and pick up 12 to 18 sts on each side of neckline at front (also pick up on front bands) = approx 78 to 112 sts, K 1 row from WS and then K 1 row from RS, AT THE SAME TIME adjust no of sts to 72-76-80 (84-88). Continue in rib, K2/P2, with K2 and 1 garter st each side towards mid front (as seen from RS). AT THE SAME TIME after 1 cm make 1 buttonhole in line with the others on front band. Cast off when neck measures 2 cm.

ASSEMBLY: Sew openings under arms. Sew on buttons. Sew on pocket, place it mid between side seam and front band, approx 6-6-7 (7-8) cm from bottom edge.


Diagram

diagram measurements
Do you have a question? See a list of frequently asked questions (FAQ)

Knitting tension is what determines the final measurements of your work, and is usually measured per 10 x 10 cm. It is provided like so: number of stitches in width x number of rows in height - eg: 19 stitches x 26 rows = 10 x 10 cm.

The knitting tension is very individual; some people knit/crochet loosely while others work tightly. You adjust the knitting tension with the needle size, which is why the suggested needle size is only meant as a guide! You need to adjust this (up or down) to ensure that YOUR knitting tension matches the knitting tension provided in the pattern. If you work with a different knitting tension than provided you will have a different yarn consumption, and your work will have different measurements than what the pattern suggests.

The knitting tension also determines which yarns can replace each other. As long as you achieve the same knitting tension you can replace one yarn with another.

See DROPS lesson: How to measure your tension/gauge

See DROPS video: How to make a gauge tension swatch

The required amount of yarn is provided in grams, eg: 450 g. To calculate how many balls you’ll need you first need to know how many grams are in 1 ball (25g, 50g or 100g). This information is available if you click on the individual yarn quality on our pages. Divide the amount required with the amount of each ball. For example, if each ball is 50g (the most common amount), the calculation will be as follows: 450 / 50 = 9 balls.

The important thing when changing from one yarn to another is that the knitting/crochet tension remains the same. This is so that the measurements of the finished piece will be the same as on the sketch provided. It is easier to achieve the same knitting tension using yarns from the same yarn group. It is also possible to work with multiple strands of a thinner yarn to achieve the knitting tension of a thicker one. Please try our yarn converter. We recommend you to always work a test swatch.

Please NOTE: when changing yarn the garment might have a different look and feel to the garment in the photo, due to individual properties and qualities of each yarn.

See DROPS lesson: Can I use a different yarn than the one mentioned in the pattern?

All our yarns are categorised into yarn groups (from A to F) according to thickness and knitting tension – group A contains the thinnest yarns and group F the thickest. This makes it easier for you to find alternative yarns to our patterns, should you wish to switch yarn. All yarns within the same group have a similar knitting tension and can easily replace each other. However, different yarn qualities have different structures and properties which will give the finished work a unique look and feel.

Click here for an overview of the yarns in each yarn group

At the top of all our patterns you’ll find a link to our yarn calculator, which is a helpful tool should you wish to use a different yarn than suggested. By filling in the yarn quality you wish to replace, the amount (in your size) and number of strands, the calculator will present good alternative yarns with the same knitting tension. Additionally it will tell you how much you’ll require in the new qualities and whether you’ll need to work with multiple strands. Most skeins are 50g (some are 25g or 100g).

If the pattern is worked with multiple colours, every colour will have to be calculated separately. Similarly, if the pattern is worked with several strands of different yarns (for example 1 strand Alpaca and 1 strand Kid-Silk) you will have to find alternatives for each, individually.

Click here to see our yarn calculator

Since different yarns have different qualities and textures we have chosen to keep the original yarn in our patterns. However, you can easily find options among our available qualities by using our yarn calculator, or simply pick a yarn from the same yarn group.

It is possible that some retailers still have discontinued yarns in stock, or that someone has a few skeins at home that they would like to find patterns for.

The yarn calculator will provide both alternative yarn as well as required amount in the new quality.

If you think it's hard to decide what size to make, it can be a good idea to measure a garment you own already and like the size of. Then you can pick the size by comparing those measures with the ones available in the pattern's size chart.

You'll find the size chart at the bottom of the pattern.

See DROPS lesson: How to read size chart

The needle size provided in the pattern serves only as a guide, the important thing is to follow the knitting tension. And since knitting tension is very individual, you will have to adjust the needle size to ensure that YOUR tension is the same as in the pattern – maybe you’ll have to adjust 1, or even 2 needle sizes, up or down to achieve the correct tension. For this, we recommend that you work test swatches.

Should you work with a different knitting tension than the one provided, the measurements of the finished garment might deviate from the measurement sketch.

See DROPS lesson: How to measure your tension/gauge

See DROPS video: How to make a tension/gauge swatch

Working a garment top-down provides more flexibility and room for personal adjustment. For example it is easier to try the garment on while working, as well as making adjustments to length of yoke and shoulder caps.

The instructions are carefully explaining every step, in the correct order. Diagrams are adjusted to the knitting direction and are worked as usual.

The diagram depicts all rows/rounds, and every stitch seen from the right side. It is read from bottom to top, from right to left. 1 square = 1 stitch.

When working back and forth, every other row is worked from the right side and every other row is worked from the wrong side. When working from the wrong side, the diagram will have to be worked reversed: from left to right, knit stitches are purled, purl stitches are knit etc.

When working in the round every round is worked from the right side and the diagram are worked from right to left on all rounds.

See DROPS lesson: How to read knitting diagrams

The diagram depicts all rows/rounds, and every stitch seen from the right side. It is worked from bottom to top, from right to left.

When working back and forth every other row is worked from the right side: from right to left and every other row is worked from the wrong side: from left to right.

When working in the round, every row in the diagram are worked from the right side, from right to left.

When working a circular diagram you start in the middle and work your way outwards, counter clockwise, row by row.

The rows usually start with a given number of chain stitches (equivalent to the height of the following stitch), this will either be depicted in the diagram or explained in the pattern.

See DROPS lesson: How to read crochet diagrams

Instructions for working several diagrams after each other on the same row/round, will often be written like so: “work A.1, A.2, A.3 a total of 0-0-2-3-4 times". This means you work A.1 once, then A.2 is worked once, and A.3 is repeated (in width) the number of times provided for your size – in this case like so: S = 0 times, M = 0 times, L=2 times, XL= 3 times and XXL = 4 times.

The diagrams are worked as usual: begin with the first row in A.1, then work the first row in A.2 etc.

See DROPS lesson: How to read knitting diagrams

See DROPS lesson: How to read crochet diagrams

The total width of the garment (from wrist-to-wrist) will be larger in the larger sizes, despite the actual sleeves being shorter. The larger sizes have longer sleeve caps and wider shoulders, so there will be a good fit in all sizes.

The measurement sketch/schematic drawing provides information regarding the full length of the garment. If it’s a jumper or a jacket the length is measured from the highest point on the shoulder closest to the neckline, and straight down to the bottom of the garment. It is NOT measured from the tip of shoulder. Similarly, the length of yoke is measured from the highest point on the shoulder and down to where yoke is split into body and sleeves.

On a jacket measures are never taken along bands, unless specifically stated. Always measure inside band stitches when measuring the length.

See DROPS lesson: How to read a schematic drawing

Diagrams are often repeated on the round or in height. 1 repeat is the diagram the way it appears in the pattern. If it says to work 5 repeats of A.1 in the round, then you work A.1 a total of 5 times after/next to each other in the round. If it says to work 2 repeats of A.1 vertically/in height you work the entire diagram once, then begin again at the start and work the entire diagram one more time.

Chain stitches are slightly narrower than other stitches and to avoid working the cast-on edge too tight, we simply chain more stitches to begin with. The stitch count will be adjusted on the following row to fit the pattern and measurement sketch.

The rib edge is more elastic and will contract slightly compared to, for example, stocking stitch. By increasing before the rib edge, you avoid a visible difference in width between the rib edge and the rest of the body.

It’s very easy to cast off too tightly, and by making yarn overs while casting off (and simultaneously casting these off) you avoid a too tight cast off edge.

See DROPS video: How to bind off with yarn overs (yo)

To achieve an even increase (or decrease) you can increase on, for example: every 3rd and 4th row alternately, like so: work 2 rows and increase on the 3rd row, work 3 rows and increase on the 4th. Repeat this until the increase is complete.

See DROPS lesson: Increase or decrease 1 st on every 3rd and 4th row alternately

Should you prefer to work in the round instead of back and forth, you may of course adjust the pattern. You’ll need to add steeks mid-front (usually 5 stitches), and follow the instructions. When you would normally turn and work from the wrong side, simply work across the steek and continue in the round. At the end you’ll cut the piece open, pick up stitches to work bands, and cover the cut edges.

See DROPS video: How to knit steeks and cut open

Should you prefer to work back and forth instead of in the round, you may of course adjust the pattern so you work the pieces separately and then assemble them at the end. Divide the stitches for the body in 2, add 1 edge stitch in each side (for sewing) and work the front and back pieces separately.

See DROPS lesson: Can I adapt a pattern for circular needles into straight needles?

Pattern repeats can vary slightly in the different sizes, in order to get the correct proportions. If you’re not working the exact same size as the garment in the photo, yours might deviate slightly. This has been carefully developed and adjusted so that the complete impression of the garment is the same in all sizes.

Make sure to follow instructions and diagrams for your size!

If you have found a pattern you like which is available in women’s size it’s not very difficult to convert it to men’s size. The biggest difference will be the length of sleeves and body. Start working on the women size that you think would fit across the chest. The additional length will be worked right before you cast off for the armhole/sleeve cap. If the pattern is worked top-down you can add the length right after the armhole or before the first decrease on sleeve.

Regarding additional yarn amount, this will depend on how much length you add, but it is better with a skein too many than too few.

All yarns will have excess fibres (from production) that might come off as lint or shedding. Brushed yarns (ie hairier yarns) have more of these loose, excess fibres, causing more shedding.

Shedding also depends on what is worn under or over the garment, and whether this pulls at the yarn fibres. It’s therefore not possible to guarantee that there will be no shedding

Below are some tips on how to get the best result when working with hairier yarns:

1. When the garment is finished (before you wash it) shake it vigorously so the looser hairs come off. NOTE: do NOT use a lint roller, brush or any method that pulls at the yarn.

2. Place the garment in a plastic bag and put it in your freezer - the temperature will cause the fibres to become less attached to each other, and excess fibres will come off easier.

3. Leave in the freezer for a few hours before taking it out and shaking it again.

4. Wash the garment according to the instructions on the yarn label.

Pilling is a natural process that happens to even the most exclusive of fibers. It's a natural sign of wear and tear that is hard to avoid, and that is most visible in high friction areas of your garment like a sweater's arms and cuffs.

You can make your garment look as new by removing the pilling, using a fabric comb or a pill/lint remover.

Still can't find the answer you need? Then scroll down and leave your question so one of our experts can try to help you. This will be done normally within 5 to 10 working days.
In the meantime, you can read the questions and answers that others have left to this pattern or join the DROPS Workshop on Facebook to get help from fellow knitters/crocheters!

You might also like...

Post a comment to pattern DROPS Baby 17-4

We would love to hear what you have to say about this pattern!

If you want to leave a question, please make sure you select the correct category in the form below, to speed up the answering process. Required fields are marked *.

Comments / Questions (45)

country flag Lisa Cunningham wrote:

I have 105 stitches at the neckline after all decreases at the raglan shoulders. I’ve counted up all the stitch counts along the way and can’t see where I might have gone wrong. Can anyone help me out?

21.09.2022 - 03:34

DROPS Design answered:

Dear Mrs Cunnignham, did you also cast off on each side for neckline ? Before Raglan decreases are done, when piece measures 23-35 cm (see size), you have to cast off at the beginning of every row on each side (both from RS and from WS for both front pieces) 5-6-8 (9-10) sts 1 time and then 1 st 2 times. Hope it can help. Happy knitting!

21.09.2022 - 09:23

country flag Lisa wrote:

Kette ich beim Halsausschnitt (Größe 50/56) 5 Maschen und dann nochmal zwei, also insgesamt 7 Maschen nacheinander ab oder ist eine normale Masche dazwischen?

07.08.2022 - 17:58

DROPS Design answered:

Liebe Lisa, für den Hals ketten Sie zuerst 5 Maschen am Anfang der 2 nächsten Reihen dann 1 Masche am Anfang der 4 nächsten Reihe, dh 5 M x 1 Mal + 1 M x 2 Mal auf beiden Seiten. Viel Spaß beim stricken!

08.08.2022 - 07:59

country flag Anna wrote:

Hallo ich habe eine Frage zur Blende: mit welcher Nadelgröße nehme ich die Maschen auf? 3,5 oder 4,5? Danke für die Antwort und sehr süßes Strickmuster!

07.03.2022 - 20:41

DROPS Design answered:

Liebe Anna, die Blende stricken Sie mit der Nadel 3,5 - danke für den Hinweis, die deutsche Anleitung wird angepasst. Viel Spaß beim stricken!

08.03.2022 - 11:04

country flag Jolanda Poelstra wrote:

Er staat bij de mouw van dit vestje, wordt in de rondte gebreid....maar verderop staat brei 1 nld r, 1 nld av... Maar in de rondte brei je toch alleen recht???

02.01.2022 - 21:26

DROPS Design answered:

Dag Jolanda,

Vlak na de boord brei je 1 naald recht en 1 naald averecht in de rondte, daarna ga je verder in tricotsteek. Hierdoor ontstaat er een ribbel vlak na de boord.

06.01.2022 - 10:02

country flag Magda wrote:

Próbuję zrobić ten sweterek, jednak źle mi się przerabia po przełożeniu rękawów ponad zamknięte oczka na podkrój rekawów (oczka ciężko się przesuwają 0po drucie, a włóczka się przeciera) . Chcialabym zrobić rękawy osób o i dosyć, ale jak wtedy zamykać oczka? W co drugim rzędzie po 1 oczku z każdej strony?

22.11.2021 - 19:33

DROPS Design answered:

Witaj Magdo, wzór Frosty Christmas TUTAJ, był wykonywany tak, że reglanowe rękawy były wykonywane oddzielnie i doszywane. Zobacz instrukcje video, które znajdują się na dole tego wzoru. Pozdrawiamy!

23.11.2021 - 11:37

country flag Brigitte Tressel wrote:

Blenden stricken: Anleitung 1 M Krausrippe und 2 M re stricken. Nur oben und unten? Was heißt hier von der rechten Seite gesehen? Die Maschenzahl teilbar durch vier geht eigentlich nur, wenn ich 2re und 2 links stricke.

09.06.2021 - 11:02

DROPS Design answered:

Liebe Frau Tressel, so sollen Sie die Blende stricken (bei einer Hinreihe): 1 Randmasche krausrrechts, *2 M re, 2 M li*, von *-* wiederholen bis noch 3 M übrig sind, 2 M re, 1 Randmasche krausrechts, dh es sind beidseitig 1 Randmasche kraus rechts und 2 M re (am Anfang der Hinreihe) und Reihe endet mit 2 M re und 1 Randmasche krausrechts. Viel Spaß beim stricken!

09.06.2021 - 15:09

country flag Brigitte Tressel wrote:

Babyjackchen Little Petunia ( 12-14 Monate) : Mein Problem: Abnahmen Raglan Passe. Mit Ärmelmaschen 188 Maschen auf der Rundstricknadel. Anleitung Passe: Bei der 3. Reihe 16 Maschen abnehmen , dann bei jeder 4. Reihe 6 mal wieder 16 Maschen abnehmen . Es verbleiben nach Abzug der abgeketteten Halsmaschen 56 Maschen, 16 weniger als die angegebenen. Ist der Fehler die Abnahme in der ditten Reihe? Die Passe wäre dann ja auch unregelmäßig.

24.05.2021 - 18:30

DROPS Design answered:

Liebe Frau Tressel, Es sind 188 Maschen am Anfang der Passe und es wird 16 Maschen insgesamt 6 Mal für den Raglan abgenommen (= 16 x 6 = 96 M) - für den Hals legen Sie 8 Maschen beidseitig still + 1 M x 2 x 2 Seiten werden abgekettet (= 10 M beidseitig) = 188 - 96 - 20 =72 Maschen sind jetzt übrig. Viel Spaß beim stricken!

25.05.2021 - 09:00

country flag Gabriella Wibring wrote:

Behöver jag verkligen använda hjälpsticka vid raglanminskning? Svårt att förstå hur jag skall göra raglanminskning? Kommer inte vidare! Mvh Gabriella

05.05.2021 - 20:29

DROPS Design answered:

Hej Gabrielle, nej det gør du som du vil, men for at antal masker skal stemme bør du tage 2 masker ind ved hver raglanindtagning :)

07.05.2021 - 14:36

country flag Nina wrote:

Nog een verheldring op mijn vorige vraag. Je zet de markeerdraad toch op aan het begin en het einde van de naald? Dus het afkanten is ook aan het begin en einde, ofwel 4 steken aan iedere kant. De verwarring ontstaat doordat er wordt gezegd dat dit het "midden" van de onderarm is. Maar zolang je nog niets hebt vast gemaakt, zijn het de uiteinden van de mouw, toch?

16.04.2021 - 10:00

country flag Nina wrote:

Wanneer je de mouw afkant voordat je deze samen met het lijfje op de rondbreinaald zet, kant je 4 steken aan iedere kant af, of acht aan één kant? Dit staat niet zo duidelijk beschreven.

15.04.2021 - 21:42

DROPS Design answered:

Dag Nina,

De afgekante steken moeten midden onder de mouw zitten, dus 4 steken aan elke kant van de markeerdraad.

16.04.2021 - 09:11