DROPS Alpaca
DROPS Alpaca
100% Alpaca
from 4.85 $ /50g
Get the yarn to make this pattern from 43.65$.

The yarn cost is calculated from the pattern’s smallest size and the yarn’s cheapest product type. Looking for an even better price? You might find it on the DROPS Deals!

DROPS SS24

First Kiss

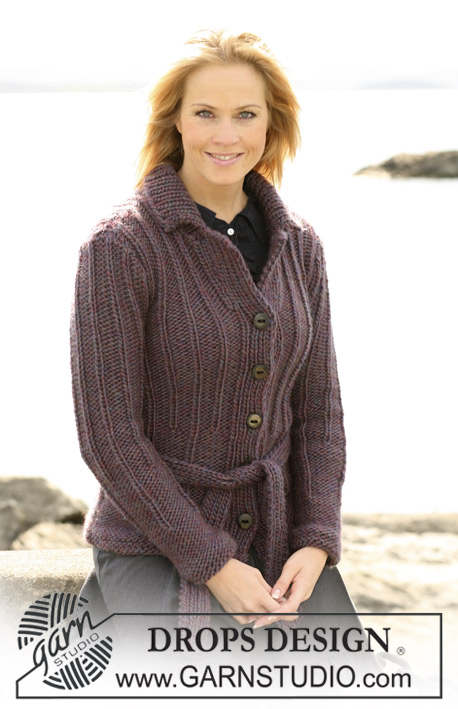
DROPS jacket with 2 threads of ”Alpaca”, with cables knitted in 2 directions. Short and long sleeves. Size S til XXXL.

DROPS 102-17
Size: S - M - L - XL - XXL - XXXL
Finished measurements at chest: 31½"-35½"-3⅜"-43⅜"-47 ¼"51"
Full length: 22"-22 ¾"-23⅝"-24⅜"-25 ¼"-26"

Materials: DROPS Alpaca from Garnstudio
450-500-550-600-700-750 g, clr. no. 0100 off white.

DROPS pointed needles and circular needle (80 cm [31½"]) size 4 mm [US 6]- or the size needed to obtain the correct knitting gauge.

DROPS Coconut buttons, no 516: 6-7-7-8-8-8 pcs.

-------------------------------------------------------

Alternative Yarn – See how to change yarns here
Yarn Groups A to F – Use the same pattern and change the yarn here
Yarn usage using an alternative yarn – Use our yarn converter here

-------------------------------------------------------

DROPS Alpaca
DROPS Alpaca
100% Alpaca
from 4.85 $ /50g
Get the yarn to make this pattern from 43.65$.

The yarn cost is calculated from the pattern’s smallest size and the yarn’s cheapest product type. Looking for an even better price? You might find it on the DROPS Deals!

Pattern instructions

NOTE: This pattern is written in American English. All measurements in charts are in cm. For conversion from inches to cm - click here. There are different terms for crocheting in American and British English. If this pattern includes crochet, click for "crochet terms" here. For this pattern in British English, please click here.
Knitting gauge: 19 sts x 25 rows in stockinette sts with 2 threads = 10 x 10 cm [4" x 4"]. 1 repeat of M.1 measures 10 cm [4"] in the vertical height.

Pattern: See diagrams M.1 og M.2. The diagram are shown from the RS.

Garter sts: Knit back and forth on all rows.

Button hole: Bind off for button holes at the right front band. 1 button hole = bind off 1 st, on the next row cast on 1 new st at the same place.


JACKET
Knit the back and front piece in 2 parts, first knit the bottom part from side to side, then pick up sts and knit the top part.

Bottom part: Knit from the right side towards the left side. Cast on 58-59-61-63-65-67 sts on needles size 4 mm [US 6] with 2 threads of Alpaca. K 1 row from the WS. Continue as follows (from the RS): P2, K2, M.1 (= 26 sts), K2, P 20-21-23-25-27-29 sts and 6 garter sts. Remember the knitting gauge! Continue until 8-9-10-11-12-13 vertical repeats of M.1 are completed. The work measures approx. 80-90-100-110-120-130 cm [31½"-35½"-39⅜"-43⅜"-47 ¼"-51"]. K 1 row from the WS. Bind off loosely.

Top part: Knit back and forth from mid front. Pick up 1 sts for each purl row inside the edge st and the bottom part on needle size 4 mm [US 6] with 2 threads of Alpaca = approx. 192-216-240-264-288-312 sts. K 1 row from the WS at the same time dec evenly distributed to 182-199-216-233-250-267 sts. Continue to measures from this point onwards. Continue as follows: 1 edge st, P3 , * M.2 (= 4 sts), P 6-7-8-9-10-11 sts *, repeat from *-* over the next 170-187-204-221-238-255 sts, M.2, P3 and 1 edge st. Insert 1 MT ( marking thread) 46-50-54-58-62-66 sts in each side (mid in M.2) = 90-99-108-117-126-135 sts in between the MT for the back piece.
When the piece measures 11 cm [4⅜"] bind off 3 sts each side of both MT =170-187-204-221-238-255 sts. Continue to knit each part seperatly.

Back piece: = 84-93-102-111-120-129 sts. Continue the pattern and bind off for armholes each side on every other row: 2 sts 1-1-2-2-3-3 times and 1 st 1-2-1-2-1-2 times = 78-85-92-99-106-113 sts. When the piece measures 28-29-30-31-32-33 cm [11"-11⅜"-11 ¾"-12 ¼"-12½"-13"] bind off the mid 30-33-36-39-42-45 sts for the neck = 24-26-28-30-32-34 sts left for each shoulder. Note! Knit remaining sts over the cables towards the neck where bound off - in stockinette sts. When the piece measures 30-31-32-33-34-35 cm [11 ¾"-12 ¼"-12½"-13"-13⅜"-13 ¾"] dec 1 st in each cable as follows: K the 2 mid sts in the cable tog. = 22-24-26-28-30-32 for each shoulder. Bind off loosely.

Left front: = 43-47-51-55-59-63 sts. Continue with pattern and bind off for armhole at the side as done for the back piece = 40-43-46-49-52-55 sts. When the piece measures 16-17-16-17-16-17 cm [6 ¼"-6 ¾"-6 ¼"-6 ¾"-6 ¼"-6 ¾"] put 10-10-10-12-12-12 sts towards the mid front on a thread or a stitch holder. Then bind off on every other row: 3 sts 1 time, 2 sts 1-1-2-1-2-2 times and 1 st 1-2-1-2-1-2 times = 24-26-28-30-32-34 sts left for shoulder. When the piece 30-31-32-33-34-35 cm [11 ¾"-12 ¼"-12½"-13"-13⅜"-13 ¾"] dec 1 st in each cable as done for the back piece = 22-24-26-28-30-32 sts for the shoulder. Bind off loosely.

Right front piece: Knit as left front piece but reverse.

Sleeves: Knit short or long sleeves. Shorter measures for bigger sizes because of the longer sleeve cap and the wider shoulders.

Short sleeves: Cast on 59-61-63-65-69-73 sts (incl. 1 edge st each side) on needle size 4 mm [US 6] with 2 threads of Alpaca. Knit 8 rows of garter sts – see explanation above. Continue in reverse stockinette sts until finish. When the piece measures 4 cm [1½"], inc. 1 st each side on every 4-3-2-1½-1-1 cm [1½"-1⅛"-¾"-½"-⅜"-⅜"] a total of 4-5-6-6-7-7 times = 67-71-75-77-83-87 sts. When the piece measures 20-19-18-16-15-14 cm [8"-7½"-7"-6 ¼"-6"-5½"] bind off for the sleeve cap each side on every other row as follows: 4 sts 1-2-2-2-3-3 times. Continue to bind off 2 sts each side until the piece measures 26-25-24-23-22-21 cm [10 ¼"-9 ¾"-9½"-9"-8 ¾"-8 ¼"]. Now bind off 4 sts each side. The piece measures approx. 27-26-25-24-23-22 cm [10⅝"-10 ¼"-9 ¾"-9½"-9"-8 ¾"]. Bind off remeining sts.

Long sleeves: Cast on 51-53-55-57-59-61 sts on needle size 4 mm [US 6] with 2 threads of Alpaca. Knit 8 rows of garter sts– see explanation above. Continue in reverse stockinette sts until finish. When the piece measures 8-8-8-7-7-6 cm [3⅛"-3⅛"-3⅛"-2 ¾"-2 ¾"-2⅜"] inc. 1 st each side on every 5½-4½-4-4-3-3 cm [2¼"-1 ¾"-1½"-1½"-1⅛"-1⅛"] a total of 8-9-10-10-12-13 times = 67-71-75-77-83-87 sts. When the piece measures 49-48-47-46-45-44 cm [19 ¼"-19"-18½"-18"-17 ¾"-17 ¼"] bind off for the sleeve cap each side on every other row as follows: 4 sts 1-2-2-2-3-3 times. Continue to bind off 2 sts each side until the piece measures 55-54-53-53-52-51 cm [21⅝"-21 ¼"-21"-21"-20½"-20"]. Now bind off 4 sts each side. The piece measures approx. 56-55-54-54-53-52 cm [22"-21⅝"-21 ¼"-21 ¼"-21"-20½"]. Bind off remaining sts.

Assembly: Sew the shoulder seams.
Neck line: Pick up 84-122 sts (incl. the sts on the threads) around the neck line with needle size 4 mm [US 6] and 2 threads of Alpaca. K 1 row from the WS and K 1 row from the RS. Continue in stockinette sts. When the neck line measures approx. 3 cm [1⅛"] knit 4 rows of garter sts and bind off loosely.

Front band: Pick up approx. 88 to 104 sts (also over the front edge) on needles size 4 mm [US 6] with 2 threads of Alpaca. Knit 12 rows of garter sts. At the same time on the 6th row bind off for 6-7-7-8-8-8 button holes evenly distributed – see explanation above. The lowest button hole should be approx. 3-5 cm [1⅛"-2"] from the bottom edge at the top button holes should be approx 1 cm [3/8"] from the neck. Bind off loosely.

Assembly: Sew the side seams inside the edge st. Sew in the sleeves and sew the buttons on.

Diagram

All measurements in charts are in cm.

symbols = K from the RS, P from the WS
symbols = K from the WS, P from the RS
symbols = put 2 sts on a cable needle in front of work, K2, K2 from cable needle
symbols = put 2 sts on a cable needle in front of work, P2, K 2 from cable needle
symbols = put 2 sts on cable needle behind the work, K2, P 2 sts from cable needle.
symbols = Knitting direction.
diagram
Do you have a question? See a list of frequently asked questions (FAQ)

Knitting tension is what determines the final measurements of your work, and is usually measured per 10 x 10 cm. It is provided like so: number of stitches in width x number of rows in height - eg: 19 stitches x 26 rows = 10 x 10 cm.

The knitting tension is very individual; some people knit/crochet loosely while others work tightly. You adjust the knitting tension with the needle size, which is why the suggested needle size only serve as a guide! You need to adjust this (up or down) to ensure that YOUR knitting tension matches the knitting tension provided in the pattern. If you work with a different knitting tension than provided you will have a different yarn consumption, and your work will have different measurements than what the pattern suggests.

The knitting tension also determines which yarns can replace each other. As long as you achieve the same knitting tension you can replace one yarn with another.

See DROPS lesson: How to measure your tension/gauge

See DROPS video: How to make a gauge tension swatch

The required amount of yarn is provided in grams, eg: 450 g. To calculate how many balls you’ll need you first need to know how many grams are in 1 ball (25g, 50g or 100g). This information is available if you click on the individual yarn quality on our pages. Divide the amount required with the amount of each ball. For example, if each ball is 50g (the most common amount), the calculation will be as follows: 450 / 50 = 9 balls.

The important thing when changing from one yarn to another is that the knitting/crochet tension remains the same. This is so that the measurements of the finished piece will be the same as on the sketch provided. It is easier to achieve the same knitting tension using yarns from the same yarn group. It is also possible to work with multiple strands of a thinner yarn to achieve the knitting tension of a thicker one. Please try our yarn converter. We recommend you to always work a test swatch.

Please NOTE: when changing yarn the garment might have a different look and feel to the garment in the photo, due to individual properties and qualities of each yarn.

See DROPS lesson: Can I use a different yarn than the one mentioned in the pattern?

All our yarns are categorised into yarn groups (from A to F) according to thickness and knitting tension – group A contains the thinnest yarns and group F the thickest. This makes it easier for you to find alternative yarns to our patterns, should you wish to switch yarn. All yarns within the same group have a similar knitting tension and can easily replace each other. However, different yarn qualities have different structures and properties which will give the finished work a unique look and feel.

Click here for an overview of the yarns in each yarn group

At the top of all our patterns you’ll find a link to our yarn converter, which is a helpful tool should you wish to use a different yarn than suggested. By filling in the yarn quality you wish to replace, the amount (in your size) and number of strands, the converter will present good alternative yarns with the same knitting tension. Additionally it will tell you how much you’ll require in the new qualities and whether you’ll need to work with multiple strands. Most skeins are 50g (some are 25g or 100g).

If the pattern is worked with multiple colours, every colour will have to be converted separately. Similarly, if the pattern is worked with several strands of different yarns (for example 1 strand Alpaca and 1 strand Kid-Silk) you will have to find alternatives for each, individually.

Click here to see our yarn converter

Since different yarns have different qualities and textures we have chosen to keep the original yarn in our patterns. However, you can easily find options among our available qualities by using our yarn converter, or simply pick a yarn from the same yarn group.

It is possible that some retailers still have discontinued yarns in stock, or that someone has a few skeins at home that they would like to find patterns for.

The yarn converter will provide both alternative yarn as well as required amount in the new quality.

If you think it's hard to decide what size to make, it can be a good idea to measure a garment you own already and like the size of. Then you can pick the size by comparing those measures with the ones available in the pattern's size chart.

You'll find the size chart at the bottom of the pattern.

See DROPS lesson: How to read size chart

The needle size provided in the pattern serves only as a guide, the important thing is to follow the knitting tension. And since knitting tension is very individual, you will have to adjust the needle size to ensure that YOUR tension is the same as in the pattern – maybe you’ll have to adjust 1, or even 2 needle sizes, up or down to achieve the correct tension. For this, we recommend that you work test swatches.

Should you work with a different knitting tension than the one provided, the measurements of the finished garment might deviate from the measurement sketch.

See DROPS lesson: How to measure your tension/gauge

See DROPS video: How to make a gauge tension swatch

Working a garment top-down provides more flexibility and room for personal adjustment. For example it is easier to try the garment on while working, as well as making adjustments to length of yoke and shoulder caps.

The instructions are carefully explaining every step, in the correct order. Diagrams are adjusted to the knitting direction and are worked as usual.

The diagram depicts all rows/rounds, and every stitch seen from the right side. It is read from bottom to top, from right to left. 1 square = 1 stitch.

When working back and forth, every other row is worked from the right side and every other row is worked from the wrong side. When working from the wrong side, the diagram will have to be worked reversed: from left to right, knit stitches are purled, purl stitches are knit etc.

When working in the round every round is worked from the right side and the diagram are worked from right to left on all rounds.

See DROPS lesson: How to read knitting diagrams

The diagram depicts all rows/rounds, and every stitch seen from the right side. It is worked from bottom to top, from right to left.

When working back and forth every other row is worked from the right side: from right to left and every other row is worked from the wrong side: from left to right.

When working in the round, every row in the diagram are worked from the right side, from right to left.

When working a circular diagram you start in the middle and work your way outwards, counter clockwise, row by row.

The rows usually start with a given number of chain stitches (equivalent to the height of the following stitch), this will either be depicted in the diagram or explained in the pattern.

See DROPS lesson: How to read crochet diagrams

Instructions for working several diagrams after each other on the same row/round, will often be written like so: “work A.1, A.2, A.3 a total of 0-0-2-3-4 times". This means you work A.1 once, then A.2 is worked once, and A.3 is repeated (in width) the number of times provided for your size – in this case like so: S = 0 times, M = 0 times, L=2 times, XL= 3 times and XXL = 4 times.

The diagrams are worked as usual: begin with the first row in A.1, then work the first row in A.2 etc.

See DROPS lesson: How to read knitting diagrams

See DROPS lesson: How to read crochet diagrams

The total width of the garment (from wrist-to-wrist) will be larger in the larger sizes, despite the actual sleeves being shorter. The larger sizes have longer sleeve caps and wider shoulders, so there will be a good fit in all sizes.

The measurement sketch/schematic drawing provides information regarding the full length of the garment. If it’s a jumper or a jacket the length is measured from the highest point on the shoulder (usually closest to the neckline), and straight down to the bottom of the garment. It is NOT measured from the tip of shoulder. Similarly, the length of yoke is measured from the highest point on the shoulder and down to where yoke is split into body and sleeves.

See DROPS lesson: How to read a schematic drawing

Diagrams are often repeated on the round or in height. 1 repeat is the diagram the way it appears in the pattern. If it says to work 5 repeats of A.1 in the round, then you work A.1 a total of 5 times after/next to each other in the round. If it says to work 2 repeats of A.1 vertically/in height you work the entire diagram once, then begin again at the start and work the entire diagram one more time.

Chain stitches are slightly narrower than other stitches and to avoid working the cast-on edge too tight, we simply chain more stitches to begin with. The stitch count will be adjusted on the following row to fit the pattern and measurement sketch.

The rib edge is more elastic and will contract slightly compared to, for example, stocking stitch. By increasing before the rib edge, you avoid a visible difference in width between the rib edge and the rest of the body.

It’s very easy to cast off too tightly, and by making yarn overs while casting off (and simultaneously casting these off) you avoid a too tight cast off edge.

See DROPS video: How to bind off with yarn overs (yo)

To achieve an even increase (or decrease) you can increase on, for example: every 3rd and 4th row alternately, like so: work 2 rows and increase on the 3rd row, work 3 rows and increase on the 4th. Repeat this until the increase is complete.

See DROPS lesson: Increase or decrease 1 st on every 3rd and 4th row alternately

Should you prefer to work in the round instead of back and forth, you may of course adjust the pattern. You’ll need to add steeks mid-front (usually 5 stitches), and follow the instructions. When you would normally turn and work from the wrong side, simply work across the steek and continue in the round. At the end you’ll cut the piece open, pick up stitches to work bands, and cover the cut edges.

See DROPS video: How to knit steeks and cut open

Should you prefer to work back and forth instead of in the round, you may of course adjust the pattern so you work the pieces separately and then assemble them at the end. Divide the stitches for the body in 2, add 1 edge stitch in each side (for sewing) and work the front and back pieces separately.

See DROPS lesson: Can I adapt a pattern for circular needles into straight needles?

Pattern repeats can vary slightly in the different sizes, in order to get the correct proportions. If you’re not working the exact same size as the garment in the photo, yours might deviate slightly. This has been carefully developed and adjusted so that the complete impression of the garment is the same in all sizes.

Make sure to follow instructions and diagrams for your size!

If you have found a pattern you like which is available in women’s size it’s not very difficult to convert it to men’s size. The biggest difference will be the length of sleeves and body. Start working on the women size that you think would fit across the chest. The additional length will be worked right before you cast off for the armhole/sleeve cap. If the pattern is worked top-down you can add the length right after the armhole or before the first decrease on sleeve.

Regarding additional yarn amount, this will depend on how much length you add, but it is better with a skein too many than too few.

All yarns will have excess fibres (from production) that might come off as lint or shedding. Brushed yarns (ie hairier yarns) have more of these loose, excess fibres, causing more shedding.

Shedding also depends on what is worn under or over the garment, and whether this pulls at the yarn fibres. It’s therefore not possible to guarantee that there will be no shedding

Below are some tips on how to get the best result when working with hairier yarns:

1. When the garment is finished (before you wash it) shake it vigorously so the looser hairs come off. NOTE: do NOT use a lint roller, brush or any method that pulls at the yarn.

2. Place the garment in a plastic bag and put it in your freezer - the temperature will cause the fibres to become less attached to each other, and excess fibres will come off easier.

3. Leave in the freezer for a few hours before taking it out and shaking it again.

4. Wash the garment according to the instructions on the yarn label.

Pilling is a natural process that happens to even the most exclusive of fibers. It's a natural sign of wear and tear that is hard to avoid, and that is most visible in high friction areas of your garment like a sweater's arms and cuffs.

You can make your garment look as new by removing the pilling, using a fabric comb or a pill/lint remover.

Still can't find the answer you need? Then scroll down and leave your question so one of our experts can try to help you. This will be done normally within 5 to 10 working days.
In the meantime, you can read the questions and answers that others have left to this pattern or join the DROPS Workshop on Facebook to get help from fellow knitters/crocheters!

You might also like...

Post a comment to pattern DROPS 102-17

We would love to hear what you have to say about this pattern!

If you want to leave a question, please make sure you select the correct category in the form below, to speed up the answering process. Required fields are marked *.

Comments / Questions (17)

country flag Monique wrote:

Beste Tine, ik ben er al uit...!

08.07.2015 - 09:49

country flag Monique wrote:

Hallo! Ik begin aan het bovenste deel dus met de opgenomen steken, en heb 216 steken zoals in patroon staat. Hoe kan het dan, dat ik moet breien over de vlg 187 st, dan 3 av. en 1 kantst? = 4 steken) Ik kom dan lamg niet op 216 st. Want dan kom ik uit op 187 + 4 = 191 steken! Hoe kan dat? Dank je voor een uitleg.

05.07.2015 - 16:30

DROPS Design answered:

Hoi Monique. Er staat in het patroon: Brei 1 nld r op de verkeerde kant en minder tegelijkertijd gelijkmatig verdeeld naar in totaal 182-199-216-233-250-267 st. Daarna brei je het patroon: Brei door als volgt (voor maat M): 1 kantst, 3 av, * M.2 (= 4 st), 7 av *, herhaal *-* over de volgende 187 st, M.2, 3 av en 1 kantst.

30.07.2015 - 14:00

country flag DieAnne wrote:

Hallo! Ist der Garnverbrauch für kurze oder lange Ärmel angegeben? Ich bräuchte die Angabe für lange Ärmel. Danke schonmal!

26.10.2014 - 21:52

DROPS Design answered:

Die Garnmenge sollte auch für lange Ärmel reichen.

06.03.2015 - 10:26

country flag DARNAY wrote:

Dans "explications diagramme"du modèle 102-17, il faut lire 1 m end sur l'env et non pas 1 m end sur end au niveau du carre coche d'une croix. J'espère être claire !

30.11.2012 - 13:54

DROPS Design answered:

Bonjour Madame Darnay, la légende du diagramme a été modifiée, merci ! Bon tricot !

30.11.2012 - 15:00

country flag Drops Design France wrote:

Merci Maria José, Lima appartient au groupe B, ce modèle est réalisé en double Alpaca, et 2 fils du groupe A = 1 fil du groupe C. Préférez la Nepal (1 seul fil) et n'hésitez pas à vous reporter au tableau des groupes de qualités.

11.01.2011 - 10:36

country flag Maria José wrote:

Très joli! juste le modèle que je cherchais^^ Pensez-vous qu'il rendrait aussi bien dans la qualité Lima?

10.01.2011 - 17:05

country flag Gun Aspnäs wrote:

Löydät mitat ohjeen alla olevasta mittapiirroksesta!

19.09.2008 - 21:24

country flag Tiina wrote:

Hei, enkö vain löydä, vai onko Dropsin malleihin valmiiden töitten tavoitemittoja missään? Rinnanympärystää yms. Mutta siis mahtavat sivut kaiken kaikkiaan, reilun vuoden olen ollut näihin koukussa.

16.09.2008 - 11:30

country flag Maria wrote:

Kær! Det ord er det eneste der kan beskrive den, for mig!

05.07.2007 - 22:28

Mia wrote:

Väldigt fin, jättefint mönster kul at sticka en del på andra ledden. Måste med!

21.06.2007 - 12:32