
Popular categories
Looking for a yarn?


|
|||||||||||||
DROPS Children 12-14 |
|||||||||||||
|
|
|||||||||||||
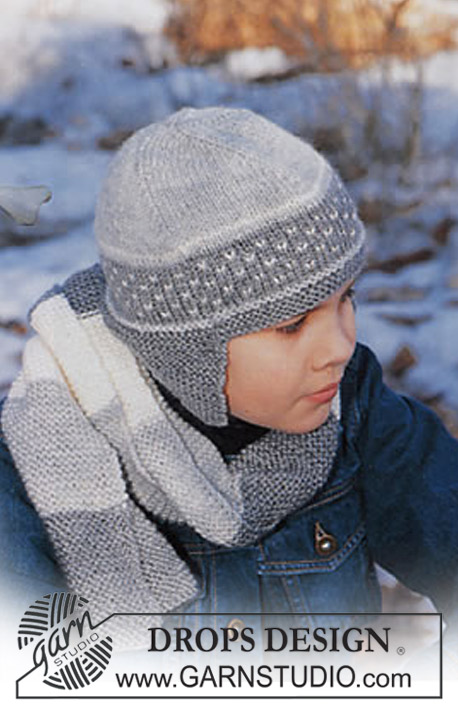
DROPS Hat, scarf and gloves in Karisma Superwash
DROPS Children 12-14 |
|||||||||||||
|
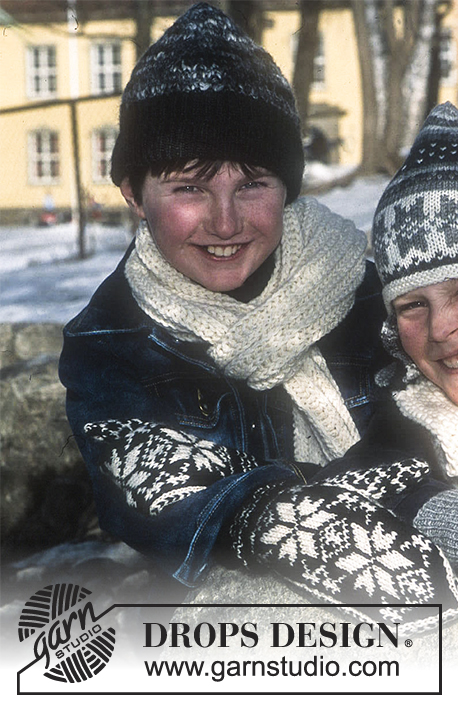
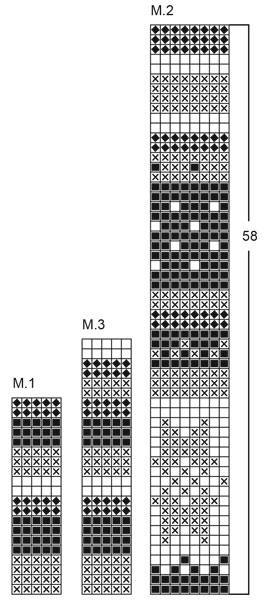
HAT: Gauge: 21 sts x 28rows on needles size 4 mm / US 6 in stockinette sts = 10 x 10 cm / 4" x 4". Garter sts (back and forth on needle): knit all rows. Garter sts (round on double pointed needles): knit 1 round, purl 1 round. Pattern: See diagram M.1 and M.2 Work diagram M.2 in stockinette sts Work diagram M.1 in garter sts, i.e. 1 row in diagram = 2 rows of garter sts Diagram M.1 is worked on earflaps, i.e. therefore cut and sew the yarn ends after each stripe. Earflap: Cast on 5 sts on needle size 4 mm / US 6 with gray. Work garter sts and M.1 – see explanation above. After 2 rows in garter sts inc 1 st each side from the right side by making a yo within 2 sts each side. On next row K the yo into back of st to avoid creating a hole. Inc on every 4th row a total of 8-9-10 times = 21-23-25 sts. Continue in garter sts until earflap measures 8-9-10 cm / 3"-3½"-4" (if M.1 finishes before finished measurements, continue in the color from the last stripe). Put the piece aside and knit another earflap. Hat: Put one earflap on needle size 4 mm / US 6. Cast on 14-16-18 new sts with the last color in M.1 (= back) and put the other earflap on needle = 56-62-68 sts. Knit 4 rows garter sts over all sts, at the same time inc 1 st each side as described for earflap on every other row 2 times = 60-66-72 sts. On next row change to off-white and cast on 28-30-32 new sts between earflaps at the front = 88-96-104 sts. Measure piece from here from now on! Continue in the round on double pointed needles size 4 mm / US 6, work 4 rounds garter sts over all sts, cut the yarn and begin new rounds mid back. Now finish the hat in stockinette sts and M.2. Remember your knitting gauge! At the same time when the piece measures 13 cm / 5⅛" dec 3-1-4 sts evenly on round = 85-95-100 sts. Now insert 5 markers in piece with 17-19-20 sts between each marker. Start dec on every other round by K2 tog to the right of all markers. Note: If dec are made on rounds in pattern, dec in the base color and not the pattern color. Continue to dec until there are 10 sts left, cut the yarn, pull it through remaining sts and fasten. The hat measures approx 24-25-26 cm / 9½"-9¾"-10¼" from mid front to the top. ________________________________________ GLOVES: Gauge: 23 sts x 32 rounds on needles size 3 mm / US 3 in stockinette sts = 10 x 10 cm / 4" x 4". Rib: *K1, P1*, repeat from *-*. Pattern: See diagram M.3. The diagram shows all the rows in the pattern seen from the right side and pattern is worked in stockinette sts. Glove: Cast on 48-52-56 sts on double pointed needles size 2.5 mm / US 2 with gray and work 10 cm / 4" in Rib. Change to double pointed needles size 3 mm / US 3 and continue in stockinette sts and diagram M.3. At the same time dec 12 sts evenly on the first round of stockinette sts = 36-40-44 sts. Measure glove from here from now on. Remember your knitting gauge! When piece measures 1-1-2 cm / ⅜"-⅜"-¾" inc for thumb as follows: insert a marker, inc 1 st by K2 in next st, K1, inc 1 st by K2 in next st, insert a marker, knit the rest of the round (the sts between the 2 markers = thumb sts). Now inc 1 st within each marker on every other round a total of 3-3-4 times = 11-11-13 thumb sts. When piece measures 3-4-4 cm / 1"-1½"-1½" put the thumb sts on a holder. Cast on 3 new sts behind the thumb sts = 36-40-44 sts and continue in stockinette sts. When piece measures 6-7.5-9 cm / 2⅜"-2⅞"-3½" work next round as follows: K14-16-17 sts (= upper hand), K and then put 8-8-10 sts on holder for little finger, K14-16-17 sts (= palm of hand). Now work the fingers on double pointed needles size 2.5 mm / US 2 with gray. Little finger: Put the 8-8-10 sts from holder on needles size 2.5 mm / US 2 and cast on 3 new sts towards ring finger = 11-11-13 sts. Work stockinette sts until finger measures 3-4-5 cm / 1⅛"-1½"-2", on next round K2 tog around, cut yarn and pull it through remaining sts. Ring finger: Put 4-5-5 sts from upper hand and 4-4-5 sts from palm on hand on needles size 2.5 mm / US 2, pick up 3 new sts towards the little finger and cast on 2 new sts towards the middle finger = 13-14-15 sts. Work stockinette sts until finger measures 5-6-7 cm / 2"-2⅜"-2¾", on next round K2 tog around, cut yarn and pull it through remaining sts. Middle finger: Put 4-5-5 sts from upper hand and 5-5-6 sts from palm of hand on needles size 2.5 mm / US 2, pick up 3 new sts towards the ring finger and cast on 2 new sts towards index finger = 14-15-16 sts. Work until finger measures 6-7-8 cm / 2½"-2¾"-3", on next round K2 tog around, cut yarn and pull it through remaining sts. Index finger: Put the remaining 11-11-13 sts on needles size 2.5 mm / US 2, pick up 3 new sts towards the middle finger = 14-16-16 sts. Work until finger measures 4.5-5.5-6.5 cm / 1¾"-2¼"-2½", on next round K2 tog around, cut yarn and pull it through remaining sts. Thumb: Put the 11-11-13 thumb sts back on needle and cast on 3 new sts behind these = 14-14-16 sts. Work 3.5-4.5-5.5 cm / 1¼"-1¾"-2¼" in stockinette sts, K2 tog around, cut yarn and pull it through remaining sts. Make another glove, but mirrored. SCARF: see pattern 12-15 |
|||||||||||||
Diagram explanations |
|||||||||||||
|
|||||||||||||
|
|||||||||||||
|
Have you made this or any other of our designs? Tag your pictures in social media with #dropsdesign so we can see them! Do you need help with this pattern?You'll find tutorial videos, a Comments/Questions area and more by visiting the pattern on garnstudio.com. © 1982-2024 DROPS Design A/S. We reserve all rights. This document, including all its sub-sections, has copyrights. Read more about what you can do with our patterns at the bottom of each pattern on our site. |
|||||||||||||


With over 40 years in knitting and crochet design, DROPS Design offers one of the most extensive collections of free patterns on the internet - translated to 17 languages. As of today we count 304 catalogs and 11422 patterns - 11417 of which are translated into English (US/in).
We work hard to bring you the best knitting and crochet have to offer, inspiration and advice as well as great quality yarns at incredible prices! Would you like to use our patterns for other than personal use? You can read what you are allowed to do in the Copyright text at the bottom of all our patterns. Happy crafting!
Comments / Questions (11)
Hi, please excuse my novice question, I’ve not made gloves before! I’m trying to knit the gloves, and have got as far as the 9cm stretch after the thumb increase so am ready to begin the fingers. Can I check where exactly that round begins? I wasn’t sure where to start the knit 17 stitches, place 10 on holder, knit final 17 stitches relative to the 3 stitches cast on after the thumb stitches have been placed on a holder. Thanks.
19.11.2022 - 12:41DROPS Design answered:
Dear Emma, please see answer below.
21.11.2022 - 00:37Hi, please excuse my novice question, I’ve not made gloves before! I’m trying to knit the gloves, and have got as far as the 9cm stretch after the thumb increase so am ready to begin the fingers. Can I check where exactly that round begins? I wasn’t sure where to start the knit 17 stitches, place 10 on holder, knit final 17 stitches relative to the 3 stitches cast on after the thumb stitches have been placed on a holder. Thanks.
19.11.2022 - 12:39DROPS Design answered:
Dear Emma, the beginning of the round is the same as before (should be next to the thumb). You start working from the thumb towards the little finger. Happy knitting!
21.11.2022 - 00:36Hi, so I am off by 3/8" then since mine measures 1 3/8" from the rib? Thanks.
19.11.2021 - 20:40DROPS Design answered:
Dear Mrs Agnew, the first increase for thumb is worked when piece measures 3/8''-3/8"-3/4", then repeat the increase 3 more times on every other round and when piece measures 3-4-4 cm / 1"-1½"-1½" put the thumb sts on a st holder (remember the tension). Happy knitting!
22.11.2021 - 07:25Hi, I just finished the thumb increases and it measures 1 3/8" from the beginning of the wrist; however, the instructions say "When piece measures 3-4-4 cm / 1"-1½"-1½" put the thumb sts on a holder.". Is this supposed to be 1" from the wrist or 1" from the last measurement of 3/8" so that the total from wrist would be 1 3/8"? Thanks.
19.11.2021 - 05:59DROPS Design answered:
Hi Kari, These measurements are from after the rib. Happy knitting!
19.11.2021 - 07:33Hi, I just did the first increase for the thumb. After that it says "Now inc 1 st within each marker on every other round a total of 3-3-4 times ". Do I knit a round first before I begin these rounds of increases/knit? Thanks.
17.11.2021 - 22:21DROPS Design answered:
Dear Mrs Agnew, the increases are worked on every other round, this means: *work 1 round increasing 2 sts, work 1 round without increasing*, work from *-* a total of 3 or 4 more times depending on the size = there will be 11 or 13 sts for the thumb. Happy knitting!
18.11.2021 - 08:41Hi, do you folks have any children's size 2T glove patterns? I am working on this pattern size 3/5 and it will be too big for my son. I looked and only saw mittens, but was wondering if I was missing one. I am looking for a glove pattern, not mitten. Thanks.
17.11.2021 - 02:31DROPS Design answered:
Dear Mrs Agnew, you will find our gloves for Children here - remember to check your tension, if your tension is not right, the gloves will be either too small or too big (see FAQ. Happy knitting!
17.11.2021 - 07:54Hi, for the first part, it says to knit 4" and then dec 12 sts. It is hard to tell from the picture what the glove looks like on top, but I assume that means the part that goes on the wrist and up the arm is 4"? and the dec by 12 sts is the beginning of where the wrist and hand meet? If this is the case, would there be any problems with me shortening it? Thanks.
14.11.2021 - 21:09DROPS Design answered:
Dear Mrs Agnew, you are right, these 4" are for the glove ribbing edge, you can shorten it if you like. Happy knitting!
15.11.2021 - 08:36Bonjour je voudrais savoir si je peu faire les gants avec des aiguilles droite merci d'avance bonne journée à vous
27.10.2020 - 08:21DROPS Design answered:
Bonjour Mme Bal, cette leçon explique comment adapter un modèle sur aiguilles droites, toutefois, des gants seront probablement plus simples à réaliser en rond sur aiguilles doubles pointes. Bon tricot!
27.10.2020 - 13:15Claire wrote:
Le diagrame ne veut pas s'afficher voudriez-vous me l'envoyer car le modèle est tres beau merci!
20.12.2008 - 20:47Har du sjekket strikkefastheten din? I følge mønsteret skal det stemme. Strikkefastheten der er oppgitt til 28 p på 10 cm. Feller du 5 m på annenhver pinne, blir det felt 70 masker på 10 cm. (14 x 5 = 70)
08.03.2006 - 15:57