
Popular categories
Looking for a yarn?


|
|||||||||||||||||||||||||
Marelius |
|||||||||||||||||||||||||
 |
 |
||||||||||||||||||||||||
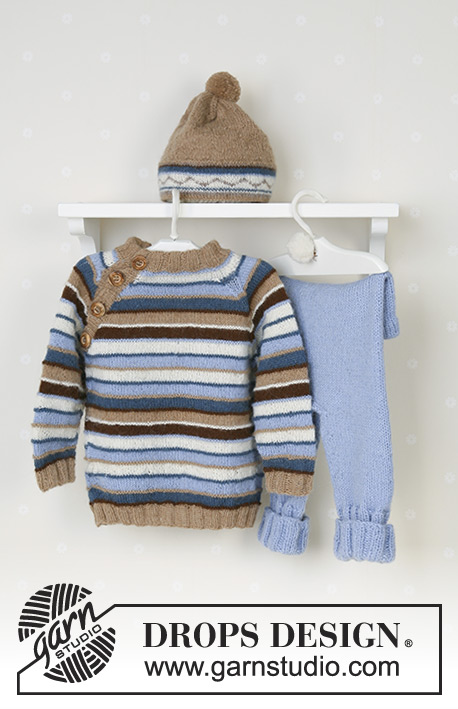
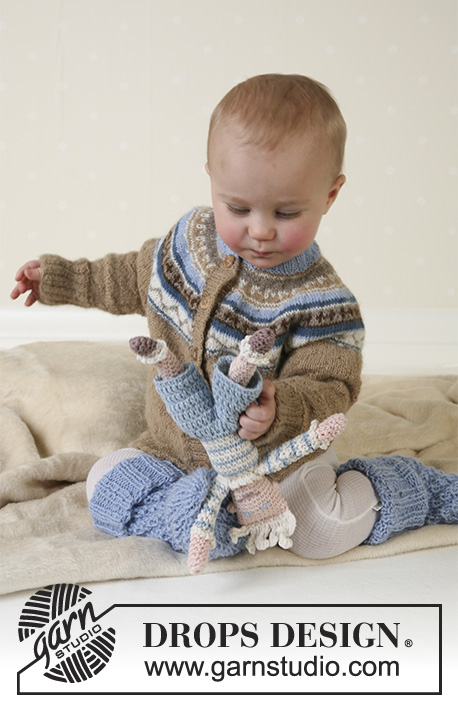
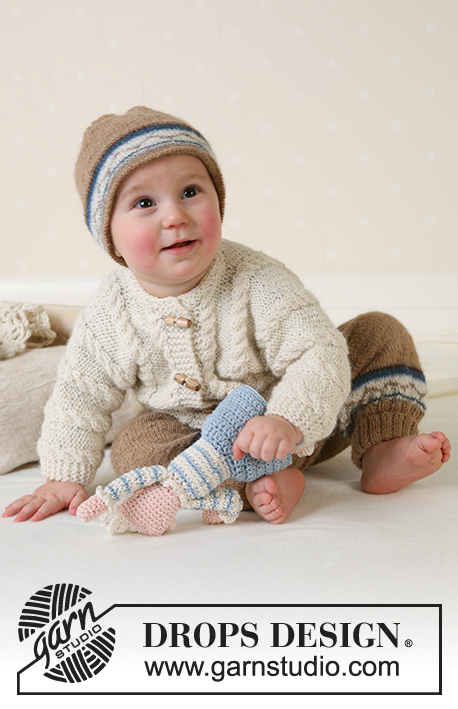
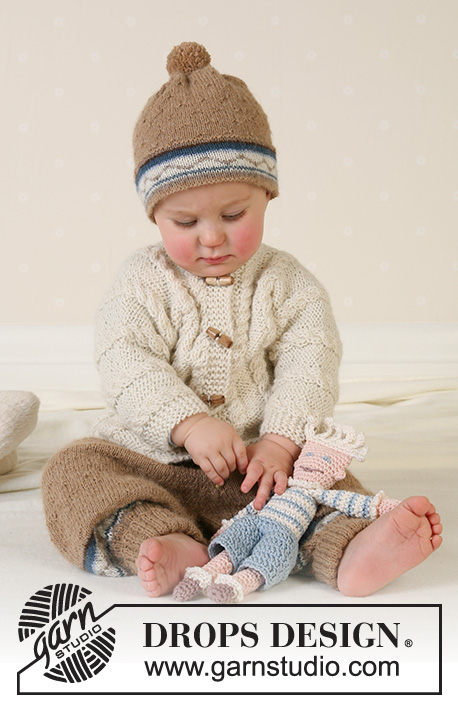
DROPS Jacket, trousers, hat and soft toy in Alpaca
DROPS Baby 13-14 |
|||||||||||||||||||||||||
|
JACKET: Knitting tension: 18 sts x 23 rows with 2 strands of Alpaca on needles size 4.5mm in stocking sts = 10 x 10 cm. Garter sts: Knit all rows Pattern: See diagram M.1. The diagram shows the pattern from the right side Buttonhole: Make buttonholes on right front band from mid front as follows: K1, K2 tog, yo, K2. Make buttonholes as follows: Size 1/3 months: 2, 9, 16 and 22 cm Size 6/9 months: 3, 10, 17 and 24 cm Size 12/18 months: 3, 11, 19 and 27 cm Size 2 years: 3, 10, 17, 24 and 31 cm Size 3/4 years: 3, 11, 19, 26 and 33 cm Right front: Knit back and forth on circular needle. Cast on 31-34-40 (42-45) sts (incl 1 edge st at side and 5 front band sts, all knitted in garter sts throughout) with 2 strands of off-white Alpaca and circular needle size 4.5mm. Knit 4 rows garter sts. Knit next row as follows from the right side: 5 front band sts in garter sts, M.1 over the next 24-24-34 (34-34) sts, purl 1-4-0 (2-5) sts and 1 edge st. Continue pattern – remember buttonholes on front band – until piece measures 16-17-20 (23-25) cm. Now cast on new sts at side for sleeve on every other row as follows (incorporate new sts in pattern as you go along): Size 1/3 months: 2 sts 1 time, 4 sts 1 time, 6 sts 2 times and 15 sts 1 time Size 6/9 months: 4 sts 2 times, 6 sts 1 time, 8 sts 1 time and 18 sts 1 time Size 12/18 months: 4 sts 3 times, 6 sts 1 time, 8 sts 1 time and 18 sts 1 time Size 2 years: 4 sts 2 times, 6 sts 1 time, 8 sts 1 time, 9 sts 1 time and 21 sts 1 time Size 3/4 years: 4 sts 2 times, 6 sts 1 time, 8 sts 3 times and 21 sts 1 time After all inc are complete there are 64-74-84 (94-104) sts on row. Continue M.1 with 5 sts in garter sts at sleeve edge and on front band. When piece measures 23-25-28 (32-34) cm put the 9 sts towards mid front on a thread for neck. Now dec to shape the neckline on every other row as follows: 2 sts 1 time and 1 st 2-2-2 (4-4) times = 51-61-71 (79-89) sts left on shoulder/sleeve. When piece measures 27-29-33 (37-40) cm insert a marking thread (= mid shoulder), knit 1 more cm and put piece aside. Left front: Cast on and knit as right front – do not make buttonholes. Back piece: Put sts from left front piece on needle, cast on 22-22-22 (26-26) new sts (= back neck), put sts from right front piece on needle = 124-144-164 (184-204) sts. Continue in M.1 with 5 garter sts each side. When piece measures 7-8-8 (9-9) cm from marking thread on shoulder cast off sts on sleeves on every other row as follows: Size 1/3 months: 15 sts 1 time, 6 sts 2 times, 4 sts 1 time and 2 sts 1 time Size 6/9 months: 18 sts 1 time, 8 sts 1 time, 6 sts 1 time and 4 sts 2 times Size 12/18 months: 18 sts 1 time, 8 sts 1 time, 6 sts 1 time and 4 sts 3 times Size 2 years: 21 sts 1 time, 9 sts 1 time, 8 sts 1 time, 6 sts 1 time and 4 sts 2 times Size 3/4 years: 21 sts 1 time, 8 sts 3 times, 6 sts 1 time and 4 sts 2 times. After all dec are complete there are 58-64-76 (80-86) sts left on row. Continue M.1 with 1 edge st each side. When piece measures 26-28-32 (36-39) cm from marking thread knit 4 rows garter sts over all sts and cast off. Neck: Pick up approx 48 to 58 sts round neck (incl sts on threads on front pieces) with 2 strands off-white and needle size 4.5mm. Knit 3 rows garter sts and cast off. Assembly: Sew sleeve and side seams within 1 edge st. Sew on buttons. _________________________________________ TROUSERS: Knitting tension: 24 sts x 32 rows with 1 strand of Alpaca on needles size 3mm in stocking sts = 10 x 10 cm. Rib: *K2, P2*, repeat from *-* Pattern: see diagrams M.2 and M.3. Decreasing tips (applies to inner side of leg: Dec as follows 1 st before the marking thread: K2 tog Decrease as follows 1 st after marking thread: slip 1 st as if to knit, K1, psso. Start at the top and knit downwards. Cast on 116-120-124 (132-140) sts with camel and circular needle size 2.5mm. Knit 4 cm Rib. Change to circular needle size 3mm and knit 1 round, at the same time inc evenly on round to 144-156-168 (180-192) sts. Insert a marking thread at the beginning of round = mid back and after 72-78-84 (90-96) sts = mid front. Knit M.3, at the same time, knitting elevation at the back as follows: knit 12 sts, turn the piece (to avoid a hole slip the first st as if to knit and tighten thread when knitting back), knit 24 sts, turn the piece. Continue like this by knitting 12 sts more before each turn another 8-10-10 (12-12) times. Now knit 1 round over all sts. When piece measures 12-15-16 (17-18) cm (measured from mid front) inc 1 st on each side of the middle 2 sts mid front on every other row a total of 10 times (inc by picking up st from previous row and incorporate this in M.3) = 164-176-188 (200-212) sts. After the last inc the piece measures approx 18-21-22 (23-24) cm mid front. Knit next round as follows from mid back: Cast off 3 sts, knit 76-82-88 (94-100) sts, cast off 6 sts, knit 76-82-88 (94-100) sts, cast off 3 sts. Now finish each leg separately. Legs: Put sts from one leg on a thread and sts from the other leg on double pointed needles size 3mm = 76-82-88 (94-100) sts. Knit round (continue pattern as before) and insert a marking thread at beginning of round = inner side of leg. When leg measures 2 cm dec 1 st on both sides of marking thread – see Decreasing tips – on every 5-2-3 (2.5-4) cm a total of 2-5-4 (7-6) times = 72-72-80 (80-88) sts. When leg measures 8-11-14 (19-24) cm knit M.2 – start at the top of diagram and knit downwards. After M.2 knit 1 round with camel, at the same time dec evenly to 60-64-68 (72-76) sts. Knit 10 cm Rib and cast off loosely. Knit the other leg in the same way. Assembly: Sew opening between legs. Fold the rib at bottom of legs. _________________________________________ HAT: Size: 1/3 – 6/18 months (2 –3/4 years) To fit head circumference: 40/42 – 43/45 (48/50 – 50/52) cm Knitting tension: 24 sts x 32 rows with 1 strand of Alpaca on needles size 3mm in stocking sts = 10 x 10 cm. Pattern: see diagrams M.2 and M.3. Decreasing tips: Dec as follows before the marking thread: K2 tog Decrease as follows after marking thread: slip 1 st as if to knit, K1, psso. Cast on 96-104 (112-120) sts with camel on double pointed needles size 2.5mm and knit 6 cm stocking sts. Now purl 1 round (= folding edge) and knit 1 round. Now knit M.2 once. Change back to camel, knit 1 round and purl 1 round. Now knit M.3, at the same time adjusting number of sts to 96-102 (108-102) on first round. When piece measures 13-15 (16-17) cm from folding edge adjust number of sts to 90-100 (110-120). Now insert 5 marking threads in piece with 18-20 (22-24) sts between each thread. Continue in stocking sts, at the same time dec 1 st on each side of all marking threads on each round until there are 10 sts left – see Decreasing tips. Pull thread through remaining sts and attach. Fold lower edge against wrong side and attach with neat sts – make sure seam isn’t too tight. Pompon: Make a pompon in camel with a diameter of approx 4 cm and attach at the top of hat. _________________________________________ SOFT TOY: see pattern no 13-33 |
|||||||||||||||||||||||||
Diagram explanations |
|||||||||||||||||||||||||
|
|||||||||||||||||||||||||

|
|||||||||||||||||||||||||

|
|||||||||||||||||||||||||
|
Have you made this or any other of our designs? Tag your pictures in social media with #dropsdesign so we can see them! Do you need help with this pattern?You'll find tutorial videos, a Comments/Questions area and more by visiting the pattern on garnstudio.com. © 1982-2024 DROPS Design A/S. We reserve all rights. This document, including all its sub-sections, has copyrights. Read more about what you can do with our patterns at the bottom of each pattern on our site. |
|||||||||||||||||||||||||


With over 40 years in knitting and crochet design, DROPS Design offers one of the most extensive collections of free patterns on the internet - translated to 17 languages. As of today we count 304 catalogues and 11422 patterns - 11422 of which are translated into English (UK/cm).
We work hard to bring you the best knitting and crochet have to offer, inspiration and advice as well as great quality yarns at incredible prices! Would you like to use our patterns for other than personal use? You can read what you are allowed to do in the Copyright text at the bottom of all our patterns. Happy crafting!
Comments / Questions (15)
Når beinet måler 24cm. Menes det ifra livet eller mellom bein.
19.03.2023 - 21:28DROPS Design answered:
Hei Christina, Beinet er målt mellom beinene. God fornøyelse!
20.03.2023 - 06:49Tusen takk for raskt svar
17.03.2023 - 09:46Skal det virkelig snus 12 ganger til forhøyning bak på buksen? Eller er det 6 ganger på hver siden av mm
16.03.2023 - 22:02DROPS Design answered:
Hej Cristina, det er ialt du snur 12 gange, så det bliver 6 gange i hver side :)
17.03.2023 - 09:03Bonjour, il y a toujours une erreur sur la patron Français en 12-18 mois, sur le devant, la dernière augmentation pour faire les manches est de 18 mailles et non de 21. cordialement.
06.09.2022 - 11:20DROPS Design answered:
Bonjour Mme Poulet et merci, la correction a été corrigée :) Bonne continuation!
06.09.2022 - 12:06Les augmentations devant en 12-18 mois ne sont pas identiques aux diminutions dos
21.08.2022 - 20:35DROPS Design answered:
Bonjour Mme Poulet, les diminutions du dos sont correctes, ce sont celles du devant qui étaient erronées, il faut bien augmenter 3 fois 4 mailles au début (et non 2 fois seulement). Merci pour votre retour, la correction a été faite. Bon tricot!
22.08.2022 - 10:17Vraag: wordt het vestje helemaal met 2 draden gebreid? groet Bea
01.02.2022 - 19:25Bij het rugpand voor het minderen van de mouw staat 1x4 st maar met opzetten staat dit er niet dus of het is daar vergeten of het staat bij het minderen verkeerd. Ik denk ij het laatste omdat het patroon klopt zonder die 4 steken.
09.01.2022 - 15:54Hej! Enligt mönstret ska tröjan stickas med ”två trådar natur”. Vad betyder det? Ska tröjan stickas med dubbelt garn?
22.04.2021 - 23:04DROPS Design answered:
Hej Gunilla. Ja det stämmer, tröjan stickas med dubbelt garn. Mvh DROPS Design
23.04.2021 - 10:59Bij het vestje staat in het rechter voorpand Zet bij ( )CM de 9 steken van de middenvoor op een hulp draad. Welke 9 steken?
24.11.2020 - 11:26DROPS Design answered:
Dag Sylvia,
Daarmee worden de eerste 9 steken op de naald aan de kant van de knoopbies bedoeld.
24.11.2020 - 13:23Hallo liebes Drops-Team, Ich komme einfach nicht dahinter, wir im Diagramm M3, Re von rechts, li von links und li von rechts, Re von links zu stricken ist. Könnt ihr mir da bitte helfen? Vielen Dank für die Mühe und herzliche Grüße Tina
13.11.2019 - 18:39DROPS Design answered:
Liebe Tina, bei der Erhöhung wird M.3 in Hin- und Rückreihen gestrickt (bei Hinreihen lesen Sie M.3 rechts nach links und bei Rückreihen lesen Sie M.3 links nach rechts). Wenn Sie dann wieder in Runden stricken, lesen Sie M.3 immer rechts nach links (= Hinreihen). M.3 wird glatt rechts gestrickt (= 6. Symbol) mit linken Maschen (= 7.Symbol) - von der Vorderseite gesehen. Viel Spaß beim stricken!
14.11.2019 - 09:31