
Popular categories
Looking for a yarn?


|
|||||||
Cosmos |
|||||||
|
|
|||||||
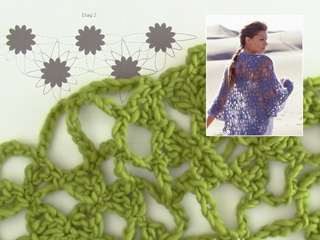
DROPS Crochet shawl in Alpaca and Vivaldi or Alpaca and Brushed Alpaca Silk.
DROPS 94-7 |
|||||||
|
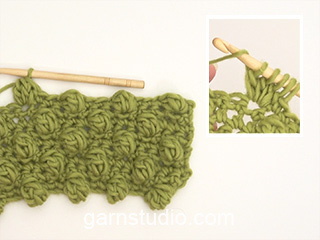
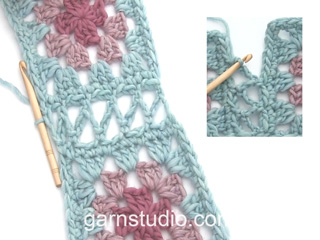
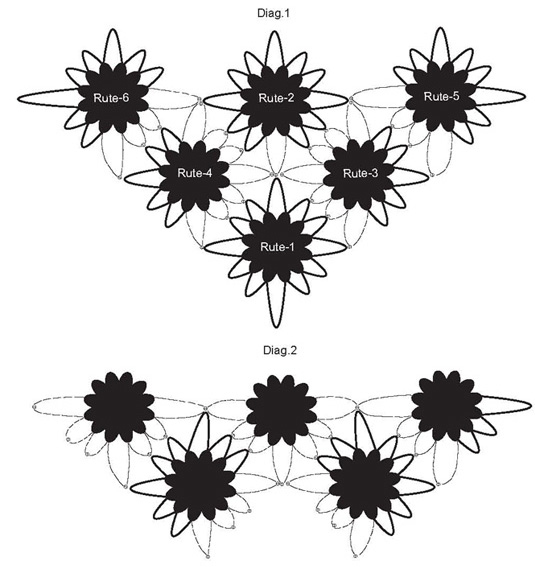
SHAWL The shawl is made up of 21 squares and 7 half squares crochet as explained below, and crochet together as explained in diagram 1 and diagram 2 (see how to crochet together below). 1 whole square: Ch 4 with 1 strand of Alpaca and 1 strand of Vivaldi and make a ring with a sl st in 1st ch. 1st round: 3 ch (= 1 dc), crochet 11 dc around the ring and finish with a sl st in the 3rd ch from beginning of round = 12 dc. 2nd round: *4 ch, 1 dc in the 1st of the ch 4, skip 1 dc, 1 sl st in the next dc*, repeat from *-* a total of 6 times and finish with a sl st in the sl st from the end of the previous round = 6 leaves. 3rd round: ch 3, 1 sc in the top of the 1st leaf, *7 ch, 1 sc in the top of the next leaf* repeat from *-* a total of 6 times and finish with a sl st in the sc at the top of the 1st leaf = 6 ch-spaces. 4th round: *4 ch, 1 dc in the 1st of the ch 4, 1 sc around the ch-space, ch 4, 1 dc in the 1st of the ch 4, 1 sc in the sc between the ch-spaces*, repeat from *-* a total of 6 times and finish with a sl st in the sl st from the end of the previous round = 12 leaves. 5th round: ch 3,*1 sc in the top of the 1st leaf, ch 7, 1 sc in the top of the next leaf, ch 7, 1 sc in the next leaf, 11 ch*, repeat from *-* a total of 4 times and finish with a sl st in the 1st sc from beginning of round = 4 corners with 2 ch-spaces in between. 1 half square: Ch 4 with 1 strand of Alpaca and 1 strand of Vivaldi and make a ring with a sl st in 1st ch. 1st round: 3 ch (= 1 dc), crochet 11 dc around the ring and finish with a sl st in the 3rd ch from beginning of round = 12 dc. 2nd round: *4 ch, 1 dc in the 1st of the ch 4, skip 1 dc, 1 sl st in the next dc*, repeat from *-* a total of 6 times and finish with a sl st in the sl st from the end of the previous round = 6 leafs. Now crochet rows back and forth instead of rounds. 3rd row: ch 3, 1 sc in the top of the 1st leaf, *7 ch, 1 sc in the top of the next leaf* repeat from *-* a total of 3 times = 3 ch-spaces. Turn the piece. 4th row: *4 ch, 1 dc in the 1st of the ch 4, 1 sc around the loop, 4 ch, 1 dc in the first of the 4 chains, 1 sc into the sc between the ch-spaces*, repeat from *-* a total of 3 times and finish with a sc in the sc from the end of the previous round = 6 leaves. Turn the piece. 5th row: *11 ch, 1 sc in the top of the 1st leaf, ch 7, 1 sc in the top of the next leaf, ch 7, 1 sc in the next leaf*, repeat from *-* 1 time and finish with 11 ch and a sl st into the 1st ch from beginning of previous row = 3 corners with 2 ch-spaces in between. How to crochet the squares tog: Crochet 1 whole square (= square 1), crochet 1 more (= square 2), but on the last round crochet square 2 tog. with square 1 as shown in diagram - this means the last round on square 2 is crochet as described under "1 whole square" but in 1 corner ch 5, then a sc into a corner of square 1, 5 ch (instead of 11 ch). Now crochet square 3, but on the last round crochet square 3 tog. with square 2 and square 1 as follows: ch 5, 1 sc into the corner of square 2, 5 ch. 1 sc around the next ch-space on square 3, 3 ch. 1 sc around the next ch-space on square 2, ch 3, 1 sc around the the next ch-space on square 3, 3 ch. 1 sc into the next ch-space on square 2, 3 ch. 1 sc around the next ch-space on square 3, 5 ch. 1 sc into the sc which holds the corner tog. of square 1 and square 2, 5 ch. 1 sc into the next ch-space on square 3, 3 ch. 1 sc around the next ch space on square 1, ch 3, 1 sc around the next ch-space on square 3, 3 ch. 1 sc around the next ch-space on square 1, ch 3, 1 sc around the next ch-space on square 3, 5 ch. 1 sc around the corner of square 1, ch 5, 1 sc around the next ch-space on square 3, now crochet the last round as explained under "1 whole square". Continue to crochet together as follows: Put the work flat as you go along as it becomes easier to control each square which needs to be crochet tog – Note: Solid lines in diagram 1 indicate crochet as described under "1 whole square"; dotted lines indicate the number of ch’s and sc’s where crochet tog. When you have crochet 6 rows of whole squares, crochet the 7 half squares, at the same time crochet them tog with the whole squares – see diagram 2. Crochet edge: Crochet an edge along the whole shawl with 2 strands of Vivaldi as follows: Begin in one of the top corners and crochet downwards as follows: 1 sc into the ch space at the corner, *7 ch, 1 sc into the next sc*, repeat from *-* around the whole shawl, but along the flowers in the half square at the top of the shawl crochet ch 3, 1 sc in between 2 leaves, ch 3, 1 sc into the top of the leaf, ch 3, 1 sc in between the next 2 leaves and so on. When you have crochet 1 round around the whole shawl crochet 1 more row but only along the sides (i.e. not along the top edge): *4 ch, 1 dc into the 1st of the ch 4, 1 sc around the ch space, ch 4, 1 dc into the 1st of the ch 4, 1 sc into the sc in between the ch spaces*, repeat from *-*. Bobbles: Crochet 15 bobbles, and sew to the shawl at the point where 4 corners meet up – see photo. 1 bobble = Ch 4 (= 1 ch + 1 dc) with 2 strands of Vivaldi. Crochet 3 dc into the 1st of the 4 ch crochet (= 4 dc), turn the piece. Ch 3 (= 1 dc), crochet the next 3 dc tog (i.e. crochet 1 dc into the next dc but wait with the last pull through (= 2 sts on hook), crochet 1 dc into the next dc, but wait with the last pull through (= 3 sts on hook), crochet 1 dc into the 3rd ch from beginning of previous row, and pull through all 4 yo’s. Cut the yarn, form the bobble and use the 2 ends of threads to sew the bobble to the shawl. |
|||||||
Diagram explanations |
|||||||
|
|||||||
|
|||||||
|
Have you made this or any other of our designs? Tag your pictures in social media with #dropsdesign so we can see them! Do you need help with this pattern?You'll find tutorial videos, a Comments/Questions area and more by visiting the pattern on garnstudio.com. © 1982-2024 DROPS Design A/S. We reserve all rights. This document, including all its sub-sections, has copyrights. Read more about what you can do with our patterns at the bottom of each pattern on our site. |
|||||||


With over 40 years in knitting and crochet design, DROPS Design offers one of the most extensive collections of free patterns on the internet - translated to 17 languages. As of today we count 304 catalogs and 11422 patterns - 11417 of which are translated into English (US/in).
We work hard to bring you the best knitting and crochet have to offer, inspiration and advice as well as great quality yarns at incredible prices! Would you like to use our patterns for other than personal use? You can read what you are allowed to do in the Copyright text at the bottom of all our patterns. Happy crafting!
Comments / Questions (31)
Half Square: I've been ages trying to complete row 4 but since watching the video it makes sense now. On written instructions the section 'dc around loop, 4 ch, 1 tr in 1st of 4 ch' has been accidentally omitted (as in full square). Loving crocheting this shawl
31.12.2022 - 23:45Hej! Kan man välja 2 trådar brushed alpaca silk istället?
04.04.2019 - 18:10DROPS Design answered:
Hej. Detta mönster är skrivet för att virkas med en tråd från garngrupp A (alpaca) och en från garngrupp C (brushed alpaca silk / vivaldi). Du kan byta ut dessa garn till andra garn i samma garngrupp, du kan läsa mer om våra garngrupper här. Att göra den i dubbel tråd brushed alpaca silk blir alltså fel eftersom det blir 2 garn ur garngrupp C. Lycka till!
05.04.2019 - 07:58I'd call this pattern "Starburst."
05.05.2017 - 14:09Is het mogelijk een telschema van de driehoekjes en vierkantjes te krijgen? Dat leest veel makkelijker.
09.10.2016 - 11:53DROPS Design answered:
Beste Marion. Ik heb helaas geen telpatroon voor deze, maar ik zal het op onze wenslijst zetten voor een video!
10.10.2016 - 11:12Hej Vil lave dette til min svigermor, men da jeg allerede har rigtig meget Alpaca liggende, vil jeg høre om det vil være ok at hækle det med to tråde Alpaca i stedet for en af hver? Mvh Anne
09.05.2015 - 22:46DROPS Design answered:
Hej Anne. Det tror jeg sagtens du kan. Men tjek lige at fastheden er korrekt og du synes det ser fint ud. God fornöjelse med det.
11.05.2015 - 13:23This shawl is magnificent and even more beautiful than in the photo ! Congrats to your designers.
30.01.2014 - 15:39Another pattern with mistakes in the French translation : it says in French to make the border and the knots with one strand of each, and in the English version it's 2 threads of Vivaldi
28.01.2014 - 22:27DROPS Design answered:
Dear Mrs Meynard, you are correct, French pattern has been edited. Thank you very much, Happy crocheting!
29.01.2014 - 16:35Har heklet 2, ett med bobler i nydelig blått med bobler og ett sandfarget. uten bobler. Nydelige sjal, og utrolig ø.myke og varme. Etter endel.strikking skriker dette sjalet nå etter å bli heklet enda en gang, og det skal bli julerødt :-) jeg burde gitt ett bort i gave, men klarer ikke gi dem fra meg. Beste sjal ever!
22.10.2013 - 01:59Jeg har lige hæklet det her dejlige sjal og kun brugt to nøgler Vivaldi og to nøgler Alpaca. Der er en del Vivaldi tilbage.
07.09.2013 - 20:54Gorgeous. I hope to be able to work this up soon. I've been crocheting for others now it's time for a little something special for me. ;-)
12.04.2013 - 06:59