
Popular categories
Looking for a yarn?


|
|||||||||||||
Sweet Marie |
|||||||||||||
 |
 |
||||||||||||
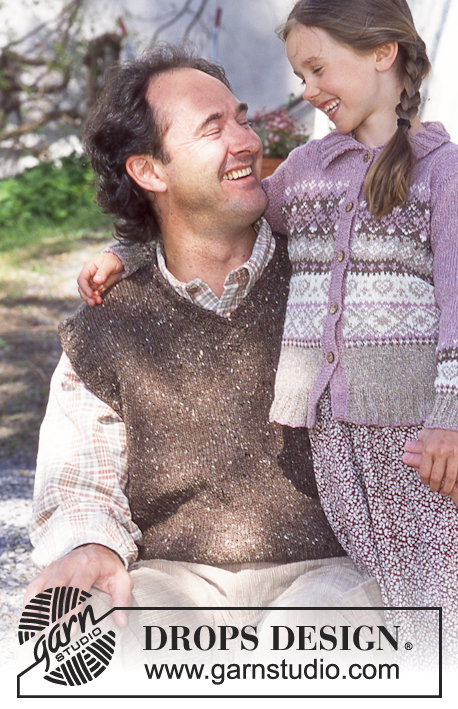
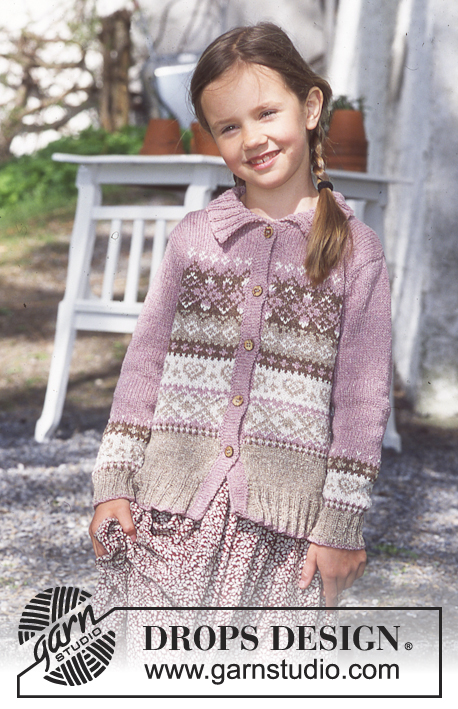
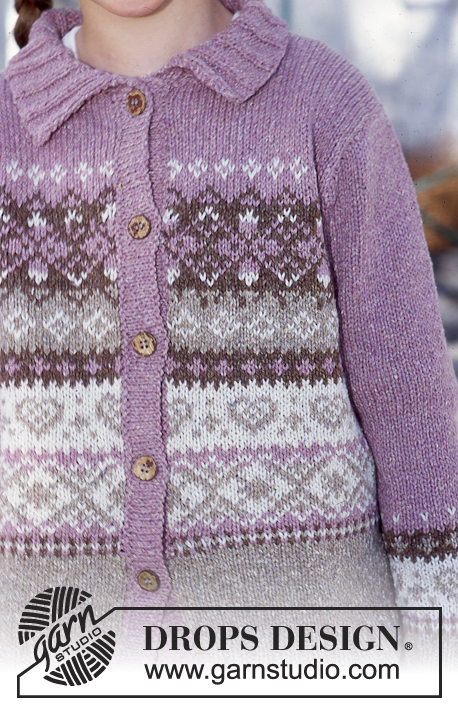
DROPS Cardigan in Silke-Tweed or BabyAlpaca Silk.
DROPS 70-6 |
|||||||||||||
|
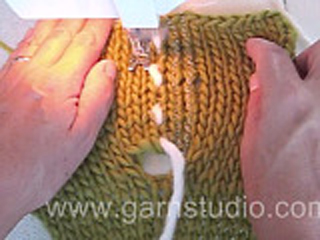
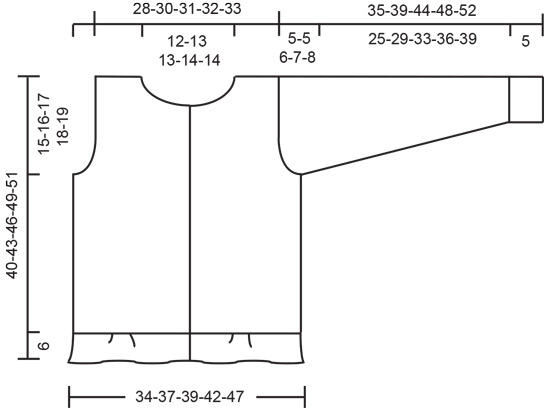
Gauge: 23 sts x 30 rows on larger needles in stockinette st = 10 x 10 cm Garter st, when knitting flat: Knit all sts, all rows. Rib-1: * K 2, P 4 *, repeat from * - *. Rib-2: * K 2, P 2 *, repeat from * - *. Pattern: See charts. The pattern is seen from the right side and is knit entirely in stockinette st. The charts are placed sideways on the page, with the bottom of the charts closest to the inside edge of the page. Body: The cardigan is knit in the round after the rib with steeks cut at center front and for armholes. Cast on 226-244-268-286-316 sts on smaller circular needles with pink /light old pink. Knit 1 row of Rib-1, keeping 1 st at each edge in garter st throughout and beginning rib with K 2 after the 1 garter st. Change to beige / light grey purple and continue in Rib-1. When the piece measures 2 cm dec all P 4 ribs to P 3 = 189-204-224-239-264 sts. When the piece measures 4 cm dec all P 3 ribs to P 2 = 152-164-180-192-212 sts. You are now knitting Rib-2. When the piece measures 6 cm change to larger circular needles and stockinette st, increasing 7-7-3-3-7 sts evenly distributed on the row and cast on 3 new sts at center front (these 3 sts + 2 edge sts = 5 steek sts which are not knit in the pattern) = 162-174-186-198-222 sts. Join and continue with beige / light grey purple in stockinette st over all sts. When the piece measures 8-9-11-12-13 cm knit Pattern 1 (except over steek sts). After Pattern 1 knit the rest with pink. At the same time when the piece measures 25-27-29-31-32 cm knit the next row as follows: 5 steek sts, 36-39-42-44-49 st for the front, bind off 6-6-6-8-10 sts for armhole, 73-79-85-89-99 sts for the back, bind off 6-6-6-8-10 sts for armhole, 36-39-42-44-49 sts for the front. On the next row cast on 5 new sts over the bound-off armhole sts at each side (these 5 sts are for the armhole steek and are not knit in the pattern) = 160-172-184-192-212 sts. Now dec 1 st for armhole at each side of the 5 armhole steek sts at each side every other row 4-5-7-8-12 times = 144-152-156-160-164 sts remain on needles. When the piece measures 36-38-41-44-45 cm bind off 17-17-17-19-19 sts (incl. 5 steek sts) at center front for neck = 127-135-139-141-145 sts and knit the rest back and forth on the needles. Now bind off at each neck edge every other row: 3 sts 1 time, 2 sts 1 time and 1 st 3-4-4-4-4 times = 111-117-121-123-127 sts remain on needles. When the piece measures 38-41-44-47-49 cm bind off the 25-27-27-29-29 sts at center back for the neck. Then bind off 2 sts at each back neck edge on the next row. Bind off the remaining 41-43-45-45-47 sts on each side (incl. 5 armhole steek sts) when the piece measures 40-43-46-49-51 cm Sleeve: Cast on 40-44-44-48-48 sts on smaller double-pointed needles with pink / light old pink. Join and place a marker at the join. Knit 1 row of Rib-2, change to beige / light grey purple and continue the rib. When the piece measures 5 cm change to larger double-pointed needles. Continue with Pattern 2 - centering the pattern on sleeves. At the same time when the piece measures 7 cm inc 1 st each side of marker 12-12-15-16-18 times: Size 3/4: alternately every 5th and 6th row. Size 5/6: alternately every 6th and 7th row. Sizes 7/8, 9/10 and 11/12: every 6 rows = 64-68-74-80-84 sts. After Pattern 2 is complete, knit the rest with pink / light old pink. When the piece measures 30-34-38-41-44 cm bind off 3 sts each side of marker and knit back and forth on needles. Now put sts on a st holder at each side for sleeve caps every other row: 3 sts 1 time, then 2 sts at each side until the piece measures 35-39-44-48-52 cm Put all sts from st holders back on the same needles and knit 2 cm reverse stockinette st back and forth on needles (for seam allowance over cut edge on body), increasing 12 sts evenly distributed on first row. Bind off. Assembly: Sew a marker thread in the center of the steek sts on either side and at the center front. Sew two machine seams around the marker thread, 1st seam = 1/2 st from the marker thread, 2nd seam = 1/2 st from first seam. Cut steeks for armholes and at the center front. Left button band: Pick up approx. 110 to 135 sts along left front on smaller needles with pink / light old pink. P 1 row (seen from the right side) then continue in stockinette st. When button band measures 2 cm P 1 row (seen from the right side) for folding edge, then knit 2 cm stockinette st, bind off. Right button band: Knit the same as the left, but after 1 cm make 5-5-6-6-6 buttonholes evenly distributed along button band - put bottom buttonhole approx. 9 cm from bottom edge and top buttonhole approx. 1 cm from top edge. 1 buttonhole = bind off 2 sts and cast on 2 new sts over the bound-off sts on on the next row. Make corresponding buttonholes on facing after folding edge. Fold button bands against wrong side and sew in place. Collar: Pick up from right side: approx. 68 to 80 sts (divisible by 4) around the neck (including over button bands) on smaller circular needles with pink / light old pink. K 1 row, then knit Rib-2, keeping 1 st at each edge in garter st throughout and beginning with K 2 after the edge st. When the collar measures 2.5 cm inc all P 2 ribs to P 3 and when the collar measures 5 cm inc all P 3 ribs to P 4. Continue in Rib-1 until the collar measures 8 cm ; bind off in pattern. Sew in sleeves. Fold seam allowance from sleeve cap over cut edge on Body and sew in place. Sew on buttons. |
|||||||||||||
Diagram explanations |
|||||||||||||
|
|||||||||||||

|
|||||||||||||
|
|||||||||||||
|
Have you made this or any other of our designs? Tag your pictures in social media with #dropsdesign so we can see them! Do you need help with this pattern?You'll find tutorial videos, a Comments/Questions area and more by visiting the pattern on garnstudio.com. © 1982-2024 DROPS Design A/S. We reserve all rights. This document, including all its sub-sections, has copyrights. Read more about what you can do with our patterns at the bottom of each pattern on our site. |
|||||||||||||


With over 40 years in knitting and crochet design, DROPS Design offers one of the most extensive collections of free patterns on the internet - translated to 17 languages. As of today we count 304 catalogues and 11422 patterns - 11422 of which are translated into English (UK/cm).
We work hard to bring you the best knitting and crochet have to offer, inspiration and advice as well as great quality yarns at incredible prices! Would you like to use our patterns for other than personal use? You can read what you are allowed to do in the Copyright text at the bottom of all our patterns. Happy crafting!
Comments / Questions (25)
Hello, do i have to do the steek...or can i just omit this and if so how do i do this
11.01.2024 - 19:57DROPS Design answered:
Dear Julia, you can work without steek stitches, you then just have to cast on 1 edge stitch on each side for body, then cast on 1 edge stitch towards armhole when dividing piece, then just don't work the 2 cm reversed stocking stitch on top of sleeve. Happy knitting!
12.01.2024 - 07:58Mit welchem Garn ist die Jacke auf dem Bild gestrickt? SilkeTweet oder BabyAlpacaSIlk?
04.01.2022 - 11:30DROPS Design answered:
Liebe Katja, die Jacke wurde mit Silke Tweed gestrickt, aber dieses Garn ist jetzt ausgelaufen, deshalb schlagen wir eine Variante mit Baby Alpaca Silk. Viel Spaß beim stricken!
04.01.2022 - 12:36Hallo, ich habe Verständnis Probleme mit den Ärmeln. Nachdem ich die 6 M unten abgekettet habe soll M auf einen hilfsfaden legensind das insgesamt nur 5 Maschen und dann mit der linken Seite nach aussen. Das verstehe ich leider nicht.
29.11.2021 - 18:37DROPS Design answered:
Liebe Tanja, nachdem die 6 mittleren Maschen abgekettet sind, stricken Sie in Hin- und RückReihen weiter, und dann am Anfang jeder Reihe stellen Sie Maschen stil so: 3 Maschen am Anfang der 2 nächsten Reihe (3 M beidseitig), dann 2 Maschen bis die Ärmel 35-39-44-48-52 cm (die Reihenanzahl hängt an Ihrer Maschenprobe, beachten Sie nur daß dieselben Maschenanzahl auf beiden Seiten stillgelegt wurde), dann stricken Sie alle Maschen wieder und nund 2 cm glatt links (in Hin- und Rückreihen mit linken Maschen nach aussen). Viel Spaß beim stricken!
30.11.2021 - 08:09Viimeistelyohjeet puuttuvat edelleen sekä kauluksen ohje. Lisäksi vartalon ympärys on minusta aivan liian iso. 9-vuotiaan lapsenlapseni vartalon ympärys on noin 70 cm.
27.08.2021 - 15:27Hallo, ich möchte die Jacke für meine 8 Jährige Nichte stricken. Leider verstehe ich das mit dem aufschneiden nicht so ganz gibt es dazu Videos? Geht nach dem aufschneiden nicht Maschen verloren? Liebe Grüße Tanja
20.07.2021 - 11:27DROPS Design answered:
Liebe Frau Heerdt, hier finden Sie ein Video, das zeigt, wie man die Steekmaschen für die Armausschnitte/Ärmel strickt. Und dieses Video zeigt 6 Varianten für Blenden. Viel Spaß beim stricken!
20.07.2021 - 15:13Kan ni förklara delen när man stickar ärm och har maskat av 6 maskor , sedan ska maskor sättas på tråd ? Hamnar inte dem väldigt långt nedanför arbetet ? Man ska ju sätta på tråd vartannat varv tills arbetet mäter ...... sen ska de sättas tillbaks på stickan , tillsammans med övriga arbetet eller .? Jag har frågat vänner men ingen förstår
14.11.2020 - 12:17DROPS Design answered:
Hej Susanne. De maskor du maskar av hamnar under ärmen men de maskor du sätter på tråd blir till ärmkulle så det är riktigt att de 6 som du avmaskar kommer längre ner. Mvh DROPS Design
17.11.2020 - 11:41Onko 70-6 sweet marie neuletakin viimeistely ohje löydettävissä jostain?
29.07.2018 - 17:02Mistä löytyy nuo luvatut viimeistely ohjeet?
27.06.2018 - 16:19Adela wrote:
Copa manga finalizada con 2cmJersey revés El reves del jersey queda en el LD. Se cose la manga ensamblando(ocultando) por dentro del cuerpo estos 2cm Jersey reves?Hay algún video de esto? Gracias Abrazo Adela
26.05.2016 - 11:49DROPS Design answered:
Hola Adela. No hay más vídeos aparte de los que te mencionamos anteriormente. La parte de pt jersey revés se esconde dentro de la costura.
28.05.2016 - 16:40Adela wrote:
Estoy muy agradecida por tu respuesta.Te saludo Adela
22.05.2016 - 16:56