
Popular categories
Looking for a yarn?


|
||||||||||||||||||||||||||||||||||
Budding Romance |
||||||||||||||||||||||||||||||||||
 |
 |
|||||||||||||||||||||||||||||||||
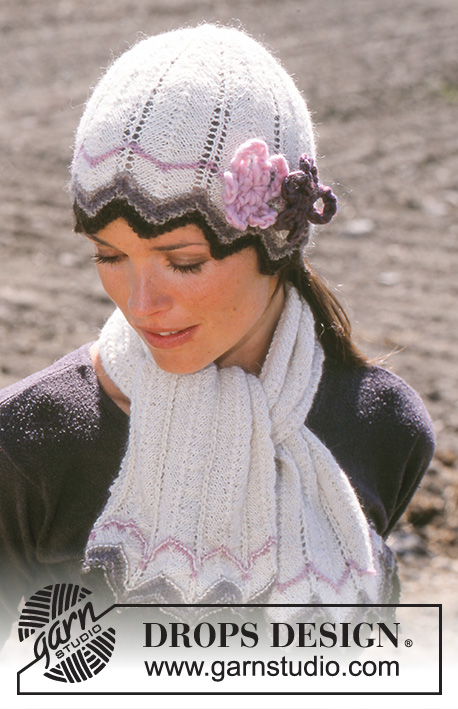
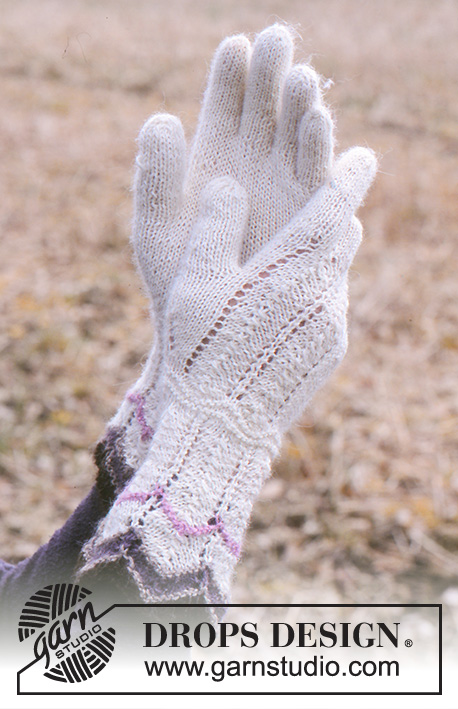
DROPS Romantic hat, scarf and gloves in Alpaca
DROPS 93-12 |
||||||||||||||||||||||||||||||||||
|
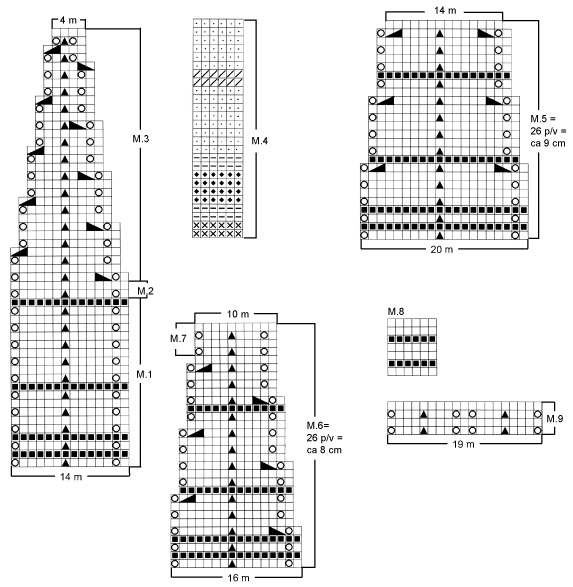
Hat and scarf: Knitting tension: 28 sts x 30 rows using needles 3.5 mm in pattern = 10x10cm Pattern: See diagrams M.1 to M.5 Hat: Cast on 140 sts loosely using brown and double pointed needles 3.5mm. K 1 round and P 1 round. Continue in M.1 whilst knitting stripes following M.4. Knit M. once and continue in off-white and M.2 until piece measures 12cm from lowest point. Change to M.3 and decrease as shown in diagram. After M.3, there are 40 sts left on needle. Cut thread and pull through remaining sts. Hat measures approx 22 cm from lowest point. Crochet rosettes: Crochet 4 cs using pale pink and crochet hook 7mm and form a ring with a sl st. 1st round: *6 ch, 1 dc in ring*, repeat from *-* a total of 5 times. Cut thread. Sew on a little safety pin to back of rosette. Make another using dark purple-mix. Scarf: Cast on 87 sts using brown and needles 3.5mm. Knit 2 rows garter stitch (1st row = right side). Knit next row as follows: 3 edge sts (garter throughout), M.5 over the next 80 sts, k 1 st from beg of M.5 (in order that the pattern starts the same way either side) and finish with 3 edge sts (garter). Continue the pattern like this, whilst knitting stripes after M.4 – NB! 1st row in M4 is already knitted. After 1 report of M.5, there are 63 sts on needle. Change to off-white and continue in M.2 with 3 edge sts (garter) each side. NB: Remember that pattern has to start the same way each side as before. When scarf measures 80 cm knit M.5 again, whilst knitting stripes after M.4, but start at the top of each pattern diagram so that the pattern is knitted mirrored, i.e. inc. sts in M.5 by knitting 2 sts in 1 instead of dec. After M.5 and M.4, there are 87 sts on needle. K 1 row from the wrong side, K 1st row in M.5 while casting off this row to make the edge wavy. Gloves Knitting tension: 32 sts x 34 rows using needles 2.5mm in pattern = 10x10cm 25 sts x 34 rows using needles 2.5mm in stocking sts = 10x10cm Pattern: See diagrams M.4 and M.6 to M.9. Diagrams show patterns from the right side Right glove: Cast on 80 (96) sts using two 2.5mm double pointed needles and dark brown. Remove one needle, distribute sts on 4 double pointed needles 2.5mm. K 1 row, P 1 row. Continue in M.6 whilst knitting stripes after M.4. After M.6 there are 50 (60) sts on row. Continue in off-white (until finished measurements) and M.7. When glove measures 11 (12) cm knit M.8, at the same time dec 2 sts evenly on last row of M.8 for size M/L(no dec for size XS/S) = 50 (58) sts. After M.8 knit next row as follows 25 (29) stocking sts (= palm of hand), insert a marking thread (= side), 3 (5) stocking sts, M.9 (= 19 sts), 3 (5) sts stocking sts, insert a marking thread (= side). Continue as follows: At the same time, on 2nd row of M.9 (piece measures approx 13 (14) cm) increase for thumb on each side of 2nd st on row. Inc. on every second row a total of 5(6) times = 11 (13) sts – inc. by picking up st from previous row and K it. When piece measures approx 18 (20) cm, put the 11 (13) thumb sts on a safety pin. On next row, cast on 1 new st over these = 50 (58) sts. Continue in pattern as before. When piece measures 22 (24) cm (adjust after a full report of M.9), K 2 rows stocking sts whilst adjusting number of sts to 46 (54). Now put the first and the last 19 (22) sts on thread and knit little finger over the remaining 8 (10) sts. Little finger: Cast on 4 (4) new sts towards thread = 12 (14) sts. Distribute sts on 3 needles and knit stocking sts until finger measures 4.5 (6) cm, on next round knit all sts 2 and 2 together and pull thread through remaining sts. Put all sts from thread back on needles and cast on 2 new sts towards little finger. Knit 3 rows stocking sts over all sts. Now put sts back on 2 threads, i.e. 20 (23) sts from palm of hand on 1 thread and 20 (23) sts from upper hand on 1 thread. Ring finger: Take 6 (7) sts from each thread and cast on 2 new sts towards middle finger = 16 (18) sts. Distribute sts on 3 needles and knit stocking stitch until finger measures 6.5 (8) cm, on next round knit all sts 2 and 2 together and pull thread through remaining sts. Middle finger: Take 7 (7) sts from thread 1, and 6 (7) sts from thread 2, and cast on 1 new st towards index finger and 1 towards ring finger = 15 (16) sts. Distribute sts on 3 needles and knit stocking stitch until finger measures 7 (8) cm, on next round knit all sts 2 and 2 together and pull thread through remaining sts. Index finger: Put the remaining 14 (16) sts back on needle and cast on 3 (4) new sts towards middle finger = 17 (20) sts. Knit stocking stitch until finger measures 5.5 (7) cm, on next round knit all sts 2 and 2 together and pull thread through remaining sts. Thumb: Put the 11 (13) thumb sts back on needle and cast on 7 (8) new sts behind these = 18 (21) sts. Knit approx 5 (6) cm stocking stitch, knit all sts 2 and 2 together and cast off as on the other fingers. Knit another glove, but mirrored, i.e. after M.8 knit following row as follows: Insert marking thread (= side), 3 (5) stocking sts, M.9 (=19 sts), 3 (5) stocking sts, insert marking thread (= side), 25 (29) stocking sts (= palm of hand) and inc. for thumb each side of last but one st on row. |
||||||||||||||||||||||||||||||||||
Diagram explanations |
||||||||||||||||||||||||||||||||||
|
||||||||||||||||||||||||||||||||||
|
||||||||||||||||||||||||||||||||||
|
Have you made this or any other of our designs? Tag your pictures in social media with #dropsdesign so we can see them! Do you need help with this pattern?You'll find tutorial videos, a Comments/Questions area and more by visiting the pattern on garnstudio.com. © 1982-2024 DROPS Design A/S. We reserve all rights. This document, including all its sub-sections, has copyrights. Read more about what you can do with our patterns at the bottom of each pattern on our site. |
||||||||||||||||||||||||||||||||||


With over 40 years in knitting and crochet design, DROPS Design offers one of the most extensive collections of free patterns on the internet - translated to 17 languages. As of today we count 304 catalogues and 11422 patterns - 11422 of which are translated into English (UK/cm).
We work hard to bring you the best knitting and crochet have to offer, inspiration and advice as well as great quality yarns at incredible prices! Would you like to use our patterns for other than personal use? You can read what you are allowed to do in the Copyright text at the bottom of all our patterns. Happy crafting!
Comments / Questions (9)
Ik heb voor de handschoen 80 steken opgezet, die staan nu op 5 naalden, brei ik die nu zo verder dus met 6 naalden en brei ik dat niet in het rond?
26.05.2018 - 05:03DROPS Design answered:
Hallo Monique, Je zet de 80 steken op met 2 breinaalden en dan trek je er 1 naald uit. Op die manier heb je steken losjes en gelijkmatig opgezet. Daarna verdeel je die 80 steken over sokkenbreinaalden en brei je in de rondte. (je kan ipv sokkenbreinaalden ook een rondbreinaald nemen). Bij sokkenbreinaalden is het het handgist om de steken over 3 naalden te verdelen en dan met de vierde naald te breien.
27.05.2018 - 19:45Det er kun huen der skal laves som den ses her men ved ikk hvor meget jeg skal bruge i natur farve bundfarven , men er 50 g nok til den største str.
13.03.2017 - 15:52DROPS Design answered:
Hej Pia. Som jeg skrev i mit forrige svar, saa vil jeg tro at du har nok i 50 gr hvis du laver den med striberne (ogsaa i den store str).
14.03.2017 - 14:50Det er kun huen der skal laves som den ses her men ved ikk hvor meget jeg skal bruge i natur farve bundfarven , men er 50 g nok til den største str.
13.03.2017 - 15:43Hvor meget skal der bruges til kun huen
13.03.2017 - 15:08DROPS Design answered:
Hej Pia. Det ved jeg desvaerre ikke. Men jeg vil skyde paa at du har nok i 1 nögle Alpaca naturel og saa rester til kanterne. Vil du strikke den i 1 farve, ville jeg nok tage 2 nögler for at vaere helt sikker.
13.03.2017 - 15:39Corina wrote:
Is this a free pattern or not? It seems like teaser for a movie: some information but most of the plot left out. If the pattern is available for free where is the rest of it?
12.04.2016 - 04:44DROPS Design answered:
Dear Corina, you will find on this page the free pattern for hat, scarf and gloves. Diagrams M.1 to M.9 are at the very bottom of the pattern (read more here about diagrams) and you will find related videos to that pattern under thumb "videos". Happy knitting!
12.04.2016 - 09:24Kajsa, du har rätt. Självklart är det M.8 först, och sedan kommer M.9. Vi har rättat i mönstret. Tack ska du ha!
23.05.2008 - 16:47Jag tror att jag har hittat ett eventuellt fel i mönstret på vantarna, men är ej säker... Det står att när arbetet mäter (11) 12 cm - se mått-tips - stickas M.9 - samtidigt på sista v i M.8 minskas 2 m jämnt fördelat i stl M/L (minska ingen m i stl XS/S) = (50) 58 m. Där det står att man ska sticka M 9 borde det väl vara M 8 det ska vara? M 9 kommer ju senare och ska vara på handens ovansida...
21.05.2008 - 19:49Självklart behövs det hjälp med ma an st ro et no bb ed
09.07.2007 - 16:27
10.11.2006 - 23:43