
Popular categories
Looking for a yarn?


|
|||||||||||||
DROPS 91-10 |
|||||||||||||
|
|
|||||||||||||
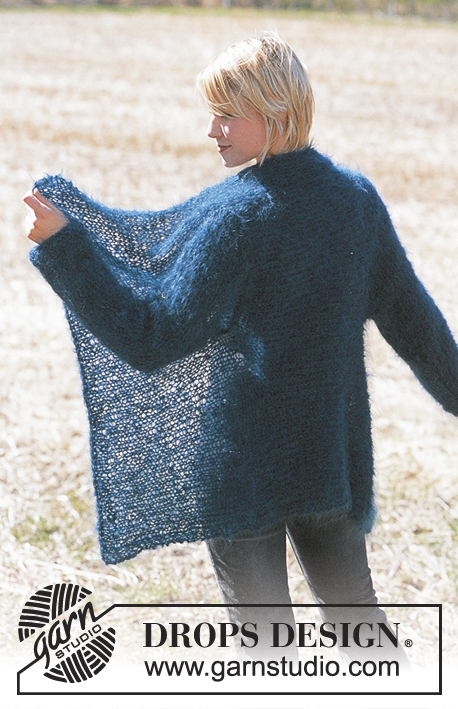
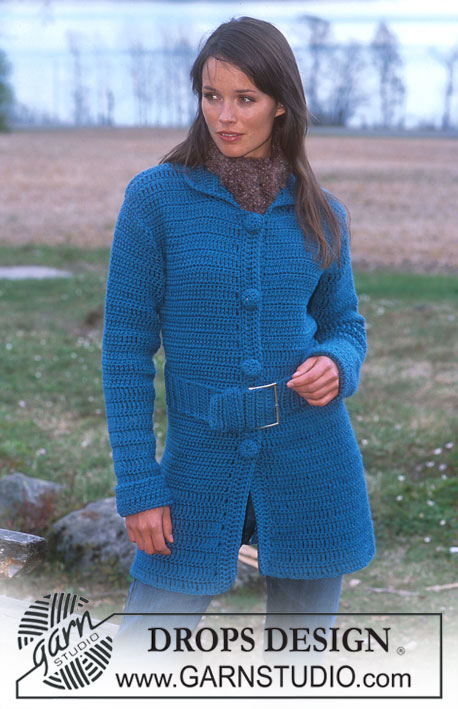
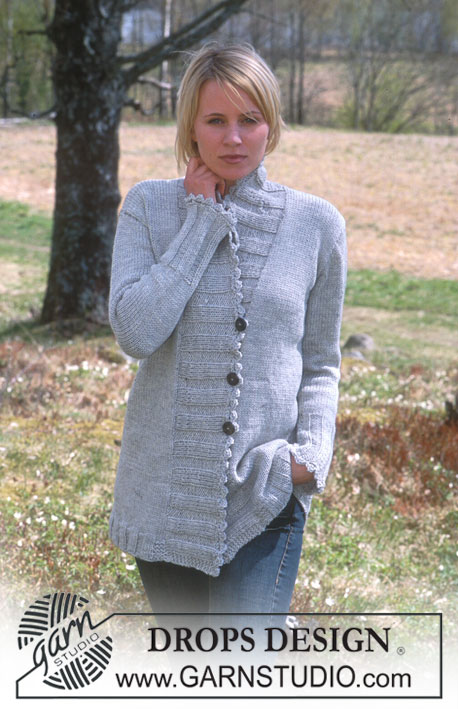
DROPS Lace Coat in Vivaldi
DROPS 91-10 |
|||||||||||||
|
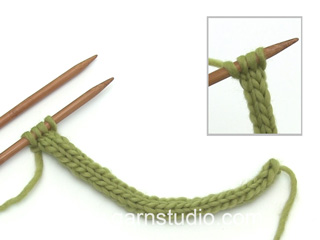
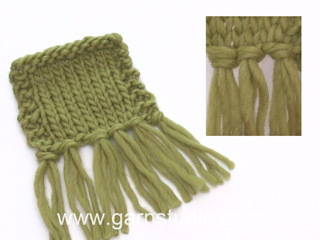
COAT: Gauge: 8 sts in Pattern 1 = approx. 10 cm in width. Pattern: See the charts. The pattern is the same on right and wrong sides. Rib-1: * K 3, P 5 *, repeat * - *. Rib-2: * K 3, P 3 *, repeat * - *. Measuring tips: Make all measurements when the garment is held up. Otherwise, it will be too long when worn. Back: Cast on 43-47-51-55-59 sts around 2 needles with 2 strands Vivaldi (so that the edge will be elastic). Pull out one needle and knit 4 rows garter st (row 1 = right side). Take away 1 strand and continue with only one strand of yarn. Establish pattern on the next row as follows (right side row): 9-5-7-9-5 sts garter st, Pattern 1A (= 5 sts), Pattern 1B over the following 12-24-24-24-36 sts, Pattern 1C (= 8 sts) and finish with 9-5-7-9-5 sts garter st. Continue in the pattern as established. When the piece measures 20 cm dec 1 st at each side every 17-17-18-18-19 cm a total of 4 times = 35-39-43-47-51 sts. When the piece measures 85-87-89-91-93 cm – read Measuring tips above: bind off 3-5-6-8-10 sts at each side for armhole = 29-29-31-31-31 sts. Continue the pattern as before – any sts not in the Pattern knit in garter st. When approx. 3-7 cm remain to finished measurements finish a whole or half repeat of the lace pattern and continue with garter st over all sts to finished measurements. At the same time when the piece measures 102-105-108-111-114 cm bind off the center 7 sts for the neck. On the next row dec 1 st at each neck edge = 10-10-11-11-11 sts remain on each shoulder. When the piece measures 104-107-110-113-116 cm bind off all sts loosely – so that the bound-off edge is not too tight, make and bind off a yo approx. every 5 sts. Left front: Cast on 24-26-28-30-32 sts around 2 needles with 2 strands Vivaldi. Pull out one needle and knit 4 rows garter st (row 1 = right side). Take away 1 strand and continue with only one strand. Establish pattern on the next row as follows (from side edge): Size S: 9 sts garter st, Pattern 2 (= 13 sts), finish with 2 sts garter st at the center front edge. Sizes M + L + XL + XXL: 5-7-9-5 sts garter st, Pattern 2B (= 5 sts), Pattern 2C (= 12 sts), Pattern 2D (= 2 sts) and finish with 2-2-2-8 sts garter st at the center front edge. Continue the pattern as established. When the piece measures 20 cm dec 1 st at each side 4 times as on back. When the piece measures 76-77-78-79-80 cm dec 1 st at the center front for V-neck every 3-3-4-4-4 cm a total of 7 times. At the same time when the piece measures 85-87-89-91-93 cm – read Measuring-tips – bind off 3-5-6-8-10 sts at the side for armhole. After all shaping is complete 10-10-11-11-11 sts remain on shoulder. Continue the pattern until approx. 3 - 7 cm remain to finished measurements. Now finish a whole or half repeat as on back and then continue in garter st to finished measurements. When piece is the same length as back bind off all sts, the piece measures approx. 104-107-110-113-116 cm. Right front: Cast on and knit the same as the left reversing shaping – that is, make Pattern 2 a mirror image so that the pattern will be the same at the center front. Sleeve: Loosely cast on 42-42-42-50-50 sts with 2 strands Vivaldi. Knit Rib-1, keeping 1 edge st at each side in garter st. When the piece measures 6 cm dec all P 5 to P 4 and when the piece measures 11 cm dec all P 4 to P 3 = 32-32-32-38-38 sts. When the piece measures 16 cm K 1 row (right side row), decreasing 5-5-5-9-9 sts evenly distributed on the row = 27-27-27-29-29 sts. P 1 row and then take away 1 strand Vivaldi. Establish pattern on the next row as follows: 1-1-1-2-2 sts garter st, Pattern 1A (= 5 sts), Pattern 1B (= 12 sts), Pattern 1C (= 8 sts) and 1-1-1-2-2 sts garter st. Continue the pattern as established. When the piece measures 18 cm inc 1 st at each side every 30-15-14-14-8 cm a total of 2-3-3-3-4 times = 31-33-33-35-37 sts – knit the increased sts in garter st. When the piece measures 51-51-49-48-46 cm – read Measuring tips above – put a marker at each side (markers indicate where sleeves shall be sewn to Body). Finish the pattern after a whole or half repeat and continue with garter st to finished measurements. When the piece measures 55-57-57-58-59 cm bind off all sts loosely – so that the bound-off edge will not be too tight, make and bind off a yo approx. every 5 sts. Assembly: Sew shoulder seams. Button band + collar: Pick up approx. 119-137 sts (divisible by 6 + 5) along right front and up to center back of neck with 2 strands Vivaldi – pick up from right side. K 2 rows, then knit the next row as follows (wrong side row = from back of the neck and down to lower edge): K 1 (edge st knit in garter st), P 1, * K 3, P 3 *, repeat * - * and finish with 3 sts in garter st. Continue the rib as established. When buttonband measures 8 cm inc all P 3 to P 4 (as seen from the right side) over just the outermost 14 sts at back neck = approx. 121-139 sts. When buttonband measures 10 cm bind off the bottom 63-63-63-69-69 sts from lower edge and up. Then knit rib as before over the remaining 52-70 sts for collar, but put the lower 3 sts on a st holder every other row (that is, at the end of each wrong side row) a total of 7 times = approx. 31-49 sts remain on needle. Put sts on st holder back on needles and knit 1 row rib over all sts then bind off loosely in rib. Repeat on left front, then sew buttonbands together at center back using edge sts as seam allowance. Sew seam so that it does not show when collar is folded out. Sew in sleeves using edge sts as seam allowance. Sew sleeve and side seams using edge sts as a seam allowance. I-cord Belt: Cast on 9 sts on circular needles or a double pointed needle with 2 strands Vivaldi and knit as follows: K 1 row, * push sts to right end of needle without turning work, pull yarn tight on back side and K 1 row *, repeat * - *. Bind off when belt measures approx. 2 - 2.5 meters. If you prefer, you can knit 9 sts stockinette st back and forth on needles, then sew the sides together to form a long tube. |
|||||||||||||
Diagram explanations |
|||||||||||||
|
|||||||||||||

|
|||||||||||||
|
Have you made this or any other of our designs? Tag your pictures in social media with #dropsdesign so we can see them! Do you need help with this pattern?You'll find tutorial videos, a Comments/Questions area and more by visiting the pattern on garnstudio.com. © 1982-2024 DROPS Design A/S. We reserve all rights. This document, including all its sub-sections, has copyrights. Read more about what you can do with our patterns at the bottom of each pattern on our site. |
|||||||||||||


With over 40 years in knitting and crochet design, DROPS Design offers one of the most extensive collections of free patterns on the internet - translated to 17 languages. As of today we count 304 catalogues and 11422 patterns - 11422 of which are translated into English (UK/cm).
We work hard to bring you the best knitting and crochet have to offer, inspiration and advice as well as great quality yarns at incredible prices! Would you like to use our patterns for other than personal use? You can read what you are allowed to do in the Copyright text at the bottom of all our patterns. Happy crafting!
Comments / Questions (3)
I would love to have a go at this pattern, unfortunately the diagram isn't showing.
15.02.2013 - 17:11DROPS Design answered:
Dear Mandy, diagram is back at the bottom of the page, thank you. Happy knitting!
16.02.2013 - 10:19Hoi Marjan, Hij is wel vertaald, hij staat onder "vertaling diagram" in dezelfde verticale volgorde als de symbolen bij de teltekening. Ik zal later even de symbolen 'vertalen' zodat het wat duidelijker is.
23.01.2007 - 19:20bij dit patroon is de uitleg van het gaatjesmotief niet naar het Nederlands vertaald en kan ik er geen patroon inbreien. zouden jullie mij dit in het nederlands kunnen vertalen en toesturen en het gaat dan om de uitleg van de symbolen. b.v.d
23.01.2007 - 19:07