DROPS Safran
DROPS Safran
100% Cotton
from 2.05 $ /50g
Get the yarn to make this pattern from 16.40$.

The yarn cost is calculated from the pattern’s smallest size and the yarn’s cheapest product type. Looking for an even better price? You might find it on the DROPS Deals!

DROPS SS24
DROPS Baby 1-11
Size: 3 – 6/9 (12/18 -24) months

Sweater:

Materials: DROPS Safran from Garnstudio
100-100 (150-150) g col 009, navy
50-50 (50-50) g col 019, red
50-50 (50-50) g col 006, blue
50-50 (50-50) g col 011, yellow
50-50 (50-50) g col 004, mint

Sweater and Pants:
200-250 (300-300) g col no 009, navy

DROPS double pointed needles and circ needle: 2.5mm and 3mm/ US 1.5 and 2.5, or the size needed to obtain the correct knitting gauge.

DROPS buttons: 3 pcs.


-------------------------------------------------------

Alternative Yarn – See how to change yarns here
Yarn Groups A to F – Use the same pattern and change the yarn here
Yarn usage using an alternative yarn – Use our yarn converter here

-------------------------------------------------------

DROPS Safran
DROPS Safran
100% Cotton
from 2.05 $ /50g
Get the yarn to make this pattern from 16.40$.

The yarn cost is calculated from the pattern’s smallest size and the yarn’s cheapest product type. Looking for an even better price? You might find it on the DROPS Deals!

Pattern instructions

NOTE: This pattern is written in American English. All measurements in charts are in cm. For conversion from inches to cm - click here. There are different terms for crocheting in American and British English. If this pattern includes crochet, click for "crochet terms" here. For this pattern in British English, please click here.
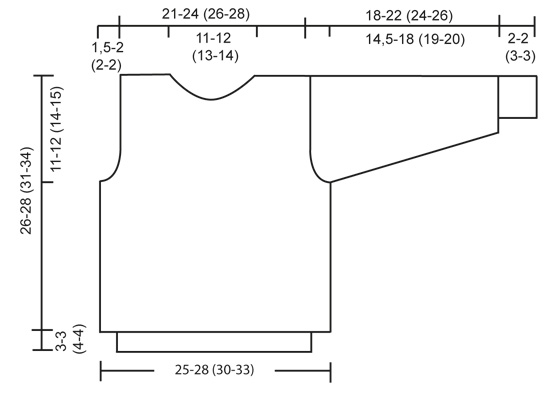
Knitting gauge: 24sts x 32 rows on needles size 3 mm / US 2.5 in stockinette st = 10x10cm.

Rib: *K1, P1*

Pattern: See diagram (1 diagram = 1 repeat). Pattern is seen from RS and worked in stockinette st.

Body:
Worked in the round on a circular needle.
Cast on 120-132 (144-156) sts on circ needles size 2.5 mm / US 1.5 with navy.
Work 3-3 (4-4) cm rib.
Change to circ needle size 3 mm / US 2.5 and work M.1. and then continue in navy. Remember to check knitting gauge.
At the same time when piece measures 14-15 (17-19) cm , bind off 4-6 (6-6) sts each side for arm hole and finish back and front separately.

Front: = 56-60 (66-72) sts. Dec for arm hole on every other row as follows: 1 st twice = 52-56 (62-68) sts. Continue until piece measures 19-21 (24-27) cm .
Work M.2 and then finish piece in navy.
At the same time when piece measures 23-25 (27-30) cm , bind off centre 14-16 (18-22) sts for neck.
Dec on neck edge on every other row as follows: 2 sts twice, 1 st twice. Continue until piece measures 26-28 (31-34) cm .
Bind off remaining 13-14 (16-17) sts for shoulder.

Back: = 56-60 (66-72) sts. Dec for arm hole and work pattern as front. Continue until piece measures 20-22 (25-28) cm . Bind off 4 sts mid back for slit and finish each side separately.
Left side: When piece measures 24-26 (29-32) cm , dec for neck on every other row as follows: 9-10 (11-13) sts once, 1 st twice.
Continue until piece measures 26-28 (31-34) cm .
Bind off remaining 13-14 (16-17) sts. Right side: Work as left side.

Sleeves:
Worked in the round on double pointed needles.
Cast on 38-40 (40-42) sts on double pointed needles size 2.5 mm / US 1.5 with navy. Work 2-2 (3-3) cm rib.
Change to double pointed needles size 3 mm / US 2.5 and work M.2, and at the same time inc 2-4 (8-10) sts evenly on first round = 40-44 (48-52) sts.
At the same time inc underneath sleeve as follows: 2 sts 9-9 (10-10) times for 3months: every 4th round, for 6/9 + 24 months: every 6th round, for 12/18 months: alternatively every 5th and 6th round = 58-62 (68-72) sts.
Work inc sts into pattern. After M.2, work in navy until piece measures 14-18 (20-22) cm . Work M.3 and then finish in navy.
Continue until piece measures 18-22 (24-26) cm . Bind off.

Assembly:
Sew shoulder and side seams. Pick up 12 sts on needle size 2.5 mm / US 1.5 with navy along left side of slit and work 1.5 cm in rib. Bind off.
Repeat along right side of slit, but after 0.5 cm make 2 button holes evenly spaced – 1 button hole = bind off 2 sts, cast on 2 sts on next row. Sew rib band at bottom of slit.
Pick up approx 70-80 sts around neck opening on circ needle size 2.5 mm / US 1.5 and work 1.5 cm in rib. Bind off.
Sew sleeves to body in edge st to avoid seams being too bulky. Sew in buttons.


Pants:

Size: 3 – 6/9 (12/18 -24) months

Materials: DROPS Safran from Garnstudio
100-150 (150-200) g col 009, navy
Remnants of all pattern colors from sweater.

DROPS circular needle and double pointed needles: 2.5mm and 3mm/ US 1.5 and 2.5.

Knitting gauge: 24sts x 32 rows on needles size 3 mm / US 2.5 in stockinette st = 4" x 4" (10x10cm)

Rib: *K1, P1*

Right leg:
Worked in the round on double pointed needles.
Cast on 64-68 (70-74) sts on double pointed needles size 2.5 mm / US 1.5 with navy and work 6 cm / 2⅜" rib. Change to double pointed needles size 3 mm / US 2.5 and work M.2, and at the same time inc 12-12 (14-14) sts evenly on 1st round = 76-80 (84-88) sts. Complete M.2 and continue in navy.
Continue until piece measures 19-21 (24-28) cm . Divide work and work back and forth on needle. Inc 1 st at beginning and end of row for seam.
Continue until piece measures 21-23 (26-30) cm .
Bind off 3 sts each side = 72-76 (80-84) sts. Put work aside.

Left leg: Work as right leg.

Pants:
Put both legs on a circ needle = 144-152 (160-168) sts and at the same time inc 1 st in last st on each leg = 146-154 (162-170) sts
Inc mid back each side of middle 2 sts on every other round as follows: 1 st 4 times.
Right side of the middle: Sl 1, K1, psso.
Left side: K2tog.
At the same time dec mid front each side of mid 2 sts on every other round as follows: 1 st 5 times = 144-152 (160-168) sts.
Continue until piece measures 38-42 (47-52) cm .
Change to needle size 2.5 mm / US 1.5 and work 2 cm / ¾" rib.
Dec for eyelets on next round as follows: 3 + 24 months: K 5th and 6th sts tog, 6/9 + 12/18 months: K 7th and 8th st tog. Inc with a yo over the dec sts on next round.
Continue until rib measures 3 cm / 1". Bind off.

Assembly: Sew seam between legs. Insert elastic through eyelets.


Socks:

Size: 3 – 6/9 (12/18 -24) months.

Length of foot: 10-11 (12.5-14.5) cm .

Materials: DROPS Safran from Garnstudio
50-50 (50-50) g col 019, red

DROPS double pointed needles: 2.5mm and 3mm/ US 1.5 and 2.5.

Knitting gauge: 24sts x 32 rows on needles size 3 mm / US 2.5 in stockinette st = 4" x 4" (10x10cm)

Rib: *K1, P1*

Cast on 34-36 (36-38) sts on double pointed needles size 2.5 mm / US 1.5 with red.
Work 1.5 cm in rib. Change to needle size 3 mm / US 2.5 and work stockinette st. until work measures 7-8 (8-9) cm .
Heel: Work 3 cm / 1" in stockinette st back and forth on needle over mid 18 sts.
Decrease for heel: (1st row RS):
1st row: K10, K2tog back of loop, K1, turn. 2nd row: S1, P4, P2tog, P1, turn. 3rd row: S1, K5, K2tog back of loop, K1, turn. 4th row: S1, P6, P2tog, P1, turn.
5th row: S1, K7, K2tog back of loop, K1, turn. 6th row: S1, P8, P2tog, P1, turn. 7th row: K2tog, K8, K2tog back of loop = 10 sts left on needle.
Pick up 7-7 (8-8) sts each side of heel and put all sts on one needle = 40-42 (44-46) sts. Dec each side of the 16-18 (18-20) sts on top of foot on every row as follows: 1 st 4-4 (5-5) times = 32-34 (34-36) sts.
Continue until foot measures 7-8 (9-11) cm (measured from start of heel dec). Dec for toes at beginning of each row (4 dec in all) 1 st 4-4 (5-5) times, then on every other row: 1 st twice.
Pull double thread through remaining sts and fasten.

Diagram

All measurements in charts are in cm.

symbols = mint
symbols = navy
symbols = red
symbols = blue
symbols = yellow
diagram
diagram

Each of our patterns has specific tutorial videos to help you.

Do you have a question? See a list of frequently asked questions (FAQ)

Knitting tension is what determines the final measurements of your work, and is usually measured per 10 x 10 cm. It is provided like so: number of stitches in width x number of rows in height - eg: 19 stitches x 26 rows = 10 x 10 cm.

The knitting tension is very individual; some people knit/crochet loosely while others work tightly. You adjust the knitting tension with the needle size, which is why the suggested needle size only serve as a guide! You need to adjust this (up or down) to ensure that YOUR knitting tension matches the knitting tension provided in the pattern. If you work with a different knitting tension than provided you will have a different yarn consumption, and your work will have different measurements than what the pattern suggests.

The knitting tension also determines which yarns can replace each other. As long as you achieve the same knitting tension you can replace one yarn with another.

See DROPS lesson: How to measure your tension/gauge

See DROPS video: How to make a gauge tension swatch

The required amount of yarn is provided in grams, eg: 450 g. To calculate how many balls you’ll need you first need to know how many grams are in 1 ball (25g, 50g or 100g). This information is available if you click on the individual yarn quality on our pages. Divide the amount required with the amount of each ball. For example, if each ball is 50g (the most common amount), the calculation will be as follows: 450 / 50 = 9 balls.

The important thing when changing from one yarn to another is that the knitting/crochet tension remains the same. This is so that the measurements of the finished piece will be the same as on the sketch provided. It is easier to achieve the same knitting tension using yarns from the same yarn group. It is also possible to work with multiple strands of a thinner yarn to achieve the knitting tension of a thicker one. Please try our yarn converter. We recommend you to always work a test swatch.

Please NOTE: when changing yarn the garment might have a different look and feel to the garment in the photo, due to individual properties and qualities of each yarn.

See DROPS lesson: Can I use a different yarn than the one mentioned in the pattern?

All our yarns are categorised into yarn groups (from A to F) according to thickness and knitting tension – group A contains the thinnest yarns and group F the thickest. This makes it easier for you to find alternative yarns to our patterns, should you wish to switch yarn. All yarns within the same group have a similar knitting tension and can easily replace each other. However, different yarn qualities have different structures and properties which will give the finished work a unique look and feel.

Click here for an overview of the yarns in each yarn group

At the top of all our patterns you’ll find a link to our yarn converter, which is a helpful tool should you wish to use a different yarn than suggested. By filling in the yarn quality you wish to replace, the amount (in your size) and number of strands, the converter will present good alternative yarns with the same knitting tension. Additionally it will tell you how much you’ll require in the new qualities and whether you’ll need to work with multiple strands. Most skeins are 50g (some are 25g or 100g).

If the pattern is worked with multiple colours, every colour will have to be converted separately. Similarly, if the pattern is worked with several strands of different yarns (for example 1 strand Alpaca and 1 strand Kid-Silk) you will have to find alternatives for each, individually.

Click here to see our yarn converter

Since different yarns have different qualities and textures we have chosen to keep the original yarn in our patterns. However, you can easily find options among our available qualities by using our yarn converter, or simply pick a yarn from the same yarn group.

It is possible that some retailers still have discontinued yarns in stock, or that someone has a few skeins at home that they would like to find patterns for.

The yarn converter will provide both alternative yarn as well as required amount in the new quality.

If you think it's hard to decide what size to make, it can be a good idea to measure a garment you own already and like the size of. Then you can pick the size by comparing those measures with the ones available in the pattern's size chart.

You'll find the size chart at the bottom of the pattern.

See DROPS lesson: How to read size chart

The needle size provided in the pattern serves only as a guide, the important thing is to follow the knitting tension. And since knitting tension is very individual, you will have to adjust the needle size to ensure that YOUR tension is the same as in the pattern – maybe you’ll have to adjust 1, or even 2 needle sizes, up or down to achieve the correct tension. For this, we recommend that you work test swatches.

Should you work with a different knitting tension than the one provided, the measurements of the finished garment might deviate from the measurement sketch.

See DROPS lesson: How to measure your tension/gauge

See DROPS video: How to make a gauge tension swatch

Working a garment top-down provides more flexibility and room for personal adjustment. For example it is easier to try the garment on while working, as well as making adjustments to length of yoke and shoulder caps.

The instructions are carefully explaining every step, in the correct order. Diagrams are adjusted to the knitting direction and are worked as usual.

The diagram depicts all rows/rounds, and every stitch seen from the right side. It is read from bottom to top, from right to left. 1 square = 1 stitch.

When working back and forth, every other row is worked from the right side and every other row is worked from the wrong side. When working from the wrong side, the diagram will have to be worked reversed: from left to right, knit stitches are purled, purl stitches are knit etc.

When working in the round every round is worked from the right side and the diagram are worked from right to left on all rounds.

See DROPS lesson: How to read knitting diagrams

The diagram depicts all rows/rounds, and every stitch seen from the right side. It is worked from bottom to top, from right to left.

When working back and forth every other row is worked from the right side: from right to left and every other row is worked from the wrong side: from left to right.

When working in the round, every row in the diagram are worked from the right side, from right to left.

When working a circular diagram you start in the middle and work your way outwards, counter clockwise, row by row.

The rows usually start with a given number of chain stitches (equivalent to the height of the following stitch), this will either be depicted in the diagram or explained in the pattern.

See DROPS lesson: How to read crochet diagrams

Instructions for working several diagrams after each other on the same row/round, will often be written like so: “work A.1, A.2, A.3 a total of 0-0-2-3-4 times". This means you work A.1 once, then A.2 is worked once, and A.3 is repeated (in width) the number of times provided for your size – in this case like so: S = 0 times, M = 0 times, L=2 times, XL= 3 times and XXL = 4 times.

The diagrams are worked as usual: begin with the first row in A.1, then work the first row in A.2 etc.

See DROPS lesson: How to read knitting diagrams

See DROPS lesson: How to read crochet diagrams

The total width of the garment (from wrist-to-wrist) will be larger in the larger sizes, despite the actual sleeves being shorter. The larger sizes have longer sleeve caps and wider shoulders, so there will be a good fit in all sizes.

The measurement sketch/schematic drawing provides information regarding the full length of the garment. If it’s a jumper or a jacket the length is measured from the highest point on the shoulder (usually closest to the neckline), and straight down to the bottom of the garment. It is NOT measured from the tip of shoulder. Similarly, the length of yoke is measured from the highest point on the shoulder and down to where yoke is split into body and sleeves.

See DROPS lesson: How to read a schematic drawing

Diagrams are often repeated on the round or in height. 1 repeat is the diagram the way it appears in the pattern. If it says to work 5 repeats of A.1 in the round, then you work A.1 a total of 5 times after/next to each other in the round. If it says to work 2 repeats of A.1 vertically/in height you work the entire diagram once, then begin again at the start and work the entire diagram one more time.

Chain stitches are slightly narrower than other stitches and to avoid working the cast-on edge too tight, we simply chain more stitches to begin with. The stitch count will be adjusted on the following row to fit the pattern and measurement sketch.

The rib edge is more elastic and will contract slightly compared to, for example, stocking stitch. By increasing before the rib edge, you avoid a visible difference in width between the rib edge and the rest of the body.

It’s very easy to cast off too tightly, and by making yarn overs while casting off (and simultaneously casting these off) you avoid a too tight cast off edge.

See DROPS video: How to bind off with yarn overs (yo)

To achieve an even increase (or decrease) you can increase on, for example: every 3rd and 4th row alternately, like so: work 2 rows and increase on the 3rd row, work 3 rows and increase on the 4th. Repeat this until the increase is complete.

See DROPS lesson: Increase or decrease 1 st on every 3rd and 4th row alternately

Should you prefer to work in the round instead of back and forth, you may of course adjust the pattern. You’ll need to add steeks mid-front (usually 5 stitches), and follow the instructions. When you would normally turn and work from the wrong side, simply work across the steek and continue in the round. At the end you’ll cut the piece open, pick up stitches to work bands, and cover the cut edges.

See DROPS video: How to knit steeks and cut open

Should you prefer to work back and forth instead of in the round, you may of course adjust the pattern so you work the pieces separately and then assemble them at the end. Divide the stitches for the body in 2, add 1 edge stitch in each side (for sewing) and work the front and back pieces separately.

See DROPS lesson: Can I adapt a pattern for circular needles into straight needles?

Pattern repeats can vary slightly in the different sizes, in order to get the correct proportions. If you’re not working the exact same size as the garment in the photo, yours might deviate slightly. This has been carefully developed and adjusted so that the complete impression of the garment is the same in all sizes.

Make sure to follow instructions and diagrams for your size!

If you have found a pattern you like which is available in women’s size it’s not very difficult to convert it to men’s size. The biggest difference will be the length of sleeves and body. Start working on the women size that you think would fit across the chest. The additional length will be worked right before you cast off for the armhole/sleeve cap. If the pattern is worked top-down you can add the length right after the armhole or before the first decrease on sleeve.

Regarding additional yarn amount, this will depend on how much length you add, but it is better with a skein too many than too few.

All yarns will have excess fibres (from production) that might come off as lint or shedding. Brushed yarns (ie hairier yarns) have more of these loose, excess fibres, causing more shedding.

Shedding also depends on what is worn under or over the garment, and whether this pulls at the yarn fibres. It’s therefore not possible to guarantee that there will be no shedding

Below are some tips on how to get the best result when working with hairier yarns:

1. When the garment is finished (before you wash it) shake it vigorously so the looser hairs come off. NOTE: do NOT use a lint roller, brush or any method that pulls at the yarn.

2. Place the garment in a plastic bag and put it in your freezer - the temperature will cause the fibres to become less attached to each other, and excess fibres will come off easier.

3. Leave in the freezer for a few hours before taking it out and shaking it again.

4. Wash the garment according to the instructions on the yarn label.

Pilling is a natural process that happens to even the most exclusive of fibers. It's a natural sign of wear and tear that is hard to avoid, and that is most visible in high friction areas of your garment like a sweater's arms and cuffs.

You can make your garment look as new by removing the pilling, using a fabric comb or a pill/lint remover.

Still can't find the answer you need? Then scroll down and leave your question so one of our experts can try to help you. This will be done normally within 5 to 10 working days.
In the meantime, you can read the questions and answers that others have left to this pattern or join the DROPS Workshop on Facebook to get help from fellow knitters/crocheters!

You might also like...

Post a comment to pattern DROPS Baby 1-11

We would love to hear what you have to say about this pattern!

If you want to leave a question, please make sure you select the correct category in the form below, to speed up the answering process. Required fields are marked *.

Comments / Questions (5)

country flag Cheryl Skagfjord wrote:

I’m having trouble with understanding how to do the waist on this pattern for the pants, specifically the eyelet portion and how the elastic is attached.

08.06.2023 - 07:27

DROPS Design answered:

Dear Mrs Skagfjord, work the folded hem at waist as follows: work 2 cm rib K1/P1 with needle size 2,5 mm, then work the next round as follows *work 4 or 6 (see size), K2 tog*, repeat from *-* all the round. On next round increase over the decrease: *work 5 or 7 (see size), YO*, repeaet from *-*. all the round. Continue rib until rib section measures 3 cm then cast off. Thread then an elastic in the eyelet round created by the yarn overs. Happy knitting!

08.06.2023 - 09:51

country flag Lis Kaarsberg wrote:

Jeg kan ikke finde/se diagrammet på de flotte mennesker der er strikket på trøjen??

28.10.2017 - 09:11

DROPS Design answered:

Hei Lis. Her manglet den danske diagramteksten, så derfor viste ikke diagrammene. Det er nå ordnet, takk for at du gjorde oss oppmerksom på dette. Jeg ser også at diagrammene er gamle/utydelig. Jeg vil iløpet av kort tid oppdatere dem slik at det vil bli lettere å tyde dem. God Fornøyelse

31.10.2017 - 11:03

country flag Bohnhoff, Claudia wrote:

Hallo, könnte mir jemand erklären, wie ich den Halsausschnitt bzw. die Blenden machen soll? Ist eine Schulternaht offen zu lassen und dann mit Knöpfen zu schließen oder sind die Knöpfe nur "Atrappe"? LG

24.01.2014 - 19:24

DROPS Design answered:

Liebe Claudia, die Blende ist am Schlitz in der hinteren Mitte und die Knöpfe und und Knopflöcher sind "echt". Die Schulternähte sind geschlossen.

27.01.2014 - 09:43

country flag Destribats wrote:

Peut-on utiliser de l'alpaga baby à la place de safran comme indiqué ? Merci d'avance

26.11.2013 - 19:15

DROPS Design answered:

Bonjour Mme Destribats, Baby Alpaca Silk fait effectivement partie des qualités alternatives à Safran, car elles sont toutes les 2 du groupe A. Bon tricot!

27.11.2013 - 09:00

country flag Battista Chantal wrote:

Dos et devant se tricottent ils en continue sur la meme aiguille ? si oui , l'explication n'est pas claire pour les diminutions de l'enmanchure à combien de mailles faut il separer le travail ?

18.10.2013 - 14:03

DROPS Design answered:

Bonjour Mme Battista, le dos et le devant se tricotent en rond jusqu'à 14-15 (17-19) cm (cf taille), on rabat alors 4-6 m pour les emmanchures set on termine le dos et le devant séparément. Bon tricot!

18.10.2013 - 15:13