
Popular categories
Looking for a yarn?


|
|||||||
Sweet Smile |
|||||||
 |
 |
||||||
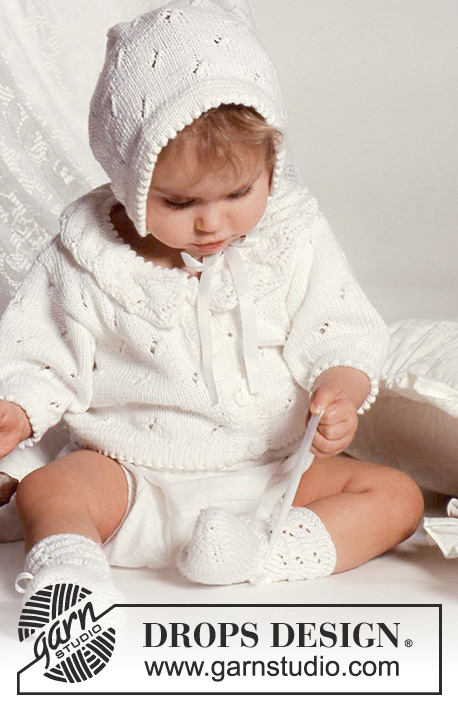
Set of knitted jacket with lace pattern and frill collar, bonnet and socks in for baby and children in DROPS Safran
DROPS Baby 1-8 |
|||||||
|
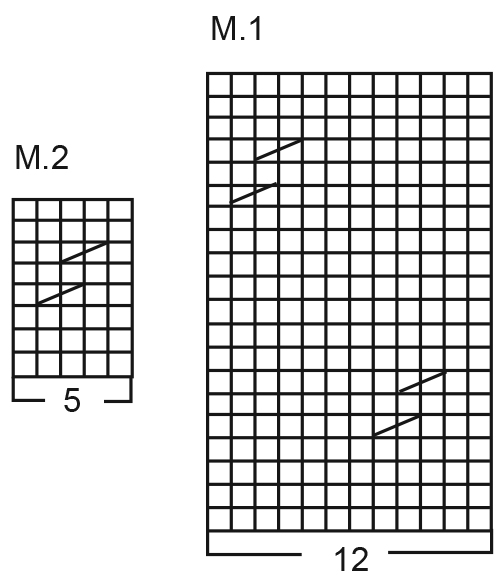
Knitting gauge: 24sts x 32 rows on needles size 3 mm / US 2.5 in stockinette st = 4" x 4" (10x10cm) Hem: Work 2 cm / 3/4'' in stockinette st. Next row: K2tog, yo (=fold – all measurements are taken from here), work 2 cm / 3/4'' stockinette st. Lace pattern: Worked over 13 sts. 1st row and all WS rows: K2, P sts until 2 sts remain, K2. 2nd row: S1, K3, yo, K5, yo, K2tog, yo, K2. 4th row: S1, K4, S1, K2tog, psso, K2, (yo, K2tog) – repeat twice, K1. 6th row: S1, K3, S1, K1, psso, K2, (yo, K2tog) – repeat twice, K1. 8th row: S1, K2, S1, K1, psso, K2, (yo, K2tog) – repeat twice, K1. 10th row: S1, K1, S1, K1, psso, K2, (yo, K2tog) – repeat twice, K1. 12th row: K1, S1, K1, psso, K2, yo, K1, yo, K2tog, yo, K2. 14th row: S1, (K3, yo) – repeat twice, K2tog, yo, K2. Repeat rows 1-14. Pattern: See diagram (1 diagram = 1 repeat). Pattern is seen from RS. Jacket: Jacket is worked back and forth on circ needle. Cast on 130-140(150-168) sts on circ needles size 2.5 mm / US 1.5 with white. Work hem. Change to circ needle size 3 mm / US 2.5, work M.1 and at the same time dec 10-8 (6-0) sts evenly on first row = 120-132 (144-168) sts. Continue until piece measures 11-12 (13-15) cm. Next row: work 28-31 (34-39) sts across front, bind off 4-4 (4-6) sts for armhole, work 56-62 (68-78) sts across back, bind off 4-4 (4-6) sts for armhole, work 28-31 (34-39) sts across front. Finish fronts and back separately. Left front: = 28-31 (34-39) sts. Continue in pattern. Dec for armhole on every other row as follows: 1 st 2-2 (3-3) times = 26-29 (31-36) sts. Continue until piece measures 17-19 (21-24) cm. Dec for neck on every other row as follows: 6-7 (9-10) sts once, 1 sts 7 times. Continue until piece measures 24-26 (28-31) cm. Bind off remaining sts for shoulder. Right front: Work as left front. Back: = 56-62 (68-78) sts. Continue in pattern. Dec for armhole each side on every other row as follows: 1 st 2-2 (3-3) times = 52-58 (62-72) sts. Continue until piece measures 23-25 (27-30) cm. Bind off centre 22-24 (28-30) sts for back neck. Dec each side for neck on every other row as follows: 1 st twice. Continue until piece measures 24-26 (28-31) cm. Bind off remain sts for each shoulder. Sleeves: Cast on 38-40 (40-42) sts on straight needles size 2.5 mm / US 1.5 with white. Work hem. Change to needles size 3 mm / US 2.5, work M.1 and at the same time inc 8-8 (8-8) sts evenly on first row = 46-48 (48-50) sts. At the same time inc 1 sts each side inside 1 edge st as follows: 1 st 8-10 (12-13) times on every 5th row = 62-68 (72-76) sts. Continue until piece measures 16.5-20 (22-24) cm. Bind off 3 sts each side for sleeve top. Dec each side on every other row as follows: 5 sts 2-3 (3-3) times. Continue until piece measures 18-22 (24-26) cm. Bind off. Assembly: Sew shoulder seams. Fold the lower edge hem to WS and sew. Left button band: Pick up 40-50 sts on needle size 2.5 mm / US 1.5 with white along left front and work hem. Bind off. Right button band: Work as left band but after 1 cm / 3/8'' make 4 button holes evenly spaced – 1 button hole = bind off 2 sts – cast on 2 sts on next row over bound off sts. Fold button bands to WS and sew Collar: Cast on 13 sts on needle size 3 mm / US 2.5 and work approx 70 cm in Lace pattern (see explanation). Bind off (adjust to pattern repeat). Pick up approx 120 sts around the edge of the Lace pattern = collar on needles 2.5mm and work 1 cm / 3/8'' in stockinette stand at the same time dec evenly on row to 80 sts. Next row: *K2tog, yo*, then work 1 cm / 3/8'' in stockinette st. Bind off. Fold collar in half and sew to neck of jacket ( - pull the edge a bit when sewing to the back to get a nicer finish). Sew sleeve seams. Sew sleeves to body in edge st to avoid seams being too bulky. Sew in buttons. Bonnet: Size: 3 – 6/9 (12/18 -24) months. Height of bonnet: 15.5-17 (20-20) cm. Materials: DROPS Safran from Garnstudio 50-50 (50-100) g col no 017, white DROPS needles: 2.5mm and 3mm/ US 1.5 and 2.5 90 cm ribbon. Knitting gauge: 24sts x 32 rows on needles size 3 mm / US 2.5 in stockinette st = 10x10cm. Edge: Work 2 cm / 3/4'' in stockinette st. Next row: *K2tog, yo*. (=fold, all measurements are taken from here). Work 2 cm / 3/4'' in stockinette st. Bonnet: Cast on 72-84 (96-96) sts on needle size 2.5 mm / US 1.5 and work Edge. Change to needle size 3 mm / US 2.5 and work M.1. Continue until piece measures 15-17 (18-18.5) cm. Bind off 24-26 (32-32) sts each side. Continue in M.1. across the mid 24-32 (32-32) sts until piece measures 25-28 (30-32) cm. bind off. Assembly: Sew seam mid back. Fold front edge in half to WS and sew. Pick up approx 100 sts along bottom edge (and also the bottom of front edge)on needle size 2.5 mm / US 1.5 and work 2 rows in stockinette st. Next row (RS): *K2tog, yo*, then 1 row stockinette st, 1 row in reverse stockinette st. Bind off. Insert ribbon through holes. Socks: Size: 3 – 6/9 (12/18 -24) months. Length of foot: 10-11 (12-14) cm. Materials: DROPS Safran from Garnstudio 50-50 (50-50) g col 017, white DROPS double pointed needles: 3mm / US 2.5. Ribbon. Knitting gauge: 24sts x 32 rows on needles size 3 mm / US 2.5 in stockinette st = 4" x 4" (10x10cm) 1 Ridge: *1 round reverse stockinette st, 1 round stockinette st*. Sock: Cast on 30-35 (40-40) sts on double pointed needles size 3 mm / US 2.5 with white. Work 2 Ridges. Next round: *K2tog, yo*, 2 rounds in stockinette st. Work M.2 until piece measures 7-8 (8-9) cm. Heel: Work 3-4 (4-4) cm in stockinette st back and forth on needle over centre back 18 sts. Decrease for heel: (1st row RS): 1st row: K10, K2tog back of loop, K1, turn. 2nd row: S1, P4, P2tog, P1, turn. 3rd row: S1, K5, K2tog back of loop, K1, turn. 4th row: S1, P6, P2tog, P1, turn. 5th row: S1, K7, K2tog back of loop, K1, turn. 6th row: S1, P8, P2tog, P1, turn. 7th row: K2tog, K8, K2tog back of loop = 10 sts left on needle. Pick up 7-8 (9-9) sts each side of heel and put all sts on one needle = 36-43 (50-50) sts. Continue in stockinette st and at the same time dec each side of the 12-17 (22-22) sts on top of foot on every row as follows: 1 st 3-4 (4-4) times = 30-35 (42-42) sts. Continue until foot measures 7-8 (9-11) cm (measured from start of heel dec). Put a marker or thread each side and dec for toes at beginning of every other row (4 dec in all) 1 st 6-7 (8-8) times = 6-7 (10-10) sts. Pull double thread through remaining sts and fasten. Insert ribbon through holes. |
|||||||
Diagram explanations |
|||||||
|
|||||||
|
|||||||

|
|||||||
|
Have you made this or any other of our designs? Tag your pictures in social media with #dropsdesign so we can see them! Do you need help with this pattern?You'll find tutorial videos, a Comments/Questions area and more by visiting the pattern on garnstudio.com. © 1982-2024 DROPS Design A/S. We reserve all rights. This document, including all its sub-sections, has copyrights. Read more about what you can do with our patterns at the bottom of each pattern on our site. |
|||||||


With over 40 years in knitting and crochet design, DROPS Design offers one of the most extensive collections of free patterns on the internet - translated to 17 languages. As of today we count 304 catalogs and 11422 patterns - 11417 of which are translated into English (US/in).
We work hard to bring you the best knitting and crochet have to offer, inspiration and advice as well as great quality yarns at incredible prices! Would you like to use our patterns for other than personal use? You can read what you are allowed to do in the Copyright text at the bottom of all our patterns. Happy crafting!
Comments / Questions (42)
DROPS Baby 1-8 DROPS design: Modello n° Ø-007-by Buonasera non capisco come è dove fare le asole visto che il bordo è doppio nel cardigan Grazie Esther
01.06.2023 - 20:36DROPS Design answered:
Buongiorno Ester, deve lavorare le asole sul bordo destro a 1 cm dal bordo a intervalli regolari. Alla fine del bordo lo piega come indicato. Buon lavoro!
02.06.2023 - 12:26Danke für die neue Übersetzung. Ein Fehler ist noch, aber dann klappt der Kragen bestens. Fehler in 4. Reihe: …. 1. Umschlag- 2 Maschen re. zusammen stricken - 1 Umschlag- 2Maschen re. stricken LG M. Schmidt
29.04.2023 - 18:54Hallo, die Spitzenanleitung klappt einfach überhaupt nicht. Da manches Mal „Masche abheben oder abnehmen steht, ist es sehr unverständlich. Überarbeitung? LG M. Schmidt
27.04.2023 - 17:27DROPS Design answered:
Liebe Martina, die Spitzenkante wurde neu übersetzt, nun ist es hoffentlich verständlicher. Sollten noch Fragen sein, melden Sie sich gerne wieder. Gutes Gelingen nun!
28.04.2023 - 10:38Vielen Dank, ich hätte einen Denkfehler! 🙈
19.03.2022 - 16:03Ich verstehe das Ende der Anleitung für die Socken nicht. Wird bis zum Ende immer nur hin und zurück gestrickt? Und was heißt im vorletzten Satz: bei jeder und jeder? Fehlt da etwas?
16.03.2022 - 00:01DROPS Design answered:
Liebe Frau Gröpl, Socken werden in der Runde gestrickt, dann Fersen wird hin und zurück gestrickt, dann Fuss wird in der Runde bis zur Ende gestrickt. Für die Spitze wird es abwechslungsweise in jeder Runde und in jeder 2. Runde abgenommen (= 1 Runde mit Abnahmen, 1 Runde ohne Abnahmen, 1 Runde mit Abnahmen => diese 3 Runden wiederholen bis 6-7 (10-10) Maschen übrig sind. Viel Spaß beim stricken!
16.03.2022 - 09:40Where is the rib pattern like in the picture for the edging of the baby jacket? It just says do a hem in stocking st. I am confused
24.07.2021 - 16:21DROPS Design answered:
Dear Tonya, that is not a ribbing, but a turned up edging, that has a yo / K2tog at the foldong like, that forms the picot edging. Happy Stitching!
25.07.2021 - 01:32I'm sorry, my question somehow ended up beneath the wrong pattern. I will try to repost (and clarify) under the correct pattern because your answer of course doesn't match my confusion...
01.03.2021 - 10:25Ich verstehe die Anleitung für die Spitze nicht, ich versuche es jetzt schon zum dritten Mal, und die Maschenzahl kommt nicht hin, weder in der 4. Reihe noch am Ende, da habe ich nicht mehr genug Maschen. Kann mir jemand helfen?
28.02.2021 - 08:43DROPS Design answered:
Liebe Sandra, Sie haben vor der Spitze 30-35-42-42 Maschen, dann nehmen Sie für die Spitze 4 Maschen in jeder 2. Reihe insgesamt 6-7-8-8-8 Mal (= 24-28-32-32 Maschen werden insgesamt abgenommen) = 6-7-10-10 Maschen bleiben noch übrig. Kann das Ihnen helfen? Viel Spaß beim stricken!
01.03.2021 - 09:21Hi, could you pls explain what does that means: work 1 cm in stocking stand Thanks, Alica
08.08.2019 - 18:56DROPS Design answered:
Dear Alica007, you'vd to work 1 cm in stockinette stitch, i.e. knit all rounds if you're working in round, or knit one row and purl the other row, if you're working flat. Happy crafting!
08.08.2019 - 19:14Hi, I will knit a jacket. I understand all, except when should I start lace pattern? Does jacket has lace pattern or is it whole done only in M1? Thanks and regards Alica
16.07.2019 - 07:59DROPS Design answered:
Dear Alica007, the lace pattern (explained at the beg of the pattern) will be used for collar - see under Assembly - M1 will be worked on the jacket, it's the larger diagram, worked over 12 sts. Happy knitting!
16.07.2019 - 09:28