
Popular categories
Looking for a yarn?


|
|||||||
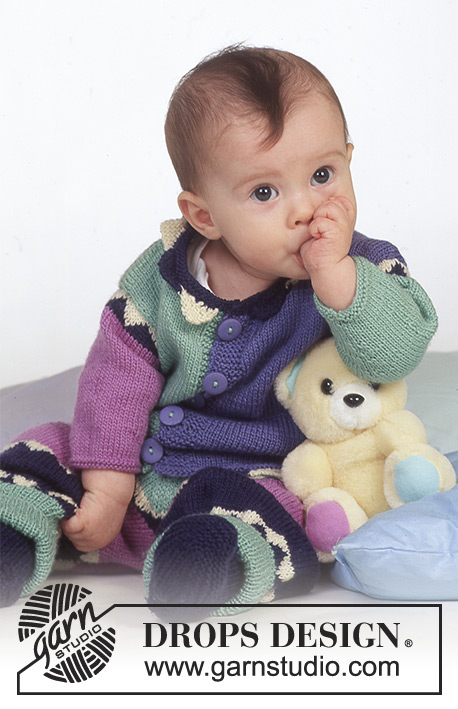
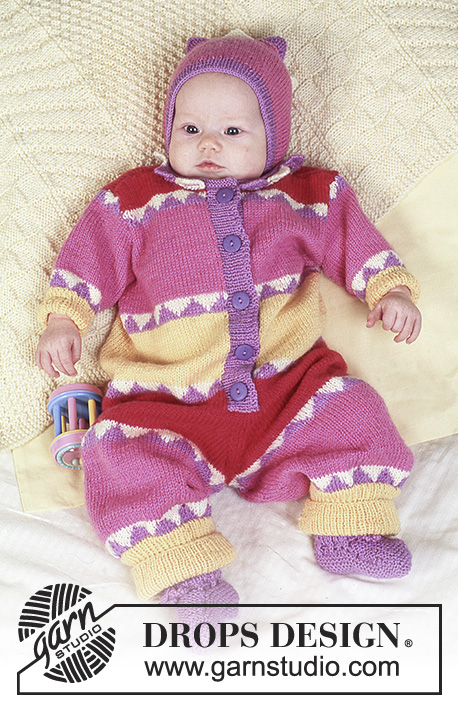
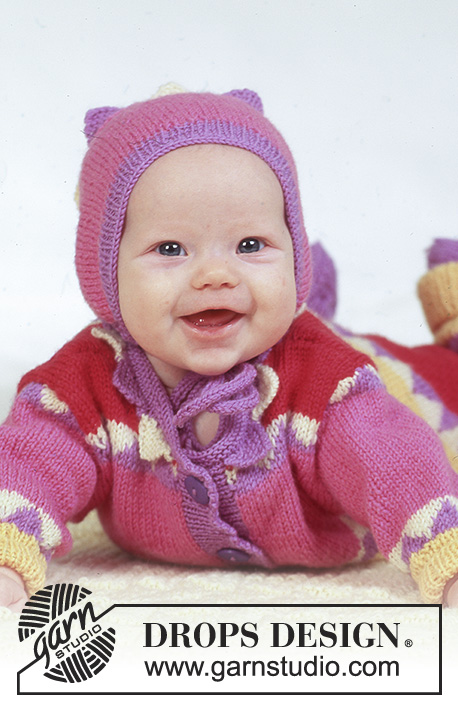
Circus Act |
|||||||
 |
 |
||||||
DROPS long sleeved jumpsuit in harlequin pattern, hat and socks in “BabyMerino”.
DROPS Baby 4-4 |
|||||||
|
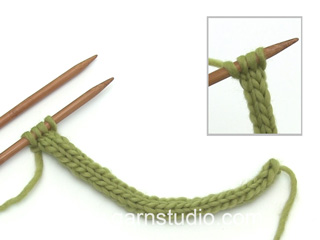
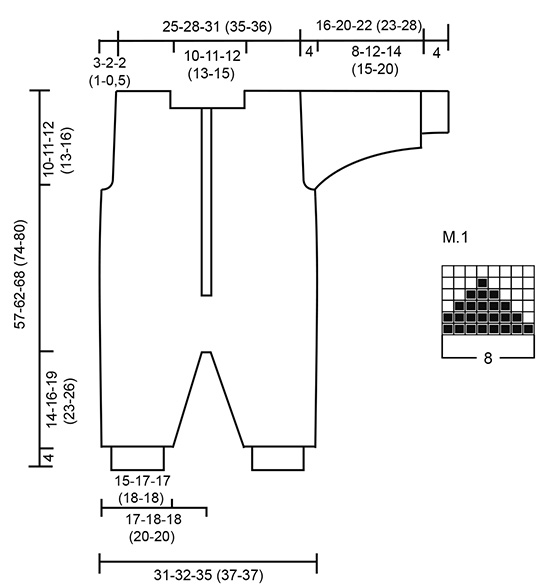
JUMPSUIT: Knitting gauge: 26 sts x 35 rows on needles size 2.5 mm / US 1.5 in stockinette sts = 4" x 4" (10 x 10 cm). Garter st, back and forth on needle: K all rows. Rib: *K1, P1*, repeat from *-*. Pattern: *M.1 (see diagram, the diagram show the pattern from the RS), then 9-10-9 (10-9) cm cerise(blue), M.1, 9-10-9 (10-9) cm red (purple), M.1, 9-10-9 (10-9) cm yellow (mint)*. Repeat from *-*. Left leg: Cast on 80-88-88 (96-96) sts on double pointed needles size 2 mm/US 0 with yellow (mint) and knit 8 cm / 3" Rib (to be folded double so measure as 4 cm / 1½"). Change to needle size 2.5 mm / US 1.5 and continue in pattern (see explanation above), at the same time inc on the inside of leg on every 2-3-3 (4-5) cm : 2 sts 4 times = 88-96-96 (104-104) sts. Remember the knitting gauge. When piece measures 17-18-20 (25-28) cm divide piece at inside leg (= split) and complete piece back and forth on needle. Inc 1 st each side for seam = 90-98-98 (106-106) sts. When piece measures 18-20-23 (27-30) cm bind off 5-7-3 (5-5) sts each side = 80-84-92 (96-96) sts. Put piece aside and knit the other leg. Right leg: knit as left leg. Body piece: Put left and right leg in on the same circular needle = 160-168-184 (192-192) sts. Knit 3 rounds and now inc mid back on both sides of the middle 2 sts on every other round: 1 st 8 times, at the same time dec mid front on every other round on both sides of the middle 2 sts: 1 st 8 times = 160-168-184 (192-192) sts. When piece measures 25-26-28 (33-36) cm bind off 8 sts mid front for opening and continue back and forth on needle = 152-160-176 (184-184) sts. When piece measures 47-51-56 (61-64) cm divide the piece as follows: 36-38-42 (44-44) sts = front piece, 80-84-92 (96-96) sts = back piece, 36-38-42 (44-44) sts = front piece. Now complete each piece separately. Left front piece: = 36-38-42 (44-44) sts. Bind off to shape the armhole on every other row: 2 sts 2-1-1 (0-1) times, 1 st 4-4-4 (1-1) times = 28-32-36 (41-43) sts. When piece measures 53-58-64 (69-75) cm , dec to shape the neckline on every other row: 5-6-7 (7-10) sts 1 time, 2 sts 2-2-2 (3-3) times. Bind off remaining sts when piece measures 57-62-68 (74-80) cm . Right front piece: As left front piece, but mirrored. Back piece: = 80-84-92 (96-96) sts. Dec to shape the armhole as described for front piece = 64-72-80 (90-94) sts. When piece measures 55-60-66 (72-78) cm bind off the middle 20-22-24 (28-34) sts for neck and dec to shape the neckline on every other row: 2 sts 1 time, 1 st 1 time. Bind off when piece measures 57-62-68 (74-80) cm . Sleeve: Knitted in the round on double pointed needles. Cast on 44-46-50 (52-52) sts on double pointed needles size 2 mm with yellow (mint) and knit 4 cm / 1½" Rib. Change to needle size 2.5 mm / US 1.5 and continue in pattern as described for body piece – make sure to place a pattern repeat mid upper sleeve. At the same time after the Rib inc 2 sts mid under arm a total of 4-6-6 (8-16) times as follows: Size 3 + 6/9 months: on every 6th round Size 12/18 months: on every 7th round Size 2 years: on every 5th round Size 3/4 years: on every 4th round = 52-58-62 (68-84) sts. When piece measures 12-16-18 (19-24) cm bind off 6 sts mid under sleeve and complete piece back and forth on needle. Bind off to shape the sleeve cap on every other row: 3 sts 6 times, bind off. Sleeve measures approx 16-20-22 (23-28) cm . Assembly: Sew shoulder seam. Pick up 80-86-94 (100-104) sts along left front piece on needle size 2 mm with purple (navy blue), P 1 row, knit 2.5 cm / 1" Rib and bind off. Repeat along right front piece, but after 1 cm / ⅜" make 5 buttonholes evenly distributed on row. 1 buttonhole = bind off 3 sts and cast on 3 new sts on return row. Fasten edges at bottom of split. Collar: Triangles, see M.1. Cast on 8 sts on needle size 2.5 mm / US 1.5 with purple (navy blue) and knit garter st back and forth on needle, at the same time dec on every other row on the left side: 1 st 7 times = 1 st left on needle. Change to off-white and inc 7 sts on next row = 8 sts on needle, continue in garter st and dec as described for the first triangle (1 triangle = approx 3.5 cm ). Continue like this and change color for every triangle until there are 10-10-11 (12-13) triangles. Now pick up 80-85-90(95-100) sts on needle size 2.5 mm / US 1.5 with purple (navy blue) in the outermost sts in the row of triangles. Put piece aside. Pick up 80-85-90 (95-100) sts round the neck on needle size 2.5 mm / US 1.5 purple (navy blue) (do not pick up on front edges) and knit tog sts from collar and sts from body piece as follows: knit tog first st from collar with first st from body piece, etc. Change to needle size 2 mm/ US 0, pick up 10 sts on each front edge and knit 4 rows garter st on all sts. Bind off. Sew tog split on inside of legs and sew tog the opening between legs from mid front to mid back. Set in sleeves and sew on buttons. SOCKS: Size: 3 – 6/9 – 9/12 months (2 -3/4 years) Foot length: 10-11-12 (14-15) cm DROPS STRAIGHT NEEDLES size 2 mm and 2.5 mm / US 0 an 1.5 DROPS crochet hook size 2.5 mm Knitting gauge: 26 sts x 52 rows on needles size 2.5 mm / US 1.5 in garter st = 4" x 4" (10 x 10 cm). Rib: *K1, P1*, repeat from *-*. Garter st: K all rows Cast on 46-50-50 (54-54) sts on needle size 2 mm/ US 0 with purple (navy blue) and knit 6-7-7 (8-8) cm Rib back and forth on needle. Knit 1 row stockinette st and change to needle size 2.5 mm / US 1.5, at the same time dec 10-14-8 (12-8) sts = 36-36-42 (42-46) sts. Knit next row as follows from RS: *K2 tog, 1 yo*, repeat from *-*. Knit 1 row stockinette st. Put 12-12-14 (12-14) sts on a thread each side and knit 6-7-9 (10-10) cm garter st on the middle 12-12-14 (18-18) sts. Put sts from threads back on needle and pick up 16-18-23 (26-26) sts on each side of the middle piece = 68-72-88 (94-98) sts. Knit 3-4-4 (5-5) cm garter st on all sts, at the same time after 2-2.5-2.5 (3-3) cm dec on every other row as follows: 1 st at the beg and 1 st at the end of row and K2 tog on both sides of the middle 2 sts for another 3-4-4 (5-5) cm . Bind off and sew seam under foot and along the Rib – sew the upper part of the Rib from WS and fold it double. Crochet a chain on needle size 2.5 mm / US 1.5, approx 30-35 cm long, and thread through eyelet row. HAT: Size: 3 – 6/9 – 12/18 months (2) years DROPS STRAIGHT NEEDLES size 2 and 2.5 mm / US 0 an 1.5 Knitting gauge: 26 sts x 35 rows on needles size 2.5 mm / US 1.5 in stockinette st = 4" x 4" (10 x 10 cm). Rib: *K1. P1*, repeat from *-*. Cast on and knit row of triangle as described for collar above. Now pick up 78-90-104 (104) sts on needle size 2.5 mm / US 1.5 with cerise(blue) in the outermost sts in the row of triangles. Knit 2 rows garter st and continue in stockinette st. When piece measures 9-9-9 (10) cm change to needle size 2 mm and purple (navy blue), knit 1 cm / ⅜" Rib and bind off loosely in Rib. Now pick up approx 26-28-30 (32) sts in the row of triangles on the middle 10-11-12 (12) cm on needle size 2.5 mm / US 1.5 with red (purple), knit 2 rows garter st and then 10-12-14 (14) cm stockinette st. Change to purple (navy blue) and needle size 2 mm and pick up approx 32-32-34 (36) sts on each side of the cerise (blue) section incl on Rib = 90-92-98 (104) sts and knit 2 rows stockinette st. Knit next row as follows from RS: *K2 tog, 1 yo*, repeat from *-*. Knit 1 row stockinette st, 1 row reverse stockinette st, bind off. Ribbon: Cast on 4 sts with purple (navy blue) on needle size 2.5 mm / US 1.5 and K4, "don’t turn the piece, but pull yarn behind the 4 sts and knit the 4 sts again from RS* , repeat from *-* until ribbon measures approx 70 cm . Sew tog sides on hat and pull ribbon through eyelet row. For pattern for the blanket see DROPS 18-16 |
|||||||
Diagram explanations |
|||||||
|
|||||||
|
|||||||
|
Have you made this or any other of our designs? Tag your pictures in social media with #dropsdesign so we can see them! Do you need help with this pattern?You'll find tutorial videos, a Comments/Questions area and more by visiting the pattern on garnstudio.com. © 1982-2024 DROPS Design A/S. We reserve all rights. This document, including all its sub-sections, has copyrights. Read more about what you can do with our patterns at the bottom of each pattern on our site. |
|||||||


With over 40 years in knitting and crochet design, DROPS Design offers one of the most extensive collections of free patterns on the internet - translated to 17 languages. As of today we count 304 catalogs and 11422 patterns - 11417 of which are translated into English (US/in).
We work hard to bring you the best knitting and crochet have to offer, inspiration and advice as well as great quality yarns at incredible prices! Would you like to use our patterns for other than personal use? You can read what you are allowed to do in the Copyright text at the bottom of all our patterns. Happy crafting!
Comments / Questions (10)
Letar efter ett mönster på vit virkad babysitter med rosa bård nere på koftan. Mönster är från tidigt 80 talet. Med vänlig hälsning, Mimmi Jacobsen
03.04.2021 - 20:42DROPS Design answered:
Hej Mimmi, Inte säker på vad du söker, men här ser du allt virkat till baby: Baby - Virkat
06.04.2021 - 15:13Det ser ud til at drenge versionen har adskilt trøje. Er der en opskrift til denne?
29.06.2019 - 16:53DROPS Design answered:
Hej. Du hittar den här. Lycka till!
01.07.2019 - 11:47Hvor mange gram garn skal der bruges, hvis den kun skal strikkes i en farve? Jeg tænker, det måske er mindre, da der ikke er spild garn mht. rester af de forskellige farver, der bliver brugt.
03.10.2016 - 12:29DROPS Design answered:
Hej Mette. Det ved jeg desvaerre ikke. Men sammenligner jeg med f.eks. BabyDROPS 21-3, som har mindre farver er der brugt 200 gr BabyAlpaca Silk for den mindste str. Saa jeg ville nok regne ud derfra
03.10.2016 - 17:08Selam wrote:
Any pictures to show the colour combination for the boys version? Thank you
04.08.2015 - 00:40DROPS Design answered:
Dear Selam, sorry, we do not have such a picture, check the colours from shadecard and remember you can get tips & advices choosing colours with your DROPS store. Happy knitting!
04.08.2015 - 09:02Waarom staat er bovenaan het patroon niet voor welke maat het is? Dat staat pas aan het eind van het kruippakje.
18.12.2014 - 21:38DROPS Design answered:
Hoi Maatkamp. Dat was helaas vergeten bij de vertaling. Ik heb het nu toegevoegd. Veel breiplezier.
19.12.2014 - 19:07Pour la combinaison arlequin, je ne comprends pas "diviser l'ouvrage à l'intérieur de la jambe(= fente)"
19.06.2014 - 16:56DROPS Design answered:
Bonjour Cathrine, on continue à partir d'ici en allers et retours, tourner à la fin du tour et augmentez 1 m de chaque côté pour les coutures. La suite du travail sera ensuite facilité lorsque l'on tricotera les 2 jambes ensembles. Bon tricot!
19.06.2014 - 17:33Hallo, ich verstehe die Anleitung bezüglich der Dreiecke nicht. Muss ich die Dreiecke alle einzeln Stricken(abketten?) und dann dazwischen 80 M aufnehmen? Was bedeutetet: in den Dreiecken 80 M. aufnehmen? Ist die Mütze jetzt schon richtig beschrieben? Habe in einem Kommentar gelesen, dass sie neu übersetzt werden muss, weil etwas in der Anleitung fehlt? Das Set ist total süß. LG Jutta
03.03.2014 - 13:29DROPS Design answered:
Liebe Jutta, die Dreiecke werden an einem Stück gestrickt. Sie schlagen 8 M an, nehmen an der linken Seite wie erklärt ab und schlagen dann an der linken Seite zu der letzten M 7 M neu an, sodass Sie wieder 8 M haben, und stricken wie vorher. So entstehen auf der linken Seite die Dreiecksspitzen, rechts ergibt sich ein gerader Rand. Aus diesem Rand fassen Sie dann 80 M auf und stricken den Kragen wie erklärt an den Halsrand. Die Mütze wurde neu übersetzt.
04.03.2014 - 10:38Ich wollte die Mütze stricken, jedoch stimmt die Übersetzung hier nicht. Die Angabe, dass aus der unteren Reihe der Dreiecke M aufgen. werden fehlt ebenso wie Angaben zu cm Bündchen und glatt rechts der kurzen Teile. Bitte noch einmal überarbeiten - die Mütze ist so schön!
27.10.2013 - 13:33DROPS Design answered:
Liebe Brunhilde, wir werden die Mütze bei Gelegenheit neu übersetzen, danke für den Hinweis!
29.10.2013 - 09:48Erme står rett etter høyre forstk.
28.05.2008 - 22:01Hvor er oppskriften til ermene på denne oppskriften
27.05.2008 - 21:00