DROPS Baby Merino
DROPS Baby Merino
100% Wool
from 4.55 $ /50g
DROPS Karisma
DROPS Karisma
100% Wool
from 3.00 $ /50g
Get the yarn to make this pattern from 52.85$.

The yarn cost is calculated from the pattern’s smallest size and the yarn’s cheapest product type. Looking for an even better price? You might find it on the DROPS Deals!

DROPS SS24

Lemon Souffle

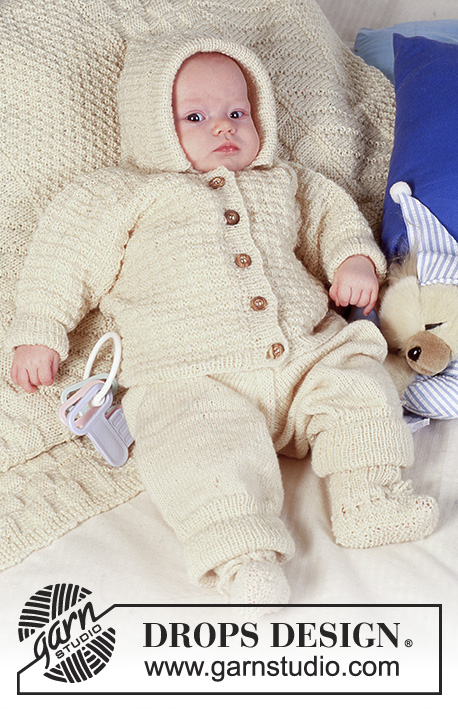
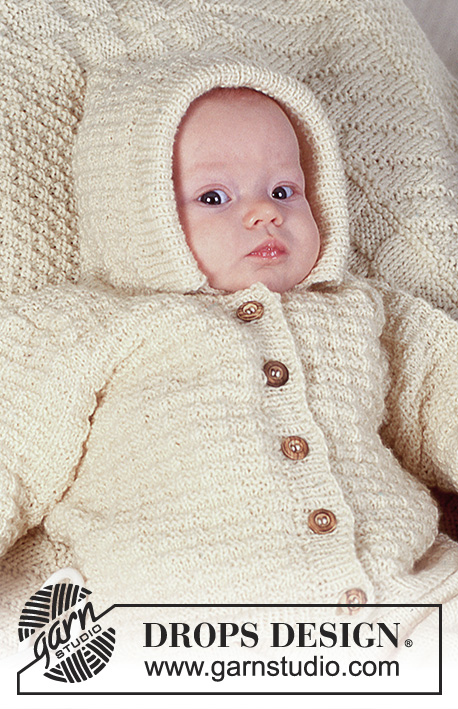
DROPS jacket with or without hood in textured pattern, pants and socks in “BabyMerino”. Blanket in Karisma.

DROPS Baby 4-1
Size: 3 – 6/9 – 12/18 months (2 - 3/4 years)

Materials: DROPS Baby Merino, from Garnstudio
The whole set:
350-400-450 (500-650) g color no 02, off-white
DROPS wooden button, no 503, 8-8-8 (9-9) pcs

Jacket only:
200-200-250 (250-300) g color no 02, off-white
DROPS wooden button, no 503, 6-6-6 (7-7) pcs

DROPS circular needle and double pointed needles size 2 mm and 2.5 mm /US 0 and 2

-------------------------------------------------------

Alternative Yarn – See how to change yarns here
Yarn Groups A to F – Use the same pattern and change the yarn here
Yarn usage using an alternative yarn – Use our yarn converter here

-------------------------------------------------------

DROPS Baby Merino
DROPS Baby Merino
100% Wool
from 4.55 $ /50g
DROPS Karisma
DROPS Karisma
100% Wool
from 3.00 $ /50g
Get the yarn to make this pattern from 52.85$.

The yarn cost is calculated from the pattern’s smallest size and the yarn’s cheapest product type. Looking for an even better price? You might find it on the DROPS Deals!

Pattern instructions

NOTE: This pattern is written in American English. All measurements in charts are in cm. For conversion from inches to cm - click here. There are different terms for crocheting in American and British English. If this pattern includes crochet, click for "crochet terms" here. For this pattern in British English, please click here.
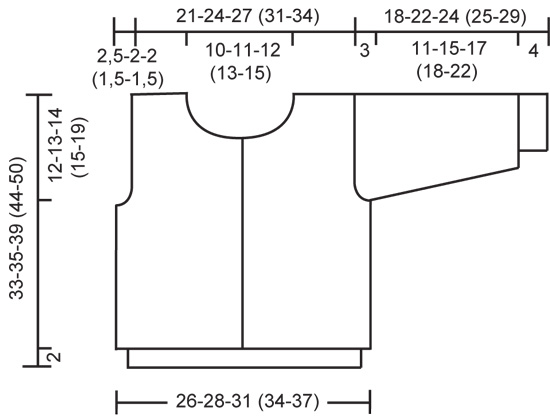
JACKET:
Knitting gauge: 26 sts x 35 rows on needles size 2.5 mm / US 2 in stockinette sts = 10 x 10 cm / 4" x 4".
Rib: *K1, P1*, repeat from *-*.
Pattern: See diagram. The diagrams show the pattern from the right side.

Front and back piece:
Knitted back and forth on circular needle from mid front.
Cast on 136-144-160 (176-192) sts on circular needle size 2 mm/0 with off-white and knit 2 cm / ¾" Rib. Change to needle size 2.5 mm / US 2 and continue in M.1. Remember the knitting gauge. When piece measures 21-22-25 (29-31) cm / 8¼"-8¾"-9¾" (11½"-12¼") knit next row as follows from the RS: 32-34-38 (42-46) sts = front piece, bind off 4 sts for armhole, 64-68-76 (84-92) sts = back piece, bind off 4 sts for armhole, 32-34-38 (42-46) sts = front piece. Now complete front and back pieces separately.

Front piece: = 32-34-38 (42-46) sts. bind off to shape the armhole on every other row as follows: 2 sts 1-1-1 (0-0) times, 1 st 3-1-1 (2-2) times = 27-31-35 (40-44) sts.
When piece measures 30-32-35 (40-45) cm / 11¾"-12½"-13¾" (15¾"-17¾") bind off to shape the neckline on every other row: 5-6-7 (9-12) sts 1 time, 3 sts 1 time, 2 sts 2 times and 1 st 1 time. Bind off when piece measures 33-35-39 (44-50) cm / 13"-13¾"-15¼" (17¼"-19¾").

Back piece: = 64-68-76 (84-92) sts. Bind for armholes as described for front piece = 54-62-70 (80-88) sts. When piece measures 31-33-37 (42-48) cm / 12¼"-13"-14½" (16½"-19") bind off the middle 20-22-24 (28-34) sts for neck. Bind off to shape the neckline on every other row: 2 sts 1 time and 1 st 1 time. Bind off when piece measures 33-35-39 (44-50) cm /13"-13¾"-15¼" (17¼"-19¾").

Sleeve: Cast on 44-46-48 (50-52) sts on double pointed needles size 2 mm/US 0 with off-white and knit 8 cm / 3⅛" Rib (Rib is folded double towards WS afterwards, so measure as 4 cm / 1½"). Change to needle size 2.5 mm / US 2 and continue in M.1, at the same time inc 2 sts mid under arm a total of 9-11-12 (14-23) times as follows:
Size 3 months + 3/4 years: on every 3rd round
Size 6/9 + 12/18 months + 2 years: on every 4th round
= 62-68-72 (78-98) sts – incorporate new sts in pattern as you go along.
When piece measures 15-19-21 (22-26) cm / 6"-7½"-8¼" (8¾"-10¼") bind off 4 sts mid under arm and complete sleeve back and forth on needle. Bind off to shape the sleeve cap each side on every other row: 3 sts 4 times. Bind off, sleeve measures approx 18-22-24 (25-29) cm / 7"-8¾"-9½" (9¾"-11½").

Assembly:

Without hood: Sew shoulder seams. Pick up 84-90-100 (110-120) sts along left front piece on needle size 2 mm/US 0 with off-white, P 1 row, knit 2.5 cm / ⅞" Rib and bind off.
Repeat along right front piece, but after 0.5 cm / ¼" make 6-6-6 (7-7) buttonholes evenly distributed on row (top buttonhole approx 1 cm / ⅜" from neckline).
1 buttonhole = bind off 3 sts and cast on 3 new sts on return row.
Pick up approx 100-110 sts round neck on needle size 2 mm/US 0 with off-white and knit 4 cm / 1½" Rib, bind off, fold neck double towards WS and fasten.
Set in sleeves and sew on buttons.

With hood: Sew shoulder seam. Pick up approx 68-70-78 (84-84) sts round neck on needle size 2 mm with off-white and knit 2 cm / ¾" Rib.
Change to needle size 2.5 mm / US 1 and continue in M.1 until piece measures 18-19-20 (21-22) cm / 7"-7½"-8" (8¼"-8¾"), bind off.
Sew tog hood mid back. Pick up approx 84-88-94 (100-106) sts round hood on needle size 2 mm/US 0 with off-white and knit 8 cm / 3⅛" Rib, bind off loosely in Rib.
Pick up 84-90-100 (110-120) sts along left front piece on needle size 2 mm with off-white (also pick up on Rib at neckline), P 1 row, knit 2.5 cm / ⅞" Rib and bind off. Repeat along right front piece, but after 0.5 cm / ¼" make 6-6-6 (7-7) buttonholes even distributed on row (top buttonhole approx 1.5 cm / ½" from neckline).
1 buttonhole = bind off 3 sts and cast on 3 new sts on return row.
Fasten the inner 2.5 cm / ⅞" Rib on hood over the front edge and fold the remaining 5.5 cm / 2¼" Rib over M.1 and fasten at each corner. Set in sleeves and sew on buttons.
_______________________________________________________________

PANTS:
DROPS wooden button, no 503, 2 pcs
DROPS circular needle size 2 mm and 2.5 mm / US 0 and 2

Knitting gauge: 26 sts x 35 rows on needles size 2.5 mm / US 2 in stockinette sts = 10 x 10 cm / 4" x 4".
Rib: *K1, P1*, repeat from *-*.
Pattern: See diagram.

Left leg: Cast on 80-88-88 (96-96) sts on circular needle size 2 mm/US 0 with off-white and knit 10 cm / 4" Rib (to be folded double afterwards, so measure as 5 cm / 2").
Change to circular needle 2.5 mm/US 2 and continue in stockinette st, at the same time inc 2 sts on inside leg on every 2-3-3 (4-5) cm / ¾"-1⅛"-1⅛" (1½"-2") a total of 4 times = 88-96-96 (104-104) sts. Remember the knitting gauge.
When piece measures 17-18-20 (25-28) cm / 6¾"-7"-8" (9¾"-11") divide piece at inside leg (= split) and complete piece back and forth on needle.
Inc 1 st each side for seam = 90-98-98 (106-106) sts.
When piece measures 18-20-23 (27-30) cm / 7"-8"-9" (10½"-11¾") bind off 5-7-3 (5-5) sts each side = 80-84-92 (96-96) sts. Put piece aside and knit the other leg.

Right leg: knit as left leg.

Pants: Put left and right leg in on the same circular needle = 160-168-184 (192-192) sts. Knit 3 rounds and then inc mid back 1 st on both sides of the middle 2 sts on every other round a total of 8 times, at the same time dec mid front on every other round 1 st on both sides of the middle 2 sts a total of 8 times = 160-168-184 (192-192) sts.
When piece measures 33-37-42 (47-51) cm / 13"-14½"-16½" (18½"-20") dec 24-28-34 (32-32) sts evenly distributed on round = 136-140-150 (160-160) sts.
Change to circular needle 2 mm/ US 0, continue in Rib and insert a marker mid front. When Rib measures 8 cm / 3⅛", make a buttonhole on both sides of marker, 5-5-6 (6-7) cm / 2"-2"-2⅜" (2⅜"-2¾") from marker.
1 buttonhole = bind off 3 sts and cast on 3 new sts on return row.
Bind off when Rib measures 10 cm / 4", the whole piece now measures approx 43-47-52 (57-61) cm / 17"-18½"-20½" (22½"-24").
Sew tog split on inside of legs and sew tog the opening between legs from mid front to mid back.

Braces: Cast on 11-11-11 (13-15) sts on needle size 2 mm/ US 0 with off-white and knit approx 30 cm / 11¾" Rib, bind off. Fasten braces mid back with approx 5-8 cm / 2"-3" between them. Sew on buttons.
_______________________________________________________________

SOCKS:
Size: 3 – 6/9 – 9/12 months (2 -3/4 years)

DROPS double pointed needles size 2 mm and 2.5 mm / US 0 and 2

Knitting gauge: 26 sts x 35 rows on needles size 2.5 mm / US 2 in stockinette sts = 10 x 10 cm / 4" x 4".
Rib: *K1, P1*, repeat from *-*.
Seed st: Row 1: K1, P1. Row 2: P over K and K over P. Repeat row 2.

The sock is knitted in the round. Cast on 58-60-62 (64-66) sts on needles size 2 mm/US 0 with off-white and knit Rib.
When Rib measures 4-5-5 (5-6) cm / 1½"-2"-2" (2"-2½") on next round K tog 3 sts mid back. Knit another 4 rounds and on next round K tog 3 sts mid back = 54-56-58 (60-62) sts.
When piece measures 10-11-12 (13-14) cm / 4"-4⅜"-4¾" (5⅛"-5½") change to needle size 2.5 mm / US 2 and continue in stockinette st, at the same time dec no of sts to 46-50-50 (54-54).
After 2 rounds work next round as follows: *K2 tog, yo*, repeat from *-*. Remember the knitting gauge.
Knit 1 round and then work the middle 10-12-12 (14-14) sts (= mid upper piece) in seed st, put remaining sts on a holder.
After 4-5-5.5 (7-7.5) cm / 1½"-2"-2¼" (2¾"-2⅞") pick up 10-12-14 (16-18) sts on both sides of upper piece = 66-74-78 (86-90) sts, incl sts on holder.
Knit in the round on all sts as follows: 1.5-2-2.5 (3-3.5) cm / ½"-¾"-⅞" (1⅛"-1¼") seed st, P 1 round. Now bind off all sts except the front 10-12-12 (14-14) sts.
Knit 9-10-11 (13-14) cm / 3½"-4"-4½" (5"-5½") on these for sole.
Bind off and fasten sole to the sock.
Crochet a chain measuring approx 30-35 cm / 11¾"-13¾" and pull through eyelet row.
_______________________________________________________________


BLANKET:

Material: DROPS KARISMA from Garnstudio
350 g color 01, off-white

Material: DROPS circular needle size 3.5 mm = US 4

Knitting gauge: 21 stitches on needles size 3.5 mm = US 4 = width 10 cm = 4".

Garter stitch (back and forth): Knit all rows. 1 ridge vertically = knit 2 rows.

Pattern: See diagrams A.1 to A.4.
NOTE! If a diagram is finished from right side, start first row on next diagram from wrong side. Pay extra attention that the diagrams show the pattern seen from right side.

Blanket:
To fit in all stitches work blanket back and forth on circular needle.
Cast on 128 stitches with Karisma on circular needle size 3,5 mm = US 4.

Work 3 ridges in garter stitch over all stitches.
Continue with 4 stitches in garter stitch on each side and PATTERN – read explanation above, on the middle 120 stitches as follows:
Work A.3 for approx. 8 cm = 3⅛" - adjust after a whole repeat or half a repeat.
REMEMBER THE KNITTING GAUGE!
Then work A.4 one time (= 5 rows)
Work A.1 for approx. 11 cm = 4⅜" – adjust after a whole repeat or half a repeat.
Then work A.4 one time (= 5 rows)
Work A.2 for approx. 8 cm = 3⅛".
Then work A.4 one time (= 5 rows)
Work A.3 for approx. 16 cm = 6¼" - adjust after a whole repeat or half a repeat.
Then work A.4 one time (= 5 rows)
Work A.1 for approx. 11 cm = 4⅜" – adjust after a whole repeat or half a repeat.
Then work A.4 one time (= 5 rows)
Work A.2 for approx. 8 cm = 3⅛".
Then work A.4 one time (= 5 rows)
Work A.3 for approx. 8 cm = 3⅛" - adjust after a whole repeat or half a repeat.
Then work 3 ridges in garter stitch over all stitches on row. Piece now measures approx. 82 cm = 32¼" – bind off.

This pattern has been corrected.

Updated online: 20.04.2018
Updated diagrams. The diagrams for the blanket has been renamed from M to A
Updated online: 08.10.2020
Correction: Pattern text for blanket has been updated to make it easier to read.

Diagram

All measurements in charts are in cm.

symbols = K on RS, P on WS
symbols = P on RS, K on WS
diagram
diagram
diagram

Each of our patterns has specific tutorial videos to help you.

Do you have a question? See a list of frequently asked questions (FAQ)

Knitting tension is what determines the final measurements of your work, and is usually measured per 10 x 10 cm. It is provided like so: number of stitches in width x number of rows in height - eg: 19 stitches x 26 rows = 10 x 10 cm.

The knitting tension is very individual; some people knit/crochet loosely while others work tightly. You adjust the knitting tension with the needle size, which is why the suggested needle size only serve as a guide! You need to adjust this (up or down) to ensure that YOUR knitting tension matches the knitting tension provided in the pattern. If you work with a different knitting tension than provided you will have a different yarn consumption, and your work will have different measurements than what the pattern suggests.

The knitting tension also determines which yarns can replace each other. As long as you achieve the same knitting tension you can replace one yarn with another.

See DROPS lesson: How to measure your tension/gauge

See DROPS video: How to make a gauge tension swatch

The required amount of yarn is provided in grams, eg: 450 g. To calculate how many balls you’ll need you first need to know how many grams are in 1 ball (25g, 50g or 100g). This information is available if you click on the individual yarn quality on our pages. Divide the amount required with the amount of each ball. For example, if each ball is 50g (the most common amount), the calculation will be as follows: 450 / 50 = 9 balls.

The important thing when changing from one yarn to another is that the knitting/crochet tension remains the same. This is so that the measurements of the finished piece will be the same as on the sketch provided. It is easier to achieve the same knitting tension using yarns from the same yarn group. It is also possible to work with multiple strands of a thinner yarn to achieve the knitting tension of a thicker one. Please try our yarn converter. We recommend you to always work a test swatch.

Please NOTE: when changing yarn the garment might have a different look and feel to the garment in the photo, due to individual properties and qualities of each yarn.

See DROPS lesson: Can I use a different yarn than the one mentioned in the pattern?

All our yarns are categorised into yarn groups (from A to F) according to thickness and knitting tension – group A contains the thinnest yarns and group F the thickest. This makes it easier for you to find alternative yarns to our patterns, should you wish to switch yarn. All yarns within the same group have a similar knitting tension and can easily replace each other. However, different yarn qualities have different structures and properties which will give the finished work a unique look and feel.

Click here for an overview of the yarns in each yarn group

At the top of all our patterns you’ll find a link to our yarn converter, which is a helpful tool should you wish to use a different yarn than suggested. By filling in the yarn quality you wish to replace, the amount (in your size) and number of strands, the converter will present good alternative yarns with the same knitting tension. Additionally it will tell you how much you’ll require in the new qualities and whether you’ll need to work with multiple strands. Most skeins are 50g (some are 25g or 100g).

If the pattern is worked with multiple colours, every colour will have to be converted separately. Similarly, if the pattern is worked with several strands of different yarns (for example 1 strand Alpaca and 1 strand Kid-Silk) you will have to find alternatives for each, individually.

Click here to see our yarn converter

Since different yarns have different qualities and textures we have chosen to keep the original yarn in our patterns. However, you can easily find options among our available qualities by using our yarn converter, or simply pick a yarn from the same yarn group.

It is possible that some retailers still have discontinued yarns in stock, or that someone has a few skeins at home that they would like to find patterns for.

The yarn converter will provide both alternative yarn as well as required amount in the new quality.

If you think it's hard to decide what size to make, it can be a good idea to measure a garment you own already and like the size of. Then you can pick the size by comparing those measures with the ones available in the pattern's size chart.

You'll find the size chart at the bottom of the pattern.

See DROPS lesson: How to read size chart

The needle size provided in the pattern serves only as a guide, the important thing is to follow the knitting tension. And since knitting tension is very individual, you will have to adjust the needle size to ensure that YOUR tension is the same as in the pattern – maybe you’ll have to adjust 1, or even 2 needle sizes, up or down to achieve the correct tension. For this, we recommend that you work test swatches.

Should you work with a different knitting tension than the one provided, the measurements of the finished garment might deviate from the measurement sketch.

See DROPS lesson: How to measure your tension/gauge

See DROPS video: How to make a gauge tension swatch

Working a garment top-down provides more flexibility and room for personal adjustment. For example it is easier to try the garment on while working, as well as making adjustments to length of yoke and shoulder caps.

The instructions are carefully explaining every step, in the correct order. Diagrams are adjusted to the knitting direction and are worked as usual.

The diagram depicts all rows/rounds, and every stitch seen from the right side. It is read from bottom to top, from right to left. 1 square = 1 stitch.

When working back and forth, every other row is worked from the right side and every other row is worked from the wrong side. When working from the wrong side, the diagram will have to be worked reversed: from left to right, knit stitches are purled, purl stitches are knit etc.

When working in the round every round is worked from the right side and the diagram are worked from right to left on all rounds.

See DROPS lesson: How to read knitting diagrams

The diagram depicts all rows/rounds, and every stitch seen from the right side. It is worked from bottom to top, from right to left.

When working back and forth every other row is worked from the right side: from right to left and every other row is worked from the wrong side: from left to right.

When working in the round, every row in the diagram are worked from the right side, from right to left.

When working a circular diagram you start in the middle and work your way outwards, counter clockwise, row by row.

The rows usually start with a given number of chain stitches (equivalent to the height of the following stitch), this will either be depicted in the diagram or explained in the pattern.

See DROPS lesson: How to read crochet diagrams

Instructions for working several diagrams after each other on the same row/round, will often be written like so: “work A.1, A.2, A.3 a total of 0-0-2-3-4 times". This means you work A.1 once, then A.2 is worked once, and A.3 is repeated (in width) the number of times provided for your size – in this case like so: S = 0 times, M = 0 times, L=2 times, XL= 3 times and XXL = 4 times.

The diagrams are worked as usual: begin with the first row in A.1, then work the first row in A.2 etc.

See DROPS lesson: How to read knitting diagrams

See DROPS lesson: How to read crochet diagrams

The total width of the garment (from wrist-to-wrist) will be larger in the larger sizes, despite the actual sleeves being shorter. The larger sizes have longer sleeve caps and wider shoulders, so there will be a good fit in all sizes.

The measurement sketch/schematic drawing provides information regarding the full length of the garment. If it’s a jumper or a jacket the length is measured from the highest point on the shoulder (usually closest to the neckline), and straight down to the bottom of the garment. It is NOT measured from the tip of shoulder. Similarly, the length of yoke is measured from the highest point on the shoulder and down to where yoke is split into body and sleeves.

See DROPS lesson: How to read a schematic drawing

Diagrams are often repeated on the round or in height. 1 repeat is the diagram the way it appears in the pattern. If it says to work 5 repeats of A.1 in the round, then you work A.1 a total of 5 times after/next to each other in the round. If it says to work 2 repeats of A.1 vertically/in height you work the entire diagram once, then begin again at the start and work the entire diagram one more time.

Chain stitches are slightly narrower than other stitches and to avoid working the cast-on edge too tight, we simply chain more stitches to begin with. The stitch count will be adjusted on the following row to fit the pattern and measurement sketch.

The rib edge is more elastic and will contract slightly compared to, for example, stocking stitch. By increasing before the rib edge, you avoid a visible difference in width between the rib edge and the rest of the body.

It’s very easy to cast off too tightly, and by making yarn overs while casting off (and simultaneously casting these off) you avoid a too tight cast off edge.

See DROPS video: How to bind off with yarn overs (yo)

To achieve an even increase (or decrease) you can increase on, for example: every 3rd and 4th row alternately, like so: work 2 rows and increase on the 3rd row, work 3 rows and increase on the 4th. Repeat this until the increase is complete.

See DROPS lesson: Increase or decrease 1 st on every 3rd and 4th row alternately

Should you prefer to work in the round instead of back and forth, you may of course adjust the pattern. You’ll need to add steeks mid-front (usually 5 stitches), and follow the instructions. When you would normally turn and work from the wrong side, simply work across the steek and continue in the round. At the end you’ll cut the piece open, pick up stitches to work bands, and cover the cut edges.

See DROPS video: How to knit steeks and cut open

Should you prefer to work back and forth instead of in the round, you may of course adjust the pattern so you work the pieces separately and then assemble them at the end. Divide the stitches for the body in 2, add 1 edge stitch in each side (for sewing) and work the front and back pieces separately.

See DROPS lesson: Can I adapt a pattern for circular needles into straight needles?

Pattern repeats can vary slightly in the different sizes, in order to get the correct proportions. If you’re not working the exact same size as the garment in the photo, yours might deviate slightly. This has been carefully developed and adjusted so that the complete impression of the garment is the same in all sizes.

Make sure to follow instructions and diagrams for your size!

If you have found a pattern you like which is available in women’s size it’s not very difficult to convert it to men’s size. The biggest difference will be the length of sleeves and body. Start working on the women size that you think would fit across the chest. The additional length will be worked right before you cast off for the armhole/sleeve cap. If the pattern is worked top-down you can add the length right after the armhole or before the first decrease on sleeve.

Regarding additional yarn amount, this will depend on how much length you add, but it is better with a skein too many than too few.

All yarns will have excess fibres (from production) that might come off as lint or shedding. Brushed yarns (ie hairier yarns) have more of these loose, excess fibres, causing more shedding.

Shedding also depends on what is worn under or over the garment, and whether this pulls at the yarn fibres. It’s therefore not possible to guarantee that there will be no shedding

Below are some tips on how to get the best result when working with hairier yarns:

1. When the garment is finished (before you wash it) shake it vigorously so the looser hairs come off. NOTE: do NOT use a lint roller, brush or any method that pulls at the yarn.

2. Place the garment in a plastic bag and put it in your freezer - the temperature will cause the fibres to become less attached to each other, and excess fibres will come off easier.

3. Leave in the freezer for a few hours before taking it out and shaking it again.

4. Wash the garment according to the instructions on the yarn label.

Pilling is a natural process that happens to even the most exclusive of fibers. It's a natural sign of wear and tear that is hard to avoid, and that is most visible in high friction areas of your garment like a sweater's arms and cuffs.

You can make your garment look as new by removing the pilling, using a fabric comb or a pill/lint remover.

Still can't find the answer you need? Then scroll down and leave your question so one of our experts can try to help you. This will be done normally within 5 to 10 working days.
In the meantime, you can read the questions and answers that others have left to this pattern or join the DROPS Workshop on Facebook to get help from fellow knitters/crocheters!

Post a comment to pattern DROPS Baby 4-1

We would love to hear what you have to say about this pattern!

If you want to leave a question, please make sure you select the correct category in the form below, to speed up the answering process. Required fields are marked *.

Comments / Questions (30)

country flag Lillemor wrote:

Jeg skulle gjerne sett flere bilder av buksa uten jakka. Sånn at man kan se detaljene på felling midt foran og gjernenogsp bilde av buksa bakfra. Jeg lurer også på hvorfor bukse beina strikkes fram og tilbake med splitt på det øvre stykket av beina

31.12.2023 - 00:08

country flag Monika wrote:

Hallo, beim Jäckchen fehlt die Angabe der Nadelstärke und der Maschenprobe. Kann man die von der Hose nehmen? Danke.

07.07.2023 - 22:08

DROPS Design answered:

Liebe Monika, ja genau - danke für den Hinweis, eine Korrektur erfolgt gleich. Viel Spaß beim stricken!

27.07.2023 - 09:27

country flag Maria wrote:

Puedo tejer en agujas rectas? O necesariamente en agujas circulares

20.08.2022 - 00:59

DROPS Design answered:

Hola Maria, se pueden usar agujas circulares o agujas de doble punta. La aguja circular se usa para trabajar más comodamente debido al elevado número de puntos. Para trabajar con agujas rectas, puedes leer la siguiente lección sobre cómo adaptar el patrón: https://www.garnstudio.com/lesson.php?id=13&cid=23

21.08.2022 - 21:03

country flag Evelin Nussbaumer wrote:

Wie muss ich das Kapuzenbündchen annähen? Nur seitlich oder ganze Länge?

02.08.2022 - 16:35

DROPS Design answered:

Liebe Frau Nussbaumer, die 2,5 cm Bündchen bei der Kapuzen nähen Sie zusammen an den Blenden, die restlichen 5,5 cm die übrig sind nähen Sie mit nur 1 Stich an jeder Ecke. Viel Spaß beim fertigstellen!

02.08.2022 - 17:30

country flag Evelin Nussbaumer wrote:

Wie muss ich das Kapuzenbündchen annähen? Nur seitlich oder ganze Länge?

02.08.2022 - 16:34

country flag Anki wrote:

Hur stickar man mönster m1 på ärmen när man stickar runt med strumpstickor?

07.09.2021 - 15:36

DROPS Design answered:

Hej Anki. När du stickar runt blir alla varav från rätsidan, du stickar alltså diagrammet från höger till vänster hela tiden. De ökade maskorna under ärmen stickas in i mönstret. Mvh DROPS Design

08.09.2021 - 08:13

country flag Anki Pettersson wrote:

Ska man sticka runt med strumpstickor när man gör ärmen? Så att man inte behöver sy ihop ärmen?

06.09.2021 - 18:35

DROPS Design answered:

Hej Anki. Ja det stämmer. Mvh DROPS Design

07.09.2021 - 09:45

country flag Eva Bodin wrote:

Hur ska jag göra färdigt ärmen? Det ska avmaskas 4 m mitt under men sen?avmaska 3 m vartannat varv för Axel 4 ggr? Fortsätter jag från de 4 avmaskade mitt under armen?eller hur gör jag?

17.03.2021 - 20:54

DROPS Design answered:

Hej Eva. Du avmaskar 4 maskor mitt under ärmen och efter det stickas ärmen fram och tillbaka. Sedan avmaskar du till ärmkulle och det gör du i varje sida av arbetet det antal gånger som uppges i mönstret. Mvh DROPS Design

24.03.2021 - 12:03

country flag Seija wrote:

Minkä pituiset pyöröpuikot?

12.10.2020 - 07:05

DROPS Design answered:

Voit neuloa työn 60 tai 80 cm:n pituisella pyöröpuikolla, koska työ neulotaan tasona.

30.11.2020 - 14:20

country flag Lisbeth Karlsson wrote:

Ser att ni fått en fråga innan om mönstret på kofta och bild .NEJ det är inte samma . gör om gör rätt. skriv om mönstret ,går ju inte att använda era mönster !!

17.05.2020 - 05:03