
Popular categories
Looking for a yarn?


|
|||||||
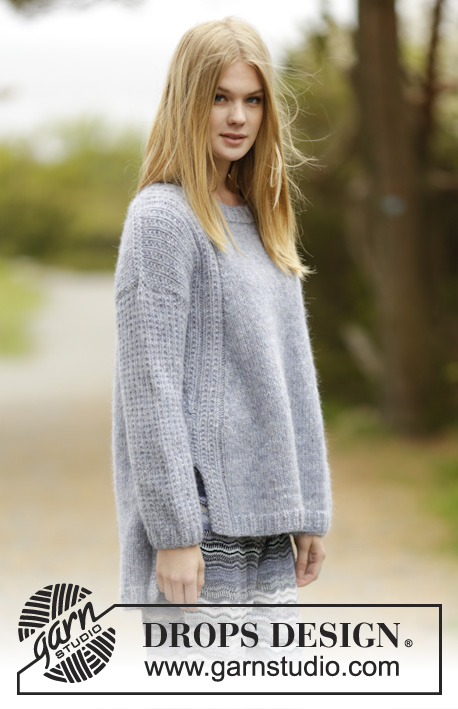
Sigrid Jacket |
|||||||
|
|
|||||||
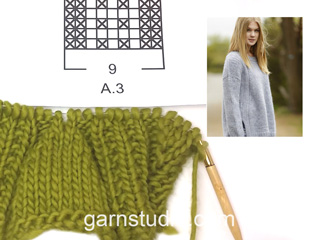
Knitted DROPS jacket with false raglan, vent and textured pattern in ”Air”. Size: S - XXXL.
DROPS 166-11 |
|||||||
|
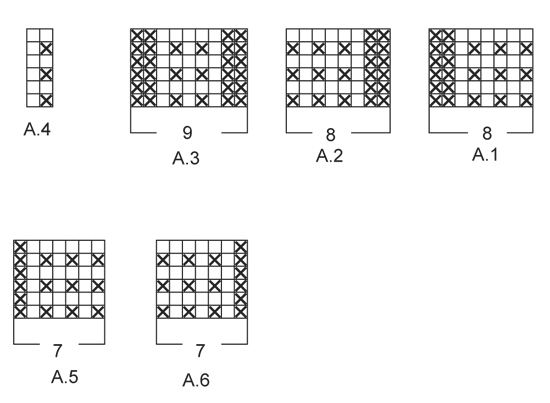
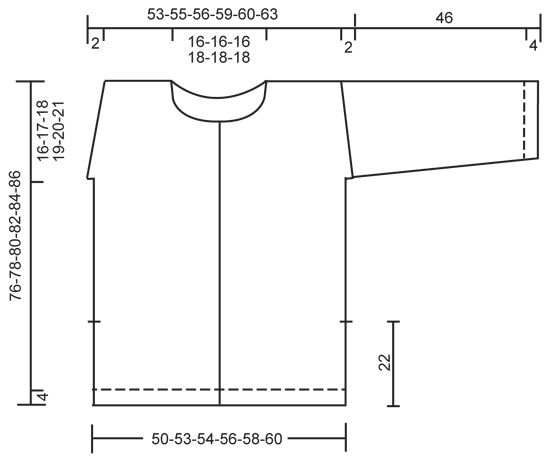
GARTER ST (back and forth): K all rows. 1 ridge = K2 rows. PATTERN: See diagrams A.1 to A.6. The diagrams show all rows in pattern seen from RS. INCREASE TIP: Inc 1 st by making 1 YO. On next row work YOs twisted, i.e. work in the back loop of st instead of front to avoid holes. NOTE: Work the inc sts gradually in diagram A.4. DECREASE TIP: Dec 1 sts as follows: All dec are done from RS! Dec as follows after A.3: K 2 tog. Dec as follows before A.3: Work until 2 sts before A.3, slip 1 st as if to K, K 1, psso. BUTTONHOLES: Dec for buttonholes on right band. 1 buttonhole = K tog third and fourth st from edge and make 1 YO. Dec for buttonholes when piece measures: SIZE S: 25, 33, 41, 49, 57 and 65 cm / 9 3/4",13",16",19 1/4",22½",25½". SIZE M: 25, 33, 42, 50, 59 and 67 cm / 9 3/4",13",16½",19 3/4",23 1/4",26½". SIZE L: 27, 35, 44, 52, 61 and 69 cm / 10½",13 3/4",17 1/4",20½",24",27". SIZE XL: 28, 37, 45, 54, 62 and 71 cm / 11",14½",17 3/4",21 1/4",24½",28". SIZE XXL: 28, 37, 46, 55, 64 and 73 cm / 11",14½",18",21½",25 1/4",28 3/4". SIZE XXXL: 30, 39, 48, 57, 66 and 75 cm / 11 3/4",15 1/4",19",22½",26",29½". ---------------------------------------------------------- JACKET: Worked back and forth on circular needle and sewn tog when finished. BACK PIECE: Cast on 95-98-101-107-113-116 sts on circular needle size 5 mm / US 8 with Air. Work rib as follows: A.1 (= 8 sts), K 1, * P 2, K 1 *, repeat from *-* until 8 sts remain on row, A.2 (= 8 sts). Continue like this back and forth until piece measures 4 cm / 1½''. On next row from RS switch to circular needle size 5.5 mm / US 9 and work as follows: A.1, stockinette st over the next 79-82-85-91-97-100 sts, AT THE SAME TIME dec 15-14-15-17-21-20 sts evenly, A.2 = 80-84-86-90-92-96 sts on needle in total. Continue in stockinette st, work A.1 and A.2 in each side as before until piece measures 22 cm / 8 3/4''. REMEMBER THE KNITTING TENSION/GAUGE At the end of the next 2 rows cast on 2 new sts (marks vent) = 84-88-90-94-96-100 sts. Now work as follows: 1 edge st in GARTER ST - see explanation above, A.3 (= 9 sts) stockinette st until A.2, work A.3 over A.2 and next to last st and finish with 1 edge st in garter st. When piece measures 26-24-24-23-23-23 cm / 10 1/4"-9½"-9½"-9"-9"-9", beg displacement of A.3 towards mid back. Work 1 edge st in garter st, inc 1 st - READ INCREASE TIP, A.3, dec 1 st - READ DECREASE TIP, stockinette st until 2 sts remain before A.3, dec 1 st, A.3, inc 1 st, 1 edge st in garter st. Repeat displacement of A.3 every 4th row 17-19-20-21-22-24 more times. NOTE: Inc is always inside 1 edge st in garter st in each side. AT THE SAME TIME when piece measures 60-61-62-63-64-65 cm / 23 5/8''-24''-24 3/8''-24¾''-25¼''-25½'', cast on 1 new st at the end of the next 2 rows for armholes = 86-90-92-96-98-102 sts. Now continue pattern inside 1 edge st in garter st and 1 st in stockinette st in each side. Work the 82-86-88-92-94-98 middle sts in pattern as before. When piece measures 74-76-78-80-82-84 cm / 29 1/8''-30''-30¾''-31½''-32¼''-33'', cast/bind off the middle 24-24-24-26-26-26 sts for neck and finish each shoulder separately. On next row from the neck, cast/bind off 1 st = 30-32-33-34-35-37 sts remain on each shoulder. When piece measures 76-78-80-82-84-86 cm / 30''-30¾''-31½''-32¼''-33''-33 7/8'', work 1 ridge over all sts. Cast/bind off. Work the other shoulder the same way. RIGHT FRONT PIECE: Cast on 55-55-58-61-64-64 sts on circular needle size 5 mm / US 8 with Air. Work rib as follows: A.5 (= band), K 1, * P 2, K 1 *, repeat from *-* until 8 sts remain, A.2. Continue like this back and forth until piece measures 4 cm / 1½''. On next row from RS switch to circular needle size 5.5 mm / US 9 and work as follows: A.5 (= 7 sts), stockinette st until 8 sts remain, AT THE SAME TIME dec 8-6-8-9-11-9 sts evenly over these sts, A.2 = 47-49-50-52-53-55 sts. Continue in stockinette st, work A.5 over band and A.2 in the side as before until piece measures 22 cm / 8 3/4''. Now cast on 2 new sts in the side (= marks vent) = 49-51-52-54-55-57 sts. REMEMBER BUTTONHOLES! Now work A.3 over A.2 and next to last st on needle and work 1 edge st in garter st in the side. When piece measures 26-24-24-23-23-23 cm / 10 1/4"-9½"-9½"-9"-9"-9", beg displacement of A.3 towards mid front. Dec 1 st before A.3 and inc 1 st before last st on needle. Repeat displacement of A.3 every 4th row 17-19-20-21-22-24 more times. NOTE: Inc is always inside 1 edge st in garter st in the side. AT THE SAME TIME when piece measures 60-61-62-63-64-65 cm / 23 5/8''-24''-24 3/8''-24¾''-25¼''-25½'', cast on 1 new st at the end of next row from RS for armhole = 50-52-53-55-56-58 sts. Continue pattern as before with 1 edge st in garter st and 1 st in stockinette st in the side. When piece measures 64-66-68-69-71-73 cm / 25 1/4"-26"-26 3/4"-27"-28"-28 3/4", slip the first 14-14-14-15-15-15 sts on a stitch holder for neck. Then cast/bind off sts on every row from neck as follows: 3 sts 1 time, 2 sts 1 time and 1 st 1 time = 30-32-33-34-35-37 sts remain for shoulder. Work edge st towards neck in garter st. When piece measures 76-78-80-82-84-86 cm / 30''-30¾''-31½''-32¼''-33''-33 7/8'', work 1 ridge over all sts. Cast/bind off. LEFT FRONT PIECE: Cast on and work as right front piece but reversed. I.e. work as follows on first row: A.1, K 1, * P 2, K 1 *, repeat from *-* until 7 sts remain, A.6 (= band). When piece measures 22 cm / 8 3/4'', cast on 2 new sts in the side (marks vent). Now work A.3 over the 2nd st on row and A.1. When piece measures 26-24-24-23-23-23 cm / 10 1/4"-9½"-9½"-9"-9"-9", beg displacement of A.3 towards mid front. Inc 1 st after 1 edge st in garter st in the side and dec 1 st after A.3. Continue displacement the same way as on right front piece AT THE SAME TIME cast on 1 new st for armhole - adjust according to right front piece. When piece measures 64-66-68-69-74-73 cm / 25 1/4"-26"-26 3/4"-27"-28"-28 3/4", slip the first 14-14-14-15-15-15 sts seen from WS on a stitch holder for neck. Then cast/bind off sts on every row from neck as follows: 3 sts 1 time, 2 sts 1 time and 1 st 1 time = 30-32-33-34-35-37 sts. Work edge st towards neck in garter st. When piece measures 76-78-80-82-84-86 cm / 30''-30¾''-31½''-32¼''-33''-33 7/8'', work 1 ridge over all sts. Cast/bind off. SLEEVE: Work back and forth on circular needle. Cast on 39-41-43-43-43-45 sts on circular needle size 5 mm / US 8 with Air. Work rib as follows: 1 edge st in garter st, K 1, * P 1, K 1 *, repeat from *-* until 1 st remains, 1 edge st in garter st. When rib measures 4 cm / 1½'', switch to circular needle size 5.5 mm / US 9 and continue pattern as follows: 1 edge st in garter st, work last st in A.4, repeat A.4 until 1 st remains, 1 edge st in garter st. When piece measures 10 cm / 4'', inc 1 st inside 1 edge st in garter st in each side. Work the inc sts in pattern A.4: Repeat inc every approx. 5½-4½-4½-3½-3-3 cm / 2 1/4"-1 3/4"-1 3/4"-1 1/4"-1"-1" 6-7-7-9-11-11 more times = 53-57-59-63-67-69 sts. When sleeve measures 46 cm / 18'' in all sizes, work a sleeve cap with short rows as follows from RS: Work until 8-9-9-10-11-12 sts remain, turn and work until 8-9-9-10-11-12 sts remain, turn and work until 17-19-19-21-22-23 sts remain, turn and work until 17-19-19-21-22-23 sts remain. Turn and work all sts on needle, turn and work over all sts. Cast/bind off with K from RS. Make another sleeve. ASSEMBLY: Sew the shoulder seams tog. Sew sleeves to body inside 1 edge st in garter st. Sew underarm seams and side seams in one inside 1 edge st in garter st but leave 22 cm / 8 3/4'' for vent at the bottom of body. Sew the buttons on to left band. NECK EDGE: Beg from RS on right front piece and pick up approx. 120-130 sts (includes sts on stitch holders the front). K 1 round from WS while adjusting no of sts to 90-90-90-96-96-96 sts - but not over band sts, work these as before. Now work rib (K 1/P 2) inside band sts in each side, finish with K 1 before last band. When rib measures 3 cm / 1'', cast/bind off with K over K and P over P. |
|||||||
Diagram explanations |
|||||||
|
|||||||
|
|||||||
|
|||||||
|
Have you made this or any other of our designs? Tag your pictures in social media with #dropsdesign so we can see them! Do you need help with this pattern?You'll find tutorial videos, a Comments/Questions area and more by visiting the pattern on garnstudio.com. © 1982-2024 DROPS Design A/S. We reserve all rights. This document, including all its sub-sections, has copyrights. Read more about what you can do with our patterns at the bottom of each pattern on our site. |
|||||||


With over 40 years in knitting and crochet design, DROPS Design offers one of the most extensive collections of free patterns on the internet - translated to 17 languages. As of today we count 304 catalogs and 11422 patterns - 11417 of which are translated into English (US/in).
We work hard to bring you the best knitting and crochet have to offer, inspiration and advice as well as great quality yarns at incredible prices! Would you like to use our patterns for other than personal use? You can read what you are allowed to do in the Copyright text at the bottom of all our patterns. Happy crafting!
Comments / Questions (73)
I don’t know if someone has asked this, I can only read the English. When doing the displacement of A3/increasing stitches - what stitch do I use for those extra stitches? After the edge garter stitch & before A3 are they stocking stitch or garter stitch pls?
07.02.2024 - 16:37DROPS Design answered:
Hi Bex, The increased stitches are in stocking stitch. Happy knitting!
08.02.2024 - 07:03Me gustaría contar con un tutorial de vueltas acortadas para la manga , con el fin de entenderlo mejor .
14.11.2023 - 21:34DROPS Design answered:
Hola Luz, aquí tienes un video sobre cómo trabajar filas acortadas: https://www.garnstudio.com/video.php?id=66&page=2&lang=es.
26.11.2023 - 23:46Hallo liebes Team, könnte ich diese Anleitung auch mit dem Garn Melody stricken? Das ist ja nun Garngruppe D. Vielen Dank für Ihre Rückmeldung.
22.12.2021 - 21:19DROPS Design answered:
Liebe Frau Deppendorf, DROPS Air gehört zur Garngruppe C so wird Melody nicht das richtige Garn um Air zu erseten. Hier lesen Sie mehr. Viel Spaß beim stricken!
03.01.2022 - 08:16I agree with the lady who has been knitting for 70 years. Your videos are as poor as the pattern instructions, no sound or explanations given.
14.11.2021 - 15:16Hallo Drops-Team, Ich habe eine Frage direkt am Beginn der Anleitung. Stricke ich den Anfang des Rückenteils an dem später der Schlitz sein soll, ganz ohne Randmasche, d.h. Hinreihe links und Rückreihe rechts? Viele Grüße, Ute
24.08.2021 - 08:47DROPS Design answered:
Liebe Ute, die Randmaschen sind in A.1 und A.2 gestrickt (= die erste Masche in A.1 und die letzte Masche in A.2 ist kraus rechts gestrickt. Viel Spaß beim stricken!
03.01.2022 - 08:04Dankjewel voor de reacties, in de opmerkingen staat het volgende: DROPS Design 18.05.2018 kl. 13:32: displacement will be worked from RS, ie on a RS row increase 1 st before A.3 and dec 1 st after A.3 at the beg of row and dec 1 st before last A.3 and inc 1 st after last A.3 at the end of row. The new sts increased will be then worked in A.4 see INCREASE-TIP. Happy knitting! Zo lijkt het op de foto ook of het patroon door gebreid wordt.
17.02.2021 - 09:06Vervolg op de eerste vraag , Net een proeflapje gemaakt met de verschuivingen in het A3 patroon, er komt dus iedere 4 pen een steek aan iedere kant bij, ik kan niet goed vinden wat ik hiermee ga doen, moeten die in a3 mee gebreid worden zodat de steken gaan verspringen of komen er steeds meer steken in A3 gebreid en steeds minder tricot steken in het middelste deel, Erg onduidelijk patroon, Hoop dat jullie mij snappen
14.02.2021 - 14:35DROPS Design answered:
Dag Wendy,
Aan het begin van de naald meerder je 1 steek voor A.3 en minder je 1 steek na A.3 en aan het eind van de naald minder je 1 steek voor A.3 en meerder je 1 steek na A.3. Het totaal aantal steken blijft dus hetzelfde, maar door het meerderen en minderen verplaatst het patroon zich richting midden voor. De gemeerderde steken brei je in tricotsteek. Lees ook de tips voor het meerderen en minderen bovenaan bij de instructies.
15.02.2021 - 10:07Ik ben begonnen met dit patroon,het einge waar ik even niet uit komis het volgende: Begin bij een hoogte van 26-24-24-23-23-23 cm met het verschuiven van A.3 middenachter. dat verspringen is niet het probleem maar ik begrijp het middenachter niet, misschien kunnen jullie helpen m.v.g Wenny
14.02.2021 - 13:04DROPS Design answered:
Dag Wendy,
Het 'midden achter' stond er een beetje ongelukkig; er wordt mee bedoeld dat je A.3 richting midden achter verschuift, dus door de meerderingen en minderingen aan beide kanten verschuift het patroon vanaf beide zijkanten richting midden achter. Ik heb de tekst nu aangepast.
15.02.2021 - 10:04I have been knitting for more than 70 years, and I have never seen a pattern as difficult to understand as this one. And with so many questions, none of which Americans can understand. Is there anyone on thisl ist who has completed this sweater without problems or confusion?
11.05.2020 - 19:31DROPS Design answered:
Dear Mrs Ray, The DROPS patterns are knitted and crocheted by thousands and thousands of people around the world. We understand however that in certain countries, with different knitting/crochet traditions than Scandinavia, our patterns might be written in a way that differs from what some are used to. But of course we want everyone to understand our patterns, so that’s why we have created an extensive library of tutorial videos as well as step by step lessons that explain how to follow the techniques we use and how to read the diagrams in our patterns. Give them a try!
12.05.2020 - 10:11Me quedo muy lindo el suéter las explicaciones son excelentes agradezco mucho la ayuda. Y aclaró que no es la primera vez que hago un trabajo bajo la dirección de ustedes gracias
07.07.2019 - 17:57