DROPS Merino Extra Fine
100% Wool
from 4.55 $ /50g
Get the yarn to make this pattern from 40.95$.

The yarn cost is calculated from the pattern’s smallest size and the yarn’s cheapest product type. Looking for an even better price? You might find it on the DROPS Deals!

DROPS SS24

Little Oliver

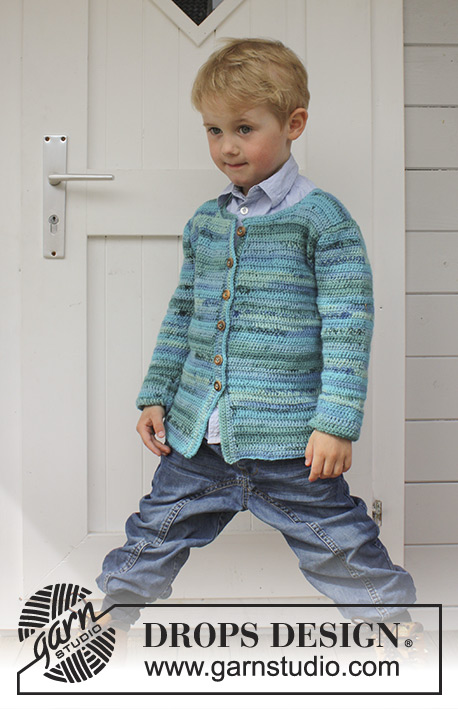
Crochet sweater with vent and buttons at the front in DROPS Merino Extra Fine. Size children 3 - 12 years.

DROPS Children 24-28
DROPS design: Pattern no me-014-bn
Yarn group B
--------------------------------------------------------
Size: 3/4 - 5/6 - 7/8 - 9/10 - 11/12 years
Finished measurements:
Bust: 68-74-78-82-86 cm / 26¾"-29"-30¾"-32¼"-34"
Full length: 40-44-48-52-56 cm / 15¾"-17¼"-19"-20½"-22"

Materials:
DROPS MERINO EXTRA FINE from Garnstudio
250-250-300-300-350 g color no 23, gray blue
200-200-200-250-250 g color no 15, light greyish green

DROPS CROCHET HOOK size 4 mm / G/6 – or size needed to get 18 sts x 12 rows with pattern= 10 x 10 cm / 4" x 4".

DROPS WOOD BUTTON BURNED, NO 513: 2-2-3-3-3 pieces

-------------------------------------------------------

Alternative Yarn – See how to change yarns here
Yarn Groups A to F – Use the same pattern and change the yarn here
Yarn usage using an alternative yarn – Use our yarn converter here

-------------------------------------------------------

DROPS Merino Extra Fine
100% Wool
from 4.55 $ /50g
Get the yarn to make this pattern from 40.95$.

The yarn cost is calculated from the pattern’s smallest size and the yarn’s cheapest product type. Looking for an even better price? You might find it on the DROPS Deals!

Pattern instructions

NOTE: This pattern is written in American English. All measurements in charts are in cm. For conversion from inches to cm - click here. There are different terms for crocheting in American and British English. If this pattern includes crochet, click for "crochet terms" here. For this pattern in British English, please click here.
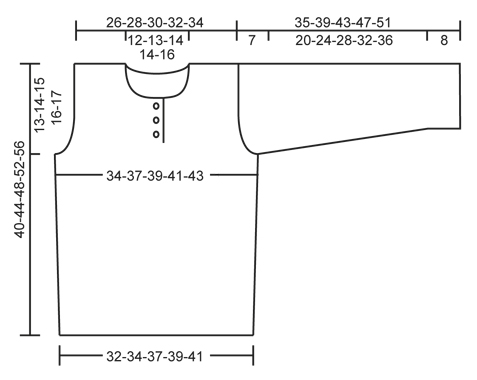
CROCHET INFO:
On every sc row replace first sc with 1 ch.
On every dc row replace first dc with 3 ch.

PATTERN ON BODY:
ROW 1: 1 dc in every sc in light greyish green.
ROW 2: 1 sc in every dc in light greyish green.
ROW 3: 1 dc in every sc in gray blue.
ROW 4: 1 sc in every dc gray blue.
Repeat rows 1 to 4.

PATTERN SLEEVE:
ROW 1: 1 sc in every dc gray blue.
ROW 2: 1 dc in every sc in gray blue.
ROW 3: 1 sc in every dc gray blue.
ROW 4: 1 dc in every sc in gray blue.
ROW 5: 1 sc in every dc gray blue.
ROW 6: 1 dc in every sc in gray blue.
ROW 7: 1 sc in every dc in light greyish green.
ROW 8: 1 dc in every sc in light greyish green.
Repeat rows 1 to 8.

DECREASE TIP:
Dec 1 st by working 2 sts tog.
Work 2 sc tog as follows: Insert hook in first st and pull thread through, insert hook in next st and pull yarn through, make 1 YO and pull yarn through all 3 loops on hook.
Work 2 dc tog as follows: Work 1 dc in first st but wait with last pull through, work 1 dc in next st but on last pull through, pull yarn through all 3 loops on hook.
--------------------------------------------------------

JUMPER:
To make the texture the same on the piece work all parts back and forth and sew tog when finished.

BACK PIECE:
Chain 67-71-76-81-85 with gray blue on hook size 4 mm / G/6. Continue with 1 sc in 2nd ch from hook, then 1 sc in each of the next 2-6-4-2-6 ch, * skip ch 1, 1 sc in each of the next 6 ch *, repeat from *-* the entire row = 58-62-66-70-74 sc (first ch = 1 sc). READ CROCHET INFO!
Turn and work 4 rows with 1 sc in every sc. Then work PATTERN BODY until finished measurements - see explanation above. REMEMBER THE CROCHET GAUGE!
When piece measures 10-11-12-13-14 cm / 4"-4½"-4¾"-5"-5½", inc 1 st in each side by working 2 sts in the second and next to last st.
Repeat inc when piece measures 20-21-22-23-24 cm / 8"-8¼"-8¾"-9"-9½" = 62-66-70-74-78 sts.
When piece measures approx. 27-30-33-36-39 cm / 10½"-11¾"-13"-14¼"-15¼" (make sure that next row is a row with sc), dec for armholes as follows: Work sl sts over the first 4 dc, then work sc until 4 dc remain, turn. * Ch 3 (= 1 dc), then work the next 2 dc tog – SEE DECREASE TIP, then work dc until 3 sc remain, work the next 2 dc tog, then 1 dc in last sc.
Turn and work 1 row with sc over all sts, turn *. Repeat from *-* 3 more times = 46-50-54-58-62 sts on row.
Continue to work until piece measures approx. 39-43-47-51-55 cm / 15¼"-17"-18½"-20"-21½". Now work 2 rows with pattern as before only over the 12-13-14-16-17 sts in each side (the middle 22-24-26-26-28 sts = neck). Fasten off.

FRONT PIECE:
Work as back piece until piece measures approx. 27-30-33-36-39 cm / 10½"-11¾"-13"-14¼"-15¼" (make sure that next row is a row with sc) = 62-66-70-74-78 dc. Now beg armhole dec - at the same time divide mid front for vent.
1ST SIDE:
Work sl sts over the first 4 dc, then work sc over the next 29-31-33-35-37 dc. * Turn and work dc until 3 sc remain, work the next 2 dc tog – SEE DECREASE TIP, then work 1 dc in last sc. Turn and work sc over all dc *, repeat from *-* 3 more times. 8 sts have been dec in total for armhole and 25-27-29-31-33 sts remain on row.
Continue as before. When piece measures approx. 35-38-42-45-49 cm / 13¾"-15"-16½"-17¾"-19¼" (make sure that next row beg from the side), beg neck dec.
Now only work over the first 17-18-19-21-22 sts. Turn and work back - at the same time work the first 4 sts towards neck tog 2 by 2 – SEE DECREASE TIP!
On next row work the 2 outermost sts towards neck tog, repeat this dec on every row 2 more times = 12-13-14-16-17 sts remain on shoulder.
Continue to work until piece measures 40-44-48-52-56 cm / 15¾"-17¼"-19"-20½"-22", fasten off.
2ND SIDE:
Beg mid front and work 1 sc at the back of each of the outermost 4 sts from 1st side (so that the button bands overlap at the bottom). Then work sc until 4 dc remain, turn and work back. Then work this side as 1st side.

SLEEVE:
Worked top down.
Chain 32-35-38-43-46 on hook size 4 mm / G/6 with gray blue.
Work first row as follows: Work 1 sc in 2nd ch from hook, work 1 sc in each of the next 2-1-0-1-0 ch, * skip ch 1, 1 sc in each of the next 3 ch *, repeat from *-* the entire row = 24-26-28-32-34 sc on row (this is 1st row in PATTERN SLEEVE - see explanation above). Then continue stripes as explained in PATTERN SLEEVE. AT THE SAME TIME inc in each side on every row with dc as follows:
Inc on every dc-row by working 2 dc in st inside outermost st in each side (= 1 dc inc in each side – NOTE: on rows with sc work 1 sc in every dc without inc).
Continue inc like this until there are 38-40-42-46-48 sts on row (adjust so that next row is a row with sc).
Cut the yarn and work as follows: ch 4 loosely, work 1 sc in each of the 38-40-42-46-48 dc on row and then work 6 loose ch, turn piece and work 1 dc in 4th ch from hook, 1 dc in each of the next ch 2, work 1 dc in each of the 38-40-42-46-48 sc on row and finish with 1 dc in each of the 4 ch at the end of row = 46-48-50-54-56 dc on row. Insert 1 marker at the end in one side of piece. Sleeve cap is now done. Continue down the sleeve as follows:
Continue with PATTERN SLEEVE in stripes as before. AT THE SAME TIME when piece measures 2 cm / ¾" from marker, dec 1 dc/sc in each side by working the second and third dc/sc and the 2 next to last dc/sc tog – SEE DECREASE TIP! Repeat dec every 4th-4th-5th-5th-5th row 5-6-6-7-8 more times (= 6-7-7-8-9 dec in total) = 34-34-36-38-38 sts on row.
AT THE SAME TIME when sleeve measures approx. 30-34-39-43-47 cm / 11¾"-13½"-15¼"-17"-18½" – stop after 1 stripe with light greyish green, work with gray blue until finished measurements.
When piece measures 35-39-43-47-51 cm / 13¾"-15¼"-17"-18½"-20", fasten off. Work another sleeve.

ASSEMBLY:
Sew shoulder seams, side seams and sleeve seams edge to edge to avoid a chunky seam. Sew in the sleeves in body. Sew the buttons on right side of mid front and button through sts.

CROCHET EDGE:
Work an edge up along the vent mid front, around the neck and down along the other vent at the front.
Beg from RS and work with gray blue on hook size 4 mm / G/6 as follows:
Work 1 sc in 1st st, * ch 1, 1 sc in next st *, repeat from *-* - make sure that the edge is nice and even. Fasten off.


This pattern has been corrected.

Updated online: 03.03.2014
SLEEVE: Cut the yarn and work as follows: ...and finish with 1 dc in each of the 4 ch at the end of row = 46-48-50-54-56 dc on row. ... +
Continue with PATTERN SLEEVE in stripes as before....= 34-34-36-38-38 sts on row. AT THE SAME TIME when sleeve measures ...

Diagram

All measurements in charts are in cm.

diagram measurements
Do you have a question? See a list of frequently asked questions (FAQ)

Knitting tension is what determines the final measurements of your work, and is usually measured per 10 x 10 cm. It is provided like so: number of stitches in width x number of rows in height - eg: 19 stitches x 26 rows = 10 x 10 cm.

The knitting tension is very individual; some people knit/crochet loosely while others work tightly. You adjust the knitting tension with the needle size, which is why the suggested needle size only serve as a guide! You need to adjust this (up or down) to ensure that YOUR knitting tension matches the knitting tension provided in the pattern. If you work with a different knitting tension than provided you will have a different yarn consumption, and your work will have different measurements than what the pattern suggests.

The knitting tension also determines which yarns can replace each other. As long as you achieve the same knitting tension you can replace one yarn with another.

See DROPS lesson: How to measure your tension/gauge

See DROPS video: How to make a gauge tension swatch

The required amount of yarn is provided in grams, eg: 450 g. To calculate how many balls you’ll need you first need to know how many grams are in 1 ball (25g, 50g or 100g). This information is available if you click on the individual yarn quality on our pages. Divide the amount required with the amount of each ball. For example, if each ball is 50g (the most common amount), the calculation will be as follows: 450 / 50 = 9 balls.

The important thing when changing from one yarn to another is that the knitting/crochet tension remains the same. This is so that the measurements of the finished piece will be the same as on the sketch provided. It is easier to achieve the same knitting tension using yarns from the same yarn group. It is also possible to work with multiple strands of a thinner yarn to achieve the knitting tension of a thicker one. Please try our yarn converter. We recommend you to always work a test swatch.

Please NOTE: when changing yarn the garment might have a different look and feel to the garment in the photo, due to individual properties and qualities of each yarn.

See DROPS lesson: Can I use a different yarn than the one mentioned in the pattern?

All our yarns are categorised into yarn groups (from A to F) according to thickness and knitting tension – group A contains the thinnest yarns and group F the thickest. This makes it easier for you to find alternative yarns to our patterns, should you wish to switch yarn. All yarns within the same group have a similar knitting tension and can easily replace each other. However, different yarn qualities have different structures and properties which will give the finished work a unique look and feel.

Click here for an overview of the yarns in each yarn group

At the top of all our patterns you’ll find a link to our yarn converter, which is a helpful tool should you wish to use a different yarn than suggested. By filling in the yarn quality you wish to replace, the amount (in your size) and number of strands, the converter will present good alternative yarns with the same knitting tension. Additionally it will tell you how much you’ll require in the new qualities and whether you’ll need to work with multiple strands. Most skeins are 50g (some are 25g or 100g).

If the pattern is worked with multiple colours, every colour will have to be converted separately. Similarly, if the pattern is worked with several strands of different yarns (for example 1 strand Alpaca and 1 strand Kid-Silk) you will have to find alternatives for each, individually.

Click here to see our yarn converter

Since different yarns have different qualities and textures we have chosen to keep the original yarn in our patterns. However, you can easily find options among our available qualities by using our yarn converter, or simply pick a yarn from the same yarn group.

It is possible that some retailers still have discontinued yarns in stock, or that someone has a few skeins at home that they would like to find patterns for.

The yarn converter will provide both alternative yarn as well as required amount in the new quality.

If you think it's hard to decide what size to make, it can be a good idea to measure a garment you own already and like the size of. Then you can pick the size by comparing those measures with the ones available in the pattern's size chart.

You'll find the size chart at the bottom of the pattern.

See DROPS lesson: How to read size chart

The needle size provided in the pattern serves only as a guide, the important thing is to follow the knitting tension. And since knitting tension is very individual, you will have to adjust the needle size to ensure that YOUR tension is the same as in the pattern – maybe you’ll have to adjust 1, or even 2 needle sizes, up or down to achieve the correct tension. For this, we recommend that you work test swatches.

Should you work with a different knitting tension than the one provided, the measurements of the finished garment might deviate from the measurement sketch.

See DROPS lesson: How to measure your tension/gauge

See DROPS video: How to make a gauge tension swatch

Working a garment top-down provides more flexibility and room for personal adjustment. For example it is easier to try the garment on while working, as well as making adjustments to length of yoke and shoulder caps.

The instructions are carefully explaining every step, in the correct order. Diagrams are adjusted to the knitting direction and are worked as usual.

The diagram depicts all rows/rounds, and every stitch seen from the right side. It is read from bottom to top, from right to left. 1 square = 1 stitch.

When working back and forth, every other row is worked from the right side and every other row is worked from the wrong side. When working from the wrong side, the diagram will have to be worked reversed: from left to right, knit stitches are purled, purl stitches are knit etc.

When working in the round every round is worked from the right side and the diagram are worked from right to left on all rounds.

See DROPS lesson: How to read knitting diagrams

The diagram depicts all rows/rounds, and every stitch seen from the right side. It is worked from bottom to top, from right to left.

When working back and forth every other row is worked from the right side: from right to left and every other row is worked from the wrong side: from left to right.

When working in the round, every row in the diagram are worked from the right side, from right to left.

When working a circular diagram you start in the middle and work your way outwards, counter clockwise, row by row.

The rows usually start with a given number of chain stitches (equivalent to the height of the following stitch), this will either be depicted in the diagram or explained in the pattern.

See DROPS lesson: How to read crochet diagrams

Instructions for working several diagrams after each other on the same row/round, will often be written like so: “work A.1, A.2, A.3 a total of 0-0-2-3-4 times". This means you work A.1 once, then A.2 is worked once, and A.3 is repeated (in width) the number of times provided for your size – in this case like so: S = 0 times, M = 0 times, L=2 times, XL= 3 times and XXL = 4 times.

The diagrams are worked as usual: begin with the first row in A.1, then work the first row in A.2 etc.

See DROPS lesson: How to read knitting diagrams

See DROPS lesson: How to read crochet diagrams

The total width of the garment (from wrist-to-wrist) will be larger in the larger sizes, despite the actual sleeves being shorter. The larger sizes have longer sleeve caps and wider shoulders, so there will be a good fit in all sizes.

The measurement sketch/schematic drawing provides information regarding the full length of the garment. If it’s a jumper or a jacket the length is measured from the highest point on the shoulder (usually closest to the neckline), and straight down to the bottom of the garment. It is NOT measured from the tip of shoulder. Similarly, the length of yoke is measured from the highest point on the shoulder and down to where yoke is split into body and sleeves.

See DROPS lesson: How to read a schematic drawing

Diagrams are often repeated on the round or in height. 1 repeat is the diagram the way it appears in the pattern. If it says to work 5 repeats of A.1 in the round, then you work A.1 a total of 5 times after/next to each other in the round. If it says to work 2 repeats of A.1 vertically/in height you work the entire diagram once, then begin again at the start and work the entire diagram one more time.

Chain stitches are slightly narrower than other stitches and to avoid working the cast-on edge too tight, we simply chain more stitches to begin with. The stitch count will be adjusted on the following row to fit the pattern and measurement sketch.

The rib edge is more elastic and will contract slightly compared to, for example, stocking stitch. By increasing before the rib edge, you avoid a visible difference in width between the rib edge and the rest of the body.

It’s very easy to cast off too tightly, and by making yarn overs while casting off (and simultaneously casting these off) you avoid a too tight cast off edge.

See DROPS video: How to bind off with yarn overs (yo)

To achieve an even increase (or decrease) you can increase on, for example: every 3rd and 4th row alternately, like so: work 2 rows and increase on the 3rd row, work 3 rows and increase on the 4th. Repeat this until the increase is complete.

See DROPS lesson: Increase or decrease 1 st on every 3rd and 4th row alternately

Should you prefer to work in the round instead of back and forth, you may of course adjust the pattern. You’ll need to add steeks mid-front (usually 5 stitches), and follow the instructions. When you would normally turn and work from the wrong side, simply work across the steek and continue in the round. At the end you’ll cut the piece open, pick up stitches to work bands, and cover the cut edges.

See DROPS video: How to knit steeks and cut open

Should you prefer to work back and forth instead of in the round, you may of course adjust the pattern so you work the pieces separately and then assemble them at the end. Divide the stitches for the body in 2, add 1 edge stitch in each side (for sewing) and work the front and back pieces separately.

See DROPS lesson: Can I adapt a pattern for circular needles into straight needles?

Pattern repeats can vary slightly in the different sizes, in order to get the correct proportions. If you’re not working the exact same size as the garment in the photo, yours might deviate slightly. This has been carefully developed and adjusted so that the complete impression of the garment is the same in all sizes.

Make sure to follow instructions and diagrams for your size!

If you have found a pattern you like which is available in women’s size it’s not very difficult to convert it to men’s size. The biggest difference will be the length of sleeves and body. Start working on the women size that you think would fit across the chest. The additional length will be worked right before you cast off for the armhole/sleeve cap. If the pattern is worked top-down you can add the length right after the armhole or before the first decrease on sleeve.

Regarding additional yarn amount, this will depend on how much length you add, but it is better with a skein too many than too few.

All yarns will have excess fibres (from production) that might come off as lint or shedding. Brushed yarns (ie hairier yarns) have more of these loose, excess fibres, causing more shedding.

Shedding also depends on what is worn under or over the garment, and whether this pulls at the yarn fibres. It’s therefore not possible to guarantee that there will be no shedding

Below are some tips on how to get the best result when working with hairier yarns:

1. When the garment is finished (before you wash it) shake it vigorously so the looser hairs come off. NOTE: do NOT use a lint roller, brush or any method that pulls at the yarn.

2. Place the garment in a plastic bag and put it in your freezer - the temperature will cause the fibres to become less attached to each other, and excess fibres will come off easier.

3. Leave in the freezer for a few hours before taking it out and shaking it again.

4. Wash the garment according to the instructions on the yarn label.

Pilling is a natural process that happens to even the most exclusive of fibers. It's a natural sign of wear and tear that is hard to avoid, and that is most visible in high friction areas of your garment like a sweater's arms and cuffs.

You can make your garment look as new by removing the pilling, using a fabric comb or a pill/lint remover.

Still can't find the answer you need? Then scroll down and leave your question so one of our experts can try to help you. This will be done normally within 5 to 10 working days.
In the meantime, you can read the questions and answers that others have left to this pattern or join the DROPS Workshop on Facebook to get help from fellow knitters/crocheters!

You might also like...

Post a comment to pattern DROPS Children 24-28

We would love to hear what you have to say about this pattern!

If you want to leave a question, please make sure you select the correct category in the form below, to speed up the answering process. Required fields are marked *.

Comments / Questions (55)

country flag Monika wrote:

Hallo, danke für Ihre schönen Anleitungen! Zu dieser habe ich zwei Fragen: 1) Wie kommt man bei der Breite von 34 cm auf 26 cm, wenn je Armauschnitt 7 cm gerechnet sind? 2) Kann ich diesen Pullover auch gerade hoch häkeln, also ohne Abnahmen für die Achseln und auch die Ärmel gerade, also ohne Armkugel, arbeiten oder ergibt das keine brauchbare Form? Würde mich sehr über Antwort freuen, eilt nicht! Monika

07.11.2023 - 13:42

DROPS Design answered:

Liebe Monika, so wird es nicht gerechnet; die 7 cm sind für die Armkugel, aber in die 1. Größe messen die Armausschnitt nur 8 Maschen beidseitig in der Breite = ca 4 cm. Viel Spaß beim häkeln!

08.11.2023 - 07:47

country flag Marie Nordqvist wrote:

Var beskrivs knapphålen? Ska de inte vara på den påvirkade kanten runt halsen och ned mot sprunnet?

01.05.2023 - 15:36

DROPS Design answered:

Hei Marie. Det kneppes igjennom en stavmaske, så da trenges det ikke å hekle egen knappehull. Sy knappene på i høyre siden og kneppes igjennom en maske på venstre side. mvh DROPS Design

02.05.2023 - 14:03

country flag Marie Nordqvist wrote:

Sen man ökat till 38 maskor på varvet å klippt av tråden, skall man börja med ärmkullen...🤔 Men då är ju bara ärmen drygt en decimeter lång bara.\r\nHar man inte missat i beskrivningen, att man skall sticka vidare tills arbetet mäter ett visst mått, innan man börjar med ärmkullen. I beskrivningen, efter ärmkullen, när man minskar nedåt, finns det ju längdangivelser på både 30 och 35 cm??? HJÄLP!

27.04.2023 - 12:38

DROPS Design answered:

Hej igen Marie, du börjar uppifrån med ärmkullen och först när du har ökat 1 m i varje sida 7ggr (= 13 varv) har du 38 m och du klipper tråden :)

27.04.2023 - 13:32

country flag Marie Nordqvist wrote:

Har nyss skickat in mitt problem! Frågan var ju HUR man gör, när man stickat första sidan på framstycket och skall sticka andra sidan? Vad menas med att sticka i de 4:a första maskorna från första sidan (vid delningen) ? Sen ska man sticka vidare på stolpar, vilken sida är man på då? Efter att man klurat ut det, om man lyckas, ska man fortsätta med sida 2. Förstår inte🤔 Jobbigt😑😅

26.04.2023 - 11:39

DROPS Design answered:

Hej Marie, du virkar bakom de 4 första m mitt fram (i samma 4 maskor) sedan fortsætter du över det andra framstycket på samma sätt som du virkade 1:a sidan (framstycket) :)

26.04.2023 - 14:55

country flag Marie Nordqvist wrote:

Har gjort första sidan på framstycket, del 1 Ska nu börja med del 2. Står att jag skall virka i de 4 1:a maskorna från del 1 sedan fortsätta med fasta maskor till det återstår 4 stolpar. Efter det fortsätta som del 1, med del 2.

25.04.2023 - 17:57

DROPS Design answered:

Hej Marie, ja det stemmer, hvad er dit spørgsmål?

26.04.2023 - 07:54

country flag Nathalie wrote:

Diminutions au total) = 34-34-36-38-38 m. EN MÊME TEMPS, quand la manche mesure environ 30-34-39-43-47 cm – ajuster après 1 rayure gris clair, terminer en bleu gris jusqu'à la fin. À 35-39-43-47-51 cm de hauteur totale, arrêter. En suivant bien les diminutions, je suis bien a 38 m mais 52 cm. Alors je ne comprend pas?

29.12.2022 - 05:10

DROPS Design answered:

Bonjour Nathalie, votre échantillon est-il exact? Vous devez avoir 12 rangs du point fantaisie (= alternativement 1 rang de brides, 1 rang de mailles serrées) = 10 cm, si vous diminuez 8 fois tous les 5 rangs, il vous faut : 7x5 + le dernier rang de diminutions = 36 rangs soit 30 cm + les 2 cm avant de commencer à diminuer + les 7 cm de la tête de manche= 39 cm. Si vous ne tombez pas juste en hauteur, essayez en diminuant moins souvent. Bon crochet!

02.01.2023 - 11:38

country flag Nathalie wrote:

Répéter ces diminutions encore 5-6-6-7-8 fois tous les 4 -4 -5 -5 -5 rangs(= 6-7-7-8-9 diminutions au total) = 34-34-36-38-38 m. EN MÊME TEMPS, quand la manche mesure environ 30-34-39-43-47 cm – ajuster après 1 rayure gris clair, terminer en bleu gris jusqu'à la fin. Bonjour, j'ai du mal à suivre: tous les 5 rangs faire la diminution pourriez vous me l'expliquer simplement svp. Je vous remercie

17.12.2022 - 14:01

DROPS Design answered:

Bonjour Nathalie, crochetez 1 rang en diminuant 1 maille de chaque côté (à 1 m des bords), crochetez 4 rangs sans diminuer et crochetez ces 5 rangs ainsi le nombre de fois indiqué pour la taille. Bon crochet!

19.12.2022 - 08:50

country flag Nancy G wrote:

Cont.- if the sweater weren’t buttoned, what would it look like? The 2 sides? Is Side 1 on the right or left?

15.01.2022 - 23:03

DROPS Design answered:

Dear Nancy, for boys the side that is overlapping is usually the left one, passing over the right side. So the 1st side would be the left one and the Side 2 would be the right one. Happy crocheting!

17.01.2022 - 00:17

country flag Nancy G wrote:

Front sides- help!\r\nI did side 1 backwards\r\nNeither Side is right at the neck.

15.01.2022 - 22:22

country flag Linda wrote:

I'm stuck on the last part of the back. It says work 2 rows in pattern for 16 stitches on each side. How do you get to the other side? Do you slip stitch the middle stitches or cut the yarn and fasten on the other side? Thx

18.12.2021 - 06:20

DROPS Design answered:

Dear Linda, in this case, you would need to cut the yarn and fasten on the other side. Happy crochetting!

19.12.2021 - 18:29