
Popular categories
Looking for a yarn?


|
||||||||||
White Harbour |
||||||||||
|
|
||||||||||
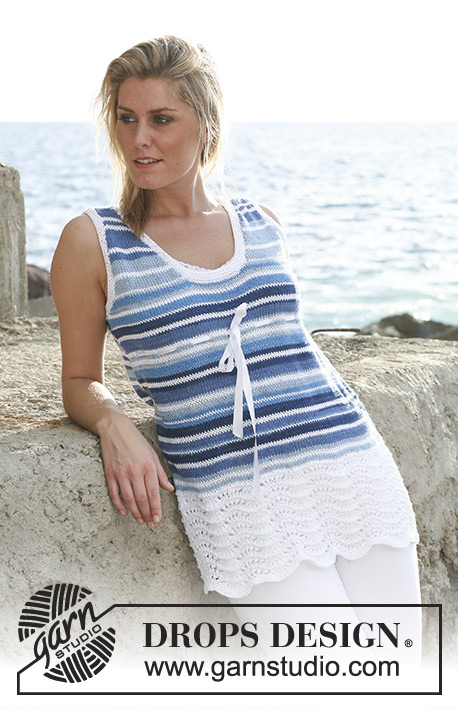
DROPS dress in in “Paris” with crochet yoke.
DROPS Extra 0-437 |
||||||||||
|
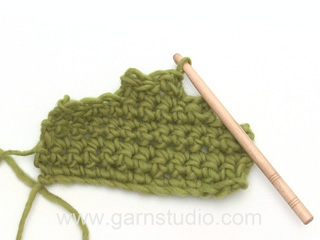
Garter st, in the round: K 1 round, P 1 round. Stripes: See diagram M.1 and M.2. Crochet 1 vertical repeat of M.1 and then complete piece in M.2. Decreasing tip-1: Dec as follows before marker: K 2 tog. Dec as follows after marker: slip 1 st as if to K, K1, psso. Decreasing tip-2: Dec dc-groups at the end of row as follows: work row until no of dc-groups to be dec remain and turn piece. Dec dc-groups at the beg of row as follows: crochet sl sts on the no of sts to be dec. -------------------------------------------------------------------- Dress: Cast on 184-196-208-220-236-248 sts on circular needle size 5 mm / US 8 with white. Work 6 rounds garter sts. Insert 1 marker each side (= 92-98-104-110-118-124 sts on front and back piece). Continue in stockinette st. REMEMBER THE GAUGE! At the same time when piece measures 4 cm / 1½'' dec 1 st on both sides of each marker – see Decreasing tip-1 – on every 3.5 cm / 1 1/4'' a total of 15 times for all sizes = 124-136-148-160-176-188 sts (= 62-68-74-80-88-94 sts on back and front pieces). When piece measures 53 cm / 21'' for all sizes work 4 rows garter st and bind off. Yoke: Work back and front piece separately and sew tog at sides afterwards. Back piece: Crochet along back piece on crochet hook size 4.5 mm/US 7 with white as follows: 1 sc in each of the first 4-4-7-6-6-9 sts, *skip 1 st, 1 sc in each of the next 3 sts*, repeat from *-* until 2-0-3-2-2-5 sts remain, 1 sc in each of these = 48-52-58-62-68-74 sc. Now work stripes – see above – and continue as follows: Row 1: ch 3, 2 dc in second sc from edge, *skip 1 sc, 2 dc in next sc*, repeat from *-* = 48-52-58-62-68-74 dc (= 24-26-29-31-34-37 dc-groups). Row 2: ch 3, 2 dc between the first 2 dc-groups, then 2 dc between all dc-groups, and finish with 2 dc in 3rd ch from beg of previous row = 24-26-29-31-34-37 dc-groups. Repeat second row. When piece measures 14-15-16-17-18-19 cm / 5½''-6''-6¼''-6¾''-7''-7½'' bind off for armhole each side on every row – see Decreasing tip-2: Dec 2 dc-groups 1 time and then 1 dc-group 0-0-1-2-3-4 times = 20-22-23-23-24-25 dc-groups left. At the same time when yoke measures 24-26-28-30-32-34 cm / 9½"-10 1/4"-11"-11 3/4"-12½"-13½" divide the piece in two for split and complete each side separately. Continue as before on the 10-11-11-11-12-12 dc-groups. When yoke measures 30-32-34-36-38-40 cm / 11¾''-12½''-13 3/8''-14¼''-15''-15¾ crochet 2 rows, but only on the 5-6-6-6-6-6 dc-groups towards armhole. Repeat on the 10-11-11-11-12-12 dc-groups on the other side. Front piece: Crochet as back piece. Bind off for armhole as described for back piece. At the same time when yoke measures 20-22-24-26-28-30 cm/8"-8 3/4"-9½"-10 1/4"-11"-11 3/4" continue on 6-7-7-7-7-7 dc-groups on one side only, and dec 1 dc-group towards neckline on next row = 5-6-6-6-6-6 dc-groups left on shoulder. Cut the thread when yoke measures 32-34-36-38-40-42 cm / 12½''-13 3/8''-14¼''-15''-15¾''-16½''. Repeat the other side. Assembly: Sew shoulder seams. Sew side seams inside 1 edge st. Crochet borders: Crochet a row of sc round neckline on crochet hook size 4.5 mm/US 7 with white as follows: beg at bottom of split on back piece, crochet round split and neckline. Chain 4 for buttonhole, crochet along other side of split and finish with 1 sl st in sc from beg of round. Sew on button. Crochet a row of sc round each armhole. Crochet a border along bottom edge of dress as follows: Round 1: *1 sc in each of the first 3 sts, skip 1 st*, repeat from *-* until 0-4-0-4-4-0 sts remain, crochet 1 sc in each remaining st = 138-148-156-166-178-186 sc, and finish with 1 sl st in first sc from beg of round. Round 2: ch 3, 1 dc in first sc, *skip 1 sc, 2 dc (= 1 dc-group) in next sc*, repeat from *-* and finish with 1 sl st in 3rd ch from beg of round = 69-74-78-83-89-93 dc-groups. Round 3: ch 3, then continue with 2 dc between each dc-group from previous round. Finish with 1 sl st in 3rd ch from beg of round. |
||||||||||
Diagram explanations |
||||||||||
|
||||||||||

|
||||||||||

|
||||||||||
|
Have you made this or any other of our designs? Tag your pictures in social media with #dropsdesign so we can see them! Do you need help with this pattern?You'll find tutorial videos, a Comments/Questions area and more by visiting the pattern on garnstudio.com. © 1982-2024 DROPS Design A/S. We reserve all rights. This document, including all its sub-sections, has copyrights. Read more about what you can do with our patterns at the bottom of each pattern on our site. |
||||||||||


With over 40 years in knitting and crochet design, DROPS Design offers one of the most extensive collections of free patterns on the internet - translated to 17 languages. As of today we count 304 catalogs and 11422 patterns - 11417 of which are translated into English (US/in).
We work hard to bring you the best knitting and crochet have to offer, inspiration and advice as well as great quality yarns at incredible prices! Would you like to use our patterns for other than personal use? You can read what you are allowed to do in the Copyright text at the bottom of all our patterns. Happy crafting!
Comments / Questions (12)
Wat wordt bedoelt met onderstaande? Minder tegelijkertijd vanaf een hoogte van 4 cm 15 x 1 st aan weerskanten van beide merkdraden op elke 3½ cm ik heb de 15 steken 2x op 1 naald geminderd maar ik krijg een totaal andere onderkant dan op de foto. Ik kom de "tegelijkertijd" in meerdere patronen tegen maar kom er maar niet achter wat jullie daar nu eigenlijk precies mee bedoelen. alvast bedankt.
02.02.2019 - 21:34DROPS Design answered:
Nicole,
Je mindert steeds 1 steek aan elke kant van het werk en dat doe je 15 keer met 3,5 cm ertussen. (Dus niet 15 steken in een keer afkanten.
03.02.2019 - 11:09Bonjour, Je suis débutante dans le crochet. Dans l'ensemble je regarde les vidéos qui m'aident bien mais je ne comprends pas cette phrase : A 32 cm de hauteur d'empiècement, crocheter 2 rangs sur les seuls 6 groupes de brides côté emmanchure. Comment doit-on crocheter? Merci d'avance.
03.05.2018 - 08:53DROPS Design answered:
Bonjour Mme Hiriart, vous formez ici les épaules, crochetez les 6 premiers groupes de brides en début de rang, tournez (laissez les autres mailles de la fin du rang non travaillées) et crochetez le rang suivant sur ces 6 groupes de brides, arrêter. Tournez et crochetez les 6 premiers groupes de brides de l'autre côté pour l'épaule (= les mailles centrales restent non travaillées pour l'encolure), tournez et crocheter le rang suivant sur ces 6 groupes de brides. Bon crochet!
03.05.2018 - 09:47Bonsoir, merci de votre réponse mais j'aimerais savoir comment on calcul le nombre de pelotes qu'il faut par rapport à la taille. Merci
26.03.2018 - 20:07DROPS Design answered:
Bonjour Mme Reix, vous trouverez sous le nuancier de chaque qualité le poids de la pelote, soit pour Paris, c'est 50 g la pelote, divisez le poids total pour votre taille par 50 pour obtenir le nombre de pelotes. Bon tricot!
28.03.2018 - 14:54Bonjour, combien de pelotes me faut il pour réaliser le modèle drops extra 0-437 en taille 40. Merci de votre réponse. Françoise
26.03.2018 - 12:43DROPS Design answered:
Bonjour Mme Reix, vous trouverez la quantité nécessaire pour chaque taille, au poids, dans l'entête du modèle. DROPS Paris = 50 g la pelote, il vous faudra par ex en taille S: 9 pelotes col. 16, 2 pelotes col 29 et 1 pelote col. 28. Bon tricot!
26.03.2018 - 13:15Bonjour, combien de pelotes me faut- il pour une taille 40 mais d'une seule couleur (uni). Merci de votre réponse
24.03.2018 - 12:59DROPS Design answered:
Bonjour Mme Reix, vous pouvez additionner les différentes quantités de chaque couleur, il vous en faudra probablement un peu moins, mais vous serez ainsi certaine d'en avoir suffisamment. Bon tricot!
26.03.2018 - 11:01Denna klänning är så fin, skulle passa som barnklänning också. Kan ni göra mönster i samma stil för barn ? Skulle uppskattas mycket. Gärna i ett lite tunnare garn. Typ Safari. Tack på förhand.
28.01.2018 - 21:13DROPS Design answered:
Har du set denne, det er næsten samme model Mint Crush!
30.01.2018 - 11:55Necesito saber cuantas cadenetas necesito montar para el canesú en la talla Mediana y Grande. Gracias
17.05.2016 - 12:04DROPS Design answered:
Hola Ester. No hay que montar cadenetas adicionales. Se trabajan puntos bajos en la parte superior del cuerpo.
21.05.2016 - 18:51Hallo, kann ich für dieses Kleid auch Drops Cotton Viskose nehmen? Es ist doch auch eine Baumwolle wie Drops Paris. Mir gefällt nämlich der schöne Glanz von Cotton Viskose. Das kann ich mir für das Kleid gut vorstellen. Danke für die Hilfe vorab.
22.12.2014 - 19:33DROPS Design answered:
Sie können Cotton Viscose doppelt verwenden, das entspricht einfädigem Paris. Cotton Viscose gehört in Garngruppe A und Paris in Gruppe C, 1 Faden C entspricht 2 Fäden A. Beachten Sie, dass Sie die benötigte Garnmenge anhand der Lauflänge neu berechnen müssen und dass Sie die Maschenprobe einhalten.
06.03.2015 - 12:16Hei! For meg ser det ut for at det er en kant nedenfor de tre rillene på skjøtet. Hvo på mønstret finner jeg det?
25.06.2014 - 13:07DROPS Design answered:
Hei Kathrine. Ja, det er sandt. Det staar nederst i mönstret under Montering: Hekle 1 kant nederst slik:
25.06.2014 - 13:47Could you add at the beginning that one button is needed.
25.02.2011 - 21:46