
Suositut kategoriat
Etsitkö tiettyä lankaa?


Kommentit / Kysymykset (64)
![]() Allinson Sherratt kirjoitti:
Allinson Sherratt kirjoitti:
Further to your answer to my earlier question, I would confirm I did do a tension square & it was fine. I'm mainly concerned that I'm interpreting the pattern correctly IE am I correct to increase the yo marker increases on the right side only - for the largest side this would equate to 76 rows. Thanks
06.08.2021 - 14:04DROPS Design vastasi:
Dear Allinson, you are right, you only increase on the right side. About the amount of rows to work, you need to check the measurements for your sizes with the ones in the diagram below the pattern; but there should be 76 rows, yes. The texture of the work should be loose and light.
07.08.2021 - 11:13
![]() Allinson Sherratt kirjoitti:
Allinson Sherratt kirjoitti:
If you only increase around the markers on every right sided row, you knit 38 X 2(for the largest size), 76 rows in total. I have used 6 balls of Muskat so far & need to knit 30 more rows. Can you please confirm the quantity of yarn required ?
06.08.2021 - 12:41DROPS Design vastasi:
Dear Allison, the amount of yarn we use dto knit the modell is stated in the pattern. However the amount of yarn a knitter catually uses depends on many factors, mostly on the gauge she is knitting with. If you knit with gauge given, the amount of yarn should be enough. Happy stitching!
06.08.2021 - 13:15
![]() Nathalie kirjoitti:
Nathalie kirjoitti:
Buongiorno, non ho capito il passaggio del retro dx e sx . Si ripete spalla destra, immagino ci sia un errore e volevo capire se tutte e due le spalle e’ corretto lavorarle in modo diverso Io per le due parti davanti ho lavorato i due pezzi insieme sullo stesso ferro Posso farlo anche per il dietro? Grazie mille ♥️
06.05.2020 - 11:59DROPS Design vastasi:
Buongiorno Nathalie, abbiamo corretto il testo. Deve lavorare prima la spalla sinistra e poi la destra, e quando le viene chiesto unirà le maglie della spalla sinistra. Buon lavoro!
06.05.2020 - 12:40
![]() Laura Crockarell kirjoitti:
Laura Crockarell kirjoitti:
When doing the increases for the arm hole from the WS, should i still do a Knit front and back or another type increase stitch?
24.03.2019 - 23:15DROPS Design vastasi:
Dear Mrs Crockarell, when increasing from the WS you can purl front and back to keep the same kind of increase -seen from RS all the way. Happy knitting!
25.03.2019 - 12:12
![]() Debbie Owen kirjoitti:
Debbie Owen kirjoitti:
When doing the YO, do we need to move the marker? I am not but do have the correct increases each time. Marker started at 37 and after 2 rows of increases it is now in 39. Is that correct.
25.04.2018 - 16:18DROPS Design vastasi:
Dear Mrs Owen, marker should stay in the same st all the way (just move it upwards when working), ie after 2 rows increase you have increased 2 sts and there are now 38 sts before marker (= marker is in the 39th st) in 5th size. Happy knitting!
25.04.2018 - 16:39
![]() Connie Ruebling kirjoitti:
Connie Ruebling kirjoitti:
While making this vest I have noticed by looking at the finished projects, there are two different ways people are knitting the yarn over increases. The pattern says in the body to increase in the 24-42nd stitch depending on your size in from each side. As you continue, that number does not stay the same. The next knit row after you have purled back, the increase will be in the 25-43rd stitch, then the 26-44th stitch and so on. Not the 24-42nd stitch throughout.
17.06.2015 - 21:18DROPS Design vastasi:
Dear Mr Ruebling, the marker on body has to be inserted in the 24th st in each side, and inc are done each side of the marker, so that you will have 23 sts for front piece before 1st inc, 24 sts after 1st inc and so on. Let marker follow this st and inc each side of this st will make the front pieces inc with 1 st and back piece with 2 sts on each inc row. Happy knitting!
18.06.2015 - 09:08
![]() Tamila kirjoitti:
Tamila kirjoitti:
I have made it, and mine curls so much being stockinette stitch. The picture with the model doesn't seem to curl so much. Is that because of blocking? Or is there something I can do to keep it from curling. I tried doing a rib edge, but didn't like it, and it still curled some.
05.05.2015 - 18:08DROPS Design vastasi:
Dear Tamila, blocking will prevent curling, you can also add a crocheted edge.
06.05.2015 - 09:17
![]() Neuling kirjoitti:
Neuling kirjoitti:
Hallo liebes Drops-Team! Sie schreiben in der Anleitung "...glatt stricken...". Meinen Sie damit glatt rechts, also Vorderseite rechte Maschen, Rückseite linke Maschen. Oder meinen Sie damit wirklich Vorder- und Rückseite rechte Maschen? Jetzt schon vielen lieben Dank für Ihre Antwort.
23.09.2014 - 16:23DROPS Design vastasi:
"glatt" bedeutet bei uns immer glatt rechts. Gutes Gelingen!
23.09.2014 - 22:16
![]() Cherry kirjoitti:
Cherry kirjoitti:
Hallo liebes Drops-Team! Ich habe gerade das linke Vorderteil gestrickt und es rollt sich an den Seiten sehr ein. Ist das so gewollt (auf dem Bild ist das für mich nicht ersichtlich!)oder sollte ich einfach ein/zwei Maschen am Rand als kraus rechts dazustricken (oder einfach von den anfänglichen 17 Maschen vier als Randmaschen (kraus rechts) einplanen - also auf jeder Seite 2?)???? Für eine Antwort wäre ich sehr dankbar.
02.08.2014 - 11:39DROPS Design vastasi:
Sie können die Weste nach dem Stricken anfeuchten und spannen oder unter feuchten Tüchern trocknen lassen, dann rollen sich die Ränder weniger stark. Sie können ein Probestück stricken und ausprobieren, wie stark es sich nach solch einer Behandlung noch einrollt. Falls das nicht reicht, können Sie wie von Ihnen vorgeschlagen ein paar Maschen am Rand kraus rechts stricken statt glatt rechts (nicht zusätzlich), ich würde 3-4 M kraus re pro Seite stricken.
04.08.2014 - 13:48
![]() Heike König kirjoitti:
Heike König kirjoitti:
150 g Wolle haben für die Größe S nicht ausgereicht. Ich habe noch 100 g dazubestellt.
01.06.2014 - 16:23
|
|
Take Me To Spain#takemetospainvest |
|
 |
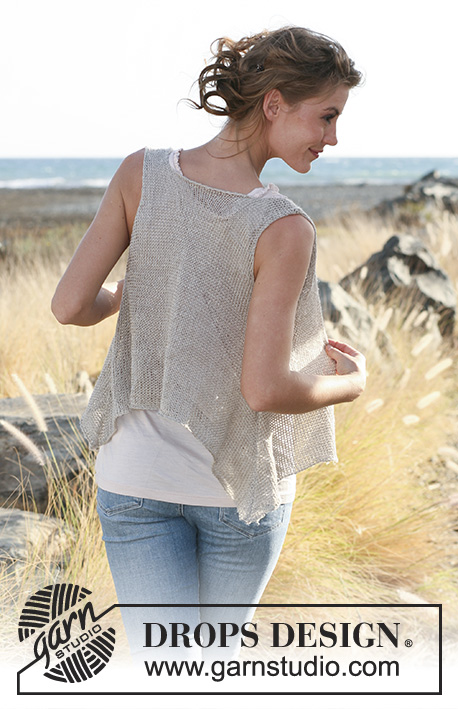 |
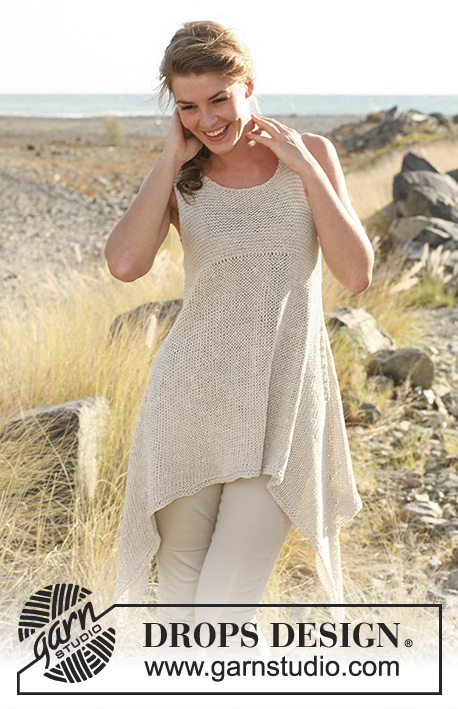
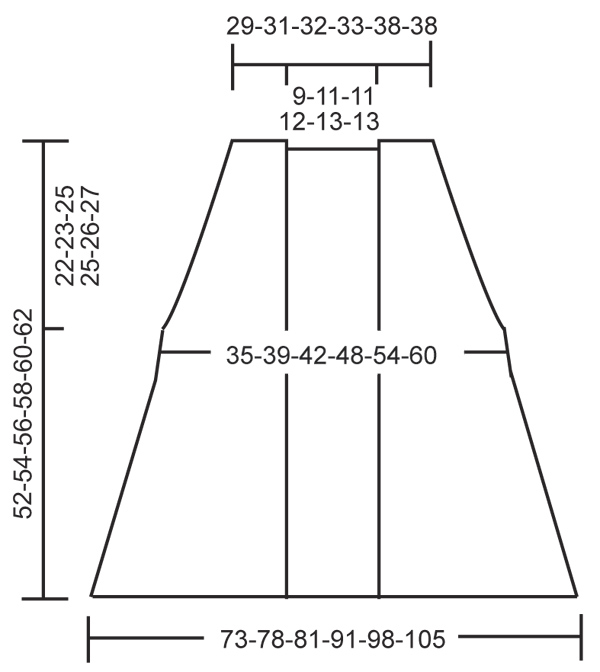
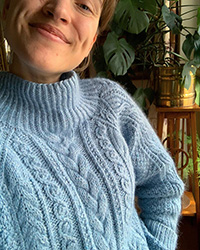
Ylhäältä alas neulottu DROPS epäsymmetrinen liivi ”Lin”- tai ”Muskat”-langasta. Koot S-XXXL.
DROPS 129-15 |
|
|
LISÄYSVINKKI: Lisää tekemällä kummankin sivun merkityn s:n molemmin puolin 1 langankierto seuraavasti: Neulo sileää neuletta merkkilankaan asti, 1 langankierto, merkitty s neulotaan sileänä neuleena, 1 langankierto. Seuraavalla krs:lla langankierrot neulotaan nurin, jottei muodostuisi reikiä. -------------------------------------------------------- Työ neulotaan ylhäältä alas. Etu- ja takakappale neulotaan tasona erikseen alas kädenteihin asti. Sitten kappaleet yhdistetään ja neulominen jatketaan tasona keskeltä edestä alkaen. VASEN ETUKAPPALE: Neulotaan tasona pyöröpuikolla. Luo 17-17-18-18-21-21 s pyöröpuikolle nro 5 Lin-langalla. Neulo sileää neuletta. Kun työn pituus on 2 cm, lisää kädentien reunaan 1 s neulomalla viimeiseen s:aan 2 s (oikealta puolelta katsottuna). Toista tällaiset lisäykset sivun reunimmaisessa silmukassa joka 9.-7.-6.-4.-4.-3. krs (eli oikean puolen krs:n viimeisessä silmukassa tai nurjan puolen krs:n ensimmäisessä silmukassa) yht. 6-8-10-14-15-20 kertaa = 23-25-28-32-36-41 s. TARKISTA NEULETIHEYS! Kun kaikki sivulisäykset on tehty, työn pituus on n. 22-23-25-25-26-27 cm. Siirrä s:t apulangalle. OIKEA ETUKAPPALE: Neulo vasemman etukappaleen peilikuvaksi. TAKAKAPPALE: Vasen olka: Luo 17-17-18-18-21-21 s pyöröpuikolle nro 5 Lin-langalla. Neulo 5 krs sileää neuletta (1. krs = oikea puoli). Katkaise lanka ja laita työ odottamaan. Oikea olka: Luo 17-17-18-18-21-21 s pyöröpuikolle nro 5 Lin-langalla. Neulo 5 krs sileää neuletta (1. krs = oikea puoli). Luo sitten seuraavan nurjan puolen krs:n loppuun 16-18-18-20-22-22 s = 33-35-36-38-43-43 s. Ota vasemman olan s:t takaisin työhön = 50-52-54-56-64-64 s. Jatka sileää neuletta. SAMANAIKAISESTI kun työn pituus olasta mitattuna on 2 cm, lisää krs:n ensimmäiseen ja viimeiseen s:aan 1 s. Toista tällaiset lisäykset joka 9.-7.-6.-4.-4.-3. krs yht. 6-8-10-14-15-20 kertaa = 62-68-74-84-94-104 s. Kun kaikki lisäykset on tehty, työn pituus on n. 22-23-25-25-26-27 cm. Katkaise lanka. ETU- JA TAKAKAPPALE: Ota oikean ja vasemman olan s:t samalle pyöröpuikolle takakappaleen kanssa. Neulo tasoneuletta keskeltä edestä alkaen = 108-118-130-148-166-186 s. Kiinnitä 1 merkkilanka 24-26-29-33-37-42 s:n päähän kummastakin reunasta (takakappale = 60-66-72-82-92-102 s). Neulo 2 cm sileää neuletta. Työn pituus on nyt n. 24-25-27-27-28-29 cm. Lisää seuraavalla krs:lla (= oikea puoli) kummankin sivun merkityn s:n molemmin puolin 1 s (LUE LISÄYSVINKKI). Toista tällaiset lisäykset jokaisella oikean puolen krs:lla lopulliseen mittaan asti = n. 32-33-33-36-37-38 lisäyskerrosta (= n. 28-29-29-31-32-33 cm). Kun kaikki lisäykset on tehty, työssä on n. 236-250-262-292-314-338 s. Päätä s:t LÖYHÄSTI. Työn pituus olasta mitattuna on nyt n. 52-54-56-58-60-62 cm (lisäysten vuoksi sivut ovat pidempiä). VIIMEISTELY: Ompele olkasaumat. |
|
 |
|
Oletko tehnyt tämän mallin?Tägää tällöin kuviasi #dropspattern #takemetospainvest tai lähetä kuvat #dropsfan galleriaan. Tarvitsetko apua tämän ohjeen kanssa?Löydät 14 ohjevideota, kommentteja/kysymyksiä ja muuta osoitteessa www.garnstudio.com © 1982-2026 DROPS Design A/S. Pidätämme kaikki oikeudet. Tämä tiedosto ja kaikki sen alatiedostot on suojattu tekijänoikeuslailla. Lue lisää siitä, mitä voit tehdä ohjeillamme, verkkosivujemme jokaisen ohjeen alaosasta. |
|


DROPS Design on toiminut neule- ja virkkausalalla yli 40 vuotta ja meillä on yksi kaikkein laajin valikoima ilmaisia ohjeita verkossa - käännettynä 17 kielelle. Tänään meiltä löytyy 324 lehteä ja 12190 ohjetta - joista 11587 ohjetta on käännetty suomeksi.
Työskentelemme ahkerasti, jotta voisimme antaa teille kaikkein parhaimpia neule- ja virkkausohjeita, inspiraatiota ja neuvoja sekä korkealaatuisia lankoja todella edulliseen hintaan! Haluaisitko käyttää ohjeitamme muuhun kuin henkilökohtaiseen käyttöön? Voit lukea säännöistä ohjeiden Tekijänoikeus -tekstissä, joka löytyy kaikkien ohjeidemme alapuolelta. Hauskoja hetkiä käsitöiden parissa!
Lisää kommentti ohjeeseen DROPS 129-15
Haluamme mielellämme kuulla mielipiteesi tästä ohjeesta!
Mikäli haluat esittää kysymyksen, valitse oikea kategoria alla olevasta valikosta - tällä tavoin saat vastauksen nopeammin. Pakolliset kentät on merkitty tähdellä *.