
Popular categories
Looking for a yarn?


|
|||||||||||||||||||
DROPS Baby 10-17 |
|||||||||||||||||||
|
|
|||||||||||||||||||
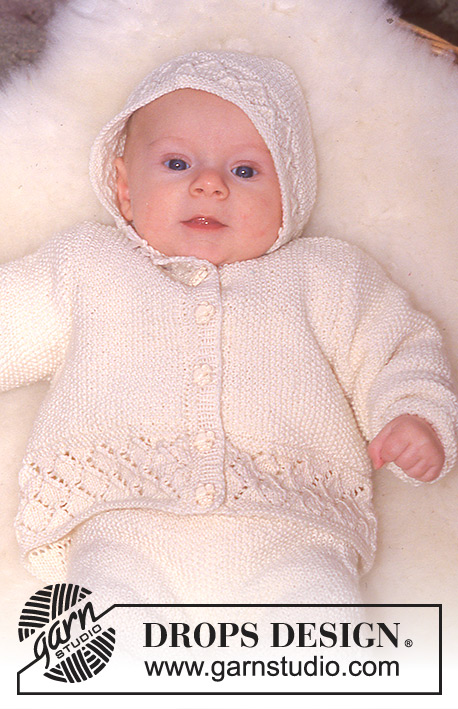
Jacket, hat and socks with borders in Alpaca
DROPS Baby 10-17 |
|||||||||||||||||||
|
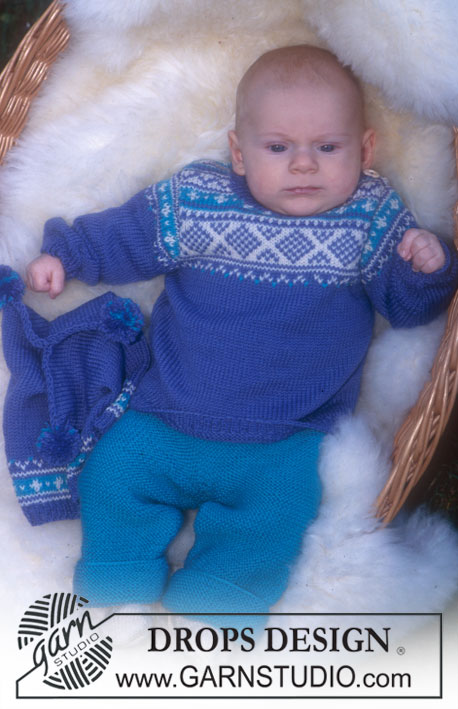
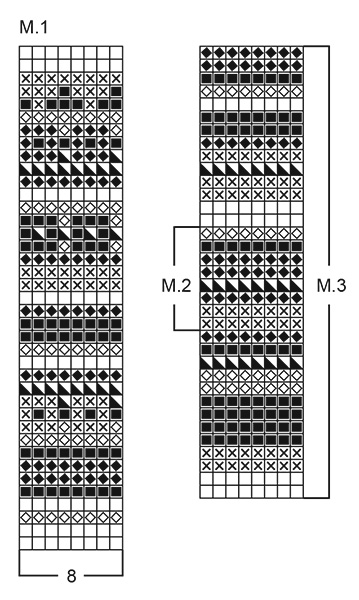
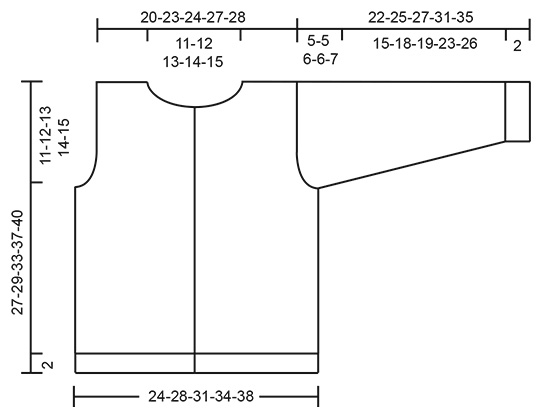
Knitting tension: 24 sts x 32 rows on needle size 3 mm in stocking sts = 10 x 10 cm. Garter sts (back and forth on needle): Knit all rows. Pattern: See diagrams M.1-M.2. The diagram shows the pattern from the right side. JACKET: Back and front piece: The jacket is knitted back and forth on circular needle from mid front. Cast on 119-135-151-167-183 sts (includes 1 edge st each side towards mid front) on needle size 2.5 mm with navy blue. Knit 6 rows garter sts, change to circular needle size 3 mm and continue in stocking sts. Remember the knitting tension! When piece measures 10-11-14-15-18 cm knit M.1. At the same time when piece measures 16-17-20-23-25 cm knit next row as follows: 28-32-35-39-43 sts (= front piece), cast off 4-4-6-6-6 sts for armhole, 55-63-69-77-85 sts (= back piece), cast off 4-4-6-6-6 sts for armhole, 28-32-35-39-43 sts (= front piece). Now complete each piece separately. Right front: = 28-32-35-39-43 sts. Cast off for sleeve cap on every other row: 2 sts 1-1-1-1-2 times and 1 st 2-3-4-5-5 times = 24-27-29-32-34 sts. After M.1 finish the piece in navy blue. When piece measures 23-25-28-32-35 cm cast off 6-7-7-8-9 sts mid front for neck and dec to shape the neckline on every other row: 2 sts 2-2-2-2-2 times and 1 st 3-3-5-5-5 times = 11-13-13-15-16 sts left on shoulder. Cast off when piece measures 27-29-33-37-40 cm. Left front: = 28-32-35-39-43 sts. Continue as for right front, but mirrored. Back: = 55-63-69-77-85 sts. Cast off for sleeve cap each side as described for front piece = 47-53-57-63-67 sts. When piece measures 25-27-31-35-38 cm cast off the middle 21-23-27-29-31 sts for neck and dec 1 st on neckline on every other row 2 times = 11-13-13-15-16 sts left on each shoulder. Cast off when piece measures 27-29-33-37-40 cm. Sleeves: Cast on 36-38-40-42-44 sts on double pointed needles size 2.5 mm with navy blue and knit 6 rounds garter sts. Change to double pointed needles size 3 mm and knit M.2. After M.2 finish the sleeve in navy blue. At the same time when piece measures 4 cm inc 2 sts mid under arm a total of 6-8-9-11-12 times on every 7-6-6-5-6 round = 48-54-58-64-58 sts. When piece measures 17-20-21-25-28 cm cast off 6 sts mid under arm and finish the sleeve back and forth on needles. Dec for sleeve cap each aide on every other row: 3 sts 1-1-1-1-1 times, 2 sts 2-2-3-4-4 times, 1 st 2-2-1-1-1 times and 2 sts each side until piece measures 22-25-27-31-35 cm. Cast off remaining sts. Assembly: Sew shoulder seams. Front edges: Pick up approx 60 to 90 sts along left front edge on needle size 2.5 mm navy blue. P 1 row from RS and continue in Rib (= *K1, P1*, repeat from *-*). When Rib measures 2 cm cast off. Repeat along right front edge, but after 0.5 cm make 5 buttonholes evenly distributed on row, the bottom one approx 1.5 cm from the edge and the top one approx 4 cm from the top edge (there will also be a buttonhole on neckline). 1 buttonhole = cast off 2 sts and cast on 2 new sts on the return row. Neckline: Pick up approx 71 to 91 sts (divisible by 2+1) round the neck (incl front edges) on needle size 2.5 mm with navy blue. P 1 row from RS and continue in Rib. At the same time on the first row in Rib make 1 buttonhole in line with the others on right front edge. Cast off when Rib measures 1.5 cm. Set in sleeves. Sew on buttons. Edges: Sew buttonhole stitches along bottom edges and round sleeve edges. Use olive and sew over 2 sts in the width and 4 rows in the height. __________________________________________________________________ HAT: DROPS double pointed needles size 3 mm. To fit head circumference: 41-44-46-48-50 cm Pattern: See diagram M.3. The entire pattern is knitted in stocking sts. The hat is knitted in M.3. Begin with ear flaps, knitted back and forth on double pointed needles. Cast on 4 sts on needle size 3 mm with navy blue and knit M.3. At the same time inc 1 st each side on every other row a total of 8-9-10-11-12 times = 20-22-24-26-28 sts. Now inc 2 sts on the right side of piece (towards forehead) on every other row a total of 2-2-3-3-3 times = 24-26-30-32-34 sts. Remember the knitting tension. Piece now measures approx 6.5-7-8-8.5-9.5 cm. Put piece aside and knit another ear flap with inc the opposite side. Put earflaps on double pointed needles as follows: Cast on 22-24-24-24-26 sts between the ear flaps at the front and 16-18-18-18-20 sts between ear flaps at the back = 86-94-102-108-114 sts. Measure piece from this point onwards. Continue in pattern. When piece measures 7-8-9-10-11 cm dec 20-20-22-26-30 sts evenly on round = 66-74-80-82-84 sts. Knit 2 cm and then dec 16-18-22-22-22 sts evenly on round = 50-56-58-60-62 sts. Knit 2 cm and then dec 14-20-22-14-16 sts = 36-36-36-46-46 sts. Knit 2 cm and then dec 18-18-18-10-10 sts = 18-18-18-36-36 sts. Knit 1 cm and then dec 9-9-9-18-18 sts evenly = 9-9-9-18-18 sts. Continue as follows: 3 smaller sizes: knit 3 cm, cut the thread and pull through remaining sts. 2 larger sizes: knit 1 cm and knit all sts tog 2 by 2 = 9-9 sts. Knit 3 cm, cut the thread and pull through remaining sts. Hat measures (from bottom of ear flap) approx 23.5-25-27-29.5-31.5 cm. Assembly: Pick up approx 70-90 sts on needle size 3 mm with navy blue round the front bottom edge – beg mid right ear flap and finish mid left ear flap. Knit 6 rows garter sts, at the same time inc 1 st inside edge st each side on every other row. Cast off. Pick up approx 60 to 80 sts round back bottom edge on needle size 3 mm with dark grey/blue and knit 6 rows garter sts, inc by ear flaps as described for front edge. Sew tog edges under ear flaps. Sew buttonhole sts round front and back edges with olive over 2 sts in the width and 4 rows in the height. Make 2 small pompongs in navy blue and attach to each ear flap. ___________________________________________________________________ SOCKS: Size: 1/3 – 6/9 -12/18 months – 2 years Foot length: 10-11-12-14 cm DROPS double pointed needles size 2 and 2.5 mm DROPS crochet hook size 2.5 mm Knitting tension: 26 sts x 35 rows on needle size 2.5 mm in stocking sts = 10 x 10 cm Rib: *K1, P1*, repeat from *-* Moss stitch: Row 1: * K1, P1 *, repeat from * - *. Row 2: * P over P and P over K *. Repeat the 2 rows. Cast on 58-60-62-64 sts on needle size 2 mm with olive Alpaca. Knit Rib. When piece measures 4-5-5-5 cm K tog 3 sts mid back, knit 4 rounds in Rib and K tog 3 sts mid back = 54-56-58-60 sts. When piece measures 10-11-12-13 cm change to needles size 2.5 mm and continue in stocking sts, at the same time dec to 46-50-50-54 sts. After 2 rounds knit next round as follows: *K 2 tog, yo*, repeat from *-*. Knit 1 round in stocking sts and now knit the middle 10-12-12-14 sts (= upper foot) in moss sts – put remaining 36-38-38-40 sts on a thread. After 4-5-5.5-7 cm pick up 10-12-14-16 sts on each side of upper piece and put sts from thread back on needles = 66-74-78-86 sts. Knit 1.5-2-2.5-3 cm in moss sts over all sts and P 1 round. Now cast off all sts of both sides of the middle 10-12-12-14 sts and continue over these in moss sts for sole. Cast off when sole measures 9-10-11-13 cm. Sew the sole to the sock. Crochet a chain in ch measuring approx 30-35 cm and pull through the row of holes. |
|||||||||||||||||||
Diagram explanations |
|||||||||||||||||||
|
|||||||||||||||||||
|
|||||||||||||||||||
|
|||||||||||||||||||
|
Have you made this or any other of our designs? Tag your pictures in social media with #dropsdesign so we can see them! Do you need help with this pattern?You'll find tutorial videos, a Comments/Questions area and more by visiting the pattern on garnstudio.com. © 1982-2024 DROPS Design A/S. We reserve all rights. This document, including all its sub-sections, has copyrights. Read more about what you can do with our patterns at the bottom of each pattern on our site. |
|||||||||||||||||||


With over 40 years in knitting and crochet design, DROPS Design offers one of the most extensive collections of free patterns on the internet - translated to 17 languages. As of today we count 304 catalogues and 11422 patterns - 11422 of which are translated into English (UK/cm).
We work hard to bring you the best knitting and crochet have to offer, inspiration and advice as well as great quality yarns at incredible prices! Would you like to use our patterns for other than personal use? You can read what you are allowed to do in the Copyright text at the bottom of all our patterns. Happy crafting!
Comments / Questions (10)
Hallo, welche Socken bzw. Puschen sind auf dem Foto zu sehen? :)
07.12.2019 - 19:58DROPS Design answered:
Liebe Uschi, die Anleitung für diese Socken finden Sie auf diese Seite, nach der Jacke und der Mütze. Viel Spaß beim stricken!
09.12.2019 - 08:50Hej! Jag håller på med koftan och ska precis göra första armen. Är det meningen att de ska stickas runt på strumpstickor eller fram och tillbaka? Det står att man ska sticka rätstickning de första 6 varven.
25.01.2015 - 20:20DROPS Design answered:
Hej Annelie, Ärmen stickar du runt på strumpstickor! Lycka till !
29.01.2015 - 15:18Hallo. Ik heb een vraag over de volgende zin: 'Kant daarbij af voor het armsgat aan de zijkant 2 st x 1-1-1-1-2 en 1 st x 2-3-4-5-5 in elke 2e nld = 24-27-29-32-34 st.' (bij de voorpanden) niet. Als ik de grootste maat brei, betekent dat in de 2 naald 3 st, 2 naalden verder weer 3, dan 1, en nog twee keer 1? Alvast bedankt, ook voor de mooie patronen!
14.12.2012 - 16:51DROPS Design answered:
Voor de grootste maat moet je dan afkanten: 2 keer 2 st en 5 keer 1 st aan beide kanten. Er zijn 5 maten en u breit de grootste maat - laatste getallen. De kleinste maat (1/3 mnd) is dan de eerste getallen (= 1 keer 2 st en 2 keer 1 st).
15.12.2012 - 17:21Renate, there has been some sentences missing in the English translation, we have now added them, so please print the pattern again. Thank you so much for letting us know!
17.05.2010 - 21:18I am working on the hat. I have 50 stitches. Then the pattern says "Knit 1 cm and dec 9-9-9-18-18 sts evenly = 9-9-9-18" I had 50 stitches, I decreased 9 stitches, that should equal 41 stitches not 9 stitches. Am I supposed to knit 3 more cm and then pull the thread through 41 stitches or keep decreasing 9 stitches every 1 cm for 3 cm and then pull the thread through the remaining 14 stitches? How should I be left with 9 stitches? Thank you, Renata
14.05.2010 - 20:32After hat is knitted there shall be an edge in garter around the bottom edge. Could be done on double pointed needles or described first along front edge and then along back edge on straight needles. After this edge is knitted you embroider the button stitches along the edge. There are not mentioned any buttons.
16.12.2008 - 16:58Im finishing hat. Totally confused on asembly and where to do the 6 row knit/ inside the hat or on the edge and on pic I dont see a button etc...plz help , thnks Mary
14.12.2008 - 23:04You are working the sleeve in the round, so you can't inc each side, so when the patter says mid under arm, it means you inc on the inside of the sleeve - mid under.
19.11.2008 - 06:03Hello Im working on this pattern. I am doing sleeve and dont understand the part saying 'inc mid' ... Im thinking it is just an increase but is it in the middle of the row or on the sides? Thnks ! Mary
19.11.2008 - 05:33Hi, Im just starting on this. Im not used to the pattern terms...any help? plz ? thank you , Mary
16.10.2008 - 17:39