
Popular categories
Looking for a yarn?


|
|
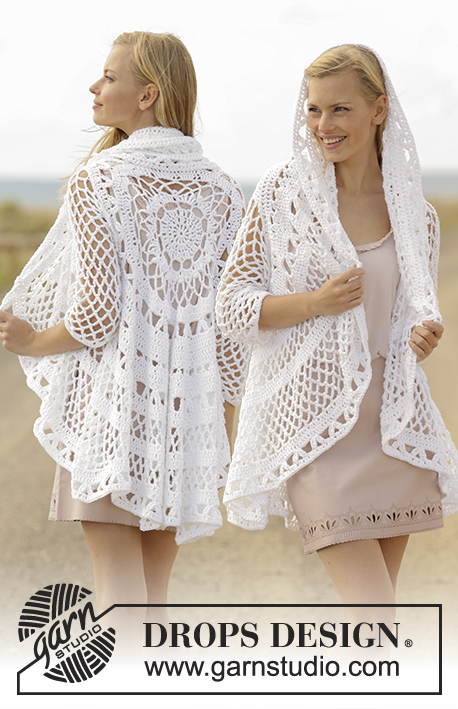
Moonlight Mist |
|
 |
 |
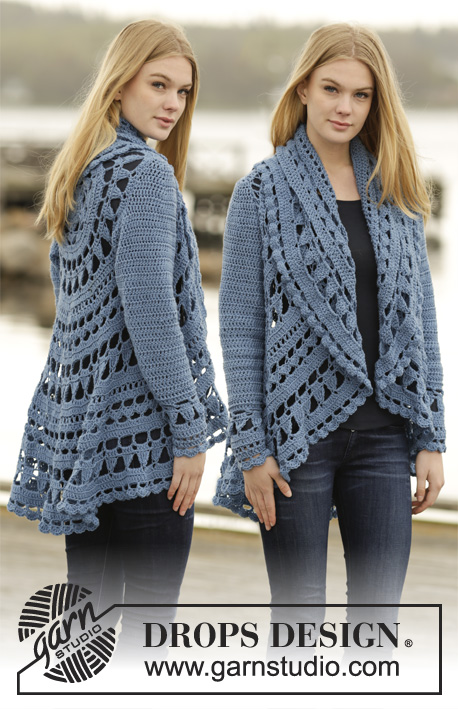
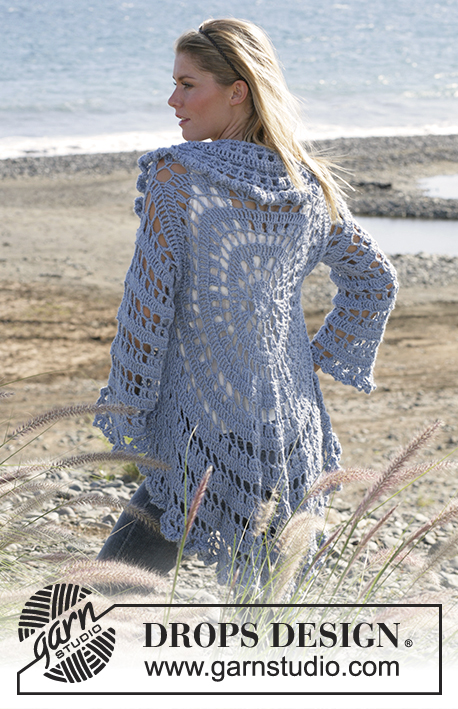
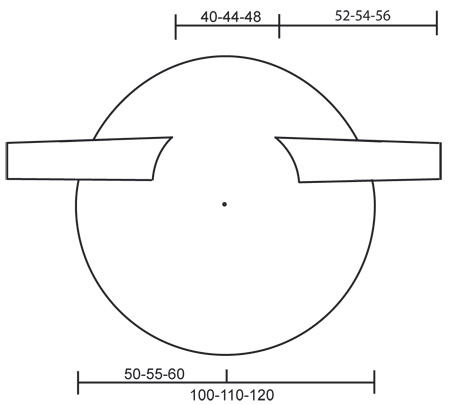
DROPS circle jacket crochet with 2 strands “Alpaca”. Sizes S-XL
DROPS 99-3 |
|
|
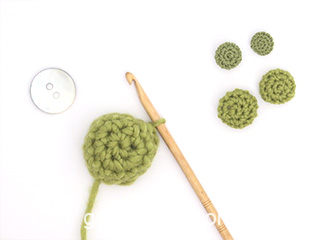
Crochet the jacket according to the explanations for the circle. Start to cast off for the armholes on the 12-13-14 round. Crochet 2 rounds according to the explanation for cast off for armholes, then continue to crochet according to explanation for the circle. Crochet tension: 3 rows in the circle using hook size 6 mm and 2 strands Alpaca measures 6.5 cm. After 5th round the circle measures 20 cm in diameter. Crochet info: Substitute the first dtr each round with 4 ch. Finish each round with a sl st at beg of round. Measurement tips: Because of the weight of the yarn, all measurements should be made whilst the garment is hanging, otherwise the sleeves will be too long when wearing the jacket. ------------------------------------------------------- CIRCLE: Crochet 4 ch with 2 strands Alpaca and make a ring with a sl st in the first ch. 1st round: Crochet 8 dc around the ring 2nd round: Read crochet info! Crochet 3 dtr in each dc. Finish with a sl st at beg. of round = 24 dtr 3rd round: Crochet 1 dtr, *3 ch, skip 1 dtr, 1 dtr in the next dtr*, repeat from *-* and finish with 3 ch and 1 sl st at the beg. of round = 12 dtr. 4th round: Crochet 3 dtr in the first dtr *3 ch, skip 3 ch, 3 dtr in the next dtr*, repeat from *-* and finish with 3 ch, skip 1 dtr and 1 sl st at beg. of round = 36 dtr. 5th round: Crochet 1 dtr in each dtr and 3 dtr in each ch-loop = 72 dtr. The circle now measures approx. 20 cm in diameter. 6th. round: Crochet 1 dtr in the first dtr, *3 ch, skip 1 dtr, 1 dtr in the next dtr*, repeat from *-* and finish with 3 ch, skip 1 dtr and a sl st at beg. of round = 36 dtr 7th. round: Crochet 3 dtr in the first dtr,* 2 ch, skip 3 ch, 3 dtr in the next dtr*, repeat from *-* and finish with 2 ch, skip 3 ch and a sl st at beg. of round = 108 dtr. 8th round: Crochet 1 dtr in each dtr and 1 dtr in each ch-loop = 144 dtr. 9th round: Crochet 1 dtr in the first dtr, *3 ch, skip 2 dtr, 1 dtr in the next dtr*, repeat from *-* and finish with 3 ch, skip 2 dtr and a sl st at beg. of round = 48 dtr 10th round: Crochet 3 dtr in the first dtr *1 ch, 3 dtr in the next dtr*, repeat from *-* and finish with 1 ch and a sl st at beg. of round = 144 dtr. 11th round: Crochet 1 dtr in each dtr and 1 dtr in each ch-loop = 192 dtr. Remember to cast off for armholes for size S/M – read cast off explanation for round 12 and 13 below! 12th round: *1 dtr, 3 ch, skip 2 dtr*, repeat from *-* until finish round = 64 dtr. Remember to cast off for armholes for size M/L – read cast off explanation for round 13 and 14 below! 13th round: 3 dtr in the first dtr, *2 ch, 3 dtr in the next dtr*, repeat from *-* = 192 dtr. Remember to cast off for armholes for size XL – read cast off explanation for round 14 and 15 below! 14th round: 1 dtr in each dtr, 1 dtr in each ch-loop = 256 dtr. 15th round: 1 dtr in the first dtr, *3 ch, skip 2 dtr, 1 dtr in the next dtr*, repeat from *-* until finish round = 86 dtr. 16th round: 3 dtr in the first dtr, *2 ch, 2 dtr in the next dtr, 2 ch, 3 dtr in the next dtr*, repeat from *-* until finish round = 215 dtr. Repeat round 14, 15 and 16 with inc. until the circle measures 100-110-120 cm in diameter. CAST OFF for armholes as follows: Size S/M: Crochet armholes according to round 12 below. 12th round: Crochet 1 dtr, 26 ch, skip over 26 dtr, *1 dtr, 3 ch, skip over 2 dtr*, repeat from *-* a total of 14 times, 1 dtr, 26 ch, skip 26 dtr, *1 dtr, 3 ch, skip 2 dtr*, repeat from *-* until finish round = 48 dtr. 13th round: Crochet as follows over the 26 ch’s: *3 dtr, 2 ch*, a total of 8 times. Over the dtr crochet as follows: *3 dtr in each dtr, 2 ch*, repeat from *-* = 192 dtr. Continue on round 14 as explained above. Size M/L: Crochet arm holes according to round 13 below. 13th round: 3 dtr in the first dtr, 30 ch, skip over (1 dtr and 3 ch) a total of 7 times, 3 dtr in the following dtr, *2 ch, 3 dtr in the next dtr*, repeat from *-* a total of 15 times, 30 ch, skip over (1 dtr and 3 ch) a total of 7 times, *2 ch, 3 dtr in the next dtr*, repeat from *-* until finish round = 150 dtr. 14th. round: Crochet as follows over the 30 ch’s: 28 dtr. Over the dtr and the ch-loops crochet as follows: 1 dtr in each dtr, 1 dtr in each ch-loop = 256 dtr. Continue on round 15 as explained above. Size XL: Crochet the armholes according to round 14 below: 14th round: 34 ch, skip over (3 dtr and 2 ch) a total of 8 times, *1 dtr in each of the next 3 dtr, 1 dtr in the next ch-loop*, repeat from *-* a total of 16 times, 34 ch, skip over (3 dtr and 2 ch) a total of 8 times *1 dtr in each of the next dtr, 1 dtr in the next ch-loop*, repeat from *-* until finish round = 192 dtr. 15th round: Crochet as follows over the 34 ch: *1 dtr, 3 ch*, repeat from *-* a total of 11 times. Over dtr crochet as follows: 1 dtr, *3 ch, skip over 2 dtr, 1 dtr in the next dtr*, finish with a dtr in the last dtr = 86 dtr. Continue on round 16 as explained above. SLEEVES: Crochet the sleeves from the armholes and down with 2 strands Alpaca. Crochet around. Remember the crochet info! 1st round: Crochet 52-60-68 dtr around the armhole from the circle and finish with a sl st in the first dtr from beg. of round. 2nd round: Crochet 1 dtr in the first dtr, *3 ch, skip over 3 dtr, 1 dtr in the next dtr*, repeat from *-* and finish with: Skip over 3 ch and 1 sl st in the first dtr = 13-15-17 dtr. 3rd round: Crochet 2 dtr in the first dtr, *1 ch, skip over 3 ch, 2 dtr in the next dtr*, repeat from *-* and finish with: 1 ch and 1 sl st in beg. of round = 26-30-34 dtr. 4th round: Crochet 1 dtr in each dtr and 2 dtr around each ch = 52-60-68 dtr. Repeat 2nd, 3rd and 4th round until the sleeve measures 52-54-56 cm from the armhole – read measurement tips. Cut and sew the thread. Crochet edge: Crochet an edge around the circle and at the bottom of the sleeves with 2 strands Alpaca as follows: 1st. round: 1 dtr in the first dtr, *2 ch, skip 1.5 - 2 cm, 1 dtr in the next stitch*, repeat from *-* and finish with 2 ch and a sl st in the first dtr. 2nd. round: 2 dtr in the first dtr, *4 ch, 2 dtr in the same dtr, 1 ch, 2 dtr in the next dtr* and finish with 4 ch, 2 dtr in the same dtr, 1 ch and 1 sl st in the first dtr. Cut and sew the thread. Button cover: Crochet 2 ch with 2 strands Alpaca and then crochet 6 dc in the first of the 2 ch and finish round with a sl st in the first dc (= 1st round). 2nd round: 1 ch, crochet 2 dc in each dc and finish with a sl st at beg. of round (= 12 dc) 3rd + 4th round: 1 ch, 1 dc in each dc and finish with a sl st at beg. of round (= 12 dc). 5th. round: 1 ch, crochet 1 dc in every other dc and finish with a sl st at beg. of round (= 6 dc). Put the button inside the cover, sew around and pull tight. Try on the jacket and place the buttons in the waist on the left side of the jacket in the penultimate round. |
|
|
|
|
Have you made this or any other of our designs? Tag your pictures in social media with #dropsdesign so we can see them! Do you need help with this pattern?You'll find tutorial videos, a Comments/Questions area and more by visiting the pattern on garnstudio.com. © 1982-2024 DROPS Design A/S. We reserve all rights. This document, including all its sub-sections, has copyrights. Read more about what you can do with our patterns at the bottom of each pattern on our site. |
|


With over 40 years in knitting and crochet design, DROPS Design offers one of the most extensive collections of free patterns on the internet - translated to 17 languages. As of today we count 304 catalogues and 11422 patterns - 11422 of which are translated into English (UK/cm).
We work hard to bring you the best knitting and crochet have to offer, inspiration and advice as well as great quality yarns at incredible prices! Would you like to use our patterns for other than personal use? You can read what you are allowed to do in the Copyright text at the bottom of all our patterns. Happy crafting!
Comments / Questions (501)
Hallo, ik wil graag aan het patroon Moonlight Mist beginnen, maar ik lijk nergens te lezen of ik het werkstuk telkens na elke toer moet keren. Alvast bedankt voor uw antwoord.
26.01.2024 - 21:00DROPS Design answered:
Dag Tessa,
Je hoeft het werk niet te keren na elke toer, dus je breit steeds aan dezelfde kant.
28.01.2024 - 18:40Would like this pattern for a 3 to 4 year old please
20.07.2023 - 12:27DROPS Design answered:
Hi Dee, please see patterns for childdren no 24-1 or 24-6. They are not the same like the adult one, but with some changes you will get something you like. Happy crocheting!
20.07.2023 - 13:15I like it what you have a written pattern but I would like a video to is there 1 on YouTube and what is it called if you have 1?
26.03.2023 - 20:53DROPS Design answered:
Dear Sarah, you can find all relevant videos for making this pattern under the pattern instructions. We don't have a special video for making this pattern step-by-step. Happy crochetting!
26.03.2023 - 21:55I won't pattern for 1 year old and 2 year old please
23.02.2023 - 06:45Ik ben met het vest bezig en dan moet ik toer 12 doen maar die staat alleen bij de maat s/m en ik wil de maat m/l aanhouden daar staat toer 12 niet bij wat moet ik nu doen gewoon toer 13 bij de maat m/l
13.10.2022 - 11:27DROPS Design answered:
Dag Joke,
Het is inderdaad een beetje verwarrend, maar onder de zin 'Begin nu voor maat S/M met het maken van de armsgaten – lees de uitleg voor toer 12 en 13 hieronder!' staat de 12e toer. Nadat je de 12e toer hebt gehaakt ga je verder met de armsgaten voor maat M/L.
26.10.2022 - 10:07Er det muligt at få opskriften på dansk
17.08.2022 - 11:38Hallo, ik ben bezig met de stekenverhouding van het patroon. Bij toer 3 zit ik op 8 cm (ipv 6,5)en bij toer 5 op 16 (ipv 20). Wat houd ik nu aan?
24.05.2022 - 16:08DROPS Design answered:
Dag Rika,
Dan heb je een grotere naald nodig. De stekenverhouding is een beetje verwarrend aangegeven. De 20 cm is namelijk de diameter en de 6,5 cm zijn 3 toeren in de hoogte.
27.05.2022 - 08:55Very nice Jacket I intend to make this, Thank you for Sharing such a pretty Jacket. I'm also going to make a smaller version for my Grand Daughters.
06.02.2022 - 06:23Round 10 ends with a slip stitch to beginning of round, but from row 11 on, there is no slip stitch tp beginning of round. Does this mean we arwe suposed to be working it as a spiral now, rather than in discreet rounds? If so, then the bind off round starting with the 34 chain (XL size) rather than a treble makes sense, but when you get to the end of that round, the stitch count is off by 1. But if still working in discreet rounds, the 34 chain without treble start makes no sense.
13.01.2022 - 22:45DROPS Design answered:
Dear Mrs Anderson, see Crochet info at the beginning of the pattern: replace each double treble at the beginning of each round with 4 chains, and finish each round with a slip stitch in the 4th chain from the beg of the round. On round 14, crochet first 4 chains, then the 34 chains for armhole, continue round as explained and end with a slip stitch in the 4th chain at the beg of the round. Happy crocheting!
14.01.2022 - 08:55Står man skal bruke 2 tråder. er det da nok med 700 gr i str s
10.11.2021 - 09:07DROPS Design answered:
Hej Anne-Karin, ja opskriften er beregnet ud fra 2 tråde :)
10.11.2021 - 10:01