
Popular categories
Looking for a yarn?


|
||||||||||||||||||||||
Suspended Ice Crystals |
||||||||||||||||||||||
|
|
||||||||||||||||||||||
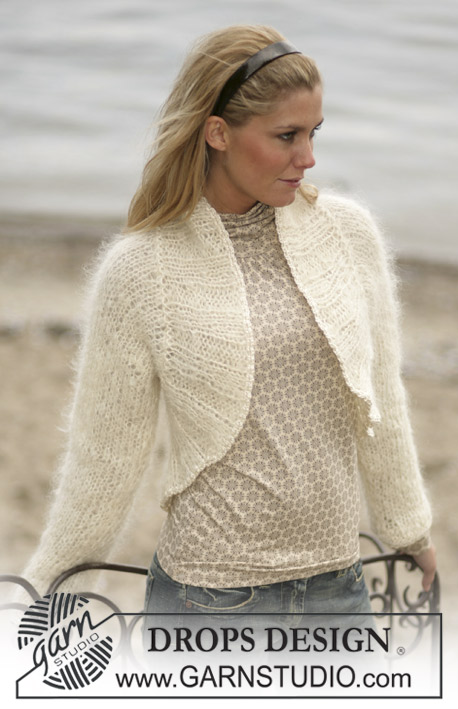
DROPS Cardigan with pattern and raglan in “Karisma
DROPS 97-22 |
||||||||||||||||||||||
|
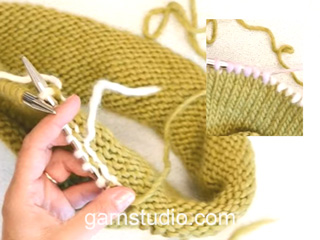
Knitting tension: 21 sts x 28 rows on needles size 4 mm in stocking sts = 10 x 10 cm. Rib: *K2, P3*, repeat from *-* Garter sts (back and forth on needle): Knit all rows Pattern: See diagram M.1 to M.3. The diagrams show the pattern from the RS. English Translations for the wording in the diagrams are given at the bottom of this pattern, and they are given in the vertical order in which they appear in the diagram. Knit all of M.2 and M.3 in stocking sts. M.2 is knitted at the same time as dec. for raglan. Make sure that the pattern tallies on both the front and the back as well as on the sleeves, so that it is only by the raglan dec. it won’t match exactly. Decreasing tips: (applies for the raglan): Dec. as follows from the RS: Before the marking thread: K2 tog. After the marking thread: Slip a st as if to knit, K1, psso. Dec. as follows from the WS: Before the marking thread: P2 tog into back of st After the marking thread: K2 tog. Buttonhole = Cast off the 3rd sts from the front edge. On the following row cast on 1 new sts at the same places. Cast off for button holes at the following measures: Size S: 2, 11, 20, 29 and 38 cm Size M: 2, 12, 21, 31 and 40 cm Size L: 2, 10, 18, 26, 34 and 42 cm Size XL: 2, 11, 19, 28, 36 and 45 cm Size XXL: 2, 11, 20, 28, 37 and 46 cm In addition cast off for 1 button hole at the neck edge. Back and front piece: Knit back and forth on circular needle. Cast on 177-192-207-232-257 sts (incl. of 5 front band sts each side) on needles size 3.5 mm in off-white. Knit as follows (1st row = RS): 5 front band sts knitted in garter sts, *K2, P3*, repeat from *-*, finish with K2 and 5 front band sts in garter sts. Continue like this - at the same time cast off for buttonholes at the right front band – see explanation above. When the Rib measures 6 cm change to circular needle size 4 mm. K 1 row (from RS) at the same time dec. the number of sts evenly distributed on row to 169-185-201-225-249. Then K 1 row from the WS. Knit next row as follows: 5 front band sts in garter sts, M.1 over the following 159-175-191-215-239 sts and 5 front band sts in garter sts. Insert a marking thread 45-47-53-59-63 sts in from each side (= 79-91-95-107-123 sts between the threads at the centre back – to avoid mis-match in the pattern some of the marking threads are not always precisely at the sides). Continue the pattern – at the same time when the piece measures 12 cm inc 1 st each side. Repeat the inc on every 5th cm a total of 3 times = 185-201-217-241-265 sts – new sts are knitted in stocking sts. When the piece measures approx. 32-33-34-35-36 cm – adjust to have at least 2 rows of stocking sts after a row of lace holes – knit the next row as follows: 44-48-52-58-64 sts (= front piece), cast off 10 sts for the armhole, 77-85-93-105-117 sts (= back piece), cast off 10 sts for the other armhole, 44-48-52-58-64 sts (= front piece). Put the piece aside and knit the sleeves. Sleeves: Cast on 48-48-52-52-56 sts on double pointed needles size 4 mm in light grey. Knit 2 rounds of stocking sts, change to off-white and knit 1 round of stocking sts and continue to knit M.3. Then knit in off-white and stocking sts until finished. At the same time when the piece measures 5 cm inc 2 sts underneath the sleeve on every 3-2.5-2.5-2-2 cm a total of 12-14-14-17-18 times = 72-76-70-86-92 sts. When the piece measures 40 cm cast off the centre 10 sts underneath the sleeve = 62-66-70-76-82 sts. Put the piece aside and knit another sleeve. Cuff: Crochet a cuff at the bottom of each sleeve. Crochet on hook size 4 in light grey as follows: 1st round: 1 dc in each st = 48-48-52-52-56 dc. 2nd. round: 3 ch, 1 tr in the following 2 st, 1 ch, skip 1 st, *1 tr in each of the following 3 sts, 1 ch skip 1 st*, repeat from *-* until end of round and finish with a sl st in st at beginning of round. 3rd. round: 4 ch, *3 tr in each ch loop and 1 ch over the tr-group*, repeat from *-* until end of round and finish with a sl st in st at beginning of round. Repeat the 3rd round until the cuff measures approx 10 cm, cut the thread. Yoke: Insert the sleeves on the same circular needle as the back and front piece at the place where you cast off for armholes = 289-313-337-373-409 sts. Insert a marking thread at each transition between back, front and sleeves. K 1 row in off-white at the same time dec the number of sts evenly distributed on round to 284-308-332-372-404 sts. Continue to knit in M.2 with 5 front band sts each side knitted in garter sts – the front band follows the colour change in pattern, at the rows where 2 colours are used choose 1 of them for the band. Knit 2 or 3 rows of M.2 (making sure the next row is from the RS) before starting the dec for the raglan. When M.2 is completed continue in off-white. Raglan decreasing: Inc each side of the marking threads, this means 8 dec per row – see decreasing tips. Dec 1 st on every other row a total of 19-20-21-20-20 times and then on every row a total of 4-5-6-10-13 times. Neckline: At the same time when the piece measures 45-47-49-51-53 cm put the centre 10-11-12-13-14 sts each side towards the centre front on a thread for neck. Continue to cast off towards the neck on every other row: 2 sts 1 time and 1 st 2 times. When all dec for raglan and neck are completed = 72-78-84-98-104 sts on needle and the piece measures approx. 52-54-56-58-60 cm up to the shoulder. Neck edge: Put sts back on the circular needle 3.5mm. Pick up 16 – 20 sts each side at the front of the neck (incl. the sts from the thread) = 104 to 144 sts. K 1 row from the RS at the same time dec evenly distributed on row (not over the front band sts) to 87-87-92-92-97 sts. K1 row from the WS. Knit the next row as follows: 5 front band sts in garter sts *K2, P3*, repeat from *-* and finish with K2 and 5 front band sts in garter sts. After 2 rows of Rib cast off for 1 buttonhole at the same place as the other button holes at the front band edge. When the Rib measures 2 cm cast off with K over K and P over P. Assembly: Sew the opening underneath the sleeves and sew on the buttons. |
||||||||||||||||||||||
Diagram explanations |
||||||||||||||||||||||
|
||||||||||||||||||||||

|
||||||||||||||||||||||
|
Have you made this or any other of our designs? Tag your pictures in social media with #dropsdesign so we can see them! Do you need help with this pattern?You'll find tutorial videos, a Comments/Questions area and more by visiting the pattern on garnstudio.com. © 1982-2024 DROPS Design A/S. We reserve all rights. This document, including all its sub-sections, has copyrights. Read more about what you can do with our patterns at the bottom of each pattern on our site. |
||||||||||||||||||||||


With over 40 years in knitting and crochet design, DROPS Design offers one of the most extensive collections of free patterns on the internet - translated to 17 languages. As of today we count 304 catalogues and 11422 patterns - 11422 of which are translated into English (UK/cm).
We work hard to bring you the best knitting and crochet have to offer, inspiration and advice as well as great quality yarns at incredible prices! Would you like to use our patterns for other than personal use? You can read what you are allowed to do in the Copyright text at the bottom of all our patterns. Happy crafting!
Comments / Questions (35)
I’m almost finished Suspended Ice Crystals but struggling with the translation “Continue to cast off towards the neck on every other row: 2 sts 1 time and 1 st 2 times.” Please could you translate/ clarify this instruction / put into other words Many thanks,
27.11.2023 - 09:26DROPS Design answered:
Dear Mrs Kilford, after you have slipped the first 10-14 stitches at the beg of both row from RS + from WS cast off at the beginning of each row from both RS and WS, ie cast off 2 sts at the beginning of next 2 rows, then cast off 1 stitch at the beg of next 4 rows. Happy knitting!
27.11.2023 - 10:19Jeg har for mange masker og kan ikke finde ud af hvor jeg skal tage ind til raglan på vrangen. jeg har taget 20 x 8 masker ind pr hver anden pind fra retsiden og 13 gange hver 4. mind, men jeg har alt for mange masker. Hvor skal jeg tage ind til raglan fra vrangen? mvh Kirsten
02.01.2021 - 10:25DROPS Design answered:
Hej Kirsten, efter de 8 indtagninger på hver 2.p 20 gange tager du ind på hver pind 13 gange (ikke hver 4.p). Det vil sige at når du begynder at tage ind på hver pind, så er du også nødt til at tage ind fra vrangen. God fornøjelse!
14.01.2021 - 13:09När man börjar med axelpartiet med raglan och mönster ska varje varv stickas med räta maskor? Både på räta och aviga sidan?
30.08.2020 - 22:29DROPS Design answered:
Hej Anna-Maria, du strikker hele mønsteret i glatstrik (ret fra retsiden og vrang fra vrangen) God fornøjelse!
02.09.2020 - 14:06Jeg kan ikke få halskanten til at blive pæn. Det er som om at forstykket er for kort når der skal samles masker op til kraven. Der bliver en bule i hver side på forstykket. det er som om de 6 cm der er forskel på for og bagstykke er for meget. Hilsen Henriette
02.04.2019 - 16:19DROPS Design answered:
Hej Henriette, da må du samle flere masker op i hvert hjørne, så maskerne bliver jævnt fordelt hele vejen rundt. God fornøjelse!
05.04.2019 - 14:17Gail E Larsen wrote:
Canadian, please can I buy from you ,this a beautiful pattern
30.12.2018 - 19:10DROPS Design answered:
Dear Mrs Larsen, please find here list of DROPS retailer in/to Canada. Happy knitting!
02.01.2019 - 10:57Uff,,nå så jeg det skal hekles en mansjett nederst til slutt. Sorry,,viktig å lese alt, hehe. Da skal det bli bra 👍
05.01.2018 - 12:41Hei. Jeg er igang med denne kjmpefine koften. Men jeg ser at mønster på nedre del( begynnelsen av erme) ikke samsvarer med bilde . Det står at jeg skal strikke M3. Men på bilde er det et boblemønster i grått. Kan du være snill å sende meg oppskriften på boblemønsteret. Vil ha jakken som på bilde 👍mvh. Gøril
05.01.2018 - 12:36DROPS Design answered:
Hei Gøril. Nederst på ermet er det en heklet grå mansjett, den hekles etter ermet er ferdig. Beskrivelsen står i oppskriften. God Fornøyelse!
05.01.2018 - 14:48Raglanminskning 8 mask per minskn varv men är det varje varv eller? Minska 1 m på vartannat varv 20 ggr detta påverkar mönstret. Om det hade stått minska 8 maskor vartannat varv hade allt varit klart. LITE BRÅDIS
11.02.2015 - 18:04DROPS Design answered:
Hej Lola, Ja du minskar 1 m på alla 8 raglan-ställen på vartannat varv. Lycka till!
25.02.2015 - 15:55Hej! Jag tänkte just sätta igång och sticka denna underbara kofta, när jag upptäckte att mönstret på Internetsidan saknar diagram för koftans mönster. Utan mönstret blir det ju svårt att sitcka koftan. Tror ni att ni skulle kunna lägga in diagrammet på hemsidan eller maila det till mig? Tack på förhand! /Rebecca Jaehnke
14.08.2007 - 21:56Pia wrote:
Underbar! Sitter och njuter av alla modellerna. Önskar att man kunde göra allihop
31.08.2006 - 01:13