
Popular categories
Looking for a yarn?


|
|
DROPS 95-1 |
|
 |
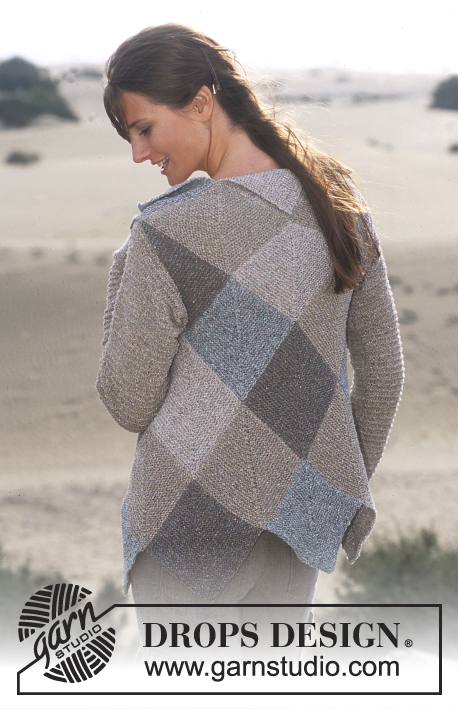 |
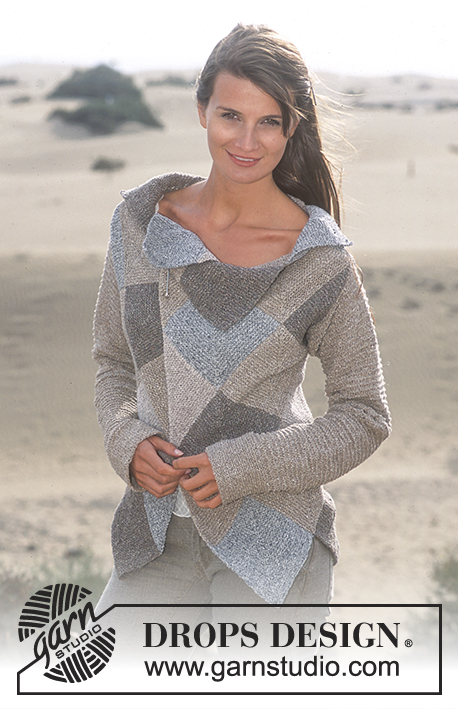
DROPS Domino cardigan in Silke-Tweed.
DROPS 95-1 |
|
|
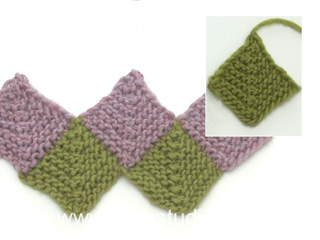
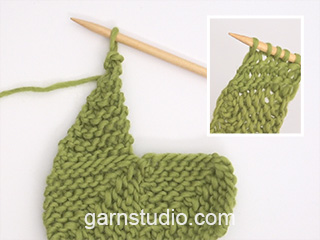
Knitting Gauge: 23 sts x 44 rows in stocking sts = 10 x 10 cm. Size S: 1 square = 13 x 13 cm Size M: 1 square = 14 x 14 cm Size L: 1 square = 16 x 16 cm Size XL: 1 square = 17 x 17 cm Size XXL: 1 square = 18 x 18 cm Diagram 1 shows the colours of the squares and the order in which to knit them. Knit 1 domino square as follows: Cast on 59-65-73-79-83 sts on needle size 3.5 with Silke-tweed. 1st row (= wrong side: Knit 2nd ro (= right side): Slip 1 st as if to knit, K 27-30-34-37-39 sts, slip 1 st as if to knit, K2 tog, psso, K the rest of the sts on row (= 28-31-35-38-40 sts) 3rd row, 5th row and every odd row: Slip 1 st as if to knit, K the rest of the sts on row. 4th row: Slip 1 st as if to knit, K 26-29-33-36-38 sts, slip 1 st as if to knit, K2 tog, psso, K the rest of the sts on row . Continue like this, i.e.: you dec 2 sts in the centre on every other row until 1 st left. Cut the thread and pull through. Knitting tips (apply to knitting the squares together – see the referral in the text): Push the needle through the left corner at the 1st square and then through the right corner of the 2nd square. Pull the thread through = 1 st. Cardigan: Back and front pieces are knitted in domino knit, which means squares and triangles are knitted together. Line 1: Knit the 5 first domino squares as described above – see the colours in the diagram. All squares should have the “finish st” pointing upwards. Line 2: Begin by knitting 1 triangle = 6th square: First triangle: Pick up sts along the right side at the top of square 1- pick up 1 st in “casting on edge”, then 1 st in each knitted st + 1 st in the top st = 30-33-37-40-42 sts. 1st row: (= wrong side) Slip a st as if to knit, K the rest of the sts on row. 2nd row: (=right side) Slip 1 st as if to knit, K2 tog, K the rest of the sts on row . Continue to knit row 1 & 2 until 2 sts left. The next row (= wrong side): Slip 1 st as if to knit, K1. Last row: Slip 1 st as if to knit, K1, psso. Cut the thread and pull it through. Pick up 29-32-36-39-41 sts with beige down along the left side at the top of square 1 (begin with 1 st in the top of the 1st square), then pick up 1 st up in between square 1 and square 2 – see knitting tips. Continue to pick up 29-32-36-39-41 sts along the left side of the 2nd square = 59-65-73-79-83 sts. Knit the square as done for the other domino squares. Knit square 8, 9 and 10 the same way. Square 11 is a triangle. Knit it as follows: Last triangle: Pick up along the left side at the top of the 5th square – start by picking up 1 st in top st, then 1 st in each knitted st + 1 st in the “casting on edge”, = 30-33-37-40-42 sts. 1st row: (= wrong side) Slip a st as if to knit, K the rest of the sts on row. 2nd row: (= right side) Slip 1 st as if to knit, K the rest of the sts on row until 3 sts are left, K2 tog, K1. Continue to knit row 1 & 2 until 3 sts left. The next row (= wrong side): Slip 1 st as if to knit, K21. Last row: Slip 1 st as if to knit, K2 tog. Cut the thread and pull it through. Line 3: Knit 5 squares the same way as the whole squares in “Line 2” Line 4: Knit as “Line 2” Line 5: Knit square no 23 as square no 12. Now make the armhole as follows: Split the next square in 2 halves and knit 2 triangles in the same colour as follows: Begin by knitting a “last” triangle as square 11 and hereafter a “first” triangle as square 6. Now knit square 25 as a normal square and then a “last” triangle and a “first” triangle again. Finish the line with a normal square. Line 6: Knit as “Line 2” Line 7: Knit as “Line 3” Sleeve: Cast on 60-62-64-66-68 sts (including a seam st each side) on needle size 3.5 with beige Silke-Tweed. Knit in garter sts until the piece measures 8 cm. Continue as follows: *K 1st row (right side). P 2nd row (= wrong side). K 3rd row, K 4th row* repeat row 1 to 4 until finished measurements. At the same time when the piece measures 10-10-12-10-12 cm inc 1 st each side on every 3.5-3-2-2-1.5 cm a total of 13-15-20-22-25 times = 86-92-104-110-118 sts. When the piece measures 54 cm bind off all sts. Assembly: Sew the side together inside of the seam sts. Sew in the sleeves. The cardigan may be held together with a pin, a kilt pin or a brooch. English translations for the diagram Beige = beige colour no. 08 Flint = stone colour no. 09 Grå = grey colour no. 10 Natur = off white colour no. 01 |
|

|
|
|
Have you made this or any other of our designs? Tag your pictures in social media with #dropsdesign so we can see them! Do you need help with this pattern?You'll find tutorial videos, a Comments/Questions area and more by visiting the pattern on garnstudio.com. © 1982-2024 DROPS Design A/S. We reserve all rights. This document, including all its sub-sections, has copyrights. Read more about what you can do with our patterns at the bottom of each pattern on our site. |
|


With over 40 years in knitting and crochet design, DROPS Design offers one of the most extensive collections of free patterns on the internet - translated to 17 languages. As of today we count 304 catalogues and 11422 patterns - 11422 of which are translated into English (UK/cm).
We work hard to bring you the best knitting and crochet have to offer, inspiration and advice as well as great quality yarns at incredible prices! Would you like to use our patterns for other than personal use? You can read what you are allowed to do in the Copyright text at the bottom of all our patterns. Happy crafting!
Comments / Questions (46)
Bij mij krullen de punten om , hoe kan dat? Geweldig patroon overigens.
21.03.2019 - 16:27DROPS Design answered:
Dag Annelies,
Dit omkrullen kun je verhelpen door het kledingstuk te 'blocken'. Bekijk deze video over blocken.
25.03.2019 - 09:39Titisa wrote:
Hello, first of all thank you for your beautiful patterns, do you have video tutorial for your patterns? I am not good at reading the patterns! Thank you
27.03.2016 - 16:16DROPS Design answered:
Dear Titisa, thank you for your nice feedback. You will find several videos related to that pattern under tab "videos" on the right side of "materials" one. There are some videos showing how to work the dominos, ie 1 domino square and half a domino vertical. Happy knitting!
29.03.2016 - 09:51Fantastisk morsom og enkel å strikke. Grugleder meg til jeg er ferdig. Veien er målet, men heldigvis har jeg funnet en nytt mønster, her inne, jeg skal starte på når denne er ferdig ☺
13.10.2015 - 02:08Pour les carrés, il est indiqué en ligne 1 de tricoté en point endroit et sur le rang de tricoter aussi en point endroit. Ce n'est plus du jersey mais du point mousse? Faut il faire en rang 2 du point envers ?
09.09.2013 - 15:47DROPS Design answered:
Bonjour Lili9417, les carrés (dominos) se tricotent entièrement au point mousse = tous les rangs à l'endroit. Bon tricot!
09.09.2013 - 17:30roligaste koftan att sticka på länge!
22.05.2006 - 18:54geweldig dit model. als ik de tijd vind ga ik dit zeker maken
03.03.2006 - 13:33Monica wrote:
Läckraste tröjan på väldigt länge. Hoppas mönstret kommer snart.
14.02.2006 - 19:55Lise-Lotte wrote:
Helt vildt smart, hvornår kan man få opskriften???
10.02.2006 - 12:10Den här tröjan ser väldigt spänande ut. Den skulle jag villa sticka såfort mönster är där. (Kanske på Holländksa)
20.01.2006 - 08:29Kjempe stilig, kan dere lage mønster av denne modellen til barn også?
12.01.2006 - 15:58