DROPS Alpaca
DROPS Alpaca
100% Alpaca
from 3.40 £ /50g
DROPS Cotton Viscose
54% Cotton, 46% Viscose
Discontinued
find alternatives
DROPS Super Sale

Stella Marina

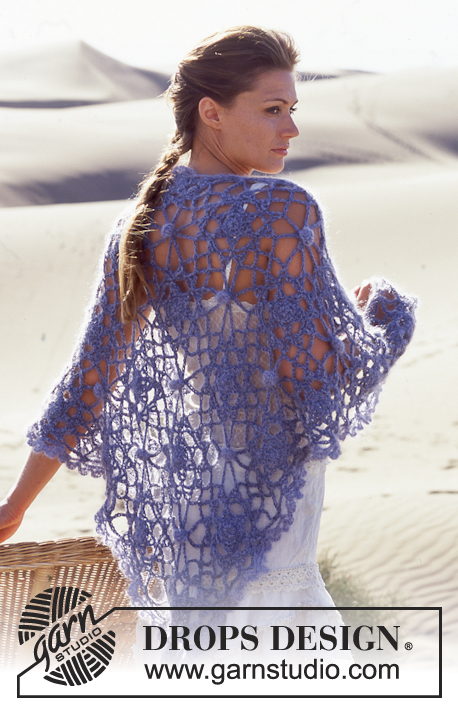
DROPS Cardigan in “art knitting” with Alpaca and Cotton Viscose, based on a circle.

DROPS 94-5
Size: S/M - M/L -XL

Materials: DROPS Cotton Viscose, from Garnstudio
400-450-500 g colour no 22 jeans blue
and use: DROPS Alpaca from Garnstudio
250-300-300 g colour no 6347, jeans blue

DROPS pointed needles and circular needles (40, 60, 80 cm) size 6 mm or the size needed to obtain the correct gauge.

DROPS crochet hook size 4 mm

-------------------------------------------------------

Alternative Yarn – See how to change yarns here
Yarn Groups A to F – Use the same pattern and change the yarn here
Yarn usage using an alternative yarn – Use our yarn converter here

-------------------------------------------------------

DROPS Alpaca
DROPS Alpaca
100% Alpaca
from 3.40 £ /50g
DROPS Cotton Viscose
54% Cotton, 46% Viscose
Discontinued
find alternatives

DROPS Super Sale

SAVE 30% on 6 cotton favourites!
Valid until 12.04.2024

Pattern instructions

NOTE: This pattern is written in British English. All measurements in charts are in cm. For conversion from cm to inches - click here. There are different terms for crocheting in British and American English. If this pattern includes crochet, click for "crochet terms" here. For this pattern in American English, please click here.
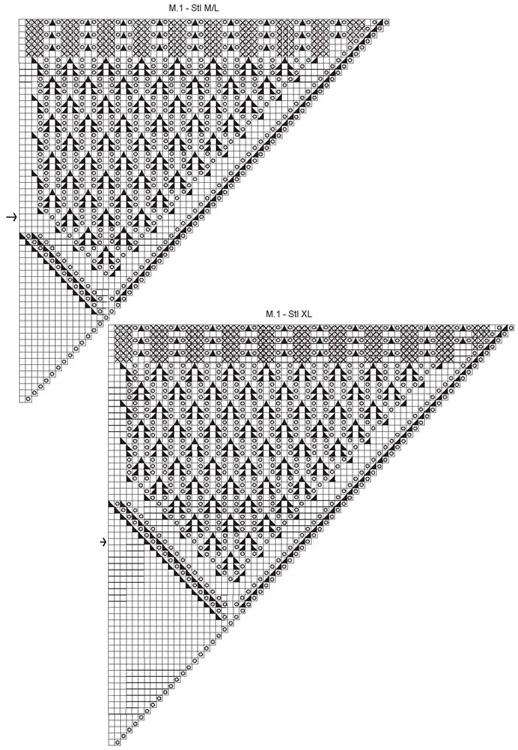
Knitting Gauge: 15 sts x 22 rounds on needles size 6 mm in pattern (front and back piece) = 10 x 10 cm and 15 sts x 19 rows of stocking sts (sleeves) = 10 x 10 cm with 1 thread of Cotton Viscose and 1 thread of Alpaca.

Lace pattern: See diagrams M.1 – there is one diagram for each size. Diagram shows 1/8 of the piece and only every other round. Rounds 2, 4, 6 and all even rounds are worked in stocking sts out to the rib (= the last 6 rounds in diagram), thereafter knit K over K and P over P so the rib will be a total of 11 rounds. M.2 = the rib for the sleeves.

Front and Back piece: The cardigan is knitted in a circle from the centre back. Cast on 8 sts with 1 thread of Cotton Viscose and 1 thread of Alpaca and distribute them evenly on 4 double pointed needles. Knit in pattern according to diagram M.1 – see explanation above. Inc. 8 sts on every other row according to diagram - change to longer circular needles as you go along.

Size S/M: Knit the round marked with an arrow for the armholes as follows: Make a yo, K2 tog. make a yo (as the first 3 windows in diagram shows). Knit 21 sts with another colour (this thread is taken out later and the sleeves are knitted from here and downwards). Knit 63 sts according to diagram, knit the next 21 sts with another colour (= 2nd armhole). Continue diagram as before.

Size M/L: Knit the round marked with an arrow for the armholes as follows: Make a yo, K2 tog. make a yo (as the first 3 windows in diagram shows). Knit 26 sts with another colour (this thread is taken out later and the sleeves are knitted from here and downwards). Knit 67 sts according the diagram, knit the next 26 sts with another colour (= 2nd armhole). Continue diagram as before.

Size XL: Knit the round marked with an arrow for the armholes as follows: Make a yo, K2 tog. make a yo (as the first 3 windows in diagram shows). Knit 30 sts with another colour (this thread is taken out later and the sleeves are knitted from here and downwards). Knit 72 sts according the diagram, knit the next 30 sts with another colour (= 2nd armhole). Continue diagram as before.

Last round in diagram is the binding off round. There is a total of 448-496-544 sts on the bind off round. The piece should measure approx 50-55-60 cm from the centre and out (= 100-110-120 cm in diameter).

Sleeves: Pick up sts for the sleeves from the thread which was knitted in another colour. The sleeves are knitted from top down. Cut this thread in the middle and use 2 needles to put the sts on each side onto the needles (then pull the thread out) = 21-26-30 sts on each needle/side. Put all the sts on a small circular needle = 42-52-60 sts. Pick up 4 additional sts for the top of the sleeve- top is where the sleeve is closest to the other sleeve – and 2 extra sts at the bottom (underneath) of the sleeve = 48-58-66 sts. Start knitting from underneath the sleeve – insert a marking thread here. P 1 round and continue in stocking sts. When the sleeve measures 4 cm bind off 1 st each side of the marking thread. Repeat to bind off 2 sts on every 6-4-2.5 cm a total of 6-8-12 times = 36-42-42 sts. When the piece measures 34 cm continue in M.2. When the piece measures 52 cm bind off loosely – remember to bind off at the 4th, 8th or 12th round as shown in diagram (= pattern round). NB: Try the cardigan on before binding off the sleeves to make sure the sleeves are the right length.

English explanations to the pattern diagram:

Diagram

symbols = K
symbols = P
symbols = 1 YO
symbols = K2 tog
symbols = slip 1 st as if to K, K1, psso
symbols = slip 1 st as if to K, K2 tog, psso
diagram
diagram
Do you have a question? See a list of frequently asked questions (FAQ)

Knitting tension is what determines the final measurements of your work, and is usually measured per 10 x 10 cm. It is provided like so: number of stitches in width x number of rows in height - eg: 19 stitches x 26 rows = 10 x 10 cm.

The knitting tension is very individual; some people knit/crochet loosely while others work tightly. You adjust the knitting tension with the needle size, which is why the suggested needle size is only meant as a guide! You need to adjust this (up or down) to ensure that YOUR knitting tension matches the knitting tension provided in the pattern. If you work with a different knitting tension than provided you will have a different yarn consumption, and your work will have different measurements than what the pattern suggests.

The knitting tension also determines which yarns can replace each other. As long as you achieve the same knitting tension you can replace one yarn with another.

See DROPS lesson: How to measure your tension/gauge

See DROPS video: How to make a gauge tension swatch

The required amount of yarn is provided in grams, eg: 450 g. To calculate how many balls you’ll need you first need to know how many grams are in 1 ball (25g, 50g or 100g). This information is available if you click on the individual yarn quality on our pages. Divide the amount required with the amount of each ball. For example, if each ball is 50g (the most common amount), the calculation will be as follows: 450 / 50 = 9 balls.

The important thing when changing from one yarn to another is that the knitting/crochet tension remains the same. This is so that the measurements of the finished piece will be the same as on the sketch provided. It is easier to achieve the same knitting tension using yarns from the same yarn group. It is also possible to work with multiple strands of a thinner yarn to achieve the knitting tension of a thicker one. Please try our yarn converter. We recommend you to always work a test swatch.

Please NOTE: when changing yarn the garment might have a different look and feel to the garment in the photo, due to individual properties and qualities of each yarn.

See DROPS lesson: Can I use a different yarn than the one mentioned in the pattern?

All our yarns are categorised into yarn groups (from A to F) according to thickness and knitting tension – group A contains the thinnest yarns and group F the thickest. This makes it easier for you to find alternative yarns to our patterns, should you wish to switch yarn. All yarns within the same group have a similar knitting tension and can easily replace each other. However, different yarn qualities have different structures and properties which will give the finished work a unique look and feel.

Click here for an overview of the yarns in each yarn group

At the top of all our patterns you’ll find a link to our yarn calculator, which is a helpful tool should you wish to use a different yarn than suggested. By filling in the yarn quality you wish to replace, the amount (in your size) and number of strands, the calculator will present good alternative yarns with the same knitting tension. Additionally it will tell you how much you’ll require in the new qualities and whether you’ll need to work with multiple strands. Most skeins are 50g (some are 25g or 100g).

If the pattern is worked with multiple colours, every colour will have to be calculated separately. Similarly, if the pattern is worked with several strands of different yarns (for example 1 strand Alpaca and 1 strand Kid-Silk) you will have to find alternatives for each, individually.

Click here to see our yarn calculator

Since different yarns have different qualities and textures we have chosen to keep the original yarn in our patterns. However, you can easily find options among our available qualities by using our yarn calculator, or simply pick a yarn from the same yarn group.

It is possible that some retailers still have discontinued yarns in stock, or that someone has a few skeins at home that they would like to find patterns for.

The yarn calculator will provide both alternative yarn as well as required amount in the new quality.

If you think it's hard to decide what size to make, it can be a good idea to measure a garment you own already and like the size of. Then you can pick the size by comparing those measures with the ones available in the pattern's size chart.

You'll find the size chart at the bottom of the pattern.

See DROPS lesson: How to read size chart

The needle size provided in the pattern serves only as a guide, the important thing is to follow the knitting tension. And since knitting tension is very individual, you will have to adjust the needle size to ensure that YOUR tension is the same as in the pattern – maybe you’ll have to adjust 1, or even 2 needle sizes, up or down to achieve the correct tension. For this, we recommend that you work test swatches.

Should you work with a different knitting tension than the one provided, the measurements of the finished garment might deviate from the measurement sketch.

See DROPS lesson: How to measure your tension/gauge

See DROPS video: How to make a tension/gauge swatch

Working a garment top-down provides more flexibility and room for personal adjustment. For example it is easier to try the garment on while working, as well as making adjustments to length of yoke and shoulder caps.

The instructions are carefully explaining every step, in the correct order. Diagrams are adjusted to the knitting direction and are worked as usual.

The diagram depicts all rows/rounds, and every stitch seen from the right side. It is read from bottom to top, from right to left. 1 square = 1 stitch.

When working back and forth, every other row is worked from the right side and every other row is worked from the wrong side. When working from the wrong side, the diagram will have to be worked reversed: from left to right, knit stitches are purled, purl stitches are knit etc.

When working in the round every round is worked from the right side and the diagram are worked from right to left on all rounds.

See DROPS lesson: How to read knitting diagrams

The diagram depicts all rows/rounds, and every stitch seen from the right side. It is worked from bottom to top, from right to left.

When working back and forth every other row is worked from the right side: from right to left and every other row is worked from the wrong side: from left to right.

When working in the round, every row in the diagram are worked from the right side, from right to left.

When working a circular diagram you start in the middle and work your way outwards, counter clockwise, row by row.

The rows usually start with a given number of chain stitches (equivalent to the height of the following stitch), this will either be depicted in the diagram or explained in the pattern.

See DROPS lesson: How to read crochet diagrams

Instructions for working several diagrams after each other on the same row/round, will often be written like so: “work A.1, A.2, A.3 a total of 0-0-2-3-4 times". This means you work A.1 once, then A.2 is worked once, and A.3 is repeated (in width) the number of times provided for your size – in this case like so: S = 0 times, M = 0 times, L=2 times, XL= 3 times and XXL = 4 times.

The diagrams are worked as usual: begin with the first row in A.1, then work the first row in A.2 etc.

See DROPS lesson: How to read knitting diagrams

See DROPS lesson: How to read crochet diagrams

The total width of the garment (from wrist-to-wrist) will be larger in the larger sizes, despite the actual sleeves being shorter. The larger sizes have longer sleeve caps and wider shoulders, so there will be a good fit in all sizes.

The measurement sketch/schematic drawing provides information regarding the full length of the garment. If it’s a jumper or a jacket the length is measured from the highest point on the shoulder closest to the neckline, and straight down to the bottom of the garment. It is NOT measured from the tip of shoulder. Similarly, the length of yoke is measured from the highest point on the shoulder and down to where yoke is split into body and sleeves.

On a jacket measures are never taken along bands, unless specifically stated. Always measure inside band stitches when measuring the length.

See DROPS lesson: How to read a schematic drawing

Diagrams are often repeated on the round or in height. 1 repeat is the diagram the way it appears in the pattern. If it says to work 5 repeats of A.1 in the round, then you work A.1 a total of 5 times after/next to each other in the round. If it says to work 2 repeats of A.1 vertically/in height you work the entire diagram once, then begin again at the start and work the entire diagram one more time.

Chain stitches are slightly narrower than other stitches and to avoid working the cast-on edge too tight, we simply chain more stitches to begin with. The stitch count will be adjusted on the following row to fit the pattern and measurement sketch.

The rib edge is more elastic and will contract slightly compared to, for example, stocking stitch. By increasing before the rib edge, you avoid a visible difference in width between the rib edge and the rest of the body.

It’s very easy to cast off too tightly, and by making yarn overs while casting off (and simultaneously casting these off) you avoid a too tight cast off edge.

See DROPS video: How to bind off with yarn overs (yo)

To achieve an even increase (or decrease) you can increase on, for example: every 3rd and 4th row alternately, like so: work 2 rows and increase on the 3rd row, work 3 rows and increase on the 4th. Repeat this until the increase is complete.

See DROPS lesson: Increase or decrease 1 st on every 3rd and 4th row alternately

Should you prefer to work in the round instead of back and forth, you may of course adjust the pattern. You’ll need to add steeks mid-front (usually 5 stitches), and follow the instructions. When you would normally turn and work from the wrong side, simply work across the steek and continue in the round. At the end you’ll cut the piece open, pick up stitches to work bands, and cover the cut edges.

See DROPS video: How to knit steeks and cut open

Should you prefer to work back and forth instead of in the round, you may of course adjust the pattern so you work the pieces separately and then assemble them at the end. Divide the stitches for the body in 2, add 1 edge stitch in each side (for sewing) and work the front and back pieces separately.

See DROPS lesson: Can I adapt a pattern for circular needles into straight needles?

Pattern repeats can vary slightly in the different sizes, in order to get the correct proportions. If you’re not working the exact same size as the garment in the photo, yours might deviate slightly. This has been carefully developed and adjusted so that the complete impression of the garment is the same in all sizes.

Make sure to follow instructions and diagrams for your size!

If you have found a pattern you like which is available in women’s size it’s not very difficult to convert it to men’s size. The biggest difference will be the length of sleeves and body. Start working on the women size that you think would fit across the chest. The additional length will be worked right before you cast off for the armhole/sleeve cap. If the pattern is worked top-down you can add the length right after the armhole or before the first decrease on sleeve.

Regarding additional yarn amount, this will depend on how much length you add, but it is better with a skein too many than too few.

All yarns will have excess fibres (from production) that might come off as lint or shedding. Brushed yarns (ie hairier yarns) have more of these loose, excess fibres, causing more shedding.

Shedding also depends on what is worn under or over the garment, and whether this pulls at the yarn fibres. It’s therefore not possible to guarantee that there will be no shedding

Below are some tips on how to get the best result when working with hairier yarns:

1. When the garment is finished (before you wash it) shake it vigorously so the looser hairs come off. NOTE: do NOT use a lint roller, brush or any method that pulls at the yarn.

2. Place the garment in a plastic bag and put it in your freezer - the temperature will cause the fibres to become less attached to each other, and excess fibres will come off easier.

3. Leave in the freezer for a few hours before taking it out and shaking it again.

4. Wash the garment according to the instructions on the yarn label.

Pilling is a natural process that happens to even the most exclusive of fibers. It's a natural sign of wear and tear that is hard to avoid, and that is most visible in high friction areas of your garment like a sweater's arms and cuffs.

You can make your garment look as new by removing the pilling, using a fabric comb or a pill/lint remover.

Still can't find the answer you need? Then scroll down and leave your question so one of our experts can try to help you. This will be done normally within 5 to 10 working days.
In the meantime, you can read the questions and answers that others have left to this pattern or join the DROPS Workshop on Facebook to get help from fellow knitters/crocheters!

You might also like...

Post a comment to pattern DROPS 94-5

We would love to hear what you have to say about this pattern!

If you want to leave a question, please make sure you select the correct category in the form below, to speed up the answering process. Required fields are marked *.

Comments / Questions (140)

country flag Lenie wrote:

Het vest wordt met 2 draden gebreid. Waarom dan van de ene kleur 500 gram en van de andere kleur 300 gram. Hoe kan dat?

21.11.2023 - 15:28

DROPS Design answered:

Dag Lenie,

De ene draad heeft een andere looplengte dan de andere draad. Dit kan bijvoorbeeld komen doordat de ene draad lichter en/of dunner is dan de andere draad. Uiteindelijk heb je van beide draden in totaal ongeveer dezelfde looplengte nodig.

21.11.2023 - 22:43

country flag Lenie wrote:

U geeft aan dat er 500 Gr van de ene kleur en 300 Gr van de andere kleur nodig heeft. Ik lees dat er met 2 draden gebreide wordt. Wordt het hele vest met 2 draden gebreid of een gedeelte hiervan. Mijn vraag is waarom het verschil van de 2 kleuren in grammen?

21.11.2023 - 15:25

DROPS Design answered:

Dag Lenie,

Het gehele vest wordt met 2 draden gebreid; 1 draad van elke kwaliteit. Het andere deel van je vraag is al beantwoord via je een reactie op je andere vraag.

21.11.2023 - 22:45

country flag Kat wrote:

I substituted yarns with C group (Nepal). My initial circle is getting wavy. Does it even out in later rows or does that mean I need thinner sock needles? I tried no. 6 by mistake but got a similar effect with no. 5. The test square for sleeves was around 9.5 cm, so it might also mean that I am knitting too tight. Any suggestions?

21.08.2023 - 10:10

DROPS Design answered:

Dear Kat, make sure to get the correct tension to get the correct finished measurements - read more here. Repeat then the diagram a total of 8 times in the round (on the first round, repeat *YO, K1*, making sure to increase 8 sts on every other round - note that in this diagram, only every other round is drawn, this means every even numbered row must be worked in stocking stitch/in rib (last 6 rows in diagram). Happy knitting!.

21.08.2023 - 15:02

country flag Anke Rüger wrote:

Ich benötige die Lauflänge der Wolle Cotton -Merino, da diese nicht mehr im Sortiment ist, finde ich diese Information nicht. Ich möchte das Projekt in Big Merino fertigen. Für Ihre Unterstützung bedanke ich mich im voraus. Liebe Grüße Anke Rüger

03.07.2023 - 06:32

DROPS Design answered:

Liebe Frau Rüger, DROPS Cotton Viscose ist jetzt ausgelaufen, mehr Info finden Sie über dieses Garn hier - hier lesen Sie mehr. Viel Spaß beim stricken!

03.07.2023 - 11:09

country flag Laurence wrote:

Bonjour, j'aimerais tricoter ce modèle en sky taille M, pouvez-vous m'indiquer combien si je dois utiliser 1 ou 2 fils et quelle taille d'aiguilles choisir? Merci!

05.10.2022 - 16:33

DROPS Design answered:

Bonjour Laurence, ce modèle peut se tricoter avec 2 fils du groupe A/1 fil du groupe C mais Sky appartient au groupe de fils B. Vous trouverez ici quelques modèles en Sky + Kid-Silk avec 15 m jersey pour 10 cm, mais le nbe de rangs est différent, il vous faudrait alors recalculer le modèle si vous n'avez pas le bon échantillon. Privilégiez un fil du groupe de fils C pour plus de simplicité - retrouvez ici plus d'infos pour faire les calculs des nouvelles quantités. Bon tricot!

06.10.2022 - 08:08

country flag Zuzana wrote:

Dobrý deň, nerozumiem ako dosiahnem na rukáv 42 ociek. V návode sa odkladá na rukáv len 21. Ďakujem za pomoc

28.01.2022 - 18:32

DROPS Design answered:

Hi Zuzana, if you could write your question in English, we will try to answer :)

22.04.2022 - 11:45

country flag Patty wrote:

Would it be possible to provide chest measurements for each size? I'm not 100% sure if I would need a M/L or an XL. Thank you!

22.08.2021 - 01:44

DROPS Design answered:

Dear Patty, all the relevant measurements are given on the schematic drawing. It would be difficult to give an exact chest measurement, because due to the shape of the sweater it can be closed so, that it allows you slightly adjust the size (you can cross it deeper with more crossing). Happy stitching,

22.08.2021 - 02:08

country flag Conny wrote:

Wanneer je de steken voor de mouw hebt gebreid, meerder je dan de steken weer in de volgende naald? Het is me niet duidelijk. Ik heb hier in de vragen gezocht en niets gevonden en ik zie het ook niet in de beschrijving.

23.02.2021 - 12:57

DROPS Design answered:

Dag Conny,

Je breit de steken voor de mouwen in een andere kleur en op de volgende naald brei je de steken weer in de kleur waar je mee breit. Als je de mouwen gaat breien neem je steken op waar je met een andere kleur hebt gebreid en haal je die draad eruit. Je zet dus geen steken op in de volgende naald, maar je breit verder over die andere kleur.

02.03.2021 - 09:06

country flag Patty Ricci wrote:

If you wanted to make this with only one type of yarn what would the weight be (in US terms, please)? I can't figure out if it would be worsted or not since one strand is a sport weight and the other one is a DK weight. Thank you!

02.09.2020 - 22:16

DROPS Design answered:

Dear Mrs Ricci, this pattern is here worked with 2 strands yarn group A and they could be replaced with one strand yarn group C - read more about altenatives here ; do not hesitate to contact your DROPS store - even per mail - for any further individual assistance choosing the yarn. Happy knitting!

03.09.2020 - 08:56

country flag Geneva wrote:

Is it possible to obtain written instructions for DROPS patterns?

29.04.2019 - 02:44

DROPS Design answered:

Dear Geneva, when our patterns only have diagrams, you have to work following the diagrams as explained in the written pattern - 29.04.2019 - 11:01