
Popular categories
Looking for a yarn?


|
|||||||||||||
DROPS 73-7 |
|||||||||||||
|
|
|||||||||||||
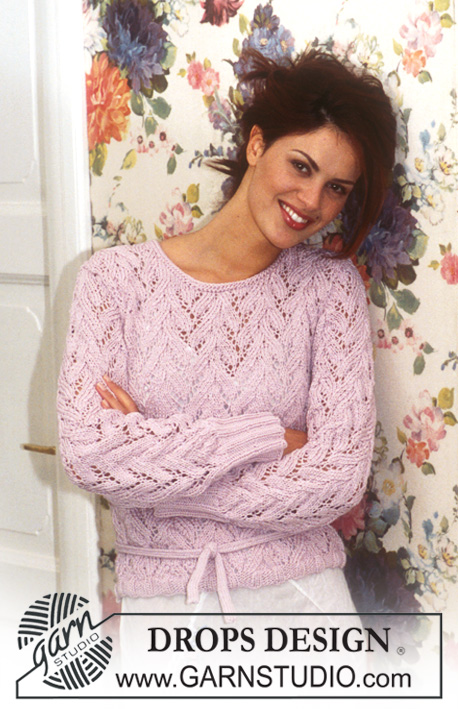
DROPS Cardigan in Muskat
DROPS 73-7 |
|||||||||||||
|
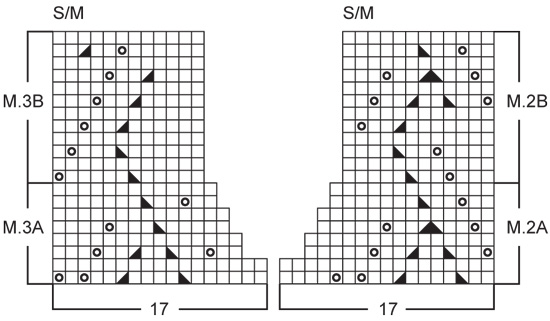
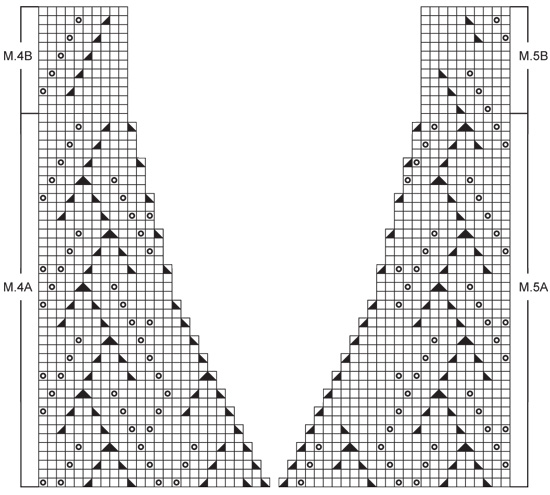
Gauge: 20 sts x 26 rows = 10 x 10 cm on larger needles in pattern. 1 repeat of Pattern 1 = 7 cm wide. Garter st, when knitting flat: Knit all sts, all rows. Pattern: See diagrams M.1 - M.5. The pattern is seen from the right side. Note: Patterns 2 and 3 (armhole shaping) are different for each size - use the chart for your size. NB: On the garment, the lace pattern (by mistake) is shown with a couple of holes too small, but follow the diagram and possibly see DROPS Design Model no. 73-5 to see how the pattern will look when the diagram is worked. Rib: * K 2, P 4 *, repeat from * - *. Buttonhole: Make buttonholes along right button band. 1 buttonhole = bind off the 2 sts at center of buttonband (P sts) and cast on 2 new sts over the bound off sts on the next row. Make buttonholes when buttonband measures: Size S/M: 2, 9, 15, 22, 28 and 34 cm. Size M/L: 2, 9, 15, 22, 29 and 35 cm. Size XL: 2, 9, 16, 22, 29 and 36 cm. Body: Cast on 202-226-250 sts on smaller circular needles. Knit rib as follows (right side row): K 2 (edge sts knit in garter st), K 2, P 2, K 2, P 2 (these 10 sts are the buttonband), * K 2, P 4 *, repeat from * - * to last 12 sts, K 2, P 2, K 2, P 2, K 2 and K 2 (edge sts knit in garter st). Knit rib for 8-9-10 cm - make buttonhole on right buttonband - see instructions above. Then put the 10 button band sts at each side on st holders, these will be knit separately. Change to larger circular needles, cast on 1 new st at each side at the center front (for sewing buttonbands) and inc 0-2-4 sts evenly distributed on the row = 184-210-236 sts. Knit Pattern 1, keeping 1 st at each edge in garter st throughout. When the piece measures approx. 31-32-33 cm - adjust to end after a complete repeat of Pattern 1 - knit the next row as follows (right side row): K 1 (edge st), 26 sts of Pattern 1, Pattern 2 (17-23-29 sts), bind off 5-6-7 sts for armhole, Pattern 3A (17-23-29 sts), 52 sts of Pattern 1, Pattern 2 (17-23-29 sts), bind off 5-6-7 sts for armhole, Pattern 3A (17-23-29 sts), 26 sts of Pattern 1, K 1 (edge st). Knit each piece separately. Left front: = 44-50-56 sts. Read the entire next section before knitting: Now bind off for armhole at the side following Pattern 3A, knit the remaining sts as before. After armhole bind off knit Pattern 3B to finished measurements. At the same time when 1 repeat of Pattern 1 has been knit after the start of armhole shaping (the piece measures approx. 35-38 cm), shape the neck following Pattern 5A (dec inside 1 edge st not shown on chart). After neck shaping follow Pattern 5B to finished measurements. After all armhole and neck shaping is complete 23-25-27 sts remain on shoulder. Bind off when the piece measures approx. 51-54-57 cm. Right front: = 44-50-56 sts. Bind off for armhole and neck as on left front but follow Pattern 2A/B and Pattern 4A/B. Bind off when the piece measures approx. 51-55-57 cm. Back: = 86-98-110 sts. Bind off for armhole at each side following Pattern 2A and Pattern 3A = 76-80-84 sts remain on needles. Continue with Pattern 1 over the center 52 sts and Pattern 2B and Pattern 3B over 12-14-16 sts at each side. When the piece measures 49-52-55 cm bind off the center 30 sts for the neck = 23-25-27 sts remain on each shoulder. Bind off the remaining sts when the piece measures 51-54-57 cm. Sleeve: Cast on 54-54-60 sts on smaller double-pointed needles; join and place a marker at the join. Knit rib for 15 cm. Knit the next row as follows: * K 1, yo, slip 1 as if to knit, K 1, psso, K 1, K 2 tog, yo *, repeat from * - *. Change to larger double-pointed needles and knit stockinette st to finished measurements. At the same time when the piece measures 17 cm inc 1 st each side of marker every 9-6-5 rows a total of 10-13-14 times = 74-80-88 sts. When the piece measures 49-47-45 cm bind off 3 sts each side of marker and knit the rest back and forth on needles. Then bind off for sleeve cap at each side every other row: 2 sts 4 times and 1 st 2-5-7 times, then bind off 2 sts each side until the piece measures 57 cm and then bind off 3 sts 1 time. Bind off, sleeve measures approx. 58 cm. Assembly: Sew shoulder seams. Left button band: Pick up sts on st holder and continue with rib on smaller needles until buttonband measures approx. 60-66 cm (measured to fit to center back, the buttonband should fit loosely when sewn. Bind off in pattern. Right button band: knit the same as the left but make buttonholes along buttonband. Sew button bands at center back. Sew buttonbands to the edge st on the cardigan. Sew in sleeves and buttons. |
|||||||||||||
Diagram explanations |
|||||||||||||
|
|||||||||||||

|
|||||||||||||
|
|||||||||||||

|
|||||||||||||

|
|||||||||||||
|
|||||||||||||

|
|||||||||||||
|
Have you made this or any other of our designs? Tag your pictures in social media with #dropsdesign so we can see them! Do you need help with this pattern?You'll find tutorial videos, a Comments/Questions area and more by visiting the pattern on garnstudio.com. © 1982-2024 DROPS Design A/S. We reserve all rights. This document, including all its sub-sections, has copyrights. Read more about what you can do with our patterns at the bottom of each pattern on our site. |
|||||||||||||


With over 40 years in knitting and crochet design, DROPS Design offers one of the most extensive collections of free patterns on the internet - translated to 17 languages. As of today we count 304 catalogues and 11422 patterns - 11422 of which are translated into English (UK/cm).
We work hard to bring you the best knitting and crochet have to offer, inspiration and advice as well as great quality yarns at incredible prices! Would you like to use our patterns for other than personal use? You can read what you are allowed to do in the Copyright text at the bottom of all our patterns. Happy crafting!
Comments / Questions (19)
In het patroon moeten de terugaande steken allemaal averechts in plaats van rechts zoals de tekening aangeeft
18.03.2024 - 14:03Chart 2a/2b for M/L states 23 sts but counting on the chart it has 22 (at dividing row). The other sizes show correct at 17 and 29. Is the chart incorrect or have I missed something?
06.10.2023 - 00:39DROPS Design answered:
Dear Mrs Barlow, thanks for noticing, the diagram M.2A/M.3A has now been edited and fixed over 23 sts. Happy knitting!
06.10.2023 - 14:44I need to clarify the binding off for the sleeve cap size SMALL. After I bind off the initial 3 sts each side of marker (68 sts remaining) and then every other row 2 sts 4 times (-16 sts for 52 sts remaining and next 1 st 2 times (48 stitches remaining), it says to bind off 2 sts each side until piece measures 57 cm and then bind off 3 sts 1 time. HOW MANY STITCHES SHOULD BE LEFT AT THIS POINT? Thank you, Sharon
05.12.2021 - 01:42DROPS Design answered:
Dear Sharon, depending on your gauge, you may need to work more or less rows to get to 57 cm, that's why we don't mention the amount of stitches. Once you make all the bind offs and you have reached 57 cm, you bind off all the remaining stitches in the same row. Happy knitting!
05.12.2021 - 17:13Bonjour, À quoi correspond le patron à la fin des explications ? les dimensions ne sont pas les mêmes que le patron juste au-dessus. Pourquoi y a-t-il 4 tailles alors qu'il y en avait 3 jusque là ? Cordialement
10.08.2021 - 09:02DROPS Design answered:
Bonjour Mme Noyer, le gilet est disponible en 3 tailles: S/M, M/L et XL - en revanche le top (que vous trouverez ici) est en 4 tailles: S-M-L-XL. Bon tricot!
10.08.2021 - 14:07Bonjour, Pour le diagramme du point fantaisie, aux rangs envers, doit-on tricoter les mailles envers ou endroit ? Cordialement
10.08.2021 - 08:56DROPS Design answered:
Bonjour Mme Noyer, effectivement, dans ce modèle, tous les rangs envers des diagrammes se tricotent à l'envers (= jersey endroit: à l'endroit sur l'endroit/à l'envers sur l'envers). Bon tricot!
10.08.2021 - 14:05Please could you clarify what Pattern 1 is? The charts only show what to do once each piece has been separated.
08.05.2021 - 18:18DROPS Design answered:
Dear Stephanie, pattern one is the small chart in the middle of M.4 diagram. Happy Knitting!
08.05.2021 - 18:34I'm confused by the number of balls of yarn I need. Looking at the description it looks like I need 10 x 50g balls but further down it states that this cardigan can be made for £6.40 which would mean only 4 balls of yarn. I'm making the smallest size, please can you clarify?
06.05.2021 - 10:21DROPS Design answered:
Dear Stephanie, according to the pattern, you will need about 500 gramms, 10 balls of DROPS Muskat yarn. The price stated as "from" probably calculates with the lowest sale price of the yarn. Happy Knitting!
06.05.2021 - 10:57Hvor finner jeg armfellingen ? Forstår det slik at det bare er 5 masker som skal felles under armen. Skal det felles mer .?. Symbol mangler forklaring ser ut som trekant, Vanskelig å forstå oppskriften
25.08.2020 - 00:241. Increase row after rib. Is this a rib row or a knit row 2. Says to use Pattern 1. No such pattern, only M1 3. Page 2 has half the legend, only then on page 3 is the full diagram explanation. Extremely confusing 4. No video showing the actual pattern. All videos in stocking stitch. Why no sample knit of pattern?
01.04.2020 - 15:26DROPS Design answered:
Dear Leona, increase the 0-2-4 sts on a WS row so that first row in M.1 will be worked from RS - you will find how to read knitting diagrams here. Happy knitting!
01.04.2020 - 15:45How do I know what each of these refer to? The diagram is there but I do not know which character refers to which instruction..... I see this is the same on all Drops patterns. Is the assumption taht everyone has used your patterns before? = stockinette = yo =K2tog
28.03.2020 - 11:01DROPS Design answered:
Dear Leona, see symbol before diagram text like first one = white square = 1 stitch in stocking stitch, 2nd one: round in a square = yarn over and so on. Read more about diagrams here. Happy knitting!
30.03.2020 - 09:29