
Popular categories
Looking for a yarn?


|
||||||||||
DROPS 69-7 |
||||||||||
 |
 |
|||||||||
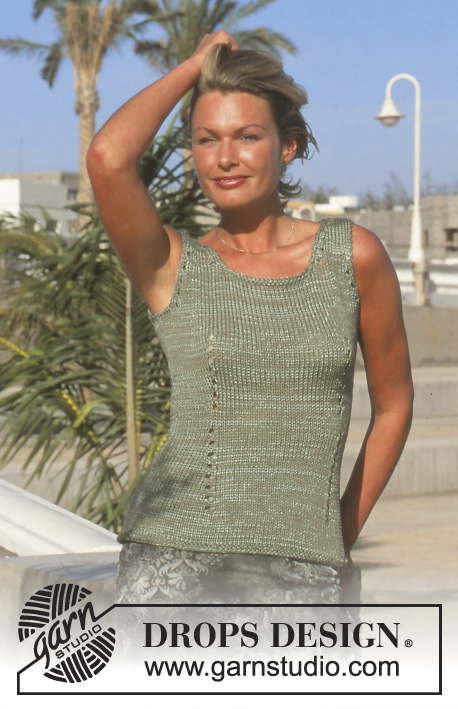
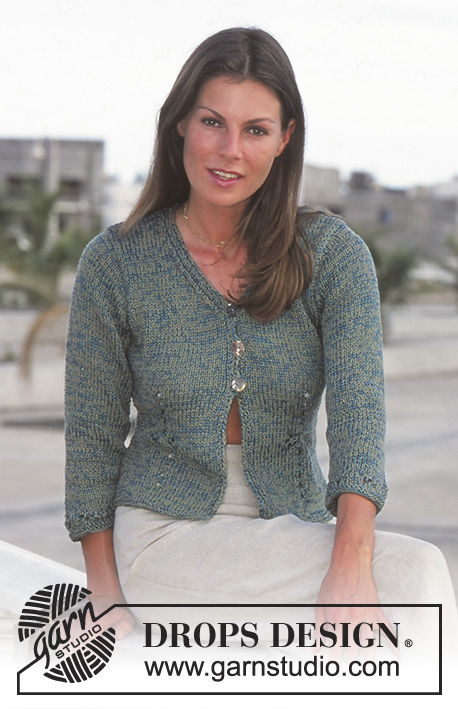
Knitted jacket with lace pattern in DROPS Cotton Viscose and DROPS Safran. Size: S-XL
DROPS 69-7 |
||||||||||
|
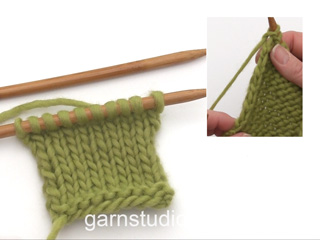
Ridge (Back and forth on needle): 1 ridge of garter st = 2 rows. 1st row K, 2nd row K. Decrease tip (for the neck): All dec is on RS. Dec inside the 3 band sts, which are worked as follows from edge: 1 st garter st, K 1, P 1. There are 2 types of decrease upwards, 1 with holes, 1 without. 1st decrease = dec with holes: Dec as follows 3 sts before edge sts: 1 YO, K 3 tog. Dec as follows after edge sts: Slip 1 st, K 2 tog and lift the slip st over, 1 YO. 2nd decrease = dec without holes: Dec as follows 2 sts before edge sts: K 2 tog. Dec as follows after edge sts: Slip 1 st, K 1 and lift the slip st over. Right front piece: Cast on 36-40-43-46 sts (incl. 1 edge st in the side and 3 band sts towards mid front) on needle size 4.5 mm with 1 strand Cotton Viscose + 1 strand Safran. Work 2 ridges, change to needle size 5.5 mm. Continue with stocking st, but 3 sts towards mid front are worked as follows from the edge (seen from RS): 1 st garter st, K 1, P 1. Remember knitting tension! Insert marker thread 16-17-18-19 sts from mid front. When the piece measures 4-5-6-7 cm work as follows after marker thread – seen from RS: K 2 tog, 1 YO (the remaining sts in stocking st), repeat this every 4th row upwards, 5 times = 5 holes upwards). At the same time, when the piece measures 5-6-7-8 cm dec 2 sts evenly on right side of marker – seen from RS. Repeat this dec when piece measures 9-10-11-12 cm and 13-14-15-16 cm = 30-34-37-40 sts. After the 5th hole is completed, work M.1 so that the pattern is the same on both sides of the row of holes. After M.1 work 4 holes upwards above each other – work the holes in the same way as below M1. Then work stocking st to full length (3 sts towards mid front worked as described earlier). At the same time when the piece measures 17-18-19-20 cm inc with 2 new sts evenly spread on left side of marker – seen from RS. Repeat the increase when the piece measures 22-23-24-25 cm and 27-28-29-30 cm = 36-40-43-46 sts. Read the following description before continuing! When the piece measures 33-34-36-37 cm cast off 3 sts in side for armhole. Continue to cast off for armhole every 2nd row: 2 sts 0-1-2-3 times and 1 st 3-4-5-5 times. At the same time, when the piece measures 34-35-36-37 cm, dec for the neck towards mid front, inside the 3 edge sts, as described in decrease tips. Repeat 1st and 2nd decrease every 2nd row upwards 9-9-9-9 times. Continue with 1st decrease every 4th row 3-3-4-4 times. There are now 12-12-13-13 sts dec for the neck and 6-9-12-14 sts cast off for the armhole = 18-19-18-19 sts remaining for the shoulder. Continue piece while at the same time, every 4th row working a hole over the others along the neck – work as follows (from mid front): 1 st garter st, K 1, P 1, slip 1 st, K 1 and lift the slip st over, cast on 1 st. Cast off when the piece measures 52-54-56-58 cm. Left front piece: Work as for the right but with the dec and cast off on opposite side, as well as the row of holes being on right side of marker upwards. After the dec for the neck is complete, work the holes as follows (5 sts before mid front): 1 YO, K 2 tog, P 1, K 1, 1 st garter st. Cast off when piece measures 52-54-56-58 cm. Back piece: Cast on 70-78-84-90 sts (incl. 1 edge st in each side) on needle size 4.5 mm with 1 strand Cotton Viscose + 1 strand Safran. Work 2 ridges. Change to needle size 5.5 mm and work stocking st. When the piece measures 5-6-7-8 dec 4 sts evenly on row. Repeat the dec when piece measures 9-10-11-12 cm and 13-14-15-16 cm = 58-66-72-78 sts. When piece measures 17-18-19-20 cm inc 4 sts evenly on row. Repeat the increase when piece measures 22-23-24-25 cm and 27-28-29-30 cm = 70-78-84-90 sts. When piece measures 33-34-36-37 cm cast off for the armholes in each side as for front pieces = 58-60-60-62 sts. When piece measures 50-52-54-56 cm cast off the middle 20-20-22-22 sts – cast these sts from WS with K sts. Continue to dec 1 st on next row towards neck – see decrease tips = 18-19-18-19 sts remaining on each shoulder. Cast off when piece measures 52-54-56-58 cm. Sleeves: Cast on 38-38-44-44 sts (incl. 1 edge st in each side) on needle size 4.5 mm with 1 strand Cotton Viscose + 1 strand Safran. Work 2 ridges, change to needle size 5.5 mm and continue with 3 rows stocking st. Continue by working M.1 across all sts apart from edge sts. After M.1 work stocking st to full length. At the same time, when the piece measures 7 cm inc in each side: 1 st 9-11-8-9 times for: Sizes S and L: Alternately every 6th and 7th row. Size M: Every 5th row. Size XL: Alternately every 5th and 6th row = 56-60-60-62 sts. When the piece measures 37-35-34-33 cm cast off for sleeve cap in each side every 2nd row: 3 sts 1-1-1-1 time, 2 sts 2-2-2-2 times, 1 st 2-4-5-6 times, 2 sts 2-2-2-2 times and 3 sts 1-1-1-1 time. Cast off when piece measures approx. 45-45-45-45 cm. Assembly: Sew shoulder seams. Sew in sleeves and sew sleeve and side seams in one, inside 1 edge st. Crochet with 1 strand Cotton Viscose + 1 strand Safran using crochet hook size 4 mm. Crochet 1 row dc round neck and down each band edge – be careful not to crochet too tightly around neck – at the same time on the right band, crochet 3 button loops as follows from the top: 1 dc, 3 ch, fasten with 1 dc 1 cm further down, repeat twice with 6 cm between. Crochet sl st up the band and 3 dc round each button loop. Sew on buttons. |
||||||||||
Diagram explanations |
||||||||||
|
||||||||||

|
||||||||||

|
||||||||||
|
Have you made this or any other of our designs? Tag your pictures in social media with #dropsdesign so we can see them! Do you need help with this pattern?You'll find tutorial videos, a Comments/Questions area and more by visiting the pattern on garnstudio.com. © 1982-2024 DROPS Design A/S. We reserve all rights. This document, including all its sub-sections, has copyrights. Read more about what you can do with our patterns at the bottom of each pattern on our site. |
||||||||||


With over 40 years in knitting and crochet design, DROPS Design offers one of the most extensive collections of free patterns on the internet - translated to 17 languages. As of today we count 304 catalogues and 11422 patterns - 11422 of which are translated into English (UK/cm).
We work hard to bring you the best knitting and crochet have to offer, inspiration and advice as well as great quality yarns at incredible prices! Would you like to use our patterns for other than personal use? You can read what you are allowed to do in the Copyright text at the bottom of all our patterns. Happy crafting!
Comments / Questions (14)
Buongiorno vorrei sapere cortesemente che taglia indossa la modella di questo cardigan sulla base delle misure esposte. Grazie mille
10.06.2023 - 22:54DROPS Design answered:
Buonasera Sara, solitamente le modelle vestono la taglia M. Buon lavoro!
11.06.2023 - 23:18Buongiorno, vorrei realizzare il modello 69-7. Quale altro filato posso usare con Safran visto che il Cotton Viscosa è fuori produzione? Nel caso posso utilizzare Bomull-Lin o Paris a un filo solo? Oppure, nel caso volessi farlo per l'inverno, potrei usare un filo solo di Big Merino? grazie molte
16.07.2020 - 14:29DROPS Design answered:
Buongiorno Gadi. Può sostituire Cotton Viscose con Safran e quindi lavorare con 2 capi di safran. Oppure può usare Paris, Bomull-Lin o Big Merino per l'inverno, tutti questi con 1 solo capo. Verifichi sempre la correttezza del suo campione con quello indicato nelle spiegazioni. Buon lavoro!
16.07.2020 - 15:08Ik wil graag deze combinatie breien. De sjaal wordt gebreid in Vienna, maar die is niet meer beschikbaar. U geeft aan dat Drops You #6 een alternatief is, maar dat is een katoenen garen en niet mohair. Zou u mij kunnen helpen met een alternatief mohair garen incl. kleurnummer (Verdi vind ik niet mooi). Misschien met twee draden breien van iets anders? Dank!
18.11.2015 - 14:47DROPS Design answered:
Hoi Mischa. De DLY#6 is een alternatief voor de garens voor het vest (Safran en Cotton-Viscose). Je kan DROPS Melody gebruiken als alternatief voor DROPS Vienna.
19.11.2015 - 15:56Hallo, stimmt das wirklich, dass man beim Vorderteil Maschen RECHTS von der Markierung abnehmen soll (also zwischen dem Lochmuster und der vorderen Mitte) und später LINKS wieder zunehmen? Oder habe ich da etwas falsch verstanden? Übrigens - ein tolles Modell! Die Kombination aus Cotton Viscose und Safran sieht super aus und strickt sich sehr angenehm. Vielen Dank!
26.05.2014 - 10:56I am knitting the R front of Drops 69-7. Where are the instructions for buttonholes? HELP PLEASE.
06.12.2013 - 19:49DROPS Design answered:
Dear Flora, buttonholes are made at the very end, when crocheting the border - see Assembly at the end of the pattern. Happy crocheting!
06.12.2013 - 21:35Dit patroon is lang geleden vertaald en ik zie dat er een foutje in geslopen is. Ik heb de vertaling gecorrigeerd - hartelijk dank voor het melden. Er staat nu: U hebt nu 12-12-13-13 st geminderd aan de halskant en 6-9-12-14 st aan de kant van het armsgat = 18-19-18-19 st resteren voor de schouder.
02.08.2013 - 08:59Kant vervolgens 12-12-13-13 st af aan de halskant en 6-9-12-14 st aan de kant van het armsgat = 18-19-18-19 st resteren voor de schouder. Deze zin is inderdaad overbodig en verwarrend. zie opm.van Anna op 14-3
01.08.2013 - 22:50U heeft gelijk, het moet 2 st samen zijn. We hebben het aangepast en bedanken u voor het doorgeven.
25.07.2013 - 21:24Bij het telpatroon staat bij de verklaring 1 st samen. Dit moet m.i. 2 st. samen zijn.
25.07.2013 - 20:48Hoe kan het dat er als prijsindicatie 27.60 euro staat en als ik naar de leverancier ga ik voor het vest en de top al 65 euro kwijt ben voor maat L
29.04.2013 - 11:58DROPS Design answered:
De prijsindicatie is voor het garen alleen en voor de kleinste maat. Maar breit u het vestje in maat L, dan zit u in garenkosten alleen op ongeveer 41 euro. dat is exclusief knopen, naalden en eventuele verzendkosten. Vraag uw winkel voor een specificatie.
29.04.2013 - 16:08