
Popular categories
Looking for a yarn?


|
|||||||||||||
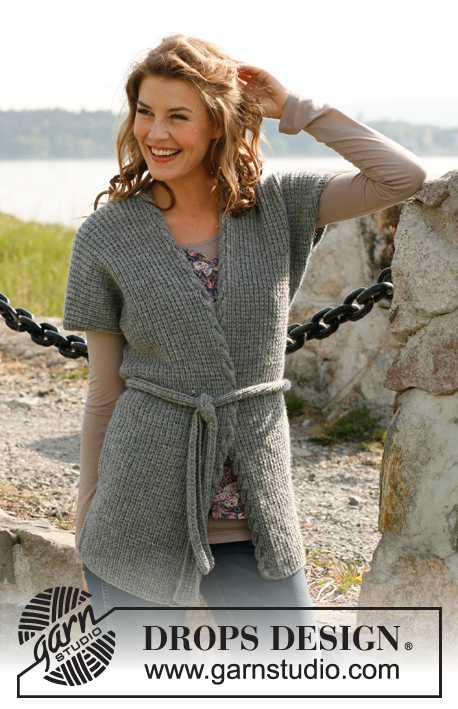
Wrapped Comfort |
|||||||||||||
 |
 |
||||||||||||
Knitted long DROPS jacket or vest with textured pattern, cable edge and belt in ”Karisma”. Size: S to XXXL.
DROPS 132-22 |
|||||||||||||
|
PATTERN: See diagram M.1 to M.3 – diagrams show pattern from RS (1st row = RS). GARTER ST (back and forth on needle): K all rows. -------------------------------------------------------- -------------------------------------------------------- BACK PIECE (jacket and vest): Worked back and forth on needle. Cast on 97-107-117-127-139-149 sts (incl 1 edge st in each side) on needle size 4 mm with Karisma. Work diagram M.1 over all sts. REMEMBER THE KNITTING TENSION! When piece measures 46-47-49-51-53-54 cm, inc for sleeves at the end of every 4th row in each side as follows: 1 st 0-0-2-3-3-3 times. Then on every other row 1 st 9-9-5-2-0-0 times, and finally 3 sts 1 time in each side (= a total of 12-12-10-8-6-6 sts inc in each side), work the inc sts in pattern, but work the last 3 inc sts in GARTER ST – see explanation above, = 121-131-137-143-151-161 sts. When piece measures 68-70-72-74-76-78 cm, cast off the middle 17-19-19-21-21-21 sts for neck. Finish each shoulder (= 52-56-59-61-65-70 sts) separately. Cast off when piece measures 70-72-74-76-78-80 cm. RIGHT FRONT PIECE (jacket and vest): Worked back and forth on needle. Cast on 53-57-63-67-73-79 sts (incl 8 band sts towards mid front and 1 edge st in the side) on needle size 4 mm with Karisma. Work as follows (1st row = from RS): Diagram M.2 (= 8 sts) then diagram M.1 over all sts. When piece measures 46-47-49-51-53-54 cm, inc for sleeve in the side as on back piece = 65-69-73-75-79-85 sts. When piece measures approx. 70-72-74-76-78-80 cm (adjust so that next row is worked from WS), cast off the first 52-56-59-61-65-70 sts = 13-13-14-14-14-15 sts remain on needle for neck edge. Continue diagram M.2 over the outermost 8 sts and work the remaining 5-5-6-6-6-7 sts in garter st. When edge measures approx. 4-4-4-5-5-5 cm, slip the first 2 sts at beg of row from WS on a stitch holder after they have been worked. Repeat at beg of every row from WS a total of 5 times - continue working cables as far as possible (= 3-3-4-4-4-5 sts remain on needle). Slip all sts back on needle and cast off. LEFT FRONT PIECE (jacket and vest): Cast on and work as right front piece but reversed – work diagram M.3 instead of diagram M.2 at the edge of band. Cast off shoulder sts from RS to avoid cutting the thread before working collar. When slipping sts from stitch holder back on needle, this is done at beg of every row from RS. SLEEVE (jacket): Worked back and forth on needle. Cast on 54-54-56-56-58-60 sts (incl 1 edge st in each side) on needle size 4 mm with Karisma. Work diagram M.1 with 1 edge st in garter st in each side. When piece measures 15 cm, inc 1 st in each side, repeat inc every 9-7-6-5-4-4 rows a total of 9-11-12-14-15-16 times (the inc sts are worked in pattern) = 72-76-80-84-88-92 sts. When piece measures 44-43-43-41-40-39 cm, cast off all sts (shorter measurements in the larger sizes because of broader shoulder width on body). BELT (jacket and vest): Cast on 11 sts on needle size 4 mm and work diagram M.1 over all sts for approx. 120-130-140-150-160-170 cm, cast off. ASSEMBLY (jacket and vest): Sew the shoulder seams. Sew collar tog mid back, edge to edge to avoid a chunky seam. Sew collar to the back of neckline. Sew the side seams inside 1 edge st. JACKET: Sew sleeves tog inside 1 edge st and sew in sleeves. |
|||||||||||||
Diagram explanations |
|||||||||||||
|
|||||||||||||

|
|||||||||||||
|
Have you made this or any other of our designs? Tag your pictures in social media with #dropsdesign so we can see them! Do you need help with this pattern?You'll find tutorial videos, a Comments/Questions area and more by visiting the pattern on garnstudio.com. © 1982-2024 DROPS Design A/S. We reserve all rights. This document, including all its sub-sections, has copyrights. Read more about what you can do with our patterns at the bottom of each pattern on our site. |
|||||||||||||


With over 40 years in knitting and crochet design, DROPS Design offers one of the most extensive collections of free patterns on the internet - translated to 17 languages. As of today we count 304 catalogues and 11415 patterns - 11415 of which are translated into English (UK/cm).
We work hard to bring you the best knitting and crochet have to offer, inspiration and advice as well as great quality yarns at incredible prices! Would you like to use our patterns for other than personal use? You can read what you are allowed to do in the Copyright text at the bottom of all our patterns. Happy crafting!
Comments / Questions (23)
Hei! Jeg finner ikke noe sted i oppskriften hvor det står hvordan kragen skal strikkes? Mrd vennlig hilsen Lisbeth Johannessen
24.07.2023 - 19:48Dessutom, om man vill sticka på rundstickor för att slippa sidosömmen, ska man skippa kantmaskorna då?
13.01.2022 - 17:22DROPS Design answered:
Hej Berit. Ja om du väljer att sticka framstyckena och bakstycket ihop där det är möjligt så skippar du kantmaskorna där. Mvh DROPS Design
14.01.2022 - 14:29Jag vet inte hur jag ska börja. När jag läser mönstret får jag inte maskantalet att stämma. I storl L bakstycke ska 117 m läggas upp inkl 2 kantm. Kantm i rätst? Mönstret M1 är på 6 m. Så 117-2=115 m som ska fördelas över mönstret på 6 m. 115/6=19,16 m, går inte. Hur ska jag tänka?
13.01.2022 - 17:16DROPS Design answered:
Hej Berit. Du stickar 1 kantmaska i rätstickning, sedan stickar du 19 hela rapporter av M1 och sedan de 5 första maskorna i M1 och till sist en kantmaska i rätstickning. Mvh DROPS Design
14.01.2022 - 14:26Jak sešít límec? Šikmé strany sešít k sobě a potom všít do průkrčníku? nebyl by nákres nebo foto? Děkuji.
27.05.2021 - 09:43DROPS Design answered:
Dobrý den, Petro, ano, postup je přesně takový, jak píšete: šikmé okraje límce/lemu sešijeme k sobě a poté celý volný konec límce/lemu všijeme do průkrčníku. Hodně zdaru! Hana
29.05.2021 - 10:33Beste, Ik brei maat M en ben bezig met het rugpand maar begrijp niet wat er bedoelt wordt met: 0-0-2-3-3-3 keer 1 st iedere 4e nld aan elke kant. Dan 9-9-5-2-0-0 keer 1 st om de nld aan elke kant en dan 1 keer 3 st aan iedere kant (= in totaal 12-12-10-8-6-6 st gemeerderd aan iedere kant). Moet ik in het begin dus niks meerderen omdat er 0 keer staat en hoe zet ik aan beide kanten van het werk extra steken op, moet het dan om de naald? Alvast bedankt
20.02.2019 - 17:52DROPS Design answered:
Dag Guusje,
Als er voor jou maat 0 staat, dan meerder je inderdaad 0 keer. Je zet de steken op aan het eind van de naald op. Als er bijvoorbeeld om de naald staat, dan zet je aan het eind van de heengaande naald en aan het eind van de teruggaande naald steken op (omdat je aan beide kanten op moet zetten). 21.02.2019 - 10:53Hvor er oppskrift til krage ?
31.10.2016 - 23:03DROPS Design answered:
Hej Tove. Naar du er naaet til ca 70-72-74-76-78-80 cm paa höjre forstk felles 52-56-59-61-65-70 m fra skulderen = 13-13-14-14-14-15 m tilbake på p til halskant. Resten af opskriften beskriver hvordan du strikker halskanten = kragen.
01.11.2016 - 09:59Salve, Vorrei sapere cosa si intende per : aumentare 9 volte a righe alterne, e 3 m. 1 volta per lato (= un totale di 12 m. aumentate per lato) Significa che devo aumentare 1 m sul diritto, 1 sul rovescio fino ad arrivare ad un totale di 18 m , quindi 3 sul d e 3 sul r x un totale di 24 m e 20 ferri, giusto? Grazie x l'attenzione. Valeria
24.02.2016 - 15:49DROPS Design answered:
Buongiorno Valeria, ad esempio per la taglia S, a 46 cm deve aumentare 1 m 9 volte a f alterni (aumenta 1 m, lavora 1 f e aumenta 1 m, lavora un f senza aumenti, poi un f con aumenti, continui fino a quando avrà aumentato 9 volte per lato), e infine 3 m a ogni lato (= quindi avrà 12 aumenti per lato). Provi a vedere se questo video può esserle di aiuto: . Buon lavoro!
25.02.2016 - 09:54Hur skall jag tänka kring antalet maskor som skall läggas upp på stickorna? Ex hö fram står det: "lägg upp 53 m (Inkl 8 kantm mot mitt fram och 1 kantm i sidan"). Innebär det alltså att jag skall lägga upp 53m+8m+1m= totalt 62m på stickorna? Vänligen Anja
09.02.2016 - 10:05DROPS Design answered:
Hej. Det är 53 m inklusive 8 kantm mot mitt fram och 1 kantm mot sidan, så du lägger upp totalt 53 m. Lycka till!
10.02.2016 - 11:50Danke für die schnelle Hilfe!!
16.10.2014 - 19:26Hallo,ich stricke gerade diese Wohlfühljacke, habe aber ein Problem mit dem Abschluss der Vorderteile.Im Text steht: Nach ca. 4 cm jeweils die 2 ersten M.auf eine Hilfsnadel legen,total 5 mal.Ist dies in jeder zweiten Reihe gemeint? Oder wann wiederholt dies sich?? Schonmal vielen Dank!
15.10.2014 - 18:46DROPS Design answered:
Sie legen die ersten 2 M jeder Rück-R auf eine Hilfsnadel, also tatsächlich in jeder 2. R. Die Anleitung wird gleich etwas umformuliert, damit das deutlicher wird.
16.10.2014 - 14:30