DROPS Safran
DROPS Safran
100% Cotton
from 1.30 £ /50g
DROPS Cotton Viscose
54% Cotton, 46% Viscose
Discontinued
find alternatives
DROPS Vivaldi
DROPS Vivaldi
56% Mohair, 30% Polyamide, 14% Wool
Discontinued
find alternatives
DROPS SS24

Emeline

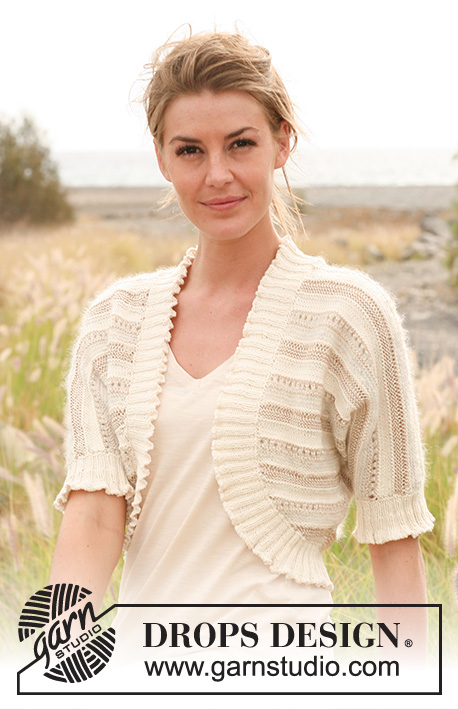
Knitted DROPS bolero with stripes and textured pattern in ”Safran”, ”Vivaldi” and ”Cotton Viscose”. Size: S - XXXL

DROPS 130-9
DROPS design: Pattern no E-172
--------------------------------------------------------
Size: S - M - L - XL - XXL - XXXL

Materials: DROPS SAFRAN from Garnstudio
Colour no 18, off white: 200-200-200-250-250-250 g
And use: DROPS COTTON VISCOSE from Garnstudio
Colour no 02, off white: 150-150-150-200-200-200 g
And use: DROPS VIVALDI from Garnstudio
Colour no 06, off white: 50 g in all sizes

DROPS CIRCULAR NEEDLE SIZE 3 mm - or size needed to get 24 sts x 46 rows with Cotton Viscose or Safran in textured pattern = 10 x 10 cm.

DROPS DOUBLE POINTED NEEDLES AND CIRCULAR NEEDLE (80 cm) SIZE 2.5 mm - for edges.

-------------------------------------------------------

Alternative Yarn – See how to change yarns here
Yarn Groups A to F – Use the same pattern and change the yarn here
Yarn usage using an alternative yarn – Use our yarn converter here

-------------------------------------------------------

DROPS Safran
DROPS Safran
100% Cotton
from 1.30 £ /50g
DROPS Cotton Viscose
54% Cotton, 46% Viscose
Discontinued
find alternatives
DROPS Vivaldi
DROPS Vivaldi
56% Mohair, 30% Polyamide, 14% Wool
Discontinued
find alternatives

Pattern instructions

NOTE: This pattern is written in British English. All measurements in charts are in cm. For conversion from cm to inches - click here. There are different terms for crocheting in British and American English. If this pattern includes crochet, click for "crochet terms" here. For this pattern in American English, please click here.
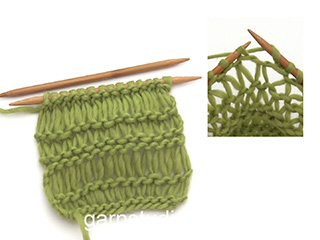
TEXTURED PATTERN:
See diagram M.1. Diagram shows pattern seen from RS (1st row = RS).

STRIPES:
See diagram M.2.

INCREASE TIP (applies to rib):
Inc 1 st by making 1 YO, on next row work YO twisted (i.e. work in the back loop of st instead front) to avoid holes. It is prettier to inc from 2 P sts to 3 P sts with 1 YO before the 2 P sts and from 2 K sts to 3 K sts with 1 YO before the 2 K sts.
--------------------------------------------------------

BACK PIECE:
The piece is worked back and forth on circular needle because of no of sts. Start at the bottom of back piece and cast on new sts in each side for sleeves.

Cast on 84-94-104-116-130-144 sts (incl 1 edge st in each side) on circular needle size 3 mm with Safran. K 1 row from WS. Then work STRIPES and TEXTURED PATTERN - see explanation above - with 1 edge st in each side.
When piece measures 2-3-2-2-3-2 cm, inc 1 st in each side. Repeat inc every 4th-4th-6th-6th-6th-6th row a total of 8 times = 100-110-120-132-146-160 sts. When piece measures 9-10-11-12-13-14 cm (inc are now done), cast on new sts at the end of every row in each side for sleeves as follows: 1 st 20 times, 2 sts 3 times and 3 sts 2 times = 164-174-184-196-210-224 sts. Continue the pattern as before with 1 edge st in each side. When piece measures 31-33-35-37-39-41 cm, cast off the middle 18-20-20-22-22-24 sts for neck and finish each shoulder/sleeve separately. Continue to cast off 1 st on next row from neck = 72-76-81-86-93-99 sts. Work until piece measures 33-35-37-39-41-43 cm (adjust so that the next row is worked from WS). K 1 row from WS with Safran and then LOOSELY cast off with K from RS.
Work the other shoulder/sleeve the same way.

RIGHT FRONT PIECE:
Worked back and forth on circular needle.
READ ALL OF THE FOLLOWING SECTION BEFORE CONTINUING!
Cast on 11-13-15-18-21-24 sts on circular needle size 3 mm with Safran. K 1 row from WS.
Then work STRIPES and TEXTURED PATTERN - see explanation above - with 1 edge st in each side. AT THE SAME TIME cast on new sts at the end of every row towards mid front for rounded front edge as follows: 2 sts 4-4-5-5-6-7 times and 1 st 8-9-9-11-12-14 times. Then cast on at the end of every other row towards mid front (i.e. on every 4th row): 1 st 6-7-8-9-10-11 times. AT THE SAME TIME when piece measures 2-3-2-2-3-2 cm, start inc in the side as on back piece. AT THE SAME TIME when piece measures 9-10-11-12-13-14 cm, cast on new sts at the end of every row towards the side for sleeve as on back piece. AT THE SAME TIME when piece measures 14-16-17-19-20-21 cm, dec 1 st towards mid front by K the 2 outermost sts tog. Repeat dec in Size XL + XXL + XXXL every 4-4-2 cm a total of 2-2-4 times (in Size S + M + L only the 1 dec is done). After all inc and dec, there are 72-76-81-86-93-99 sts on needle. When piece measures 33-35-37-39-41-43 cm - adjust so that the piece is the same length as back piece - K 1 row from WS with Safran before LOOSELY casting off with K from RS.

LEFT FRONT PIECE:
Cast on and work as right front piece but reversed.
ASSEMBLY:
Sew shoulder/overarm seams inside cast off edge. Sew underarm seams and side seams in one inside 1 edge st.

SLEEVE EDGE:
Knit up approx. 60 to 86 sts at the edge of one sleeve on double pointed needles size 2.5 mm with Safran. P 1 round. Then K 1 round while AT THE SAME TIME inc evenly to 80-84-92-96-100-108 sts. Then work rib (= K 2/P 2). When rib measures 2 cm, inc all 2 P sts to 3 P sts - READ INCREASE TIP. When rib measures 4 cm, inc all 2 K sts to 3 K sts. When rib measures 5 cm, cast off as follows: K 2 sts, pass 1st st over 2nd st (= 1 st dec), * 1 YO, pass st over YO, K 1, pass first st over last st, P 1, pass first st over last st, 1 YO, pass st over YO, P 1, pass first st over last st, 1 YO, pass st over YO, P 1, pass first st over last st, K 1, pass first st over last st, 1 YO, pass st over YO, K 1, pass first st over last st *, repeat from *-* the entire round.
Work the same way around the edge of the other sleeve.

EDGE AROUND JACKET OPENING:
Start mid back at the bottom of back piece and knit up sts from RS along back piece, then up along front piece and to mid back of neck on circular needle size 2.5 mm with Safran (knit up approx. 24-26 sts per 10 cm). K 1 row from WS, then K 1 row from RS while AT THE SAME TIME dec evenly to 206-210-222-238-250-266 sts. Then work rib (= K 2/P 2) with 1 edge st in garter st each side. When rib measures 2 cm, inc all 2 P sts to 3 P sts (seen from RS) - READ INCREASE TIP! When rib measures 4 cm, inc all 2 K sts to 3 K sts (seen from RS). When rib measures 5 cm, cast off the same way as on edge around sleeve by making YO while casting off.
Work the same way over the sts along the other side. Then sew the 2 edges tog mid back (at top and bottom) inside 1 edge st - make sure to sew so that the seam is not visible when rib is folded down in the neck.


Diagram

symbols = K from RS, P from WS
symbols = K from WS
symbols = 1 YO between 2 sts
symbols = K, slip YO from previous row off the needle
symbols = K 2 tog
symbols = Safran
symbols = Cotton Viscose
symbols = Vivaldi
diagram
diagram
Do you have a question? See a list of frequently asked questions (FAQ)

Knitting tension is what determines the final measurements of your work, and is usually measured per 10 x 10 cm. It is provided like so: number of stitches in width x number of rows in height - eg: 19 stitches x 26 rows = 10 x 10 cm.

The knitting tension is very individual; some people knit/crochet loosely while others work tightly. You adjust the knitting tension with the needle size, which is why the suggested needle size is only meant as a guide! You need to adjust this (up or down) to ensure that YOUR knitting tension matches the knitting tension provided in the pattern. If you work with a different knitting tension than provided you will have a different yarn consumption, and your work will have different measurements than what the pattern suggests.

The knitting tension also determines which yarns can replace each other. As long as you achieve the same knitting tension you can replace one yarn with another.

See DROPS lesson: How to measure your tension/gauge

See DROPS video: How to make a gauge tension swatch

The required amount of yarn is provided in grams, eg: 450 g. To calculate how many balls you’ll need you first need to know how many grams are in 1 ball (25g, 50g or 100g). This information is available if you click on the individual yarn quality on our pages. Divide the amount required with the amount of each ball. For example, if each ball is 50g (the most common amount), the calculation will be as follows: 450 / 50 = 9 balls.

The important thing when changing from one yarn to another is that the knitting/crochet tension remains the same. This is so that the measurements of the finished piece will be the same as on the sketch provided. It is easier to achieve the same knitting tension using yarns from the same yarn group. It is also possible to work with multiple strands of a thinner yarn to achieve the knitting tension of a thicker one. Please try our yarn converter. We recommend you to always work a test swatch.

Please NOTE: when changing yarn the garment might have a different look and feel to the garment in the photo, due to individual properties and qualities of each yarn.

See DROPS lesson: Can I use a different yarn than the one mentioned in the pattern?

All our yarns are categorised into yarn groups (from A to F) according to thickness and knitting tension – group A contains the thinnest yarns and group F the thickest. This makes it easier for you to find alternative yarns to our patterns, should you wish to switch yarn. All yarns within the same group have a similar knitting tension and can easily replace each other. However, different yarn qualities have different structures and properties which will give the finished work a unique look and feel.

Click here for an overview of the yarns in each yarn group

At the top of all our patterns you’ll find a link to our yarn calculator, which is a helpful tool should you wish to use a different yarn than suggested. By filling in the yarn quality you wish to replace, the amount (in your size) and number of strands, the calculator will present good alternative yarns with the same knitting tension. Additionally it will tell you how much you’ll require in the new qualities and whether you’ll need to work with multiple strands. Most skeins are 50g (some are 25g or 100g).

If the pattern is worked with multiple colours, every colour will have to be calculated separately. Similarly, if the pattern is worked with several strands of different yarns (for example 1 strand Alpaca and 1 strand Kid-Silk) you will have to find alternatives for each, individually.

Click here to see our yarn calculator

Since different yarns have different qualities and textures we have chosen to keep the original yarn in our patterns. However, you can easily find options among our available qualities by using our yarn calculator, or simply pick a yarn from the same yarn group.

It is possible that some retailers still have discontinued yarns in stock, or that someone has a few skeins at home that they would like to find patterns for.

The yarn calculator will provide both alternative yarn as well as required amount in the new quality.

If you think it's hard to decide what size to make, it can be a good idea to measure a garment you own already and like the size of. Then you can pick the size by comparing those measures with the ones available in the pattern's size chart.

You'll find the size chart at the bottom of the pattern.

See DROPS lesson: How to read size chart

The needle size provided in the pattern serves only as a guide, the important thing is to follow the knitting tension. And since knitting tension is very individual, you will have to adjust the needle size to ensure that YOUR tension is the same as in the pattern – maybe you’ll have to adjust 1, or even 2 needle sizes, up or down to achieve the correct tension. For this, we recommend that you work test swatches.

Should you work with a different knitting tension than the one provided, the measurements of the finished garment might deviate from the measurement sketch.

See DROPS lesson: How to measure your tension/gauge

See DROPS video: How to make a tension/gauge swatch

Working a garment top-down provides more flexibility and room for personal adjustment. For example it is easier to try the garment on while working, as well as making adjustments to length of yoke and shoulder caps.

The instructions are carefully explaining every step, in the correct order. Diagrams are adjusted to the knitting direction and are worked as usual.

The diagram depicts all rows/rounds, and every stitch seen from the right side. It is read from bottom to top, from right to left. 1 square = 1 stitch.

When working back and forth, every other row is worked from the right side and every other row is worked from the wrong side. When working from the wrong side, the diagram will have to be worked reversed: from left to right, knit stitches are purled, purl stitches are knit etc.

When working in the round every round is worked from the right side and the diagram are worked from right to left on all rounds.

See DROPS lesson: How to read knitting diagrams

The diagram depicts all rows/rounds, and every stitch seen from the right side. It is worked from bottom to top, from right to left.

When working back and forth every other row is worked from the right side: from right to left and every other row is worked from the wrong side: from left to right.

When working in the round, every row in the diagram are worked from the right side, from right to left.

When working a circular diagram you start in the middle and work your way outwards, counter clockwise, row by row.

The rows usually start with a given number of chain stitches (equivalent to the height of the following stitch), this will either be depicted in the diagram or explained in the pattern.

See DROPS lesson: How to read crochet diagrams

Instructions for working several diagrams after each other on the same row/round, will often be written like so: “work A.1, A.2, A.3 a total of 0-0-2-3-4 times". This means you work A.1 once, then A.2 is worked once, and A.3 is repeated (in width) the number of times provided for your size – in this case like so: S = 0 times, M = 0 times, L=2 times, XL= 3 times and XXL = 4 times.

The diagrams are worked as usual: begin with the first row in A.1, then work the first row in A.2 etc.

See DROPS lesson: How to read knitting diagrams

See DROPS lesson: How to read crochet diagrams

The total width of the garment (from wrist-to-wrist) will be larger in the larger sizes, despite the actual sleeves being shorter. The larger sizes have longer sleeve caps and wider shoulders, so there will be a good fit in all sizes.

The measurement sketch/schematic drawing provides information regarding the full length of the garment. If it’s a jumper or a jacket the length is measured from the highest point on the shoulder closest to the neckline, and straight down to the bottom of the garment. It is NOT measured from the tip of shoulder. Similarly, the length of yoke is measured from the highest point on the shoulder and down to where yoke is split into body and sleeves.

On a jacket measures are never taken along bands, unless specifically stated. Always measure inside band stitches when measuring the length.

See DROPS lesson: How to read a schematic drawing

Diagrams are often repeated on the round or in height. 1 repeat is the diagram the way it appears in the pattern. If it says to work 5 repeats of A.1 in the round, then you work A.1 a total of 5 times after/next to each other in the round. If it says to work 2 repeats of A.1 vertically/in height you work the entire diagram once, then begin again at the start and work the entire diagram one more time.

Chain stitches are slightly narrower than other stitches and to avoid working the cast-on edge too tight, we simply chain more stitches to begin with. The stitch count will be adjusted on the following row to fit the pattern and measurement sketch.

The rib edge is more elastic and will contract slightly compared to, for example, stocking stitch. By increasing before the rib edge, you avoid a visible difference in width between the rib edge and the rest of the body.

It’s very easy to cast off too tightly, and by making yarn overs while casting off (and simultaneously casting these off) you avoid a too tight cast off edge.

See DROPS video: How to bind off with yarn overs (yo)

To achieve an even increase (or decrease) you can increase on, for example: every 3rd and 4th row alternately, like so: work 2 rows and increase on the 3rd row, work 3 rows and increase on the 4th. Repeat this until the increase is complete.

See DROPS lesson: Increase or decrease 1 st on every 3rd and 4th row alternately

Should you prefer to work in the round instead of back and forth, you may of course adjust the pattern. You’ll need to add steeks mid-front (usually 5 stitches), and follow the instructions. When you would normally turn and work from the wrong side, simply work across the steek and continue in the round. At the end you’ll cut the piece open, pick up stitches to work bands, and cover the cut edges.

See DROPS video: How to knit steeks and cut open

Should you prefer to work back and forth instead of in the round, you may of course adjust the pattern so you work the pieces separately and then assemble them at the end. Divide the stitches for the body in 2, add 1 edge stitch in each side (for sewing) and work the front and back pieces separately.

See DROPS lesson: Can I adapt a pattern for circular needles into straight needles?

Pattern repeats can vary slightly in the different sizes, in order to get the correct proportions. If you’re not working the exact same size as the garment in the photo, yours might deviate slightly. This has been carefully developed and adjusted so that the complete impression of the garment is the same in all sizes.

Make sure to follow instructions and diagrams for your size!

If you have found a pattern you like which is available in women’s size it’s not very difficult to convert it to men’s size. The biggest difference will be the length of sleeves and body. Start working on the women size that you think would fit across the chest. The additional length will be worked right before you cast off for the armhole/sleeve cap. If the pattern is worked top-down you can add the length right after the armhole or before the first decrease on sleeve.

Regarding additional yarn amount, this will depend on how much length you add, but it is better with a skein too many than too few.

All yarns will have excess fibres (from production) that might come off as lint or shedding. Brushed yarns (ie hairier yarns) have more of these loose, excess fibres, causing more shedding.

Shedding also depends on what is worn under or over the garment, and whether this pulls at the yarn fibres. It’s therefore not possible to guarantee that there will be no shedding

Below are some tips on how to get the best result when working with hairier yarns:

1. When the garment is finished (before you wash it) shake it vigorously so the looser hairs come off. NOTE: do NOT use a lint roller, brush or any method that pulls at the yarn.

2. Place the garment in a plastic bag and put it in your freezer - the temperature will cause the fibres to become less attached to each other, and excess fibres will come off easier.

3. Leave in the freezer for a few hours before taking it out and shaking it again.

4. Wash the garment according to the instructions on the yarn label.

Pilling is a natural process that happens to even the most exclusive of fibers. It's a natural sign of wear and tear that is hard to avoid, and that is most visible in high friction areas of your garment like a sweater's arms and cuffs.

You can make your garment look as new by removing the pilling, using a fabric comb or a pill/lint remover.

Still can't find the answer you need? Then scroll down and leave your question so one of our experts can try to help you. This will be done normally within 5 to 10 working days.
In the meantime, you can read the questions and answers that others have left to this pattern or join the DROPS Workshop on Facebook to get help from fellow knitters/crocheters!

You might also like...

Post a comment to pattern DROPS 130-9

We would love to hear what you have to say about this pattern!

If you want to leave a question, please make sure you select the correct category in the form below, to speed up the answering process. Required fields are marked *.

Comments / Questions (26)

country flag Heike Rödel wrote:

Sorry, das Esatzgan für Vivaldi ist gemeint.

17.05.2016 - 23:06

country flag Heike Rödel wrote:

Leider stimmt die Mengenangabe für das Viskosegarn nicht. Man braucht mindesten 100g, also 2 Knäuel, in den größeren Größen wurde ich sicherheitshalber 3 nehmen.

17.05.2016 - 23:02

country flag Susan wrote:

Sorry, another question. Can you explain how to work the k2tog. Thank you.

03.10.2015 - 23:34

DROPS Design answered:

Dear Susan, the video below shows how to K2 tog - to make YO, let stand in front of work and K next 2 sts tog, the strand will wrap the right needle and automatically create a YO. Happy knitting!

05.10.2015 - 09:21

country flag Susan Fraser wrote:

Thank you. You people are awesome with your quick and easy to understand responses. The patterns you provide are gorgeous. Will send a comment when sweater is finished.

26.09.2015 - 00:56

country flag Susan Fraser wrote:

LAST QUESTION: Do I start at bottom of M2 and work across to M1 (right to left). Thank you.

25.09.2015 - 18:00

DROPS Design answered:

Dear Mrs Fraser, you follow both diagrams at the same time: M.2 shows yarn (colour) to work, and M1 how to work each stitch/row. Start at the very bottom corner on the right side and work towards the left from RS and from the left towards the right from WS. Happy knitting!

25.09.2015 - 18:05

country flag Susan Fraser wrote:

I am knitting a large size in pattern#130-9. starts with 104 sts. When piece measures 3/4inch inc 1 St each side (106 sts). Repeat inc total of 8 times, should there be 122 sts? The pattern reads 120sts. PLEASE REPLY. Thanks

25.09.2015 - 16:56

Susan Fraser answered:

Please ignore my last question as you have already answered it. Thank you so much for your reply. It helped me a lot. Susan

25.09.2015 - 17:58

country flag Susan wrote:

Hello. Lovely sweater pattern. 2 questions: M1= right side, row 1. The symbol for M1 row 1 is to knit on wrong side. Do we start with M2. There is a knit row on wrong side prior to starting M1 and M2. Edge stitch: should be 120 stitches after 1st increase. I count 104+2+16 =122. Thanks

24.09.2015 - 16:58

DROPS Design answered:

Dear Susan, 1st row in M1 is worked from RS (white square in diagram: K from RS, P from WS, you will then here K all sts) - read more about diagrams here. Edge sts are included in the total number of sts, ie 102 sts + 2 edge sts + 16 inc = 120 sts. Happy knitting!

25.09.2015 - 09:30

country flag Jette Nielsen wrote:

Muligheden 'Bestil fra' indeholde ikke alle 3 garntyper der skal bruges i opskriften. Hvorfor ikke??? Venlig hilsen Jette Nielsen

27.09.2011 - 20:18

country flag Carla wrote:

Complimenti avete degli stilisti in gambissima, non vedo l'ora di poter fare questo e molti altri modelli da voi proposti, a quando in vendita anche nel mio Paese le Vs lane? grazie, carla

24.01.2011 - 15:51

Rosangela wrote:

Espectacular! Fino. Elegante. Lástima que no sea para tallas grandes.

20.01.2011 - 04:49