DROPS Safran uni colour 100% Cotton |
1.30 £ /50g |
Order |
Clicking the ORDER button will redirect you to Wool Warehouse Direct Ltd website
The yarn cost is calculated from the pattern’s smallest size and the yarn’s cheapest product type. Looking for an even better price? You might find it on the DROPS Deals!
-------------------------------------------------------
Alternative Yarn – See how to change yarns here
Yarn Groups A to F – Use the same pattern and change the yarn here
Yarn usage using an alternative yarn – Use our yarn converter here
-------------------------------------------------------
DROPS Safran uni colour 100% Cotton 1.30 £ /50g Order |
Clicking the ORDER button will redirect you to Wool Warehouse Direct Ltd website
The yarn cost is calculated from the pattern’s smallest size and the yarn’s cheapest product type. Looking for an even better price? You might find it on the DROPS Deals!
= dc | |
= tr | |
= ch | |
= start |
Each of our patterns has specific tutorial videos to help you.
These step-by-step tutorials might also help you:
Why is the knitting/crochet tension so important?
Knitting tension is what determines the final measurements of your work, and is usually measured per 10 x 10 cm. It is provided like so: number of stitches in width x number of rows in height - eg: 19 stitches x 26 rows = 10 x 10 cm.
The knitting tension is very individual; some people knit/crochet loosely while others work tightly. You adjust the knitting tension with the needle size, which is why the suggested needle size is only meant as a guide! You need to adjust this (up or down) to ensure that YOUR knitting tension matches the knitting tension provided in the pattern. If you work with a different knitting tension than provided you will have a different yarn consumption, and your work will have different measurements than what the pattern suggests.
The knitting tension also determines which yarns can replace each other. As long as you achieve the same knitting tension you can replace one yarn with another.
See DROPS lesson: How to measure your tension/gauge
See DROPS video: How to make a gauge tension swatch
How do I know how many balls of yarn I need?
The required amount of yarn is provided in grams, eg: 450 g. To calculate how many balls you’ll need you first need to know how many grams are in 1 ball (25g, 50g or 100g). This information is available if you click on the individual yarn quality on our pages. Divide the amount required with the amount of each ball. For example, if each ball is 50g (the most common amount), the calculation will be as follows: 450 / 50 = 9 balls.
Can I use a different yarn than what the pattern suggests?
The important thing when changing from one yarn to another is that the knitting/crochet tension remains the same. This is so that the measurements of the finished piece will be the same as on the sketch provided. It is easier to achieve the same knitting tension using yarns from the same yarn group. It is also possible to work with multiple strands of a thinner yarn to achieve the knitting tension of a thicker one. Please try our yarn converter. We recommend you to always work a test swatch.
Please NOTE: when changing yarn the garment might have a different look and feel to the garment in the photo, due to individual properties and qualities of each yarn.
See DROPS lesson: Can I use a different yarn than the one mentioned in the pattern?
What are the yarn groups?
All our yarns are categorised into yarn groups (from A to F) according to thickness and knitting tension – group A contains the thinnest yarns and group F the thickest. This makes it easier for you to find alternative yarns to our patterns, should you wish to switch yarn. All yarns within the same group have a similar knitting tension and can easily replace each other. However, different yarn qualities have different structures and properties which will give the finished work a unique look and feel.
How do I use the yarn calculator?
At the top of all our patterns you’ll find a link to our yarn calculator, which is a helpful tool should you wish to use a different yarn than suggested. By filling in the yarn quality you wish to replace, the amount (in your size) and number of strands, the calculator will present good alternative yarns with the same knitting tension. Additionally it will tell you how much you’ll require in the new qualities and whether you’ll need to work with multiple strands. Most skeins are 50g (some are 25g or 100g).
If the pattern is worked with multiple colours, every colour will have to be calculated separately. Similarly, if the pattern is worked with several strands of different yarns (for example 1 strand Alpaca and 1 strand Kid-Silk) you will have to find alternatives for each, individually.
Why do you show discontinued yarns in the patterns?
Since different yarns have different qualities and textures we have chosen to keep the original yarn in our patterns. However, you can easily find options among our available qualities by using our yarn calculator, or simply pick a yarn from the same yarn group.
It is possible that some retailers still have discontinued yarns in stock, or that someone has a few skeins at home that they would like to find patterns for.
The yarn calculator will provide both alternative yarn as well as required amount in the new quality.
What size should I knit?
If you think it's hard to decide what size to make, it can be a good idea to measure a garment you own already and like the size of. Then you can pick the size by comparing those measures with the ones available in the pattern's size chart.
You'll find the size chart at the bottom of the pattern.
See DROPS lesson: How to read size chart
Why do I get the wrong knitting tension with the suggested needle size?
The needle size provided in the pattern serves only as a guide, the important thing is to follow the knitting tension. And since knitting tension is very individual, you will have to adjust the needle size to ensure that YOUR tension is the same as in the pattern – maybe you’ll have to adjust 1, or even 2 needle sizes, up or down to achieve the correct tension. For this, we recommend that you work test swatches.
Should you work with a different knitting tension than the one provided, the measurements of the finished garment might deviate from the measurement sketch.
See DROPS lesson: How to measure your tension/gauge
See DROPS video: How to make a tension/gauge swatch
Why is the pattern worked top-down?
Working a garment top-down provides more flexibility and room for personal adjustment. For example it is easier to try the garment on while working, as well as making adjustments to length of yoke and shoulder caps.
The instructions are carefully explaining every step, in the correct order. Diagrams are adjusted to the knitting direction and are worked as usual.
How do I work according to a knitting diagram?
The diagram depicts all rows/rounds, and every stitch seen from the right side. It is read from bottom to top, from right to left. 1 square = 1 stitch.
When working back and forth, every other row is worked from the right side and every other row is worked from the wrong side. When working from the wrong side, the diagram will have to be worked reversed: from left to right, knit stitches are purled, purl stitches are knit etc.
When working in the round every round is worked from the right side and the diagram are worked from right to left on all rounds.
See DROPS lesson: How to read knitting diagrams
How do I work according to a crochet diagram?
The diagram depicts all rows/rounds, and every stitch seen from the right side. It is worked from bottom to top, from right to left.
When working back and forth every other row is worked from the right side: from right to left and every other row is worked from the wrong side: from left to right.
When working in the round, every row in the diagram are worked from the right side, from right to left.
When working a circular diagram you start in the middle and work your way outwards, counter clockwise, row by row.
The rows usually start with a given number of chain stitches (equivalent to the height of the following stitch), this will either be depicted in the diagram or explained in the pattern.
See DROPS lesson: How to read crochet diagrams
How do I work several diagrams simultaneously on the same row/round?
Instructions for working several diagrams after each other on the same row/round, will often be written like so: “work A.1, A.2, A.3 a total of 0-0-2-3-4 times". This means you work A.1 once, then A.2 is worked once, and A.3 is repeated (in width) the number of times provided for your size – in this case like so: S = 0 times, M = 0 times, L=2 times, XL= 3 times and XXL = 4 times.
The diagrams are worked as usual: begin with the first row in A.1, then work the first row in A.2 etc.
See DROPS lesson: How to read knitting diagrams
See DROPS lesson: How to read crochet diagrams
Why are the sleeves shorter in larger sizes?
The total width of the garment (from wrist-to-wrist) will be larger in the larger sizes, despite the actual sleeves being shorter. The larger sizes have longer sleeve caps and wider shoulders, so there will be a good fit in all sizes.
Where on the garment is the length measured?
The measurement sketch/schematic drawing provides information regarding the full length of the garment. If it’s a jumper or a jacket the length is measured from the highest point on the shoulder closest to the neckline, and straight down to the bottom of the garment. It is NOT measured from the tip of shoulder. Similarly, the length of yoke is measured from the highest point on the shoulder and down to where yoke is split into body and sleeves.
On a jacket measures are never taken along bands, unless specifically stated. Always measure inside band stitches when measuring the length.
See DROPS lesson: How to read a schematic drawing
What is a repeat?
Diagrams are often repeated on the round or in height. 1 repeat is the diagram the way it appears in the pattern. If it says to work 5 repeats of A.1 in the round, then you work A.1 a total of 5 times after/next to each other in the round. If it says to work 2 repeats of A.1 vertically/in height you work the entire diagram once, then begin again at the start and work the entire diagram one more time.
Why does the piece start with more chain stitches than it’s worked with?
Chain stitches are slightly narrower than other stitches and to avoid working the cast-on edge too tight, we simply chain more stitches to begin with. The stitch count will be adjusted on the following row to fit the pattern and measurement sketch.
Why increase before the rib edge when the piece is worked top-down?
The rib edge is more elastic and will contract slightly compared to, for example, stocking stitch. By increasing before the rib edge, you avoid a visible difference in width between the rib edge and the rest of the body.
Why increase in the cast-off edge?
It’s very easy to cast off too tightly, and by making yarn overs while casting off (and simultaneously casting these off) you avoid a too tight cast off edge.
See DROPS video: How to bind off with yarn overs (yo)
How do I increase/decrease on every 3rd and 4th row/round alternately?
To achieve an even increase (or decrease) you can increase on, for example: every 3rd and 4th row alternately, like so: work 2 rows and increase on the 3rd row, work 3 rows and increase on the 4th. Repeat this until the increase is complete.
See DROPS lesson: Increase or decrease 1 st on every 3rd and 4th row alternately
How can I work a jacket in the round instead of back and forth?
Should you prefer to work in the round instead of back and forth, you may of course adjust the pattern. You’ll need to add steeks mid-front (usually 5 stitches), and follow the instructions. When you would normally turn and work from the wrong side, simply work across the steek and continue in the round. At the end you’ll cut the piece open, pick up stitches to work bands, and cover the cut edges.
See DROPS video: How to knit steeks and cut open
Can I work a jumper back and forth instead of in the round?
Should you prefer to work back and forth instead of in the round, you may of course adjust the pattern so you work the pieces separately and then assemble them at the end. Divide the stitches for the body in 2, add 1 edge stitch in each side (for sewing) and work the front and back pieces separately.
See DROPS lesson: Can I adapt a pattern for circular needles into straight needles?
Why is the pattern slightly different than what I see in the photo?
Pattern repeats can vary slightly in the different sizes, in order to get the correct proportions. If you’re not working the exact same size as the garment in the photo, yours might deviate slightly. This has been carefully developed and adjusted so that the complete impression of the garment is the same in all sizes.
Make sure to follow instructions and diagrams for your size!
How do I make a women’s size garment into a men’s size one?
If you have found a pattern you like which is available in women’s size it’s not very difficult to convert it to men’s size. The biggest difference will be the length of sleeves and body. Start working on the women size that you think would fit across the chest. The additional length will be worked right before you cast off for the armhole/sleeve cap. If the pattern is worked top-down you can add the length right after the armhole or before the first decrease on sleeve.
Regarding additional yarn amount, this will depend on how much length you add, but it is better with a skein too many than too few.
How do I prevent a hairy garment from shedding?
All yarns will have excess fibres (from production) that might come off as lint or shedding. Brushed yarns (ie hairier yarns) have more of these loose, excess fibres, causing more shedding.
Shedding also depends on what is worn under or over the garment, and whether this pulls at the yarn fibres. It’s therefore not possible to guarantee that there will be no shedding
Below are some tips on how to get the best result when working with hairier yarns:
1. When the garment is finished (before you wash it) shake it vigorously so the looser hairs come off. NOTE: do NOT use a lint roller, brush or any method that pulls at the yarn.
2. Place the garment in a plastic bag and put it in your freezer - the temperature will cause the fibres to become less attached to each other, and excess fibres will come off easier.
3. Leave in the freezer for a few hours before taking it out and shaking it again.
4. Wash the garment according to the instructions on the yarn label.
Why does my garment pill?
Pilling is a natural process that happens to even the most exclusive of fibers. It's a natural sign of wear and tear that is hard to avoid, and that is most visible in high friction areas of your garment like a sweater's arms and cuffs.
You can make your garment look as new by removing the pilling, using a fabric comb or a pill/lint remover.
Talk Pineapple |
|||||||||||||
|
|
||||||||||||
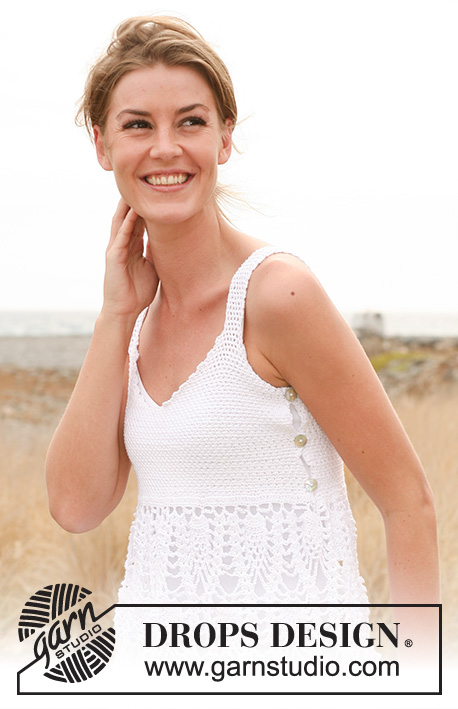
Crochet DROPS top in ”Safran”. Size: XS - XL.
DROPS 128-25 |
|||||||||||||
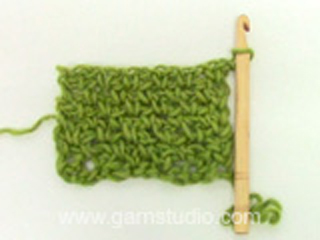
CROCHET INFO: PATTERN: M.1: Work the pattern back and forth. Start every row with 1 ch, 1 dc in 1st ch on row, * 1 ch, 1 dc in next ch * = 1 repetition of M.1. Repeat from *-*, finish with 1 ch and 1 dc in last dc on row, turn piece. See diagram M.1. M.2: Work the pattern in the round. See diagram M.2. DECREASE TIP: Decrease 2 dc as follows: Work M.1 until 2 dc remain (= no of dc to be dec) on row, finish row with 1 ch and 1 dc in next ch, turn piece = 2 dc dec at the end of row. Decrease 1 dc as follows: Work M.1 until 1 dc remains (= no of dc to be dec) on row, finish row with 1 ch and 1 dc in last ch, turn piece = 1 dc dec at the end of row. INCREASE TIP: Inc 1 repetition of M.1 in each side of piece as follows: Work 2 repetitions of M.1 in first and last ch on row = 2 new dc. Inc 1 repetition of M.1 on each side of marker as follows: Work 2 repetitions of M.1 in ch on both sides of marker = 2 new dc. -------------------------------------------------------- FRONT AND BACK PIECE: Work front and back piece back and forth in one, with opening in the left side. Start below the chest and work the top upwards. Work 210-232-254-282-316 ch (= 209-231-253-281-315 ch + 1 ch to turn with) on hook size 3 mm with Safran. Work first row (= RS) as follows: 1 dc in 2nd ch from hook, * 1 ch, skip 1 ch, 1 dc in next ch *. Repeat from *-* the entire row, finish with 1 ch and 1 dc in last ch = 105-116-127-141-158 dc. Insert a marker from RS in ch after the 53rd-58th-64th-71st-79th dc (front piece is to the right of the marker = 53-58-64-71-79 dc), turn piece. NOTE: Move the marker upwards when working. On next row, work M.1 - See explanation above, turn piece. REMEMBER THE CROCHET TENSION! Work like this until piece measures 5-5-5-6-7 cm. On next row from RS, inc 4 repetitions of M.1 as follows: Inc 1 repetition of M.1 in each side of piece and inc 1 repetition of M.1 on both sides of marker (= 4 new dc on row) - Read INCREASE TIP. Repeat inc when piece measures 10-10-10-12-14 cm = 113-124-135-149-166 dc (front piece = 57-62-68-75-83 dc). Continue until piece measures 15-16-17-18-19 cm. On next row from WS, continue as follows: Work M.1 until 2 dc remain on row, finish with 1 ch and 1 dc in next ch, turn piece (= 1st dec of 2 dc on front piece - Read Decrease tip). There are now 55-60-66-73-81 dc to the right of the marker. Then start the armhole, and finish left and right side of front piece separately. LEFT SIDE OF FRONT PIECE: Work the first row (= RS) as follows: 1 ch, 1 dc in next ch on row, work 23-25-28-32-35 repetitions of M.1, turn piece = 24-26-29-33-36 dc on row. Work next row (= WS) as follows: 1 ch, 1 dc in 1st ch on row, work M.1 until 2 dc remain on row, finish with 1 ch and 1 dc in next ch (= 2 dc dec), turn piece = 22-24-27-31-34 dc on row. Dec 2 dc at the end of row like this on 3-3-3-3-3 more rows = 16-18-21-25-28 dc. Then dec 1 dc at the end of row - Read Decrease tip - until 6-6-7-9-10 dc remain on row. Continue to work M.1 until piece measures 34-36-38-40-42 cm from armhole (= shoulder strap). Cut and fasten the thread. RIGHT SIDE OF FRONT PIECE: Pick up the thread in the 26th-28th-31st-35th-38th dc to the right of the marker. Work the right part the same way as left part of front piece. Cut and fasten the thread. ASSEMBLY: Sew the shoulder straps edge to edge on each side of back piece. SKIRT: Worked in the round top down from cast on edge on front and back piece. Work on hook size 3 mm with Safran at the bottom of left back piece as follows: Pick up the thread in 1st ch and work 1 ch. Then work 1 dc in every ch along the edge of back and front piece, finish with 1 sl st in 1st dc = 209-231-253-281-315 dc on the round, then work in the round. Work next round as follows: 3 ch, work tr in every dc - while AT THE SAME TIME adjusting no of sts to 220-240-260-280-320 tr, finish with 1 sl st in 3rd ch from beg of round. Work next round as follows: 1 ch, 1 dc in 1st tr, * 3 ch, skip 3 tr, 1 dc in next tr *, repeat from *-* the entire round. Finish round with 3 ch and 1 sl st in 1st dc. Then work M.2 in the round - See diagram, beg of round is marked with an arrow. Continue until M.2 has been worked 2 times vertically. Then work 1st round in M.2 (round marked with arrow) one more time, cut and fasten the thread. BAND IN THE LEFT SIDE WITH BUTTON HOLES: Work from RS back and forth up along the side on left front piece. Start at the bottom of left front piece (above the skirt) as follows: Pick up the thread in 1st row, work 1 ch, then work 40-42-44-46-50 dc (dc in every row) along the edge up to armhole, turn piece. Work 2 more dc rows (1 dc in every dc, beg every row with 1 ch). On next row (4th row) work button holes as follows: Work 4 dc, * skip 2 dc, work 2 ch, work 13-14-15-16-18 dc *. Repeat from *-* one more time, work 2 ch, skip 2 dc, finish with 4 dc. Then work dc rows, work 1 dc in every ch from 4th row. Continue until 7 dc rows have been worked. Cut and fasten the thread. Place the band over left back piece and sew it to the bottom edge with neat little stitches. Sew the buttons on to the left back piece. CROCHET BORDER: Work M.1 around the neck and armhole if a more even edge is desired. |
|||||||||||||
Diagram explanations |
|||||||||||||
|
|||||||||||||
Have you made this or any other of our designs? Tag your pictures in social media with #dropsdesign so we can see them! Do you need help with this pattern?You'll find tutorial videos, a Comments/Questions area and more by visiting the pattern on garnstudio.com. © 1982-2024 DROPS Design A/S. We reserve all rights. This document, including all its sub-sections, has copyrights. Read more about what you can do with our patterns at the bottom of each pattern on our site. |
With over 40 years in knitting and crochet design, DROPS Design offers one of the most extensive collections of free patterns on the internet - translated to 17 languages. As of today we count 304 catalogues and 11422 patterns - 11422 of which are translated into English (UK/cm).
We work hard to bring you the best knitting and crochet have to offer, inspiration and advice as well as great quality yarns at incredible prices! Would you like to use our patterns for other than personal use? You can read what you are allowed to do in the Copyright text at the bottom of all our patterns. Happy crafting!
Comments / Questions (89)
Bini wrote:
Hallo Drops!\r\nWie breit ist den ein Rapport M2?\r\nDanke & liebe Grüße aus Köln\r\nBirgit
17.07.2022 - 09:04DROPS Design answered:
Liebe Bini, die Maschenprobe machen Sie im Muster M.1. M.2 passt dann auch. Wenn Sie trotzdem vorher wissen möchten, wie breit M.2 ist, nehmen Sie die mit der Maschenprobe ermittelte Nadelstärke und häkeln probeweise M.2 (am besten 3 Rapporte und dann den mittleren ausmessen). Viel Spaß beim Häkeln!
25.07.2022 - 18:08Itziar wrote:
In the M.2 you said 3 chains and in the diagrame there are 4 ó 5. Could you tell me which of them are. Thank you
25.06.2022 - 11:43DROPS Design answered:
Dear Itziar, M.2 is not explained in the text. The first row drawn is the last row before M.2, where you work 3 chain stitches between dc/sc. There are some small lines over the dc/sc, but these don't represent chain stitches; they are drawn to better adjust the pattern later on. Happy crocheting!
26.06.2022 - 13:10Dia Van Der Zaag wrote:
Erg moeilijk patroon om te begrijpen. Heb hem nu 3 x doorgelezen en snap niets van waar te beginnen, waar knopen etc moeten komen. Meer foto s zouden al behulpzaam zijn. Ik heb vaker van drops patronen gehaakt, maar van deze begrijp ik niets . Ook de instructie videos zeggen niets over het patroon zelf. Ik twijfel of ik hier aan moet beginnen ook al heb ik het garen in huis. HELP want ik vind hem wel heel mooi.
20.05.2021 - 22:15DROPS Design answered:
Dag Dia,
Je begint het patroon bij de paragraaf 'VOORPAND EN ACHTERPAND'. Daar staat aangegeven hoeveel lossen je moet haken in jouw maat. Dan haak je de eerste toer op deze lossen. Je haakt eerst vanaf de buste naar boven toe. Je haakt heen en weer van de ene naar de ander zijnaad en je haakt patroon M.1. Het 'schootje' met het ananaspatroon haak je hier later aan vast van boven naar beneden.
21.05.2021 - 14:09Malou-Cheanne wrote:
Regn ikke med de størrelser. Jeg har lige lavet en i XS og prøver den nu. AAAALT for stor. Den gaber langt ved ryggen. Spild af flere dages arbejde.
17.07.2020 - 20:10Lucienne wrote:
Mijn top is erg mooi geworden, maar wat uit het patroon niet duidelijk wordt is dat alleen de voorkant verder omhoog wordt gehaakt en alleen de schouderbandjes aan de achterkant worden vastgemaakt. Er is daar ook geen foto van waaraan je het zou kunnen zien. Daardoor vond ik het lastig om zelf te bedenken.
17.07.2019 - 17:34ELLEN LIEBERMAN wrote:
I would love to make this top, but just don't understand the instruction. What is the amount of stitches you need to start.? I looked for help in the videos, but there are only 4 which have nothing to do with this pattern. Help please!
12.11.2018 - 23:17DROPS Design answered:
Dear Mrs Lieberman, you first start in the middle of piece and work "yoke part" bottom up finishing each front piece separately. Then work the bottom edge (with pineaples) top down. You finish then with the button band on the left side and with a crocheted edge around neck and armholes. Happy crocheting!
13.11.2018 - 08:45Nayda Salgado wrote:
Good morning. I’m having problems understanding some of the instructions for pattern 128-25. It sttes that ithas 4 tutorials. However, I was not able to find those in your website. Can you advise where to find them? Thanks!
05.09.2018 - 16:50DROPS Design answered:
Hi Nayda, You click on the link to the right of the photo, where it says 'Need help?' That takes you to the 4 videos mentioned. Happy crocheting!
06.09.2018 - 07:58Liz wrote:
Merci. Grace a votre reponse j ai pu passer l étape ! Je me lance dans le m2! Merci!!
27.05.2018 - 20:33Liz wrote:
Bonjour je fais et refais, mais impossible de passer du M1 au M2 j'ai bien fini le "débardeur", puis j'ai fait 209 ms, et ensuite je suis perdue, n' y aurait il pas un diagramme pour montrer ce qu'il faut faire entre ce point de l'ouvrage et le début de M2? merci
24.05.2018 - 16:15DROPS Design answered:
Bonjour Liz, après les 209 ms, crochetez 1 rang de brides en ajustant à 220 B (= augmentez 11 brides à intervalles réguliers - voir ici). Crochetez ensuite: 1 ml, 1 ms dans la 1ère B, (3 ml, sautez 3 B, 1 ms dans la B suivante), répétez de (à) 54 fois au total, et terminez par 3 ml et 1 mc dans la 1ère ms = 55 arceaux. Crochetez ensuite 11 fois M.2 au total en largeur en commençant par le rang avec la flèche. Bon crochet!
25.05.2018 - 08:04Maria-Emma Forster wrote:
Hallo, die Erklärung der linken und rechten Seite des Vorderteils ist geschrieben worden. Wie werden diese am Rückenteil gehäkelt? Gleiche Abnahmen? Vielen Dank
27.07.2017 - 19:25DROPS Design answered:
Liebe Frau Forster, wenn die Abnahmen für die Vorteile beginnen wird das Rückenteil nicht mehr gehäkelt. Viel Spaß beim stricken!
28.07.2017 - 08:18