
Popular categories
Looking for a yarn?


|
|
Cape Cod |
|
|
|
|
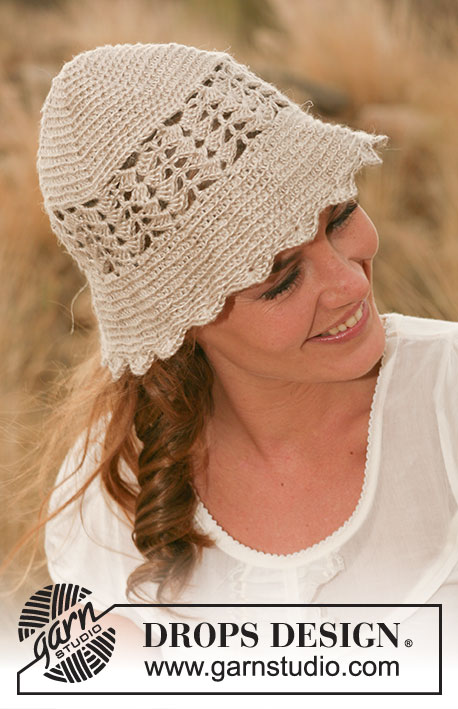
Crochet DROPS hat in "Lin".
DROPS 127-47 |
|
|
CROCHET TIP: At beg of every dc round, replace first dc with 1 ch and finish round with 1 sl st in ch from beg of round. DECREASE DC: Dec 1 dc by working 2 dc tog as follows: Work 1 dc but wait with last pull through (= 2 sts on hook), then work next dc but pull last YO through all 3 sts on hook = dec 1 dc. -------------------------------------------------------- HAT: Crochet 7 ch on hook size 3 mm and form a ring with 1 sl st in first ch. ROUND 1: 4 ch (= 1 tr + 1 ch), * 1 tr in ch-ring, 1 ch *, repeat from *-* a total of 7 times, finish with 1 sl st in 3rd ch from beg of round (= 8 tr with 1 ch between each). ROUND 2: 3 ch (= 1 tr), 1 tr in ch-loop, * 2 ch, 2 tr in next ch-loop *, repeat from *-*, finish with 2 ch and 1 sl st in 3rd ch from beg of round (= 8 tr-groups with 2 ch between each). ROUND 3: 6 ch (= 1 tr + 3 ch), * 2 tr in next ch-loop, 3 ch *, repeat from *-* a total of 7 times, finish with 1 tr in last ch-loop and 1 sl st in 3rd ch from beg of round. ROUND 4: 3 ch (= 1 tr), 1 tr in ch-loop, 1 ch, 2 tr in next ch-loop, * 1 ch, in next ch-loop work: 2 tr, 1 ch and 2 tr *, repeat from *-* a total of 7 times, finish with 1 ch and 1 sl st in 3rd ch from beg of round (= 16 tr-groups with 1 ch between each). ROUND 5: 5 ch (= 1 tr + 2 ch), * 2 tr in next ch-loop, 2 ch *, repeat from *-* a total of 15 times, finish with 1 tr in last ch-loop and 1 sl st in 3rd ch from beg of round (= 16 tr-groups with 2 ch between each). ROUND 6: 3 ch (= 1 tr), 1 tr in ch-loop, * 3 ch, 2 tr in next ch-loop *, repeat from *-* a total of 15 times, finish with 3 ch and 1 sl st in 3rd ch from beg of round (= 16 tr-groups with 3 ch between each). ROUND 7: 4 ch (= 1 tr + 1 ch) *, in next ch-loop work: 2 tr, 1 ch, 2 tr and 1 ch *, repeat from *-* a total of 15 times, finish last ch-loop with: 2 tr, 1 ch, 1 tr and 1 sl st in 3rd ch from beg of round (= 32 tr-groups with 1 ch between each). ROUND 8: 3 ch (= 1 tr), 1 tr in ch-loop, * 2 ch, 2 tr in next ch-loop *, repeat from *-* a total of 32 times, finish with 2 ch and 1 sl st in 3rd ch from beg of round (= 32 tr-groups with 2 ch between each). ROUND 9: 5 ch (= 1 tr + 2 ch), * 2 tr in next ch-loop, 2 ch *, repeat from *-*, finish with 1 tr in last ch-loop and 1 sl st in 3rd ch from beg of round (= 32 tr-groups with 2 ch between each). ROUND 10: 3 ch (= 1 tr), 1 tr in ch-loop, * 2 ch, 2 tr in next ch-loop *, repeat from *-*, finish with 2 ch and 1 sl st in 3rd ch from beg of round (= 32 tr-groups with 2 ch between each). Then work 9th and 10th round alternately upwards until piece measures approx. 16-17 cm from middle and down. Work next round as follows: 1 dc in every tr and 1 dc in every ch-loop from previous round while AT THE SAME TIME working 2 dc (instead of 1 dc) in every 4th ch-loop = 104 dc. Then work brim as follows - REMEMBER THE CROCHET TENSION and READ CROCHET TIP: ROUND 1: Work 1 dc in every dc while at the same time inc 8 dc evenly, i.e. work 2 dc in every 13th dc = 112 dc. ROUND 2: Work 1 dc in every dc while at the same time inc 4 dc evenly, i.e. work 2 dc in every 28th dc = 116 dc. ROUND 3-5: Work 1 dc in every dc while at the same time inc 4 dc evenly on every round = 128 dc. NOTE! The inc are on top of each other on every round, i.e. work 1 more dc for every round before inc 1 dc. ROUND 6-13: Work 1 dc in every dc = 128 dc. ROUND 14: Work 1 dc in every dc while at the same time inc 16 dc evenly, i.e. work 2 dc in every 8th dc = 144 dc. ROUND 15-16: Work 1 dc in every dc = 144 dc. ROUND 17: Work 1 dc in every dc while at the same time dec 4 dc evenly, i.e. work every 35th and 36th dc tog - see DECREASE DC! = 140 dc. ROUND 18-22: Work 1 dc in every dc = 140 dc. Cut and fasten the thread. |
|
|
Have you made this or any other of our designs? Tag your pictures in social media with #dropsdesign so we can see them! Do you need help with this pattern?You'll find tutorial videos, a Comments/Questions area and more by visiting the pattern on garnstudio.com. © 1982-2024 DROPS Design A/S. We reserve all rights. This document, including all its sub-sections, has copyrights. Read more about what you can do with our patterns at the bottom of each pattern on our site. |


With over 40 years in knitting and crochet design, DROPS Design offers one of the most extensive collections of free patterns on the internet - translated to 17 languages. As of today we count 304 catalogues and 11422 patterns - 11422 of which are translated into English (UK/cm).
We work hard to bring you the best knitting and crochet have to offer, inspiration and advice as well as great quality yarns at incredible prices! Would you like to use our patterns for other than personal use? You can read what you are allowed to do in the Copyright text at the bottom of all our patterns. Happy crafting!
Comments / Questions (32)
Hello, is the Drops crochet needle size 3mm/c the same size as Susan Bates crochet needle or would that be a different size? What weight is the Drop Lin?
11.04.2023 - 10:56DROPS Design answered:
Dear Lynette, the crochet hook is the size 3 mm metric system or C US system - read more about DROPS Lin in the discontinued yarn list here - use our yarn converter to see alternatives. Feel free to ask your DROPS store for US here. Happy crocheting!
11.04.2023 - 14:22Hola, puedo hacer este sobrero con Bomull Lin? al ser hilos de diferentes grupos no veo como puedo adaptar el patrón. y qué tamaño de aguja sería? Gracias!
10.04.2022 - 13:01DROPS Design answered:
Hola Kika, tienes que decidir el tamaño de aguja haciendo una muestra con Bomull-Lin y comprobando que la tensión del tejido sea igual que la establecida en la labor. De todas formas, podrías trabajar menos aumentos en el patrón de calados para adaptarte a un hilo más grueso. Nosotros no hacemos patrones personalizados, por lo que tendrías que hacer los cálculos necesarios de la cantidad de puntos y los gramos a partir de la tensión del tejido obtenida.
10.04.2022 - 19:36Wie fest soll die Mütze zu Beginn der Krempe am Kopf sitzen? Ich habe einen Kopfumfang von 60 cm, habe auch schon ein paar mehr Maschen in Runde 9 hinzugefügt und denke, ich sollte die Anzahl der festen Maschen beim Übergang zur Krempe stark erhöhen.
13.08.2018 - 23:51DROPS Design answered:
Liebe Cornelia, damit die Mütze richtig am Kopf setzt, können Sie sie ca 5 cm weniger als Kopfumfang häkeln. Probieren Sie mal die Mütze an, und wenn nötig anpassen. Viel Spaß beim häkeln!
14.08.2018 - 07:52Hallo... es ist eine tolle Anleitung. Habe nur mal eine Frage. Wie ist das gemeint mit 16 bis 17 cm ? Ist das quasi aus der Mitte gemessen ?
01.08.2018 - 06:24DROPS Design answered:
Liebe Frau Böttcher, Arbeit messen Sie von der 1. Runde bis letzte Runden, dh nicht quer sondern in der Höhe. Viel Spaß beim häkeln!
01.08.2018 - 09:05Becca wrote:
Just like to highlight I Noticed an error in the round following round 10: "work next round as follows: 1sc in every dc and 1 sc in every chain space from previous round WHILE AT SAME TIME working 2 sc (instead of 1) in every 4th ch space = 104 sc" if you sc in every 4th chain it means you end up with too many sc at the end as myself and other people have found!! It is every 8th chain a total of 4 times which brings you to the correct 104 sc the rest is correct for that row I've found!
28.08.2017 - 12:44DROPS Design answered:
Dear Becca, you are increasing in every 4th ch-space as follows: [*1 sc in next 2 dc, 1 sc around next ch-space* repeat from *-* a total of 3 times, then work 1 sc in next 2 dc, 2 sc around next ch-space], repeat from [to] = 104 sc. Happy crocheting!
29.08.2017 - 11:56For the brim, is it done in circles (is there a slip stiches at the end of each round)? Or is it done back and forward without connecting the end to the beginning? Thanks
05.06.2017 - 06:48DROPS Design answered:
Dear Darina,for the brim there is not a slip stiches at the end of each round. It is done in the round. Happy crocheting!
05.06.2017 - 10:48Bonjour, Je serais tentée de crocheter ce modèle de chapeau pour l'été ; j'aimerais juste savoir si on doit amidonner les modèles? Merci d'avance et bonne journée.
25.04.2017 - 11:15DROPS Design answered:
Bonjour Dana, les modèles présentés ne le sont pas, mais vous pouvez le faire si vous le souhaitez. Bon crochet!
25.04.2017 - 11:48I was so excited to see this new batch of lovely Drops patterns for summer hats, only to have my parade well and truly rained off when I discovered they were all crochet patterns...which I am unable to do :-( I have looked through all of your hat patterns for knitted alternatives, but no luck. Is there any chance you could perhaps develop some knitted versions of these great hats?
25.04.2017 - 10:39DROPS Design answered:
Dear Sestra, thanks for your feedback. Remember you can learn crochet with the help of our lessons and video tutorials.
25.04.2017 - 11:46Please explain starting part of round 4. Do you mean 2 DC in SAME rather than next stitch?
22.04.2017 - 20:48DROPS Design answered:
Dear Mrs Downham, There were 8 ch-space on round 3. On round 4 you will crochet in each ch-space 2 dc,1 ch, 2 dc. So that you will have a total of 16 dc-groups at the end of round 4. On round 5 and 6, you will crochet in each ch-space (2 dc, 2 ch), so that you will now keep the 16 dc-groups around. On round 7, you will inc again, working 2 dc-groups in each ch-space = 32 dc-groups. Then repeat the round 9 and 10 with 32 dc-groups on each round. Happy crocheting!
24.04.2017 - 09:23At the end of row 5 I get 17 groups not 16 as stated in pattern, do I skip the first chain space of previous row? thanks.
15.05.2016 - 05:05DROPS Design answered:
Dear Mrs Rizzo, at the end of round 5 you should have 16 groups (= 1 group in each ch-space from previous round) + the ch5 from beg of round. Happy crocheting!
17.05.2016 - 10:01