DROPS Fabel
DROPS Fabel
75% Wool, 25% Polyamide
from 2.30 £ /50g
DROPS Alpaca
DROPS Alpaca
100% Alpaca
from 3.40 £ /50g
Get the yarn to make this pattern from 17.20£.

The yarn cost is calculated from the pattern’s smallest size and the yarn’s cheapest product type. Looking for an even better price? You might find it on the DROPS Deals!

DROPS Super Sale

Mitre

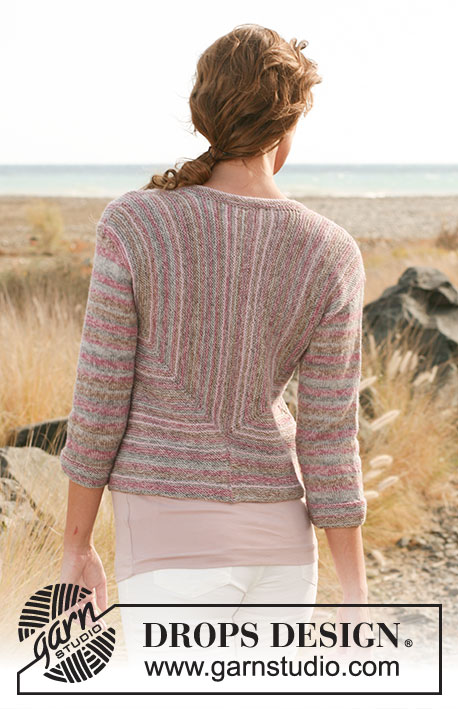
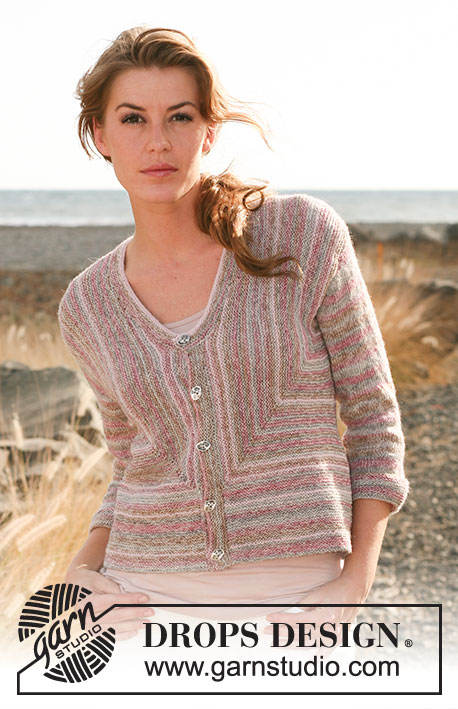
Knitted DROPS jacket in garter st and stripes in "Fabel" and "Alpaca". Size: S - XXL.

DROPS 127-12
DROPS design: Pattern no FA-135
--------------------------------------------------------
Size: S - M - L - XL - XXL

Materials: DROPS FABEL from Garnstudio
Colour no 623pl, rose mist: 300-350-350-400-450 g
And use: DROPS ALPACA from Garnstudio
Colour no 3112, powder pink: 50 g in all sizes

DROPS DOUBLE POINTED NEEDLES AND CIRCULAR NEEDLE (80 cm) SIZE 3 mm - or size needed to get 24 sts x 48 rows in garter st = 10 x 10 cm.

DROPS ANGULAR SILVER BUTTON NO 534: 5 pieces

-------------------------------------------------------

Alternative Yarn – See how to change yarns here
Yarn Groups A to F – Use the same pattern and change the yarn here
Yarn usage using an alternative yarn – Use our yarn converter here

-------------------------------------------------------

DROPS Fabel
DROPS Fabel
75% Wool, 25% Polyamide
from 2.30 £ /50g
DROPS Alpaca
DROPS Alpaca
100% Alpaca
from 3.40 £ /50g
Get the yarn to make this pattern from 17.20£.

The yarn cost is calculated from the pattern’s smallest size and the yarn’s cheapest product type. Looking for an even better price? You might find it on the DROPS Deals!

DROPS Super Sale

SAVE 30% on 6 cotton favourites!
Valid until 12.04.2024

Pattern instructions

NOTE: This pattern is written in British English. All measurements in charts are in cm. For conversion from cm to inches - click here. There are different terms for crocheting in British and American English. If this pattern includes crochet, click for "crochet terms" here. For this pattern in American English, please click here.
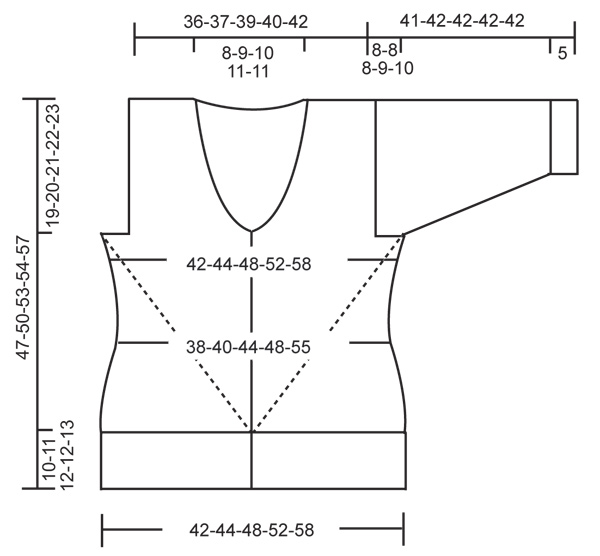
STRIPES:
On front/back piece work stripes as follows:
* 1 cm (= 4 rows) Fabel, 1 RIDGE (= 2 rows in garter st) Alpaca, 3 cm (= 14 rows) Fabel, 1 RIDGE Alpaca, 5 cm (= 24 rows) Fabel, 1 RIDGE Alpaca, 7 cm (= 34 rows) Fabel, 1 RIDGE Alpaca *, repeat from *-*.

--------------------------------------------------------

The entire back and front pieces are worked in Garter st, i.e. K all rows. Worked back and forth on circular needle to make room for all the sts.

BACK PIECE:
The back piece is worked in 2 parts that are sewn tog mid back. Beg working at the armhole.

LEFT BACK PIECE:
Cast on 54-57-61-67-76 sts on circular needle size 3 mm with Fabel. Insert a marker in the 8th-9th-11th-15th-20th st (seen from RS). Work back and forth while AT THE SAME TIME working STRIPES - see explanation above - and AT THE SAME TIME inc 1 st on each side of st with marker on every row from RS. Inc 1 st by making 1 YO, on next row knit YO twisted (i.e. work in the back loop of st instead front) to avoid holes.
When 16-18-22-24-24 rows (= approx. 3-3½-4½-5-5 cm) have been worked, continue as before (with inc) while AT THE SAME TIME dec (from RS) 1 st at beg of every 6th-6th-6th-6th-12th row a total of 5-5-5-5-3 times. Then continue back and forth (with inc) as before until 54-56-60-62-66 rows have been worked. Now inc (from WS) 1 st at the end of every 6th-6th-6th-6th-12th row a total of 5-5-5-5-3 times. AT THE SAME TIME when 68-68-70-70-74 rows have been worked, cast off the first 5 sts on needle from WS for neck. Continue working back and forth as before until there are a total of 137-142-150-158-171 sts on needle (= 51-53-57-62-69 sts before st with marker, 85-88-92-95-101 sts after st with marker). K 1 row from RS over all sts. On next row from WS, cast off the first 85-88-92-95-101 sts (= mid back) = 52-54-58-63-70 sts remain on needle (= bottom edge). Work back and forth over sts on needle for approx. 10-11-12-12-13 cm. Cast off.

RIGHT BACK PIECE:
Work as left back piece but reversed.

LEFT FRONT PIECE:
Cast on 54-57-61-67-76 sts on circular needle size 3 mm with Fabel. Insert a marker in the 47th-49th-51st-53rd-57th st (seen from RS).
Work back and forth while AT THE SAME TIME inc 1 st on each side of st with marker on every row from RS and AT THE SAME TIME working STRIPES - see explanation above. When 16-18-22-24-24 rows (= approx. 3-3½-4½-5-5 cm) have been worked, continue as before while AT THE SAME TIME dec (from WS) 1 st at beg of every 6th-6th-6th-6th-12th row a total of 5-5-5-5-3 times. Then continue back and forth (with inc) as before until 54-56-60-62-66 rows have been worked. Now inc (from RS) 1 st at the end of every 6th-6th-6th-6th-12th row a total of 5-5-5-5-3 times. AT THE SAME TIME when 68-68-70-70-74 rows have been worked, cast off the first 8 sts on needle from RS for neck. Continue to cast off 4 sts for neck at beg of every row from RS a total of 9-10-11-12-12 times. AT THE SAME TIME continue working back and forth as before until there are a total of 98-99-103-107-120 sts on needle (= 46-45-45-44-50 sts before marker, 51-53-57-62-69 sts after marker). K 1 row from RS over all sts. Now slip the first 46-45-45-44-50 sts (seen from RS) on a stitch holder = 52-54-58-63-70 sts remain on needle (= bottom edge). Work back and forth over sts on needle for approx. 10-11-12-12-13 cm. Cast off.
BAND: Slip the 46-45-45-44-50 sts from stitch holder back on needle, in addition knit up 24-26-29-29-31 sts over the 10-11-12-12-13 cm worked at the end of front piece = 70-71-74-73-81 sts. Work back and forth with Fabel for approx. 2.5 cm. Cast off from RS.

RIGHT FRONT PIECE:
Work as left front piece but reversed.
In addition when band measures approx. 1 cm, cast off for button holes as follows (from RS): Work 6-7-10-9-9 sts, cast off next st, * work 15-15-15-15-17 sts, cast off next st *, repeat from *-* a total of 3 times and work the remaining 15-15-15-15-17 sts. NOTE! Cast off the last button hole on the neckline. On next row cast on a new st where sts were cast off.

SLEEVE:
Worked back and forth on needle.
Cast on 63-65-67-69-71 sts (incl 1 edge st in each side) on needle size 3 mm with Fabel. Work in Garter st (= K all rows) back and forth for approx. 5 cm. Then work stocking st (= K from RS, P from WS) until finished measurements. AT THE SAME TIME when piece measures approx. 7-7-8-8-9 cm, inc 1 st each side, repeat every 3-2½-1½-1½-1 cm a total of 9-11-14-16-18 times = 81-87-95-101-107 sts. Continue to work until piece measures 33-34-34-33-32 cm. Now insert a marker in each side, this marks the sleeve cap (i.e. start to sew the sleeve in the armholes on body here).
Continue to work back and forth until piece measures 2½-3-4-5-7½ cm from markers. Now cast off 1-2-8-9-13 sts at beg of the next 2 rows. Continue to cast off 4 sts in each side at beg of every row until piece measures approx. 40-41-41-41-41 cm. Now cast off 1-2-8-9-13 sts at beg of the next 2 rows. Then cast off the remaining sts.

ASSEMBLY:
Sew the back piece tog mid back, edge to edge in front loop of outermost st with neat little sts. Sew the shoulder seams. Sew side seams. Sew sleeve seams (i.e. from bottom and up to markers) inside 1 edge st. Sew in sleeves.

NECK:
Knit up approx. 110 to 160 sts around the neck (also over the band in each side) on circular needle size 3 mm with Fabel from RS. Work 9 rows with Fabel back and forth over all sts. AT THE SAME TIME on the 6th row, cast off for one button hole over the other button holes on the band. Then work 2 rows with Alpaca before loosely casting off.
Sew on buttons.

Diagram

diagram measurements

Each of our patterns has specific tutorial videos to help you.

Do you have a question? See a list of frequently asked questions (FAQ)

Knitting tension is what determines the final measurements of your work, and is usually measured per 10 x 10 cm. It is provided like so: number of stitches in width x number of rows in height - eg: 19 stitches x 26 rows = 10 x 10 cm.

The knitting tension is very individual; some people knit/crochet loosely while others work tightly. You adjust the knitting tension with the needle size, which is why the suggested needle size is only meant as a guide! You need to adjust this (up or down) to ensure that YOUR knitting tension matches the knitting tension provided in the pattern. If you work with a different knitting tension than provided you will have a different yarn consumption, and your work will have different measurements than what the pattern suggests.

The knitting tension also determines which yarns can replace each other. As long as you achieve the same knitting tension you can replace one yarn with another.

See DROPS lesson: How to measure your tension/gauge

See DROPS video: How to make a gauge tension swatch

The required amount of yarn is provided in grams, eg: 450 g. To calculate how many balls you’ll need you first need to know how many grams are in 1 ball (25g, 50g or 100g). This information is available if you click on the individual yarn quality on our pages. Divide the amount required with the amount of each ball. For example, if each ball is 50g (the most common amount), the calculation will be as follows: 450 / 50 = 9 balls.

The important thing when changing from one yarn to another is that the knitting/crochet tension remains the same. This is so that the measurements of the finished piece will be the same as on the sketch provided. It is easier to achieve the same knitting tension using yarns from the same yarn group. It is also possible to work with multiple strands of a thinner yarn to achieve the knitting tension of a thicker one. Please try our yarn converter. We recommend you to always work a test swatch.

Please NOTE: when changing yarn the garment might have a different look and feel to the garment in the photo, due to individual properties and qualities of each yarn.

See DROPS lesson: Can I use a different yarn than the one mentioned in the pattern?

All our yarns are categorised into yarn groups (from A to F) according to thickness and knitting tension – group A contains the thinnest yarns and group F the thickest. This makes it easier for you to find alternative yarns to our patterns, should you wish to switch yarn. All yarns within the same group have a similar knitting tension and can easily replace each other. However, different yarn qualities have different structures and properties which will give the finished work a unique look and feel.

Click here for an overview of the yarns in each yarn group

At the top of all our patterns you’ll find a link to our yarn calculator, which is a helpful tool should you wish to use a different yarn than suggested. By filling in the yarn quality you wish to replace, the amount (in your size) and number of strands, the calculator will present good alternative yarns with the same knitting tension. Additionally it will tell you how much you’ll require in the new qualities and whether you’ll need to work with multiple strands. Most skeins are 50g (some are 25g or 100g).

If the pattern is worked with multiple colours, every colour will have to be calculated separately. Similarly, if the pattern is worked with several strands of different yarns (for example 1 strand Alpaca and 1 strand Kid-Silk) you will have to find alternatives for each, individually.

Click here to see our yarn calculator

Since different yarns have different qualities and textures we have chosen to keep the original yarn in our patterns. However, you can easily find options among our available qualities by using our yarn calculator, or simply pick a yarn from the same yarn group.

It is possible that some retailers still have discontinued yarns in stock, or that someone has a few skeins at home that they would like to find patterns for.

The yarn calculator will provide both alternative yarn as well as required amount in the new quality.

If you think it's hard to decide what size to make, it can be a good idea to measure a garment you own already and like the size of. Then you can pick the size by comparing those measures with the ones available in the pattern's size chart.

You'll find the size chart at the bottom of the pattern.

See DROPS lesson: How to read size chart

The needle size provided in the pattern serves only as a guide, the important thing is to follow the knitting tension. And since knitting tension is very individual, you will have to adjust the needle size to ensure that YOUR tension is the same as in the pattern – maybe you’ll have to adjust 1, or even 2 needle sizes, up or down to achieve the correct tension. For this, we recommend that you work test swatches.

Should you work with a different knitting tension than the one provided, the measurements of the finished garment might deviate from the measurement sketch.

See DROPS lesson: How to measure your tension/gauge

See DROPS video: How to make a tension/gauge swatch

Working a garment top-down provides more flexibility and room for personal adjustment. For example it is easier to try the garment on while working, as well as making adjustments to length of yoke and shoulder caps.

The instructions are carefully explaining every step, in the correct order. Diagrams are adjusted to the knitting direction and are worked as usual.

The diagram depicts all rows/rounds, and every stitch seen from the right side. It is read from bottom to top, from right to left. 1 square = 1 stitch.

When working back and forth, every other row is worked from the right side and every other row is worked from the wrong side. When working from the wrong side, the diagram will have to be worked reversed: from left to right, knit stitches are purled, purl stitches are knit etc.

When working in the round every round is worked from the right side and the diagram are worked from right to left on all rounds.

See DROPS lesson: How to read knitting diagrams

The diagram depicts all rows/rounds, and every stitch seen from the right side. It is worked from bottom to top, from right to left.

When working back and forth every other row is worked from the right side: from right to left and every other row is worked from the wrong side: from left to right.

When working in the round, every row in the diagram are worked from the right side, from right to left.

When working a circular diagram you start in the middle and work your way outwards, counter clockwise, row by row.

The rows usually start with a given number of chain stitches (equivalent to the height of the following stitch), this will either be depicted in the diagram or explained in the pattern.

See DROPS lesson: How to read crochet diagrams

Instructions for working several diagrams after each other on the same row/round, will often be written like so: “work A.1, A.2, A.3 a total of 0-0-2-3-4 times". This means you work A.1 once, then A.2 is worked once, and A.3 is repeated (in width) the number of times provided for your size – in this case like so: S = 0 times, M = 0 times, L=2 times, XL= 3 times and XXL = 4 times.

The diagrams are worked as usual: begin with the first row in A.1, then work the first row in A.2 etc.

See DROPS lesson: How to read knitting diagrams

See DROPS lesson: How to read crochet diagrams

The total width of the garment (from wrist-to-wrist) will be larger in the larger sizes, despite the actual sleeves being shorter. The larger sizes have longer sleeve caps and wider shoulders, so there will be a good fit in all sizes.

The measurement sketch/schematic drawing provides information regarding the full length of the garment. If it’s a jumper or a jacket the length is measured from the highest point on the shoulder closest to the neckline, and straight down to the bottom of the garment. It is NOT measured from the tip of shoulder. Similarly, the length of yoke is measured from the highest point on the shoulder and down to where yoke is split into body and sleeves.

On a jacket measures are never taken along bands, unless specifically stated. Always measure inside band stitches when measuring the length.

See DROPS lesson: How to read a schematic drawing

Diagrams are often repeated on the round or in height. 1 repeat is the diagram the way it appears in the pattern. If it says to work 5 repeats of A.1 in the round, then you work A.1 a total of 5 times after/next to each other in the round. If it says to work 2 repeats of A.1 vertically/in height you work the entire diagram once, then begin again at the start and work the entire diagram one more time.

Chain stitches are slightly narrower than other stitches and to avoid working the cast-on edge too tight, we simply chain more stitches to begin with. The stitch count will be adjusted on the following row to fit the pattern and measurement sketch.

The rib edge is more elastic and will contract slightly compared to, for example, stocking stitch. By increasing before the rib edge, you avoid a visible difference in width between the rib edge and the rest of the body.

It’s very easy to cast off too tightly, and by making yarn overs while casting off (and simultaneously casting these off) you avoid a too tight cast off edge.

See DROPS video: How to bind off with yarn overs (yo)

To achieve an even increase (or decrease) you can increase on, for example: every 3rd and 4th row alternately, like so: work 2 rows and increase on the 3rd row, work 3 rows and increase on the 4th. Repeat this until the increase is complete.

See DROPS lesson: Increase or decrease 1 st on every 3rd and 4th row alternately

Should you prefer to work in the round instead of back and forth, you may of course adjust the pattern. You’ll need to add steeks mid-front (usually 5 stitches), and follow the instructions. When you would normally turn and work from the wrong side, simply work across the steek and continue in the round. At the end you’ll cut the piece open, pick up stitches to work bands, and cover the cut edges.

See DROPS video: How to knit steeks and cut open

Should you prefer to work back and forth instead of in the round, you may of course adjust the pattern so you work the pieces separately and then assemble them at the end. Divide the stitches for the body in 2, add 1 edge stitch in each side (for sewing) and work the front and back pieces separately.

See DROPS lesson: Can I adapt a pattern for circular needles into straight needles?

Pattern repeats can vary slightly in the different sizes, in order to get the correct proportions. If you’re not working the exact same size as the garment in the photo, yours might deviate slightly. This has been carefully developed and adjusted so that the complete impression of the garment is the same in all sizes.

Make sure to follow instructions and diagrams for your size!

If you have found a pattern you like which is available in women’s size it’s not very difficult to convert it to men’s size. The biggest difference will be the length of sleeves and body. Start working on the women size that you think would fit across the chest. The additional length will be worked right before you cast off for the armhole/sleeve cap. If the pattern is worked top-down you can add the length right after the armhole or before the first decrease on sleeve.

Regarding additional yarn amount, this will depend on how much length you add, but it is better with a skein too many than too few.

All yarns will have excess fibres (from production) that might come off as lint or shedding. Brushed yarns (ie hairier yarns) have more of these loose, excess fibres, causing more shedding.

Shedding also depends on what is worn under or over the garment, and whether this pulls at the yarn fibres. It’s therefore not possible to guarantee that there will be no shedding

Below are some tips on how to get the best result when working with hairier yarns:

1. When the garment is finished (before you wash it) shake it vigorously so the looser hairs come off. NOTE: do NOT use a lint roller, brush or any method that pulls at the yarn.

2. Place the garment in a plastic bag and put it in your freezer - the temperature will cause the fibres to become less attached to each other, and excess fibres will come off easier.

3. Leave in the freezer for a few hours before taking it out and shaking it again.

4. Wash the garment according to the instructions on the yarn label.

Pilling is a natural process that happens to even the most exclusive of fibers. It's a natural sign of wear and tear that is hard to avoid, and that is most visible in high friction areas of your garment like a sweater's arms and cuffs.

You can make your garment look as new by removing the pilling, using a fabric comb or a pill/lint remover.

Still can't find the answer you need? Then scroll down and leave your question so one of our experts can try to help you. This will be done normally within 5 to 10 working days.
In the meantime, you can read the questions and answers that others have left to this pattern or join the DROPS Workshop on Facebook to get help from fellow knitters/crocheters!

You might also like...

Post a comment to pattern DROPS 127-12

We would love to hear what you have to say about this pattern!

If you want to leave a question, please make sure you select the correct category in the form below, to speed up the answering process. Required fields are marked *.

Comments / Questions (76)

country flag Catherine Renaudie wrote:

Bonjour et merci pour tous ces modèles gratuits ! Le modèle 127- 12 existe-t-il en Français ?

27.07.2023 - 11:03

DROPS Design answered:

Bonjour Catherine, bien sur, vous le trouverez ICI. Bon tricot!

27.07.2023 - 11:25

country flag Lolo Sörelius wrote:

Koftan ser så fin ut, men jag blev lite fundersam. Det står "28 m x 48 v som ska bli 10 x 10 cm med rätstickning på stickor nr 3 eller med stickor som ger den storleken. På bägge garnen Fabel och Alpacka står det att 24 m x 32 v ska ge 10 x 10 cm på nr 3 eller så ska storleken på stickorna anpassas så att det blir så . Hur stämmer det? Tacksam för svar snart för jag vill gärna komma igång!!

06.07.2021 - 18:47

DROPS Design answered:

Hej Lolo. Stickfastheten på mönstret är 24 m x 48 v i rätstickning. Stickfastheten på garnen uppges i slätstickning så det är därför det är en skillnad. Se bara till att få den stickfasthet som uppges på mönstret i rätstickning så blir det riktigt. Lycka till!

08.07.2021 - 09:01

country flag Julia Corzo wrote:

Podrian mandarme un pequeño dibujo de la pieza de la espalda ya realizada?=

26.02.2021 - 18:37

DROPS Design answered:

Hola Julia, todas las fotos del patrón disponibles están en la página del modelo.

28.02.2021 - 18:00

country flag Ida wrote:

Linker achter pand. Ik heb 68 naalden en moet 5 st afkanten. Ik heb 40 st, 1st met markeerdraad, 83 st daarna. Waar moet ik afkanten. Bij de lange stuk of de korte. Ik begrijp niet hoe het zit. Helaas kan ik hier geen foto sturen. Alvast bedankt 🙏

17.02.2021 - 10:46

DROPS Design answered:

Dag Ida,

Excuses voor het late antwoord. Het is de bedoeling dat je aan de kant van het lange stuk de 5 steken afkant. De lijn met meerderingen zit onderaan het armsgat en het lange stuk zit aan de kant van de hals.

26.05.2021 - 13:50

country flag Bente Clarlund wrote:

Ville da være rart om der stod str. på opskriften. Mit brystmål er 102 cm. Hvor mange masker skal jeg starte med at slå op. Trøjen må ikke sidde stramt

07.09.2020 - 08:54

DROPS Design answered:

Hei Bente. Ja, størrelsene til jakken står øverst i oppskriften: Størrelser: S - M - L - XL - XXL og om du da ser på målskissen og brystmål, vil du se at str XL har 52 cm (x2 = 104 cm). Om du ønsker å strikke str. XL må du følge tall nr. 4 i oppskriften. F.eks ved "VENSTRE BAKSTK: Legg opp 54-57-61-67-76 m på rundp 3 med Fabel"..... Da er det 67 masker du skal begynne med. God Fornøyelse!

07.09.2020 - 10:07

country flag Nancy Hubert wrote:

As I read them, the written instructions call for only two yarn colors, but the picture looks like at least four are used. Can you please clarify? I would like to use all the colors in the picture. It's a beautiful sweater!

18.08.2020 - 23:47

DROPS Design answered:

Dear Mrs Hubert, the color effect is due to our DROPS Fabel (click to see the shadecard). Happy knitting!

19.08.2020 - 08:12

country flag Agy wrote:

GLEICHZEITIG am Anfang jeder 6.-6.-6.-6.-12. R. (von der Vorderseite gesehen) 1 M. abn., total 5-5-5-5-3 Mal. Bitte diesen Satz nochmal erklären, habe leider nicht verstanden wie viele Maschen werden abk. Danke mfG

05.03.2020 - 08:45

DROPS Design answered:

Liebe Agy, es werden je 1 Masche 5-5-5-5-5-3 Mal in jeder 6-6-6-6-12. Reihe abgenommen, dh Sie werden insgesamt 5-5-5-5-3 Maschen abnehmen. = *Am Anfang einer Hinreihe 1 Masche abnehmen, dann 5-5-5-5-11 Reihen ohne Abnahmen stricken* , und von *-* 4-4-4-4-2 Mal wiederholen, dan am Anfang der nächsten Hinreihe noch mal abnehmen = es werden 5-5-5-5-3 Mal abgenommen. Viel Spaß beim stricken!

05.03.2020 - 10:32

country flag Nathalie Doncelle wrote:

Bonjour, je suis un peu perdue dans les explications. pour la 1/2 du dos gauche, quand on dit, tricoter de la même manière en sens inverse.Comment fait on alors? merci d'avance

27.02.2020 - 14:23

DROPS Design answered:

Bonjour Mme Doncelle, tricoter en sens inverse signifie que tout ce que vous avez fait en début de rang sur l'endroit sera fait maintenant en début de rang sur l'envers et tout ce que vous avez fait en fin de rang sur l'envers sera désormais fait en fin de rang sur l'endroit. Le marqueur sera placé dans la 8ème-20ème maille (cf taille) à partir de la fin du rang sur l'endroit (et non plus à partir du début du rang sur l'endroit). Vos deux pièces sont ainsi symétriques. Bon tricot!

27.02.2020 - 15:19

country flag Ghislaine Lamarre wrote:

Précisions pour le modele DROPS 127-12? en fin d’exécution pour les manches, il faut rabattre toutes les mailles restantes mais moi j'arrive à zéro maille Pouvez vous me dire combien je devrais en avoir .J'ai vraiment du mal à comprendre cet arrondi des manches . Merci

18.05.2019 - 22:56

DROPS Design answered:

Bonjour Mme Laure, vous rabattez 1-2-8-9-13 m au début des 2 premiers rangs, puis 4 m au début de chaque rang pendant 5-4-3-2-2 cm (soit 16-14-10-10-6 rangs environ sur la base de 32 rangs jersey = 10 cm (échantillon type)), il restera 15-27-39-43-57 m, rabattez ensuite 1-2-8-9-13 m au début des 2 rangs suivants et rabattez les mailles restantes. Bon tricot!

20.05.2019 - 13:11

country flag Ghislaine Lamarre wrote:

Bo jour Sur le modèle 127 12 les manches se font au point jersey alors que le tricot est au point mousse donc les mesures de l'échantillon sont plus petites en jersey Cela en a t'il été tenu compte dans vos explications Je ne m'y retrouve pas. Faut il prendre des aiguilles plus fines? Merci

06.05.2019 - 13:21

DROPS Design answered:

Bonjour Mme Lamarre, effectivement, les manches se tricote en jersey endroit - si votre échantillon au point mousse était juste, alors votre tension en jersey devrait être juste également, utilisez bien les aiguilles indiquées (= 3) et tricotez les manches comme indiqué. Bon tricot!

06.05.2019 - 14:51