DROPS Nepal
DROPS Nepal
65% Wool, 35% Alpaca
from 2.40 £ /50g
Get the yarn to make this pattern from 24.00£.

The yarn cost is calculated from the pattern’s smallest size and the yarn’s cheapest product type. Looking for an even better price? You might find it on the DROPS Deals!

DROPS SS24

Say it with Cables

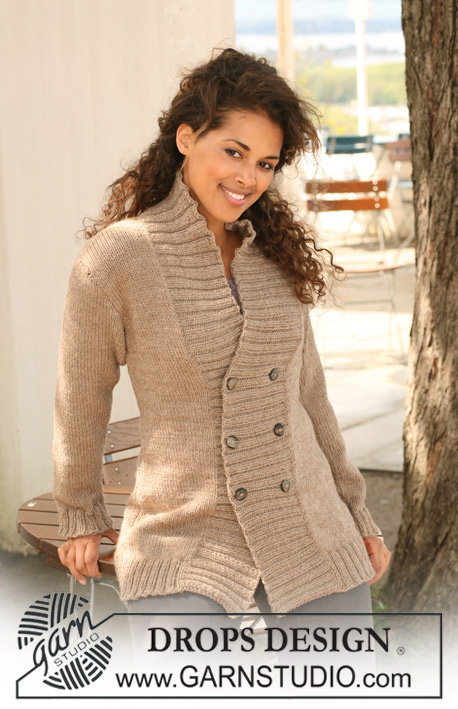
Knitted DROPS jacket with short sleeves and cables in ”Nepal”. Size S - XXXL.

DROPS 126-23
DROPS design: Pattern no NE-029
--------------------------------------------------------
Size: S - M - L - XL - XXL - XXXL
Materials: DROPS NEPAL
500-550-650-700-750-850 g colour no 4311, grey/purple

DROPS CIRCULAR NEEDLE (80 cm) size 5 mm - or size needed to get 17 sts x 22 rows in stocking st = 10 x 10 cm.
DROPS CIRCULAR NEEDLE (80 cm) size 4.5 mm - for rib.
DROPS BUFFALO HORN BUTTON, no 538:
5-5-5-6-6-6 pcs.

-------------------------------------------------------

Alternative Yarn – See how to change yarns here
Yarn Groups A to F – Use the same pattern and change the yarn here
Yarn usage using an alternative yarn – Use our yarn converter here

-------------------------------------------------------

DROPS Nepal
DROPS Nepal
65% Wool, 35% Alpaca
from 2.40 £ /50g
Get the yarn to make this pattern from 24.00£.

The yarn cost is calculated from the pattern’s smallest size and the yarn’s cheapest product type. Looking for an even better price? You might find it on the DROPS Deals!

Pattern instructions

NOTE: This pattern is written in British English. All measurements in charts are in cm. For conversion from cm to inches - click here. There are different terms for crocheting in British and American English. If this pattern includes crochet, click for "crochet terms" here. For this pattern in American English, please click here.
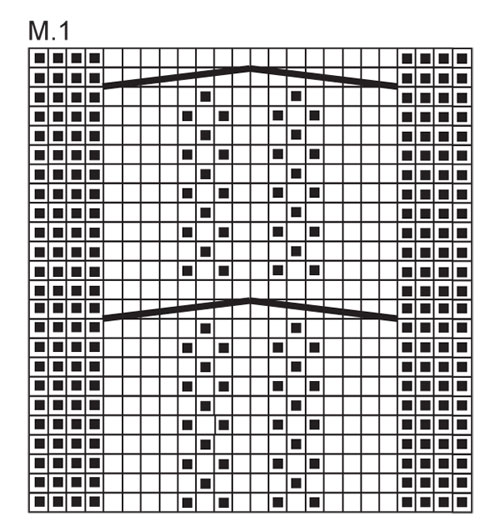
GARTER ST (back and forth on needle):
K all rows.
PATTERN:
See diagram M.1. Diagram shows the pattern from RS and row 1 in diagram = RS.
DECREASING TIP (applies to the sides on body piece):
Make all dec from RS.
Beg 2 sts before marker and K2 tog, slip 1 st as if to K, K1, psso.
KNITTING TIP:
To avoid front bands and sleeve edges becoming too tight because of the garter st, work extra rows on front band/sleeve edge only at regular intervals as follows:
* Beg from the edge and K the 9 front band sts/4 edge sts on sleeve, turn piece, slip first st as if to K, tighten thread and K return row on front band/the edge *. Continue on all sts as before. Repeat from *-* after approx every 16 rows garter st.
BUTTONHOLES:
Make buttonholes on right front band.
1 buttonhole = cast off fourth and fifth st from mid front and cast on 2 new sts on next row.
Make buttonholes when piece measures:
SIZE S: 11, 19, 27, 35 and 43 cm
SIZE M: 9, 18, 27, 36 and 45 cm
SIZE L: 11, 20, 29, 38 and 47 cm
SIZE XL: 12, 19, 26, 33, 40 and 47 cm
SIZE XXL: 9, 17, 25, 33, 41 and 49 cm
SIZE XXXL: 11, 19, 27, 35, 43 and 51 cm
--------------------------------------------------------

BODY PIECE:
Worked back and forth on circular needle from mid front – See KNITTING TIP.
Cast on 222-238-262-286-318-334 sts (includes 9 front band sts each side towards front edge) on circular needle size 4.5 mm with Nepal. P 1 row from WS and continue in rib as follows from RS: 9 front band sts in GARTER ST - see above, P4, K4, P3, K2, P3, * K4, P4 *, repeat from *-* until 29 sts remain, K4, P3, K2, P3, K4, P4 and 9 front band sts in GARTER ST towards front edge. Continue in rib like this. When piece measures 5 cm P 1 row from WS (9 front band sts each side towards front edge in garter st until finished measurements) - AT THE SAME TIME dec 46-50-58-66-78-74 sts evenly – NOTE: Do not dec on the 33 sts each side towards front edge = 176-188-204-220-240-260 sts. Now insert 2 markers in piece 50-53-57-61-66-71 sts in from each side = 76-82-90-98-108-118 sts between markers on back piece.
Change to needle size 5 mm and work next row as follows from RS: 9 front band sts as before, M.1 (= 24 sts), stocking st until 33 sts remain, M.1 (= 24 sts) and finish with 9 front band sts as before. Continue in pattern like this. When piece measures 8-8-8-9-9-10 cm dec 1 st each side of both markers (= 4 dec sts) – See DECREASING TIP. Repeat the dec on every 8-8-8-9-9-10 cm a total of 3 times = 164-176-192-208-228-248 sts. REMEMBER BUTTONHOLES ON RIGHT FRONT BAND - see above. When piece measures 27-28-29-30-31-32 cm divide it by markers and complete front and back pieces separately.

BACK PIECE:
= 70-76-84-92-102-112 sts. Now cast on 30 new sts at the end of the next 2 rows for sleeves = 130-136-144-152-162-172 sts. Continue in stocking st but work the 4 sts each side (sleeve edges) in garter st – REMEMBER KNITTING TIP. When piece measures 49-51-53-55-57-59 cm slip sts at the beg of every row each side on a stitch holder for shaped shoulders as follows: 11-12-13-14-15-16 sts a total of 3 times (work sts before slipping them on stitch holder to avoid having to cut the thread) and then the remaining 22-22-23-23-25-27 sts – NOTE: when slipping sts on stitch holder, slip the first st on next row and tighten thread before continuing to avoid holes in transition. AT THE SAME TIME when piece measures 50-52-54-56-58-60 cm cast off the middle 18-18-18-20-20-20 sts for neck and complete each shoulder separately. Cast off 1 st on neckline on next row. When all sts have been slipped on stitch holder and neck dec are complete piece measures approx 52-54-56-58-60-62 cm from bottom edge to shoulder.

RIGHT FRONT PIECE:
= 47-50-54-58-63-68 sts. Now cast on 30 new sts at the end of row towards the side for sleeve = 77-80-84-88-93-98 sts. Continue in stocking st and pattern as before but work the 4 sts on sleeve edge in garter st. When 1 row remain before piece measures 44-46-48-48-50-52 cm (approx 1 cm after the last buttonhole and next row is from WS) dec 8 sts evenly over cable in M.1. On next row from RS slip the 9 sts towards mid front on a stitch holder for neck (work sts before slipping them on stitch holder to avoid having to cut the thread). Cast off to shape the neckline at the beg of every row from mid front: 2 sts 1-1-1-2-2-2 times and 1 st 3-3-3-2-2-2 times. AT THE SAME TIME when piece measures 49-51-53-55-57-59 cm slip sts at beg of row from the side on a stitch holder for shaped shoulder as described for back piece. After all sts have been slipped on stitch holder and dec for neck are complete piece measures approx 52-54-56-58-60-62 cm from bottom edge to shoulder.

LEFT FRONT PIECE:
Like right front piece, but mirrored. NOTE: Do not make buttonholes!

ASSEMBLY:
Slip the 55-58-62-65-70-75 sts from stitch holder on one shoulder on circular needle size 5 mm and work back and forth as follows: K 1 row from RS – NOTE: To avoid a hole in transition pick up 1 st between the 2 sts in transitions and K this tog with first st on left needle. Cast off loosely on next row with K sts from WS. Repeat in the same way along the 3 other shoulder pieces.
Sew shoulder seams inside cast off row – make sure seam isn’t too tight. Sew under arm seams inside cast on row.
Sew buttons on left front piece.

COLLAR:
Pick up from RS approx 74 to 84 sts round neck (include sts from stitch holders at front) on circular needle size 4.5 mm with Nepal. K 1 row from WS, and K 1 row from RS, AT THE SAME TIME inc evenly to 94-102-102-110-118-118 sts (do not inc on front bands). Work rib as follows from WS: 9 front band sts in garter st, * P4, K4 *, repeat from *-* until 13 sts remain and finish with P4 and 9 front band sts in garter st. When collar measures 3 cm inc all K4 to K5 (as seen from RS). When collar measures 7 cm inc all P4 to P5 (as seen from RS). When collar measures 11 cm inc all K5 to K6. Cast off with K over K and P over P when collar measures approx 13-13-14-14-15-15 cm.

Diagram

symbols = K from RS, P from WS
symbols = P from RS, K from WS
symbols = slip 4 sts on cable needle in front of piece, K4, K4 from cable needle
symbols = slip 4 sts on cable needle behind piece, K4, K4 from cable needle
diagram
diagram

Each of our patterns has specific tutorial videos to help you.

Do you have a question? See a list of frequently asked questions (FAQ)

Knitting tension is what determines the final measurements of your work, and is usually measured per 10 x 10 cm. It is provided like so: number of stitches in width x number of rows in height - eg: 19 stitches x 26 rows = 10 x 10 cm.

The knitting tension is very individual; some people knit/crochet loosely while others work tightly. You adjust the knitting tension with the needle size, which is why the suggested needle size is only meant as a guide! You need to adjust this (up or down) to ensure that YOUR knitting tension matches the knitting tension provided in the pattern. If you work with a different knitting tension than provided you will have a different yarn consumption, and your work will have different measurements than what the pattern suggests.

The knitting tension also determines which yarns can replace each other. As long as you achieve the same knitting tension you can replace one yarn with another.

See DROPS lesson: How to measure your tension/gauge

See DROPS video: How to make a gauge tension swatch

The required amount of yarn is provided in grams, eg: 450 g. To calculate how many balls you’ll need you first need to know how many grams are in 1 ball (25g, 50g or 100g). This information is available if you click on the individual yarn quality on our pages. Divide the amount required with the amount of each ball. For example, if each ball is 50g (the most common amount), the calculation will be as follows: 450 / 50 = 9 balls.

The important thing when changing from one yarn to another is that the knitting/crochet tension remains the same. This is so that the measurements of the finished piece will be the same as on the sketch provided. It is easier to achieve the same knitting tension using yarns from the same yarn group. It is also possible to work with multiple strands of a thinner yarn to achieve the knitting tension of a thicker one. Please try our yarn converter. We recommend you to always work a test swatch.

Please NOTE: when changing yarn the garment might have a different look and feel to the garment in the photo, due to individual properties and qualities of each yarn.

See DROPS lesson: Can I use a different yarn than the one mentioned in the pattern?

All our yarns are categorised into yarn groups (from A to F) according to thickness and knitting tension – group A contains the thinnest yarns and group F the thickest. This makes it easier for you to find alternative yarns to our patterns, should you wish to switch yarn. All yarns within the same group have a similar knitting tension and can easily replace each other. However, different yarn qualities have different structures and properties which will give the finished work a unique look and feel.

Click here for an overview of the yarns in each yarn group

At the top of all our patterns you’ll find a link to our yarn calculator, which is a helpful tool should you wish to use a different yarn than suggested. By filling in the yarn quality you wish to replace, the amount (in your size) and number of strands, the calculator will present good alternative yarns with the same knitting tension. Additionally it will tell you how much you’ll require in the new qualities and whether you’ll need to work with multiple strands. Most skeins are 50g (some are 25g or 100g).

If the pattern is worked with multiple colours, every colour will have to be calculated separately. Similarly, if the pattern is worked with several strands of different yarns (for example 1 strand Alpaca and 1 strand Kid-Silk) you will have to find alternatives for each, individually.

Click here to see our yarn calculator

Since different yarns have different qualities and textures we have chosen to keep the original yarn in our patterns. However, you can easily find options among our available qualities by using our yarn calculator, or simply pick a yarn from the same yarn group.

It is possible that some retailers still have discontinued yarns in stock, or that someone has a few skeins at home that they would like to find patterns for.

The yarn calculator will provide both alternative yarn as well as required amount in the new quality.

If you think it's hard to decide what size to make, it can be a good idea to measure a garment you own already and like the size of. Then you can pick the size by comparing those measures with the ones available in the pattern's size chart.

You'll find the size chart at the bottom of the pattern.

See DROPS lesson: How to read size chart

The needle size provided in the pattern serves only as a guide, the important thing is to follow the knitting tension. And since knitting tension is very individual, you will have to adjust the needle size to ensure that YOUR tension is the same as in the pattern – maybe you’ll have to adjust 1, or even 2 needle sizes, up or down to achieve the correct tension. For this, we recommend that you work test swatches.

Should you work with a different knitting tension than the one provided, the measurements of the finished garment might deviate from the measurement sketch.

See DROPS lesson: How to measure your tension/gauge

See DROPS video: How to make a tension/gauge swatch

Working a garment top-down provides more flexibility and room for personal adjustment. For example it is easier to try the garment on while working, as well as making adjustments to length of yoke and shoulder caps.

The instructions are carefully explaining every step, in the correct order. Diagrams are adjusted to the knitting direction and are worked as usual.

The diagram depicts all rows/rounds, and every stitch seen from the right side. It is read from bottom to top, from right to left. 1 square = 1 stitch.

When working back and forth, every other row is worked from the right side and every other row is worked from the wrong side. When working from the wrong side, the diagram will have to be worked reversed: from left to right, knit stitches are purled, purl stitches are knit etc.

When working in the round every round is worked from the right side and the diagram are worked from right to left on all rounds.

See DROPS lesson: How to read knitting diagrams

The diagram depicts all rows/rounds, and every stitch seen from the right side. It is worked from bottom to top, from right to left.

When working back and forth every other row is worked from the right side: from right to left and every other row is worked from the wrong side: from left to right.

When working in the round, every row in the diagram are worked from the right side, from right to left.

When working a circular diagram you start in the middle and work your way outwards, counter clockwise, row by row.

The rows usually start with a given number of chain stitches (equivalent to the height of the following stitch), this will either be depicted in the diagram or explained in the pattern.

See DROPS lesson: How to read crochet diagrams

Instructions for working several diagrams after each other on the same row/round, will often be written like so: “work A.1, A.2, A.3 a total of 0-0-2-3-4 times". This means you work A.1 once, then A.2 is worked once, and A.3 is repeated (in width) the number of times provided for your size – in this case like so: S = 0 times, M = 0 times, L=2 times, XL= 3 times and XXL = 4 times.

The diagrams are worked as usual: begin with the first row in A.1, then work the first row in A.2 etc.

See DROPS lesson: How to read knitting diagrams

See DROPS lesson: How to read crochet diagrams

The total width of the garment (from wrist-to-wrist) will be larger in the larger sizes, despite the actual sleeves being shorter. The larger sizes have longer sleeve caps and wider shoulders, so there will be a good fit in all sizes.

The measurement sketch/schematic drawing provides information regarding the full length of the garment. If it’s a jumper or a jacket the length is measured from the highest point on the shoulder closest to the neckline, and straight down to the bottom of the garment. It is NOT measured from the tip of shoulder. Similarly, the length of yoke is measured from the highest point on the shoulder and down to where yoke is split into body and sleeves.

On a jacket measures are never taken along bands, unless specifically stated. Always measure inside band stitches when measuring the length.

See DROPS lesson: How to read a schematic drawing

Diagrams are often repeated on the round or in height. 1 repeat is the diagram the way it appears in the pattern. If it says to work 5 repeats of A.1 in the round, then you work A.1 a total of 5 times after/next to each other in the round. If it says to work 2 repeats of A.1 vertically/in height you work the entire diagram once, then begin again at the start and work the entire diagram one more time.

Chain stitches are slightly narrower than other stitches and to avoid working the cast-on edge too tight, we simply chain more stitches to begin with. The stitch count will be adjusted on the following row to fit the pattern and measurement sketch.

The rib edge is more elastic and will contract slightly compared to, for example, stocking stitch. By increasing before the rib edge, you avoid a visible difference in width between the rib edge and the rest of the body.

It’s very easy to cast off too tightly, and by making yarn overs while casting off (and simultaneously casting these off) you avoid a too tight cast off edge.

See DROPS video: How to bind off with yarn overs (yo)

To achieve an even increase (or decrease) you can increase on, for example: every 3rd and 4th row alternately, like so: work 2 rows and increase on the 3rd row, work 3 rows and increase on the 4th. Repeat this until the increase is complete.

See DROPS lesson: Increase or decrease 1 st on every 3rd and 4th row alternately

Should you prefer to work in the round instead of back and forth, you may of course adjust the pattern. You’ll need to add steeks mid-front (usually 5 stitches), and follow the instructions. When you would normally turn and work from the wrong side, simply work across the steek and continue in the round. At the end you’ll cut the piece open, pick up stitches to work bands, and cover the cut edges.

See DROPS video: How to knit steeks and cut open

Should you prefer to work back and forth instead of in the round, you may of course adjust the pattern so you work the pieces separately and then assemble them at the end. Divide the stitches for the body in 2, add 1 edge stitch in each side (for sewing) and work the front and back pieces separately.

See DROPS lesson: Can I adapt a pattern for circular needles into straight needles?

Pattern repeats can vary slightly in the different sizes, in order to get the correct proportions. If you’re not working the exact same size as the garment in the photo, yours might deviate slightly. This has been carefully developed and adjusted so that the complete impression of the garment is the same in all sizes.

Make sure to follow instructions and diagrams for your size!

If you have found a pattern you like which is available in women’s size it’s not very difficult to convert it to men’s size. The biggest difference will be the length of sleeves and body. Start working on the women size that you think would fit across the chest. The additional length will be worked right before you cast off for the armhole/sleeve cap. If the pattern is worked top-down you can add the length right after the armhole or before the first decrease on sleeve.

Regarding additional yarn amount, this will depend on how much length you add, but it is better with a skein too many than too few.

All yarns will have excess fibres (from production) that might come off as lint or shedding. Brushed yarns (ie hairier yarns) have more of these loose, excess fibres, causing more shedding.

Shedding also depends on what is worn under or over the garment, and whether this pulls at the yarn fibres. It’s therefore not possible to guarantee that there will be no shedding

Below are some tips on how to get the best result when working with hairier yarns:

1. When the garment is finished (before you wash it) shake it vigorously so the looser hairs come off. NOTE: do NOT use a lint roller, brush or any method that pulls at the yarn.

2. Place the garment in a plastic bag and put it in your freezer - the temperature will cause the fibres to become less attached to each other, and excess fibres will come off easier.

3. Leave in the freezer for a few hours before taking it out and shaking it again.

4. Wash the garment according to the instructions on the yarn label.

Pilling is a natural process that happens to even the most exclusive of fibers. It's a natural sign of wear and tear that is hard to avoid, and that is most visible in high friction areas of your garment like a sweater's arms and cuffs.

You can make your garment look as new by removing the pilling, using a fabric comb or a pill/lint remover.

Still can't find the answer you need? Then scroll down and leave your question so one of our experts can try to help you. This will be done normally within 5 to 10 working days.
In the meantime, you can read the questions and answers that others have left to this pattern or join the DROPS Workshop on Facebook to get help from fellow knitters/crocheters!

You might also like...

Post a comment to pattern DROPS 126-23

We would love to hear what you have to say about this pattern!

If you want to leave a question, please make sure you select the correct category in the form below, to speed up the answering process. Required fields are marked *.

Comments / Questions (11)

country flag Adrienn wrote:

Hi. Can help me understand the collar instructions please. When after 3 cm the K4 needs to change to K5, does the P4 stays P4 or does the P4 reduces to P3 (due to loosing one P to the K5)? If I keep the P4 with the K5 then the stripy pattern of the collar will totally disappear. So I assume I should just do P3. Can you help please. Thank you

03.01.2023 - 19:31

DROPS Design answered:

Dear Adrienn, you are increasing the number of stitches on collar, this means when you increase K4 to K5 you will continue working rib (K5, P4), and then after 7 cm you will increase the P-sts into P5 and continue in rib (K5,P5). After 11 cm you will increase K5 to K6 and continue in rib (K6, P5). Happy knitting!

04.01.2023 - 09:01

country flag Pirjo wrote:

Uups... I was too hurry in my previous comment. At the hips, the width in S size is 90 cm. Anyway, I use different yarn so I have done my own calculations for my purpose. Thank you Drops design for your response.

02.01.2015 - 20:07

country flag Pirjo wrote:

I'm just wondering if the instructions are really correct... 17 sts x 22 rows for 10 x 10 cm means that there are 1,7 sts per one cm. Size S is 82 cm and 1,7 sts x 82 = 139 sts, but the instructions says cast on 222 sts, which is 130,5 cm. Do I mess up something here or whether there is serious error in the instructions?

02.01.2015 - 14:30

DROPS Design answered:

Dear Pirjo, tension is given here in st st, but you work here some cables, they will make the piece smaller in width - do not forget too that you cast on 222 sts and work in ribbing, but then dec evenly to 176 sts before working in pattern. Happy knitting!

02.01.2015 - 17:02

Drops Design wrote:

Unfortunately we are not able to answer all individual questions and give pattern support, so if you need help with this pattern we kindly ask you to contact the shop that sold you your yarn, or look for help in one the forums.

31.01.2012 - 18:28

Claudia wrote:

I dont understand the pattern al all it is very confusing and the diagram too i have been knitting for many years and i have never came across with such dificul pattern to understand please can you send me a more simple instruccions i can not get the cable stich right please i am desparete thanks Claudia

31.01.2012 - 11:46

country flag Anette wrote:

Har precis avslutat den här, fast i en beige färg. Otroligt rolig att göra och trevlig modell. Känns modern nu i höst!!

17.09.2010 - 07:15

country flag Kari wrote:

JEG liker den :)

08.07.2010 - 23:39

Barbara wrote:

Love it!

26.06.2010 - 04:35

Ana Alice wrote:

AMEI PODERIAM TRADUZI-LO PARA O PORTUGUES?OBRIGADO

23.06.2010 - 23:34

country flag Jelena wrote:

Ytterligere en GRUSOM kreasjon! Vi må tenk litt på hvordan folk skal se ut. Hadde denne vart 20 - 30 cm lengre kunde den vare fin men... som den ser ut nå! Huff og huff

14.06.2010 - 18:27