DROPS Karisma
DROPS Karisma
100% Wool
from 2.30 £ /50g
Get the yarn to make this pattern from 25.30£.

The yarn cost is calculated from the pattern’s smallest size and the yarn’s cheapest product type. Looking for an even better price? You might find it on the DROPS Deals!

DROPS SS24

Ice Storm

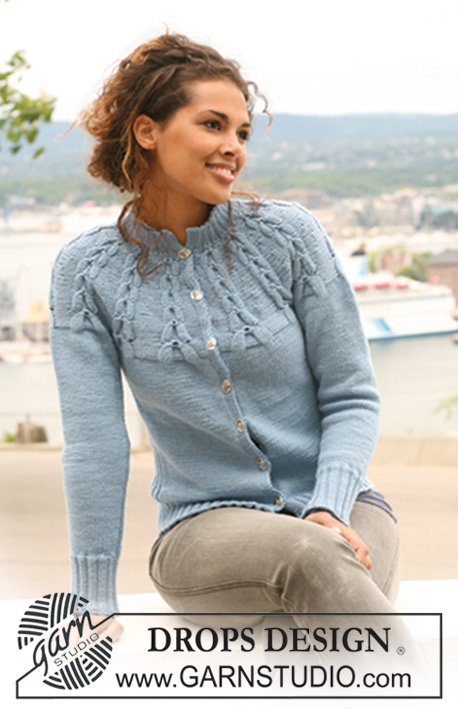
Knitted DROPS jumper with circular yoke and cables in ”Karisma”. Size S - XXXL.

DROPS 121-28
DROPS design: Pattern no U-608
--------------------------------------------------------
Size: S - M - L - XL - XXL - XXXL
Materials: DROPS KARISMA SUPERWASH from Garnstudio
550-600-650-750-800-900 g colour no 30, light denim blue

DROPS DOUBLE POINTED NEEDLES and CIRCULAR NEEDLE (40 + 80 cm) size 4 mm - or size needed to get 21 sts x 28 rows in stocking st = 10 x 10 cm.
DROPS DOUBLE POINTED NEEDLES and CIRCULAR NEEDLE (80 cm) size 3.5 mm - for rib.

-------------------------------------------------------

Alternative Yarn – See how to change yarns here
Yarn Groups A to F – Use the same pattern and change the yarn here
Yarn usage using an alternative yarn – Use our yarn converter here

-------------------------------------------------------

DROPS Karisma
DROPS Karisma
100% Wool
from 2.30 £ /50g
Get the yarn to make this pattern from 25.30£.

The yarn cost is calculated from the pattern’s smallest size and the yarn’s cheapest product type. Looking for an even better price? You might find it on the DROPS Deals!

Pattern instructions

NOTE: This pattern is written in British English. All measurements in charts are in cm. For conversion from cm to inches - click here. There are different terms for crocheting in British and American English. If this pattern includes crochet, click for "crochet terms" here. For this pattern in American English, please click here.
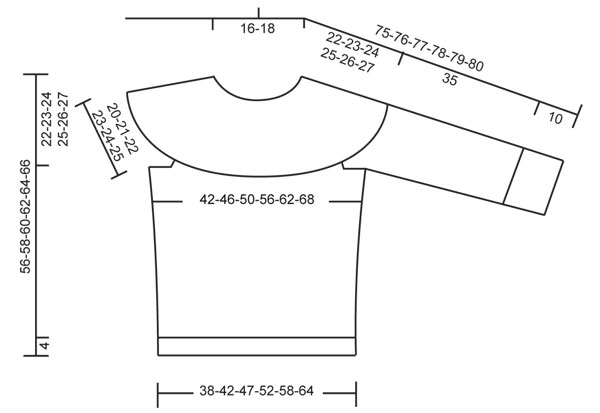
GARTER ST (in the round): K 1 round, P 1 round.
INCREASING TIP:
Inc each side of rib-section each side on body piece and mid under sleeve. Inc 1 st by picking up st from previous row and K this st.
PATTERN:
See diagram M.1 – see diagram for your size. Diagram shows the pattern from RS.
--------------------------------------------------------

JUMPER:
Worked in the round.

BODY PIECE:
Cast on 200-216-248-272-304-336 sts on circular needle size 3.5 mm with Karisma. K 1 round and continue in rib as follows: K1, * P2, K2 *, repeat from *-* until 3 sts remain, finish with P2 and K1. Continue in rib like this until piece measures 4 cm. Now insert 1 marker at beg of round and 1 marker after 100-108-124-136-152-168 sts (both markers sit between 2 K sts). Change to circular needle size 4 mm and work stocking st but continue with the 14 middle sts each side (i.e. 7 sts each side of marker) in rib (= P2, K2, P2, K2, P2, K2 and P2). AT THE SAME TIME on first round in stocking st dec 40-40-52-52-60-68 sts evenly (i.e. 20-20-26-26-30-34 sts on front piece and 20-20-26-26-30-34 sts on back piece – NOTE: Do not dec on the 14 rib sts each side) = 160-176-196-220-244-268 sts. REMEMBER THE KNITTING TENSION!
When piece measures 8 cm inc 1 st each side of the 14 rib sts each side – See INCREASING TIP! Repeat the inc on every 7 cm a total of 4 times = 176-192-212-236-260-284 sts. When piece measures 34-35-36-37-38-39 cm cast off the 14 rib sts each side (i.e. 7 sts each side of marker) =
74-82-92-104-116-128 sts left on front and back piece. Put piece aside and knit the sleeves.

SLEEVE:
Cast on 56-56-60-60-64-64 sts on double pointed needles size 3.5 mm with Karisma. K 1 round and continue in rib, K2/ P2. When rib measures 10 cm change to double pointed needles size 4 mm. Work next round as follows: K2, P2, K2, P2, then work stocking st until 6 sts remain on round, AT THE SAME TIME dec 6-4-6-6-8-8 sts evenly on these stocking sts, finish with P2, K2 and P2 = 50-52-54-54-56-56 sts. Continue like this in stocking st and 14 rib sts mid under sleeve. When piece measures 13-12-11-12-11-14 cm inc 2 sts mid under sleeve (i.e. 1 st each side of the rib section) - See INCREASING TIP – work inc sts in stocking st. Repeat the inc on every 2.5-2.5-2.5-2-2-1.5 cm a total of 12-13-14-16-17-19 times = 74-78-82-86-90-94 sts. When piece measures 45 cm for all sizes cast off the 14 rib sts mid under sleeve = 60-64-68-72-76-80 sts. Put piece aside and knit the other sleeve.

YOKE:
Slip sleeves on the same circular needle as body piece where cast off for armhole = 268-292-320-352-384-416 sts. Beg round mid back and work 1 round stocking st, AT THE SAME TIME dec 4-6-12-0-10-20 sts evenly = 264-286-308-352-374-396 sts. Now continue and dec acc to M.1 – NOTE: see diagram for your size (= a total of 12-13-14-16-17-18 repeats across the round). After M.1 (finish pattern by arrow for your size) there are 84-91-98-112-119-126 sts left on needle.

ELEVATION MID BACK:
Insert a marker mid front – i.e. in Size S + L + XL + XXXL marker sits mid between 2 repeats of M.1 and in Size M + XXL marker sits mid between the 2 K sts in a repeat of M.1. Now work elevation mid back, back and forth on needle as follows: Beg from RS mid back and work K over K and P over P until 19-22-19-19-22-19 sts remain before marker mid front (i.e. stop just before 2 K sts as seen from RS), turn piece, slip first st, tighten thread and work row until 18-22-18-18-22-18 sts remain before marker mid front the other side (i.e. stop just before 2 P sts as seen from WS). Turn piece, slip first st, tighten thread and work row until 26-29-26-33-36-33 sts remain before marker (i.e. stop just before 2 K sts as seen from RS), turn piece, slip first st, tighten thread and work row until 25-29-25-32-36-32 sts remain before marker the other side (i.e. stop just before 2 P sts as seen from WS). Turn piece, slip first st, tighten thread and work row until 33-36-33-47-50-47 sts remain before marker (stop just before K2), turn piece, slip first st, tighten thread and work row until 32-36-32-46-50-46 sts remain before marker the other side (stop just before P2). Turn piece, slip first st, tighten thread and work row until 40-43-40-54-57-54 sts remain before marker (stop just before K2), turn piece, slip first st, tighten thread and work row until 39-43-39-53-57-53 sts remain before marker the other side (stop just before P2), turn piece, slip first st, tighten thread and work row to mid back.

NECKLINE:
Change to double pointed needles size 3.5 mm. Beg from RS mid back and P 1 round on all sts. Now K 1 round, AT THE SAME TIME inc 12-11-10-5-4-3 sts evenly = 96-102-108-117-123-129 sts. Continue in rib, K2/ P1 until neckline measures 4-5 cm. Cast off with K over K and P over P.

ASSEMBLY:
Sew openings under sleeves.

This pattern has been corrected.

Updated online: 17.12.2011
5th chart symbol has been corrected to: keep the yarn behind piece, slip 2 sts as if to K

Diagram

symbols = K
symbols = P
symbols = P1, 1 YO, on next round P YO into back of loop
symbols = P2 tog
symbols = keep the yarn behind piece, slip 2 sts as if to K
symbols = keep the yarn behind piece, slip 3 sts as if to K
symbols = keep the yarn behind piece, slip 4 sts as if to K
symbols = slip 2 sts on cable needle in front of piece, P2, 1 YO, K2 tog into back of loop from cable needle
symbols = slip 2 sts on cable needle behind piece, K2 tog, 1 YO, P2 from cable needle
symbols = slip 3 sts on cable needle in front of piece, P2, 1 YO, K3 tog into back of loop from cable needle
symbols = slip 2 sts on cable needle behind piece, K3 tog, 1 YO, P2 from cable needle
symbols = slip 4 sts on cable needle in front of piece, 1 YO, P3, 1 YO, K4 tog into back of loop from cable needle
symbols = slip 3 sts on cable needle behind piece, K4 tog, 1 YO, P3 from cable needle, 1 YO
diagram
diagram

Each of our patterns has specific tutorial videos to help you.

Do you have a question? See a list of frequently asked questions (FAQ)

Knitting tension is what determines the final measurements of your work, and is usually measured per 10 x 10 cm. It is provided like so: number of stitches in width x number of rows in height - eg: 19 stitches x 26 rows = 10 x 10 cm.

The knitting tension is very individual; some people knit/crochet loosely while others work tightly. You adjust the knitting tension with the needle size, which is why the suggested needle size is only meant as a guide! You need to adjust this (up or down) to ensure that YOUR knitting tension matches the knitting tension provided in the pattern. If you work with a different knitting tension than provided you will have a different yarn consumption, and your work will have different measurements than what the pattern suggests.

The knitting tension also determines which yarns can replace each other. As long as you achieve the same knitting tension you can replace one yarn with another.

See DROPS lesson: How to measure your tension/gauge

See DROPS video: How to make a gauge tension swatch

The required amount of yarn is provided in grams, eg: 450 g. To calculate how many balls you’ll need you first need to know how many grams are in 1 ball (25g, 50g or 100g). This information is available if you click on the individual yarn quality on our pages. Divide the amount required with the amount of each ball. For example, if each ball is 50g (the most common amount), the calculation will be as follows: 450 / 50 = 9 balls.

The important thing when changing from one yarn to another is that the knitting/crochet tension remains the same. This is so that the measurements of the finished piece will be the same as on the sketch provided. It is easier to achieve the same knitting tension using yarns from the same yarn group. It is also possible to work with multiple strands of a thinner yarn to achieve the knitting tension of a thicker one. Please try our yarn converter. We recommend you to always work a test swatch.

Please NOTE: when changing yarn the garment might have a different look and feel to the garment in the photo, due to individual properties and qualities of each yarn.

See DROPS lesson: Can I use a different yarn than the one mentioned in the pattern?

All our yarns are categorised into yarn groups (from A to F) according to thickness and knitting tension – group A contains the thinnest yarns and group F the thickest. This makes it easier for you to find alternative yarns to our patterns, should you wish to switch yarn. All yarns within the same group have a similar knitting tension and can easily replace each other. However, different yarn qualities have different structures and properties which will give the finished work a unique look and feel.

Click here for an overview of the yarns in each yarn group

At the top of all our patterns you’ll find a link to our yarn calculator, which is a helpful tool should you wish to use a different yarn than suggested. By filling in the yarn quality you wish to replace, the amount (in your size) and number of strands, the calculator will present good alternative yarns with the same knitting tension. Additionally it will tell you how much you’ll require in the new qualities and whether you’ll need to work with multiple strands. Most skeins are 50g (some are 25g or 100g).

If the pattern is worked with multiple colours, every colour will have to be calculated separately. Similarly, if the pattern is worked with several strands of different yarns (for example 1 strand Alpaca and 1 strand Kid-Silk) you will have to find alternatives for each, individually.

Click here to see our yarn calculator

Since different yarns have different qualities and textures we have chosen to keep the original yarn in our patterns. However, you can easily find options among our available qualities by using our yarn calculator, or simply pick a yarn from the same yarn group.

It is possible that some retailers still have discontinued yarns in stock, or that someone has a few skeins at home that they would like to find patterns for.

The yarn calculator will provide both alternative yarn as well as required amount in the new quality.

If you think it's hard to decide what size to make, it can be a good idea to measure a garment you own already and like the size of. Then you can pick the size by comparing those measures with the ones available in the pattern's size chart.

You'll find the size chart at the bottom of the pattern.

See DROPS lesson: How to read size chart

The needle size provided in the pattern serves only as a guide, the important thing is to follow the knitting tension. And since knitting tension is very individual, you will have to adjust the needle size to ensure that YOUR tension is the same as in the pattern – maybe you’ll have to adjust 1, or even 2 needle sizes, up or down to achieve the correct tension. For this, we recommend that you work test swatches.

Should you work with a different knitting tension than the one provided, the measurements of the finished garment might deviate from the measurement sketch.

See DROPS lesson: How to measure your tension/gauge

See DROPS video: How to make a tension/gauge swatch

Working a garment top-down provides more flexibility and room for personal adjustment. For example it is easier to try the garment on while working, as well as making adjustments to length of yoke and shoulder caps.

The instructions are carefully explaining every step, in the correct order. Diagrams are adjusted to the knitting direction and are worked as usual.

The diagram depicts all rows/rounds, and every stitch seen from the right side. It is read from bottom to top, from right to left. 1 square = 1 stitch.

When working back and forth, every other row is worked from the right side and every other row is worked from the wrong side. When working from the wrong side, the diagram will have to be worked reversed: from left to right, knit stitches are purled, purl stitches are knit etc.

When working in the round every round is worked from the right side and the diagram are worked from right to left on all rounds.

See DROPS lesson: How to read knitting diagrams

The diagram depicts all rows/rounds, and every stitch seen from the right side. It is worked from bottom to top, from right to left.

When working back and forth every other row is worked from the right side: from right to left and every other row is worked from the wrong side: from left to right.

When working in the round, every row in the diagram are worked from the right side, from right to left.

When working a circular diagram you start in the middle and work your way outwards, counter clockwise, row by row.

The rows usually start with a given number of chain stitches (equivalent to the height of the following stitch), this will either be depicted in the diagram or explained in the pattern.

See DROPS lesson: How to read crochet diagrams

Instructions for working several diagrams after each other on the same row/round, will often be written like so: “work A.1, A.2, A.3 a total of 0-0-2-3-4 times". This means you work A.1 once, then A.2 is worked once, and A.3 is repeated (in width) the number of times provided for your size – in this case like so: S = 0 times, M = 0 times, L=2 times, XL= 3 times and XXL = 4 times.

The diagrams are worked as usual: begin with the first row in A.1, then work the first row in A.2 etc.

See DROPS lesson: How to read knitting diagrams

See DROPS lesson: How to read crochet diagrams

The total width of the garment (from wrist-to-wrist) will be larger in the larger sizes, despite the actual sleeves being shorter. The larger sizes have longer sleeve caps and wider shoulders, so there will be a good fit in all sizes.

The measurement sketch/schematic drawing provides information regarding the full length of the garment. If it’s a jumper or a jacket the length is measured from the highest point on the shoulder closest to the neckline, and straight down to the bottom of the garment. It is NOT measured from the tip of shoulder. Similarly, the length of yoke is measured from the highest point on the shoulder and down to where yoke is split into body and sleeves.

On a jacket measures are never taken along bands, unless specifically stated. Always measure inside band stitches when measuring the length.

See DROPS lesson: How to read a schematic drawing

Diagrams are often repeated on the round or in height. 1 repeat is the diagram the way it appears in the pattern. If it says to work 5 repeats of A.1 in the round, then you work A.1 a total of 5 times after/next to each other in the round. If it says to work 2 repeats of A.1 vertically/in height you work the entire diagram once, then begin again at the start and work the entire diagram one more time.

Chain stitches are slightly narrower than other stitches and to avoid working the cast-on edge too tight, we simply chain more stitches to begin with. The stitch count will be adjusted on the following row to fit the pattern and measurement sketch.

The rib edge is more elastic and will contract slightly compared to, for example, stocking stitch. By increasing before the rib edge, you avoid a visible difference in width between the rib edge and the rest of the body.

It’s very easy to cast off too tightly, and by making yarn overs while casting off (and simultaneously casting these off) you avoid a too tight cast off edge.

See DROPS video: How to bind off with yarn overs (yo)

To achieve an even increase (or decrease) you can increase on, for example: every 3rd and 4th row alternately, like so: work 2 rows and increase on the 3rd row, work 3 rows and increase on the 4th. Repeat this until the increase is complete.

See DROPS lesson: Increase or decrease 1 st on every 3rd and 4th row alternately

Should you prefer to work in the round instead of back and forth, you may of course adjust the pattern. You’ll need to add steeks mid-front (usually 5 stitches), and follow the instructions. When you would normally turn and work from the wrong side, simply work across the steek and continue in the round. At the end you’ll cut the piece open, pick up stitches to work bands, and cover the cut edges.

See DROPS video: How to knit steeks and cut open

Should you prefer to work back and forth instead of in the round, you may of course adjust the pattern so you work the pieces separately and then assemble them at the end. Divide the stitches for the body in 2, add 1 edge stitch in each side (for sewing) and work the front and back pieces separately.

See DROPS lesson: Can I adapt a pattern for circular needles into straight needles?

Pattern repeats can vary slightly in the different sizes, in order to get the correct proportions. If you’re not working the exact same size as the garment in the photo, yours might deviate slightly. This has been carefully developed and adjusted so that the complete impression of the garment is the same in all sizes.

Make sure to follow instructions and diagrams for your size!

If you have found a pattern you like which is available in women’s size it’s not very difficult to convert it to men’s size. The biggest difference will be the length of sleeves and body. Start working on the women size that you think would fit across the chest. The additional length will be worked right before you cast off for the armhole/sleeve cap. If the pattern is worked top-down you can add the length right after the armhole or before the first decrease on sleeve.

Regarding additional yarn amount, this will depend on how much length you add, but it is better with a skein too many than too few.

All yarns will have excess fibres (from production) that might come off as lint or shedding. Brushed yarns (ie hairier yarns) have more of these loose, excess fibres, causing more shedding.

Shedding also depends on what is worn under or over the garment, and whether this pulls at the yarn fibres. It’s therefore not possible to guarantee that there will be no shedding

Below are some tips on how to get the best result when working with hairier yarns:

1. When the garment is finished (before you wash it) shake it vigorously so the looser hairs come off. NOTE: do NOT use a lint roller, brush or any method that pulls at the yarn.

2. Place the garment in a plastic bag and put it in your freezer - the temperature will cause the fibres to become less attached to each other, and excess fibres will come off easier.

3. Leave in the freezer for a few hours before taking it out and shaking it again.

4. Wash the garment according to the instructions on the yarn label.

Pilling is a natural process that happens to even the most exclusive of fibers. It's a natural sign of wear and tear that is hard to avoid, and that is most visible in high friction areas of your garment like a sweater's arms and cuffs.

You can make your garment look as new by removing the pilling, using a fabric comb or a pill/lint remover.

Still can't find the answer you need? Then scroll down and leave your question so one of our experts can try to help you. This will be done normally within 5 to 10 working days.
In the meantime, you can read the questions and answers that others have left to this pattern or join the DROPS Workshop on Facebook to get help from fellow knitters/crocheters!

You might also like...

Post a comment to pattern DROPS 121-28

We would love to hear what you have to say about this pattern!

If you want to leave a question, please make sure you select the correct category in the form below, to speed up the answering process. Required fields are marked *.

Comments / Questions (35)

country flag Karin Nielsen wrote:

Spørgsmål til model U-608 mønster m-1 På pind nr. 11 skal man slå om pinden. Så bliver der flere masker på pinden, men som jeg læser 12. række skal der kun blive 3 retmasker tilbage mellem hver vrangmaske blok. Sidste lille i diagramforklaring hedder : 3 m på hj.p bag arb, 4 ret sammen, slå om 3 vr , slå om. Skal de sidste 3 vrang ikke strikkes fra hjælpepinden.

27.02.2023 - 11:29

DROPS Design answered:

Hej Karin, ja så de nye masker strikker du i vrang. Det skal være 3 vr fra hjælpepinden, tak for info, det er nu rettet :)

02.03.2023 - 09:36

country flag Nicole wrote:

Bonjour, Pouvez-vous faire un vidéo pour le rang 11 de M1 (pour le séquence à répéter ). Pas clair du tout …Le rang 11 devrait être une répétition de 24 mailles je crois (versus 22 mailles au rang précédent),est-ce ce exact? Il semble y a avoir une erreur dans le rang 11 car il y a aussi un endroit avec 2 jetés consécutive,est-ce normal? Un vidéo serait grandement apprécié car plusieurs d’entre nous ont un problème de compréhension avec ce rang. Merci.

27.02.2022 - 03:52

DROPS Design answered:

Bonjour Nicole, tricotez le 11ème rang de M.1 ainsi: 1 m env, 1 m env, 1 jeté, 1 m env, 1 m env, 1 jeté, (vous avez augmenté 2 mailles), puis: glissez 4 m sur l'aiguille auxiliaire devant l'ouvrage, 1 jeté, 3 m env, 1 jeté, reprenez les 4 m en attente et tricotez-les ens torse à l'end (= vous augmentez 2 m et diminuez 3 mailles); glissez 3 m derrière l'ouvrage, 4 m ens à l'end, 1 jeté, reprenez-les 3 m en attente et tricotez-les à l'envers, 1 jeté (= vous diminuez 3 m ,et augmentez 2 m), puis 1 m env, 1 jeté, 1 m env, 1 m env, 1 jeté, 1 m env (= vous augmentez 2 m); soit: 22 +2+2-3-3+2+2=24m. Bon tricot!

28.02.2022 - 10:12

country flag Rianne wrote:

Bedankt voor alle hulp. Zou u het tweede deel van mijn vorige vraag ook nog kunnen beantwoorden, alstublieft. Die over de 3 of 4 steken samen breien recht achter in de steek. Is dat hetzelfde als in het filmpje over 4 steken gedraaid samenbreien?

26.11.2021 - 08:03

DROPS Design answered:

Dag Rianne,

Oh ja, excuses. Bij het samen breien achterin de steken, steek je de naald in de achterste lussen van de steken.

26.11.2021 - 16:48

country flag Rianne wrote:

Ik heb toch nog 2 nieuwe vragen: 1) het afkanten bij het lijf, doe je dat in de laatste hele naald? En neem je dan daarna steken over totdat je de mouwen kunt opzetten en dan zo door om middenachter uit te komen? 2) hoe brei je 4st samen achter in de steek? Is dat het filmpje over 4st gedraaid samenbreien of toch nog weer iets anders? Is daar ook een filmpje van dan?

21.11.2021 - 15:10

DROPS Design answered:

Dag Rianne,

1) Het afkanten bij het lijf, dus onder de oksel doe je inderdaad op de laatste naald, daarna laat je het werk rusten en brei je de mouwen.

Wat je bedoeld met het overnemen van steken begrijp ik niet, maar nadat je de mouwen hebt gebreid, zet je de mouwen en het lijf samen op de naald. De mouwen komen op de plekken waar je hebt afgekant. Weliswaar een ander patroon maar in deze video kun je zien hou de mouwen het het lijf samen op de naald worden gezet

23.11.2021 - 10:54

country flag Rianne wrote:

Ik twijfel toch of die mouw breien met zo'n Magic loop wel een goed idee is voor mij. Ziet er lastig uit op de video. Als ik toch met de naalden zonder knop aan de slag ga, worden de mouwen dan dus platte lappen, die je later ijvert de hele lengte nog moet dichtnaaien? Ik zie niet hoe dat zo rondgebreid kan worden?

11.11.2021 - 22:29

DROPS Design answered:

Dag Rianne,

Nee, je kunt met naalden zonder knop gewoon de mouwen in de rondte breien, net als met sokken. Je kunt ook kiezen voor een rondbreinaald in de juiste maat, zodat je de magic loop niet hoeft toe te passen. Als je op het punt met de mouwen bent waarop je wellicht niet verder kunt met sokkenbreinaalden (omdat je te veel steken hebt en die kunnen dan van de naalden glijden), dan kun je op dat moment over gaan op een rondbreinaald. De magic loop ziet er ingewikkelder uit dan het lijkt. Het is echt het proberen waard, als je eenmaal ziet hoe het werkt, is het heel handig.

17.11.2021 - 16:54

country flag Rianne Appel wrote:

Ik heb 2 vragen over dit mooie patroon waar ik al druk mee bezig ben: 1. Ik heb geen breinaalden zonder kop in huis. Kan de mouw ook met een kleine rondbreinaald gemaakt worden? En idem dan voor de hals straks? 2. Bij de ronding middernacht moet steeds de eerste steek "afgehaald" worden. Wat wordt daarmee bedoeld? Dat ik die gewoon overzet op de andere punt/ naald en er dus niets mee doe?

22.10.2021 - 13:47

DROPS Design answered:

Dag Rianne,

Ja dat kan. Je kan een wat langere rondbreinaald nemen en dan de 'magic loop' techniek toepassen. Zie deze video.

Met de eerste steek afhalen wordt inderdaad bedoeld dat je hem overzet op de rechter naald. Dus je breit de steek niet.

22.10.2021 - 17:31

country flag Jokima wrote:

Merci 🙏 pour la rapidité de votre réponse, je vais ainsi pouvoir terminer ce joli pull pour ma petite fille...🧶

21.11.2020 - 01:51

country flag Jokima wrote:

Doit-on tricoter tous les jetés torses, ou seulement ceux qui concernent les 6 premières et 6 dernières mailles ? Merci pour votre réponse

20.11.2020 - 06:15

DROPS Design answered:

Bonjour Jokima, oui pardon, tous les jetés vont se tricoter torse pour éviter d'avoir des trous. Bon tricot!

20.11.2020 - 08:43

country flag Jokima wrote:

Bonjour, Au rg .11 du diag.M1 , les points noirs symbolisent une maille envers suivie d’un jeté, puis glisser 4 mailles devant le travail et un jeté : ce qui équivaut à 2 jetés l’un à la suite de l’autre ( ai-je bien compris ?) si oui dois-je les tric. à l’envers torse tous les 2 au tr. suivant ? Merci pour votre réponse.

19.11.2020 - 16:33

DROPS Design answered:

Bonjour Jokima, pour le point noir, je tricoterai 1 jeté, 1 m env avant la torsade, ainsi, j'éviterai les 2 jetés côte à côte avant de glisser les 4 mailles devant l'ouvrage. Après la 2ème torsade, tricotez 1 m env, 1 jeté, ainsi, les jetés sont séparés d'une maille envers dans les 2 cas. Au tour suivant, ces jetés vont se tricoter torse comme indiqué dans le diagramme. Bon tricot!

20.11.2020 - 08:07

country flag Janette LE MOGNE wrote:

Je ne comprends ce qu'est le "réhausse milieu dos". Quelqu'un peut-il m'aider ?

01.11.2020 - 17:10

DROPS Design answered:

Bonjour Mme Le Mogne, une réhausse au milieu dos consiste à tricoter des rangs supplémentaires (en rangs raccourcis) pour que l'encolure dos soit plus haute que l'encolure devant - cette vidéo montre comment en tricoter une (pour un pull de haut en bas, mais la technique sera la même de bas en haut). Bon tricot!

02.11.2020 - 08:38