DROPS Cotton Viscose
54% Cotton, 46% Viscose
Discontinued
find alternatives
DROPS Kid-Silk
DROPS Kid-Silk
75% Mohair, 25% Silk
from 4.60 £ /25g
DROPS Super Sale

Lady Like

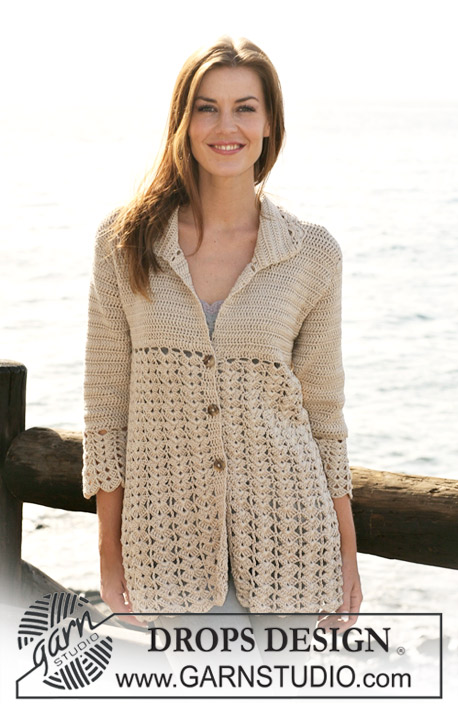
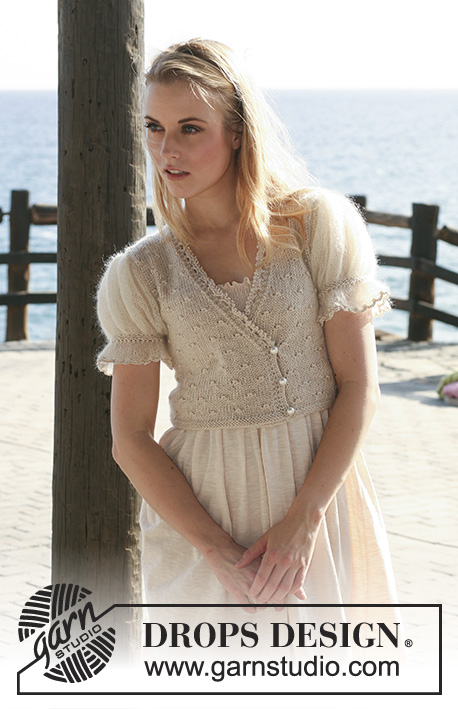
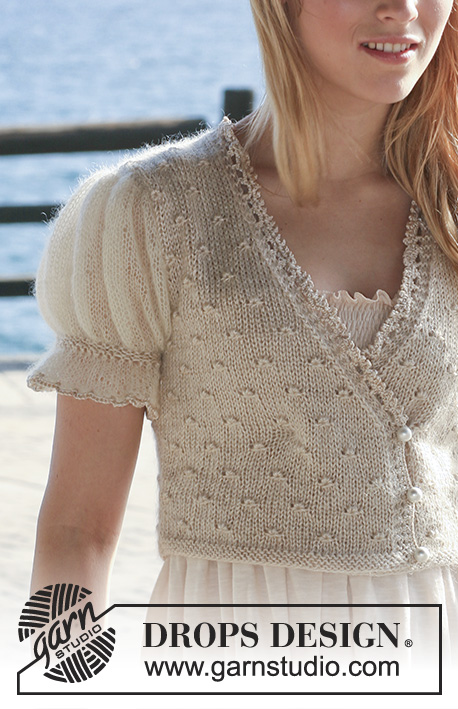
DROPS wrap-round jacket with short puff sleeves in Cotton Viscose and Kid-Silk or Safran and Kid-Silk. Size: XS to XXL.

DROPS 118-24
DROPS design: Pattern no N-112

Size: XS - S - M - L - XL - XXL
Materials: DROPS COTTON VISCOSE from Garnstudio
200-200-200-250-250-300 g colour no 02, off-white.

Or use:
DROPS SAFRAN from Garnstudio
150-150-150-200-200-250g colour no 18, off-white.

And use: DROPS KID SILK from Garnstudio
75-75-75-100-100-100 g colour no 01, off-white.

DROPS POINTED NEEDLES size 4.5 mm - or size needed to get 18 sts x 26 rows in stocking st with 1 thread of each quality = 10 x 10 cm.
DROPS POINTED NEEDLES size 3.5 mm – for garter st
DROPS CROCHET HOOK size 3 mm.
DROPS MOTHER OF PEARL BUTTONS, no 541: 3 pcs.
+ 1 small flat button for the inside of jacket.

-------------------------------------------------------

Alternative Yarn – See how to change yarns here
Yarn Groups A to F – Use the same pattern and change the yarn here
Yarn usage using an alternative yarn – Use our yarn converter here

-------------------------------------------------------

DROPS Cotton Viscose
54% Cotton, 46% Viscose
Discontinued
find alternatives
DROPS Kid-Silk
DROPS Kid-Silk
75% Mohair, 25% Silk
from 4.60 £ /25g

DROPS Super Sale

SAVE 30% on 6 cotton favourites!
Valid until 12.04.2024

Pattern instructions

NOTE: This pattern is written in British English. All measurements in charts are in cm. For conversion from cm to inches - click here. There are different terms for crocheting in British and American English. If this pattern includes crochet, click for "crochet terms" here. For this pattern in American English, please click here.
GARTER ST (back and forth on needle): K all rows.
PATTERN:
See diagram M.1 – pattern in diagram is seen from RS.
DECREASING TIP (applies to neckline):
Make all dec from RS inside 3 garter sts. Dec as follows AFTER 3 sts: slip 1 st as if to K, K1, psso.
Dec as follows BEFORE 3 sts: K2 tog.
--------------------------------------------------------
--------------------------------------------------------
BACK PIECE:
Worked back and forth on needle. Cast on 63-71-79-87-95-103 sts (includes 1 edge st each side) on needle size 3.5 mm with 1 thread Cotton Viscose/Safran + 1 thread Kid-Silk. Work 6 rows GARTER ST – see above! Change to needle size 4.5 mm and continue in M.1 (first row = RS) with 1 edge st each side in garter st.
REMEMBER THE KNITTING TENSION! When piece measures 4-4-5-5-6-6 cm inc 1 st each side inside 1 edge st, and repeat the inc on every 4 cm a total of 4 times = 71-79-87-95-103-111 sts (incorporate inc sts in pattern as you go along). When piece measures 18-19-20-21-22-23 cm cast off for armhole each side at the beg of every row: 4 sts 1-1-1-1-2-2 times, 2 sts 1-1-2-3-3-4 times and 1 st 1-3-5-5-5-5 times = 57-61-61-65-65-69 sts. Continue in pattern with 1 edge st in garter st each side (work sts inside edge st not fitting into pattern in stocking st). When piece measures 33-35-37-39-41-43 cm work 4 rows garter st on the middle 23-23-23-27-27-27 sts (work remaining sts as before), and now cast off the middle 17-17-17-21-21-21 sts for neck and complete each shoulder (= 20-22-22-22-22-24 sts) separately. Continue in M.1 with 3 garter sts towards neck until piece measures 36-38-40-42-44-46 cm, cast off.

RIGHT FRONT PIECE:
Worked back and forth on needle. Cast on 40-44-48-52-56-60 sts (includes 1 edge st at the side) on needle size 3.5 mm with 1 thread of each quality. Work 6 rows garter st. Change to needle size 4.5 mm and continue in M.1 (first row = RS) with 3 garter sts towards mid front and 1 edge st in garter st towards the side. When piece measures 4-4-5-5-6-6 cm inc at the side as described for back piece. When piece measures 12 cm dec 1 st towards mid front – SEE DECREASING TIP, and repeat the dec on every other row a total of 11-11-11-13-13-13 times and then on every 4th row 6 times (work sts not fitting into M.1 in stocking st). AT THE SAME TIME when piece measures 18-19-20-21-22-23 cm cast off for armhole at the side as described for back piece. When all dec are complete there are 20-22-22-22-22-24 sts left on shoulder. Continue until piece measures 36-38-40-42-44-46 cm, cast off.

LEFT FRONT PIECE:
Like right front piece, but mirrored, i.e. to make pattern identical on both front pieces, beg in square 6 in diagram – see arrow.

SLEEVE:
Worked back and forth on needle.
Cast on 80-84-92-96-104-112 sts (includes 1 edge st each side) on needle size 4.5 mm with 1 thread Kid-Silk. K 1 row from WS and continue in stocking st for 4 cm – adjust so that next row is from RS. Change to needle size 3.5 mm and 1 thread of each quality and K2 tog across the row = 40-42-46-48-52-56 sts. K 5 rows, remove the Viscose/Safran thread and work next row as follows from RS: * K1, 1 YO *, repeat from *-* and finish with K1 = 79-83-91-95-103-111 sts. Change to needle size 4.5 mm, P 1 row from WS (P YO into back of loop to avoid a hole), and work next row as follows from RS: * K3, 1 YO *, repeat from *-*, finish with K 1-2-1-2-1-3 = 105-110-121-126-137-147 sts. Continue in stocking st (on first row P YO into back of loop to avoid a hole). When piece measures 11 cm (for all sizes) cast off for sleeve cap each side at the beg and every row: 4 sts 1 time, 2 sts 1 time and then 1 st each side until piece measures 19-20-21-22-23-24 cm – adjust so that next row is from RS. K3 tog across the row and cast off in P sts from WS.

ASSEMBLY:
Sew shoulder seams. Set in sleeves and sew sleeve and side seams inside 1 edge st.

CROCHET BORDERS:
Crochet with Cotton Viscose/Safran and crochet hook size 3 mm along the opening of jacket as follows, beg at the bottom of left front band:
ROW 1 (crochet from WS): 1 dc in each garter st up to where dec beg, * 5 ch, skip approx 1 cm, 1 dc *, repeat from *-* up along the rest of front piece, round neckline on back piece and down along right front piece to where dec beg, then crochet 1 dc in each garter st to the bottom of right front piece. ROW 2: Turn with 1 ch, 1 dc in each of the first 2 dc, 3 ch, skip 1 dc, 1 dc in next dc, 1 dc in each dc for 5 cm, 3 ch, skip 1 dc, 1 dc in next dc, 1 dc in each dc until 3 dc remain before the ch-loops, 3 ch, skip 1 dc, 1 dc in each of the last 2 dc, 1 picot (= 3 ch, 1 dc in first ch), 1 dc in first ch-loop from row below, 1 picot, 1 dc in same ch-loop, * 1 picot, 1 dc in next ch-loop, 1 picot, 1 dc in same ch-loop *, repeat from *-* in all ch-loops down to the dec on left front piece, now crochet 1 dc in each of the first 2 dc from previous row, 3 ch, skip 1 dc, 1 dc in each dc down to bottom of left front piece (there is only 1 buttonhole loop on the inside of jacket).

Crochet a border round sleeve edges with Cotton Viscose/Safran and crochet hook size 3 mm as follows:
1 dc in first st, * 5 ch, skip 2 sts, 1 dc in next st *, repeat from *-*, finish with 1 sl st in first dc.

Sew on buttons, sew the 3 mother-of-pearl buttons to the RS of left front piece and the small flat button to the WS of right front piece – try the jacket on for the right fit, and make sure the sts are not visible from RS.

This pattern has been corrected.

Updated online: 16.02.2010
New Diagram
Updated online: 15.07.2010
And use: DROPS KID SILK from Garnstudio
color no 01, off-white: 75-75-75-100-100-100 g

Diagram

symbols = K from RS, P from WS
symbols = work these 3 sts as follows without slipping them off left needle: P3 tog, K3 tog, P3 tog, now slip sts off left needle
symbols = only applies to left front piece – see pattern
diagram
Do you have a question? See a list of frequently asked questions (FAQ)

Knitting tension is what determines the final measurements of your work, and is usually measured per 10 x 10 cm. It is provided like so: number of stitches in width x number of rows in height - eg: 19 stitches x 26 rows = 10 x 10 cm.

The knitting tension is very individual; some people knit/crochet loosely while others work tightly. You adjust the knitting tension with the needle size, which is why the suggested needle size is only meant as a guide! You need to adjust this (up or down) to ensure that YOUR knitting tension matches the knitting tension provided in the pattern. If you work with a different knitting tension than provided you will have a different yarn consumption, and your work will have different measurements than what the pattern suggests.

The knitting tension also determines which yarns can replace each other. As long as you achieve the same knitting tension you can replace one yarn with another.

See DROPS lesson: How to measure your tension/gauge

See DROPS video: How to make a gauge tension swatch

The required amount of yarn is provided in grams, eg: 450 g. To calculate how many balls you’ll need you first need to know how many grams are in 1 ball (25g, 50g or 100g). This information is available if you click on the individual yarn quality on our pages. Divide the amount required with the amount of each ball. For example, if each ball is 50g (the most common amount), the calculation will be as follows: 450 / 50 = 9 balls.

The important thing when changing from one yarn to another is that the knitting/crochet tension remains the same. This is so that the measurements of the finished piece will be the same as on the sketch provided. It is easier to achieve the same knitting tension using yarns from the same yarn group. It is also possible to work with multiple strands of a thinner yarn to achieve the knitting tension of a thicker one. Please try our yarn converter. We recommend you to always work a test swatch.

Please NOTE: when changing yarn the garment might have a different look and feel to the garment in the photo, due to individual properties and qualities of each yarn.

See DROPS lesson: Can I use a different yarn than the one mentioned in the pattern?

All our yarns are categorised into yarn groups (from A to F) according to thickness and knitting tension – group A contains the thinnest yarns and group F the thickest. This makes it easier for you to find alternative yarns to our patterns, should you wish to switch yarn. All yarns within the same group have a similar knitting tension and can easily replace each other. However, different yarn qualities have different structures and properties which will give the finished work a unique look and feel.

Click here for an overview of the yarns in each yarn group

At the top of all our patterns you’ll find a link to our yarn calculator, which is a helpful tool should you wish to use a different yarn than suggested. By filling in the yarn quality you wish to replace, the amount (in your size) and number of strands, the calculator will present good alternative yarns with the same knitting tension. Additionally it will tell you how much you’ll require in the new qualities and whether you’ll need to work with multiple strands. Most skeins are 50g (some are 25g or 100g).

If the pattern is worked with multiple colours, every colour will have to be calculated separately. Similarly, if the pattern is worked with several strands of different yarns (for example 1 strand Alpaca and 1 strand Kid-Silk) you will have to find alternatives for each, individually.

Click here to see our yarn calculator

Since different yarns have different qualities and textures we have chosen to keep the original yarn in our patterns. However, you can easily find options among our available qualities by using our yarn calculator, or simply pick a yarn from the same yarn group.

It is possible that some retailers still have discontinued yarns in stock, or that someone has a few skeins at home that they would like to find patterns for.

The yarn calculator will provide both alternative yarn as well as required amount in the new quality.

If you think it's hard to decide what size to make, it can be a good idea to measure a garment you own already and like the size of. Then you can pick the size by comparing those measures with the ones available in the pattern's size chart.

You'll find the size chart at the bottom of the pattern.

See DROPS lesson: How to read size chart

The needle size provided in the pattern serves only as a guide, the important thing is to follow the knitting tension. And since knitting tension is very individual, you will have to adjust the needle size to ensure that YOUR tension is the same as in the pattern – maybe you’ll have to adjust 1, or even 2 needle sizes, up or down to achieve the correct tension. For this, we recommend that you work test swatches.

Should you work with a different knitting tension than the one provided, the measurements of the finished garment might deviate from the measurement sketch.

See DROPS lesson: How to measure your tension/gauge

See DROPS video: How to make a tension/gauge swatch

Working a garment top-down provides more flexibility and room for personal adjustment. For example it is easier to try the garment on while working, as well as making adjustments to length of yoke and shoulder caps.

The instructions are carefully explaining every step, in the correct order. Diagrams are adjusted to the knitting direction and are worked as usual.

The diagram depicts all rows/rounds, and every stitch seen from the right side. It is read from bottom to top, from right to left. 1 square = 1 stitch.

When working back and forth, every other row is worked from the right side and every other row is worked from the wrong side. When working from the wrong side, the diagram will have to be worked reversed: from left to right, knit stitches are purled, purl stitches are knit etc.

When working in the round every round is worked from the right side and the diagram are worked from right to left on all rounds.

See DROPS lesson: How to read knitting diagrams

The diagram depicts all rows/rounds, and every stitch seen from the right side. It is worked from bottom to top, from right to left.

When working back and forth every other row is worked from the right side: from right to left and every other row is worked from the wrong side: from left to right.

When working in the round, every row in the diagram are worked from the right side, from right to left.

When working a circular diagram you start in the middle and work your way outwards, counter clockwise, row by row.

The rows usually start with a given number of chain stitches (equivalent to the height of the following stitch), this will either be depicted in the diagram or explained in the pattern.

See DROPS lesson: How to read crochet diagrams

Instructions for working several diagrams after each other on the same row/round, will often be written like so: “work A.1, A.2, A.3 a total of 0-0-2-3-4 times". This means you work A.1 once, then A.2 is worked once, and A.3 is repeated (in width) the number of times provided for your size – in this case like so: S = 0 times, M = 0 times, L=2 times, XL= 3 times and XXL = 4 times.

The diagrams are worked as usual: begin with the first row in A.1, then work the first row in A.2 etc.

See DROPS lesson: How to read knitting diagrams

See DROPS lesson: How to read crochet diagrams

The total width of the garment (from wrist-to-wrist) will be larger in the larger sizes, despite the actual sleeves being shorter. The larger sizes have longer sleeve caps and wider shoulders, so there will be a good fit in all sizes.

The measurement sketch/schematic drawing provides information regarding the full length of the garment. If it’s a jumper or a jacket the length is measured from the highest point on the shoulder closest to the neckline, and straight down to the bottom of the garment. It is NOT measured from the tip of shoulder. Similarly, the length of yoke is measured from the highest point on the shoulder and down to where yoke is split into body and sleeves.

On a jacket measures are never taken along bands, unless specifically stated. Always measure inside band stitches when measuring the length.

See DROPS lesson: How to read a schematic drawing

Diagrams are often repeated on the round or in height. 1 repeat is the diagram the way it appears in the pattern. If it says to work 5 repeats of A.1 in the round, then you work A.1 a total of 5 times after/next to each other in the round. If it says to work 2 repeats of A.1 vertically/in height you work the entire diagram once, then begin again at the start and work the entire diagram one more time.

Chain stitches are slightly narrower than other stitches and to avoid working the cast-on edge too tight, we simply chain more stitches to begin with. The stitch count will be adjusted on the following row to fit the pattern and measurement sketch.

The rib edge is more elastic and will contract slightly compared to, for example, stocking stitch. By increasing before the rib edge, you avoid a visible difference in width between the rib edge and the rest of the body.

It’s very easy to cast off too tightly, and by making yarn overs while casting off (and simultaneously casting these off) you avoid a too tight cast off edge.

See DROPS video: How to bind off with yarn overs (yo)

To achieve an even increase (or decrease) you can increase on, for example: every 3rd and 4th row alternately, like so: work 2 rows and increase on the 3rd row, work 3 rows and increase on the 4th. Repeat this until the increase is complete.

See DROPS lesson: Increase or decrease 1 st on every 3rd and 4th row alternately

Should you prefer to work in the round instead of back and forth, you may of course adjust the pattern. You’ll need to add steeks mid-front (usually 5 stitches), and follow the instructions. When you would normally turn and work from the wrong side, simply work across the steek and continue in the round. At the end you’ll cut the piece open, pick up stitches to work bands, and cover the cut edges.

See DROPS video: How to knit steeks and cut open

Should you prefer to work back and forth instead of in the round, you may of course adjust the pattern so you work the pieces separately and then assemble them at the end. Divide the stitches for the body in 2, add 1 edge stitch in each side (for sewing) and work the front and back pieces separately.

See DROPS lesson: Can I adapt a pattern for circular needles into straight needles?

Pattern repeats can vary slightly in the different sizes, in order to get the correct proportions. If you’re not working the exact same size as the garment in the photo, yours might deviate slightly. This has been carefully developed and adjusted so that the complete impression of the garment is the same in all sizes.

Make sure to follow instructions and diagrams for your size!

If you have found a pattern you like which is available in women’s size it’s not very difficult to convert it to men’s size. The biggest difference will be the length of sleeves and body. Start working on the women size that you think would fit across the chest. The additional length will be worked right before you cast off for the armhole/sleeve cap. If the pattern is worked top-down you can add the length right after the armhole or before the first decrease on sleeve.

Regarding additional yarn amount, this will depend on how much length you add, but it is better with a skein too many than too few.

All yarns will have excess fibres (from production) that might come off as lint or shedding. Brushed yarns (ie hairier yarns) have more of these loose, excess fibres, causing more shedding.

Shedding also depends on what is worn under or over the garment, and whether this pulls at the yarn fibres. It’s therefore not possible to guarantee that there will be no shedding

Below are some tips on how to get the best result when working with hairier yarns:

1. When the garment is finished (before you wash it) shake it vigorously so the looser hairs come off. NOTE: do NOT use a lint roller, brush or any method that pulls at the yarn.

2. Place the garment in a plastic bag and put it in your freezer - the temperature will cause the fibres to become less attached to each other, and excess fibres will come off easier.

3. Leave in the freezer for a few hours before taking it out and shaking it again.

4. Wash the garment according to the instructions on the yarn label.

Pilling is a natural process that happens to even the most exclusive of fibers. It's a natural sign of wear and tear that is hard to avoid, and that is most visible in high friction areas of your garment like a sweater's arms and cuffs.

You can make your garment look as new by removing the pilling, using a fabric comb or a pill/lint remover.

Still can't find the answer you need? Then scroll down and leave your question so one of our experts can try to help you. This will be done normally within 5 to 10 working days.
In the meantime, you can read the questions and answers that others have left to this pattern or join the DROPS Workshop on Facebook to get help from fellow knitters/crocheters!

You might also like...

Post a comment to pattern DROPS 118-24

We would love to hear what you have to say about this pattern!

If you want to leave a question, please make sure you select the correct category in the form below, to speed up the answering process. Required fields are marked *.

Comments / Questions (60)

country flag Rosemarie wrote:

Hej. Jeg forstår ikke helt masketallet på rygstykket. M1 strækker sig over 16 masker mens der i str. S er 71 m på pinden (69 uden kantmasker). Dette går ikke op i de 16 masker i diagrammet?

28.12.2022 - 18:28

DROPS Design answered:

Hei Rosemari. Det skal ikke opp i de 16 maskene i diagrammet. Du strikker M.1 over 69 masker = 4 rapporter av M.1 + de 5 første maskene av M.1 = 16+16+16+16+5 = 69 masker. Når arbeidet måler 4 cm økes det masker i hver side og disse maskene strikkes fortløpende inn i mønsteret. Husk når du skal strikke venstre forstykke så start ved pilen i diagrammet slik at det blir likt med høyre forstykke. mvh DROPS Design

02.01.2023 - 14:28

country flag Glesni OSullivan wrote:

Can you clarify decrease at armhole on sleeves please is it 1 stitch each side meaning at beginning and end of right side rows ?

15.07.2022 - 11:07

DROPS Design answered:

Dear Glesni, if you mean the sleeve cap, you need to decrease 1 stitch at the beginning of every row, that is, both right side and wrong side rows. Happy knitting!

15.07.2022 - 13:02

country flag Celine wrote:

Je suis débutante et je ne comprends pas comment on fait le deux dessins pouvez vous faire une vidéo ou me donner le nom du point du diagramme. Svp.

01.04.2019 - 22:04

DROPS Design answered:

Bonjour Céline, le motif du diagramme se tricote ainsi: tricotez les 3 mailles indiquées ensemble à l'envers, puis, sans les lâcher de l'aiguille gauche, tricotez-les encore une fois ensemble à l'endroit cette fois ci, puis, toujours sans lâcher les 3 mailles de l'aiguille gauche, tricotez ces 3 mailles encore 1 fois ensemble à l'envers, lâchez les 3 mailles de l'aiguille gauche, vous avez maintenant 3 mailles sur l'aiguille droite = le nombre de mailles reste le même. N'hésitez pas à vous entraîner sur un échantillon au préalable. Voir aussi la vidéo. Bon tricot!

02.04.2019 - 10:08

country flag DONATELLA DONATI wrote:

è possibile sostituire la parte in cotone con il kid silk preso a 2 fili?

29.03.2019 - 09:03

DROPS Design answered:

Buongiorno Donatella. Può sostituire cotton viscose con kid silk e lavorare la parte del corpo con 2 capi di kid silk. Il risultato avrà un effetto più vaporoso e più morbido. Verifichi sempre la correttezza del campione. Per ogni ulteriore consiglio sulla sostituzione dei filati, può contattare, anche per mail, il suo rivenditore Drops di fiducia. Buon lavoro!

29.03.2019 - 09:33

country flag Carmen wrote:

No entiendo el dibujo a realizar, los de los 3 puntos juntos y luego la explicación que le sigue. Gracias

20.01.2019 - 20:11

DROPS Design answered:

Hola Carmen. Para hacer estas motas se trabajan primero 3 puntos juntos de revés, sin deslizar a la aguja derecha; se trabajan 3 puntos juntos de derecho sobre los mismos puntos, y ,de la misma manera, otra vez 3 puntos juntos de revés sobre los mismos puntos. Ahora deslizamos 3 puntos a la aguja derecha. De está manera, se forma una mota y no hay un cambio en el número de puntos ( 3 puntos disminuidos = 3 puntos formados)

03.02.2019 - 19:29

country flag Odile Machado wrote:

Erreur couleur : j'ai commande exactement les fils de l'explication ; il y a une erreur le coton est blanc et pas écru, je suis très déçue ! !!!!

20.07.2014 - 17:58

DROPS Design answered:

Bonjour Mme Machado, DROPS Cotton Viscose 01 est blanc, le 02 est écru. Pour toute information complémentaire, vous pouvez prendre contact avec votre magasin DROPS. Bon tricot!

21.07.2014 - 15:36

country flag Karin B. wrote:

Hallo, ich würde gerne dieses Modell als längere Version also als normal lange Strickjacke (Größe M). Kann man dann einfach so weiter stricken oder wäre es möglich eine Anleitung dazu zu bekommen oder ein paar Hilfen? Wieviel Garn benötige ich dann zusätzlich? Würde mich über eine Antwort freuen. Liebe Grüße Karin

13.07.2014 - 17:34

DROPS Design answered:

Liebe Karin, die Jacke umzuarbeiten ist etwas komplizierter, da Sie nicht gerade hoch stricken (Sie stricken ja von unten nach oben), sondern Zunahmen an den Seiten arbeiten. Am besten lassen Sie sich in dem Geschäft, in dem Sie die Wolle gekauft haben, beraten, wie Sie die Jacke umarbeiten können.

14.07.2014 - 20:47

Nana wrote:

"Manches bouffantes"

29.05.2013 - 09:11

country flag Versavaud wrote:

Il doit y avoir une erreur dans les explications de la manche du modèle 118-24, car on se retrouve avec 91 mailles (modèle XS) à assembler avec une emmanchure beaucoup plus grande. Merci de me répondre.

28.05.2013 - 15:29

DROPS Design answered:

Bonjour Mme Versavaud, après calcul et vérification auprès de notre service Design, le modèle est correct ainsi et a déjà été par ailleurs réalisé maintes fois avec succès. N'hésitez pas à contacter votre magasin pour une aide personnalisée si nécessaire. Bon tricot!

30.05.2013 - 13:23

country flag Versavaud wrote:

Je ne sais comment assembler les manches aux devants, étant donné que le dernier rang se fait avec 3 mailles ensemble donc çà rétrécit le haut des manches, les emmanchures étant beaucoup plus grandes. Merci de m'indiquer comment procéder.

28.05.2013 - 11:35

DROPS Design answered:

Bonjour Mme Versavaud, l'arrondi des manches se rabat ainsi pour volontairement rétrécir l'arrondi et former l'effet bouffant du haut des manches. Bon tricot !

28.05.2013 - 13:46