DROPS Alaska
DROPS Alaska
100% Wool
from 1.90 £ /50g
Get the yarn to make this pattern from 17.10£.

The yarn cost is calculated from the pattern’s smallest size and the yarn’s cheapest product type. Looking for an even better price? You might find it on the DROPS Deals!

DROPS SS24
DROPS 117-42
DROPS design: Pattern no X-352

Size: S - M - L - XL - XXL - XXXL
Materials: DROPS ALASKA
450-500-550-600-650-700 g colour no 04, grey.

DROPS POINTED NEEDLES size 5 mm – or size needed to get 17 sts x 22 rows in stocking st = 10 x 10 cm.
DROPS Metal buttons no 542: 5 pcs.

-------------------------------------------------------

Alternative Yarn – See how to change yarns here
Yarn Groups A to F – Use the same pattern and change the yarn here
Yarn usage using an alternative yarn – Use our yarn converter here

-------------------------------------------------------

DROPS Alaska
DROPS Alaska
100% Wool
from 1.90 £ /50g
Get the yarn to make this pattern from 17.10£.

The yarn cost is calculated from the pattern’s smallest size and the yarn’s cheapest product type. Looking for an even better price? You might find it on the DROPS Deals!

Pattern instructions

NOTE: This pattern is written in British English. All measurements in charts are in cm. For conversion from cm to inches - click here. There are different terms for crocheting in British and American English. If this pattern includes crochet, click for "crochet terms" here. For this pattern in American English, please click here.
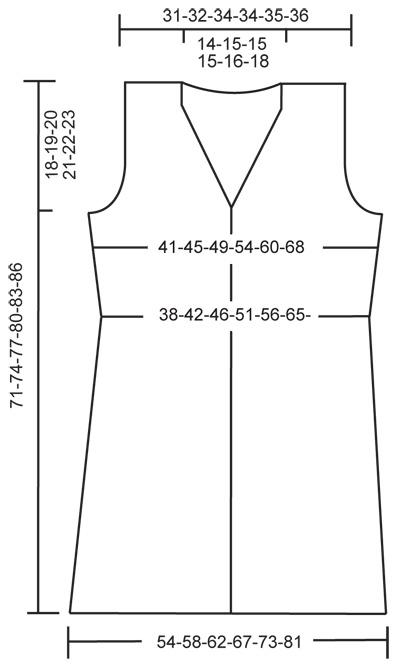
GARTER ST (back and forth on needle):
K all rows.
BUTTONHOLES:
Make buttonholes on right front band.
1 buttonhole = cast off 3rd front band st and cast on 1 new st on return row.
Make buttonholes when piece measures:
Size S: 31, 37, 43, 49 and 55 cm.
Size M: 33, 39, 45, 51 and 57 cm.
Size L: 32, 39, 46, 53 and 59 cm.
Size XL: 34, 41, 48, 55 and 61 cm.
Size XXL: 33, 41, 49, 56 and 63 cm.
Size XXXL: 35, 43, 51, 58 and 65 cm.
DECREASING TIP (applies to armhole and neckline):
Dec inside 4 garter sts along armhole and 5 garter sts on neckline.
DEC AS FOLLOWS FROM RS:
After 4/5 garter sts: slip 1 st as if to K, K1, psso.
Before 4/5 garter sts: K2 tog.
DEC AS FOLLOWS FROM WS:
After 4/5 garter sts: P2 tog.
Before 4/5 garter sts: P2 tog into back of loop.
--------------------------------------------------------

BACK PIECE:
Worked back and forth on needle. Cast on 94-101-108-116-126-140 sts (includes 1 edge st each side) on needle size 5 mm with Alaska. Work 4 rows GARTER ST - see ABOVE – and continue in stocking st. REMEMBER THE KNITTING TENSION! When piece measures 3-3-3-4-4-4 cm dec 1 st each side, and repeat the dec on every 2.5-3-3-3-3-3.5 cm a total of 14 times = 66-73-80-88-98-112 sts. When piece measures 41-43-45-47-49-51 cm (dec have now been completed) work 8 rows garter st on all sts, and continue in stocking st again. When piece measures 45-47-49-51-53-55 cm (garter st is now complete) inc 1 st each side, and repeat the inc on every 2.5 cm a total of 3 times = 72-79-86-94-104-118 sts. When piece measures 52-54-56-58-60-62 cm work 2 rows garter st on 7-7-8-9-13-16 sts each side with remaining sts as before. On next row cast off 3-3-4-5-9-12 sts each side for armhole and cast off to shape the armhole each side as follows – see DECREASING TIP: On every other row: 1 st 6-7-8-11-11-14 times and then on every 4th row: 1 st 1-2-2-2-2-2 times = 52-55-58-58-60-62 sts. Continue in stocking st with 4 garter sts each side. When piece measures 68-71-74-77-80-83 cm work 2 rows garter st on the middle 32-33-34-34-36-38 sts with remaining sts as before. On next row cast off the middle 22-23-24-24-26-28 sts for neck and complete each shoulder separately. Cast off 1 st inside 5 garter sts on neckline on next row – see DECREASING TIP = 14-15-16-16-16-16 sts left on shoulder. Continue in stocking st with 4 garter sts towards armhole and 5 garter sts towards neck until piece measures 71-74-77-80-83-86 cm. Cast off.

RIGHT FRONT PIECE:
Cast on 52-55-59-63-68-75 sts (includes 1 edge st at the side and 5 front band sts towards mid front) on needle size 5 mm with Alaska. Work 4 rows garter st and continue in stocking st with 5 front band sts towards mid front in garter st. When piece measures 3-3-3-4-4-4 cm dec at the side as described for back piece = 38-41-45-49-54-61 sts. Remember BUTTONHOLES on front band – see above. When piece measures 41-43-45-47-49-51 cm work 8 rows garter st on all sts, and then continue in stocking st with front bands in garter st as before. When piece measures 45-47-49-51-53-55 cm inc at the side as described for back piece = 41-44-48-52-57-64 sts. When piece measures 52-54-56-58-60-62 cm work 2 rows garter st on 7-7-8-9-13-16 sts at the side with remaining sts as before. On next row cast off 3-3-4-5-9-12 sts at the side for armhole and cast off to shape the armhole as described for back piece. AT THE SAME TIME when piece measures 56-58-60-62-64-66 cm dec towards mid front for neck – see DECREASING TIP! Dec on every row: 1 st a total of 5-5-6-6-6-7 times and then on every other row: 1 st a total of 12-12-12-12-13-13 times. After all dec for armhole and neck are complete there are 14-15-16-16-16-16 sts left on shoulder. Continue in stocking st with 4 garter sts towards armhole and 5 garter sts towards neck until piece measures 71-74-77-80-83-86 cm. Cast off.

LEFT FRONT PIECE:
Cast on and work like right front piece, but mirrored and without buttonholes.

ASSEMBLY:
Sew shoulder seams. Sew side seams inside 1 edge st. Sew on buttons.

Diagram

diagram measurements

Each of our patterns has specific tutorial videos to help you.

Do you have a question? See a list of frequently asked questions (FAQ)

Knitting tension is what determines the final measurements of your work, and is usually measured per 10 x 10 cm. It is provided like so: number of stitches in width x number of rows in height - eg: 19 stitches x 26 rows = 10 x 10 cm.

The knitting tension is very individual; some people knit/crochet loosely while others work tightly. You adjust the knitting tension with the needle size, which is why the suggested needle size is only meant as a guide! You need to adjust this (up or down) to ensure that YOUR knitting tension matches the knitting tension provided in the pattern. If you work with a different knitting tension than provided you will have a different yarn consumption, and your work will have different measurements than what the pattern suggests.

The knitting tension also determines which yarns can replace each other. As long as you achieve the same knitting tension you can replace one yarn with another.

See DROPS lesson: How to measure your tension/gauge

See DROPS video: How to make a gauge tension swatch

The required amount of yarn is provided in grams, eg: 450 g. To calculate how many balls you’ll need you first need to know how many grams are in 1 ball (25g, 50g or 100g). This information is available if you click on the individual yarn quality on our pages. Divide the amount required with the amount of each ball. For example, if each ball is 50g (the most common amount), the calculation will be as follows: 450 / 50 = 9 balls.

The important thing when changing from one yarn to another is that the knitting/crochet tension remains the same. This is so that the measurements of the finished piece will be the same as on the sketch provided. It is easier to achieve the same knitting tension using yarns from the same yarn group. It is also possible to work with multiple strands of a thinner yarn to achieve the knitting tension of a thicker one. Please try our yarn converter. We recommend you to always work a test swatch.

Please NOTE: when changing yarn the garment might have a different look and feel to the garment in the photo, due to individual properties and qualities of each yarn.

See DROPS lesson: Can I use a different yarn than the one mentioned in the pattern?

All our yarns are categorised into yarn groups (from A to F) according to thickness and knitting tension – group A contains the thinnest yarns and group F the thickest. This makes it easier for you to find alternative yarns to our patterns, should you wish to switch yarn. All yarns within the same group have a similar knitting tension and can easily replace each other. However, different yarn qualities have different structures and properties which will give the finished work a unique look and feel.

Click here for an overview of the yarns in each yarn group

At the top of all our patterns you’ll find a link to our yarn calculator, which is a helpful tool should you wish to use a different yarn than suggested. By filling in the yarn quality you wish to replace, the amount (in your size) and number of strands, the calculator will present good alternative yarns with the same knitting tension. Additionally it will tell you how much you’ll require in the new qualities and whether you’ll need to work with multiple strands. Most skeins are 50g (some are 25g or 100g).

If the pattern is worked with multiple colours, every colour will have to be calculated separately. Similarly, if the pattern is worked with several strands of different yarns (for example 1 strand Alpaca and 1 strand Kid-Silk) you will have to find alternatives for each, individually.

Click here to see our yarn calculator

Since different yarns have different qualities and textures we have chosen to keep the original yarn in our patterns. However, you can easily find options among our available qualities by using our yarn calculator, or simply pick a yarn from the same yarn group.

It is possible that some retailers still have discontinued yarns in stock, or that someone has a few skeins at home that they would like to find patterns for.

The yarn calculator will provide both alternative yarn as well as required amount in the new quality.

If you think it's hard to decide what size to make, it can be a good idea to measure a garment you own already and like the size of. Then you can pick the size by comparing those measures with the ones available in the pattern's size chart.

You'll find the size chart at the bottom of the pattern.

See DROPS lesson: How to read size chart

The needle size provided in the pattern serves only as a guide, the important thing is to follow the knitting tension. And since knitting tension is very individual, you will have to adjust the needle size to ensure that YOUR tension is the same as in the pattern – maybe you’ll have to adjust 1, or even 2 needle sizes, up or down to achieve the correct tension. For this, we recommend that you work test swatches.

Should you work with a different knitting tension than the one provided, the measurements of the finished garment might deviate from the measurement sketch.

See DROPS lesson: How to measure your tension/gauge

See DROPS video: How to make a tension/gauge swatch

Working a garment top-down provides more flexibility and room for personal adjustment. For example it is easier to try the garment on while working, as well as making adjustments to length of yoke and shoulder caps.

The instructions are carefully explaining every step, in the correct order. Diagrams are adjusted to the knitting direction and are worked as usual.

The diagram depicts all rows/rounds, and every stitch seen from the right side. It is read from bottom to top, from right to left. 1 square = 1 stitch.

When working back and forth, every other row is worked from the right side and every other row is worked from the wrong side. When working from the wrong side, the diagram will have to be worked reversed: from left to right, knit stitches are purled, purl stitches are knit etc.

When working in the round every round is worked from the right side and the diagram are worked from right to left on all rounds.

See DROPS lesson: How to read knitting diagrams

The diagram depicts all rows/rounds, and every stitch seen from the right side. It is worked from bottom to top, from right to left.

When working back and forth every other row is worked from the right side: from right to left and every other row is worked from the wrong side: from left to right.

When working in the round, every row in the diagram are worked from the right side, from right to left.

When working a circular diagram you start in the middle and work your way outwards, counter clockwise, row by row.

The rows usually start with a given number of chain stitches (equivalent to the height of the following stitch), this will either be depicted in the diagram or explained in the pattern.

See DROPS lesson: How to read crochet diagrams

Instructions for working several diagrams after each other on the same row/round, will often be written like so: “work A.1, A.2, A.3 a total of 0-0-2-3-4 times". This means you work A.1 once, then A.2 is worked once, and A.3 is repeated (in width) the number of times provided for your size – in this case like so: S = 0 times, M = 0 times, L=2 times, XL= 3 times and XXL = 4 times.

The diagrams are worked as usual: begin with the first row in A.1, then work the first row in A.2 etc.

See DROPS lesson: How to read knitting diagrams

See DROPS lesson: How to read crochet diagrams

The total width of the garment (from wrist-to-wrist) will be larger in the larger sizes, despite the actual sleeves being shorter. The larger sizes have longer sleeve caps and wider shoulders, so there will be a good fit in all sizes.

The measurement sketch/schematic drawing provides information regarding the full length of the garment. If it’s a jumper or a jacket the length is measured from the highest point on the shoulder closest to the neckline, and straight down to the bottom of the garment. It is NOT measured from the tip of shoulder. Similarly, the length of yoke is measured from the highest point on the shoulder and down to where yoke is split into body and sleeves.

On a jacket measures are never taken along bands, unless specifically stated. Always measure inside band stitches when measuring the length.

See DROPS lesson: How to read a schematic drawing

Diagrams are often repeated on the round or in height. 1 repeat is the diagram the way it appears in the pattern. If it says to work 5 repeats of A.1 in the round, then you work A.1 a total of 5 times after/next to each other in the round. If it says to work 2 repeats of A.1 vertically/in height you work the entire diagram once, then begin again at the start and work the entire diagram one more time.

Chain stitches are slightly narrower than other stitches and to avoid working the cast-on edge too tight, we simply chain more stitches to begin with. The stitch count will be adjusted on the following row to fit the pattern and measurement sketch.

The rib edge is more elastic and will contract slightly compared to, for example, stocking stitch. By increasing before the rib edge, you avoid a visible difference in width between the rib edge and the rest of the body.

It’s very easy to cast off too tightly, and by making yarn overs while casting off (and simultaneously casting these off) you avoid a too tight cast off edge.

See DROPS video: How to bind off with yarn overs (yo)

To achieve an even increase (or decrease) you can increase on, for example: every 3rd and 4th row alternately, like so: work 2 rows and increase on the 3rd row, work 3 rows and increase on the 4th. Repeat this until the increase is complete.

See DROPS lesson: Increase or decrease 1 st on every 3rd and 4th row alternately

Should you prefer to work in the round instead of back and forth, you may of course adjust the pattern. You’ll need to add steeks mid-front (usually 5 stitches), and follow the instructions. When you would normally turn and work from the wrong side, simply work across the steek and continue in the round. At the end you’ll cut the piece open, pick up stitches to work bands, and cover the cut edges.

See DROPS video: How to knit steeks and cut open

Should you prefer to work back and forth instead of in the round, you may of course adjust the pattern so you work the pieces separately and then assemble them at the end. Divide the stitches for the body in 2, add 1 edge stitch in each side (for sewing) and work the front and back pieces separately.

See DROPS lesson: Can I adapt a pattern for circular needles into straight needles?

Pattern repeats can vary slightly in the different sizes, in order to get the correct proportions. If you’re not working the exact same size as the garment in the photo, yours might deviate slightly. This has been carefully developed and adjusted so that the complete impression of the garment is the same in all sizes.

Make sure to follow instructions and diagrams for your size!

If you have found a pattern you like which is available in women’s size it’s not very difficult to convert it to men’s size. The biggest difference will be the length of sleeves and body. Start working on the women size that you think would fit across the chest. The additional length will be worked right before you cast off for the armhole/sleeve cap. If the pattern is worked top-down you can add the length right after the armhole or before the first decrease on sleeve.

Regarding additional yarn amount, this will depend on how much length you add, but it is better with a skein too many than too few.

All yarns will have excess fibres (from production) that might come off as lint or shedding. Brushed yarns (ie hairier yarns) have more of these loose, excess fibres, causing more shedding.

Shedding also depends on what is worn under or over the garment, and whether this pulls at the yarn fibres. It’s therefore not possible to guarantee that there will be no shedding

Below are some tips on how to get the best result when working with hairier yarns:

1. When the garment is finished (before you wash it) shake it vigorously so the looser hairs come off. NOTE: do NOT use a lint roller, brush or any method that pulls at the yarn.

2. Place the garment in a plastic bag and put it in your freezer - the temperature will cause the fibres to become less attached to each other, and excess fibres will come off easier.

3. Leave in the freezer for a few hours before taking it out and shaking it again.

4. Wash the garment according to the instructions on the yarn label.

Pilling is a natural process that happens to even the most exclusive of fibers. It's a natural sign of wear and tear that is hard to avoid, and that is most visible in high friction areas of your garment like a sweater's arms and cuffs.

You can make your garment look as new by removing the pilling, using a fabric comb or a pill/lint remover.

Still can't find the answer you need? Then scroll down and leave your question so one of our experts can try to help you. This will be done normally within 5 to 10 working days.
In the meantime, you can read the questions and answers that others have left to this pattern or join the DROPS Workshop on Facebook to get help from fellow knitters/crocheters!

Post a comment to pattern DROPS 117-42

We would love to hear what you have to say about this pattern!

If you want to leave a question, please make sure you select the correct category in the form below, to speed up the answering process. Required fields are marked *.

Comments / Questions (14)

country flag Rene Gould wrote:

I am doing the falling mist tunic just a question does the top have slits at the sides because I don’t understand the garter stitch on the back part of the Tunic do I have to do 4/5 hater stitches at each end of the row or do I do it in stocking stitch I know the fronts have the gayer stitch but not sure that you do this in the back piece hope you understand it’s hard to explain thank you

24.07.2023 - 17:14

DROPS Design answered:

Hi Rene, the tunic does not have splits on sides. 5 gartes stitches are done on mid fronts only, the rest of the tunic is worked in stocking stitch until the waist. Happy knitting!

26.07.2023 - 08:32

country flag Tina wrote:

Hej, Jag undrar vad jag kan använda för knapp istället för 542 då den verkar ha utgått ur sortimentet? Mvh Tina

04.12.2022 - 12:42

DROPS Design answered:

Hei Tine Knapp nr. 542 som er en utgått knapp hadde en str. på 23 mm. Vi har ingen knapper i den str i vårt sortiment nå, men du kan fint bruke knapper som er litt større eller mindre. F.eks større knapper som: Knapp nr 538 (kantet bøffelhorn, str. 25 mm ), knapp nr 536 (Bøffelhorn, str. 25 mm) eller knapp nr. 630 (Marmor str. 25 mm). mvh DROPS Design

06.12.2022 - 06:44

country flag Emi wrote:

Hello. Phrasing this as a question to direct attention to mistake converting cm to inches. Please see “Back Piece when decreases have been completed, work 8 rows garter stitch…When piece measures…” Then follows measurements in cm and (incorrectly) inches. Thank you for beautiful yarn, great designs, and patterns accessible to those of us who haven’t converted to metric!

20.10.2021 - 14:17

DROPS Design answered:

Dear Emi, thank you for pointing out the mistake. We've sent it to the design department to correct it. The correct measurements are the following: 17 3/4 '' - 18 1/2 '' - 19 5/16 '' - 20 1/16 '' - 20 7/8'' - 21 5/8''. Happy knitting!

24.10.2021 - 11:42

country flag Susan Broman wrote:

Hej! Är måtten ni visar i diagrammet kroppsmått eller plaggets mått?

29.10.2020 - 21:44

DROPS Design answered:

Hej Susan. Det är mått på plagget. Mvh DROPS Design

30.10.2020 - 07:40

country flag Fran Hoffman wrote:

A finished bust measurement of 40 in. fits me. With this pattern, the large is 38-1/2 in. and the extra large is 42-1/2 in. Which size should I knit?

08.12.2015 - 19:06

DROPS Design answered:

Dear Mrs Hoffman, if you like it a bit tighter choose the smaller size or if you like it a bit looser, choose larger size. Happy knitting!

09.12.2015 - 09:42

country flag Rebecca wrote:

I LOVE this!!

03.07.2009 - 06:08

country flag Elisabeth wrote:

Super sød den skal strikkes

02.07.2009 - 20:42

Treacy wrote:

Gorgeous

28.06.2009 - 12:44

country flag June-Ann Holmén wrote:

En längre väst, har letat så efter mänster, blev så glad när jag såg den.

27.06.2009 - 23:14

country flag Cecilia S wrote:

Kanon med lite mönster på västar. Denna och 348

18.06.2009 - 13:01