
Popular categories
Looking for a yarn?


|
|
DROPS 105-25 |
|
|
|
|
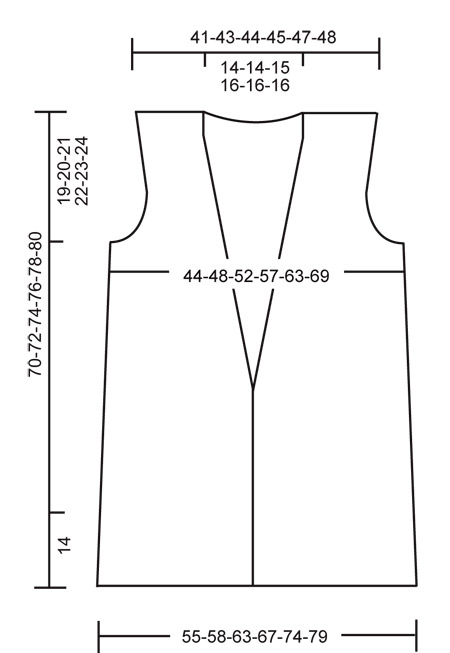
DROPS top in “Bomull-Lin”. Size S - XXXL.
DROPS 105-25 |
|
|
Garter st, back and forth on needle: K all rows. Decreasing tip (applies to neck and armhole): Make all dec from RS inside 4 garter sts. Dec as follows after 4 sts: slip 1 st as if to K, K1, psso Dec as follows before 4 sts: K2 tog. Increasing tip (applies to shoulder): Inc inside 4 garter sts as follows: Make 1 yo, K yo into back of st on return row. Work inc sts in stocking st. Back piece: Cast on 141-149-157-173-189-197 sts (incl 1 edge st each side) on needle size 4 mm. Work first row from RS as follows: 1 edge st, *K3/P5*, repeat from *-* and finish row with K3 and 1 edge st. Continue until Rib measures 5 cm and now dec all P5 to P4 = 124-131-138-152-166-173 sts. Continue with K3/P4 with 1 edge st each side until Rib measures 14 cm – adjust so that next row = WS. Change to needle size 4.5 mm, K 1 row from WS, at the same time adjust no of sts to 106-113-121-130-142-153. Now continue in stocking st. Remember the knitting tension. When piece measures 16 cm dec 1 st each side on every 3 cm a total of 10 times = 86-93-101-110-122-133 sts. When piece measures 49-50-51-52-53-54 cm work 4 rows garter st on the outermost 8-8-10-10-12-12 sts each side and now cast off 4-4-6-6-8-8 sts each side for armhole = 78-85-89-98-106-117 sts. Continue in stocking st with 4 garter sts each side, at the same time dec – see Decreasing tip – 1 st each side on every other row a total of 2-4-5-8-10-15 times = 74-77-79-82-86-87 sts. When piece measures 64-66-68-70-72-74 cm inc 1 st each side – see Increasing tip – and repeat the inc when piece measures 66-68-70-72-74-76 cm. At the same time when piece measures 66-68-70-72-74-76 cm work 4 rows garter st on the middle 34-35-37-38-38-39 sts, work remaining sts in stocking st. Then cast off the middle 24-25-27-28-28-29 sts for neck. On next row dec 1 st on neckline = 26-27-27-28-30-30 sts left on each shoulder. Continue in stocking st with 4 garter sts on neckline. Cast off when piece measures 70-72-74-76-78-80 cm. Right front piece: Cast on 85-85-93-93-109-117 sts (incl 1 edge st at side and 4 front band sts towards mid front) on needle size 4 mm. Work first row from mid front as follows: 4 front band sts in garter st, *K3/P5*, repeat from *-* and finish row with 1 edge st. Continue until Rib measures 5 cm and now dec all P5 to P4 = 75-75-82-82-96-103 sts. Continue with K3/P4 with 4 garter sts towards mid front and 1 edge st at side until Rib measures 14 cm – adjust so that next row = WS. Change to needle size 4.5 mm, K 1 row from WS, at the same time adjust no of sts to 61-64-68-72-79-84. Now continue in stocking st. Remember the knitting tension. When piece measures 16 cm dec at side as described for back piece. Neckline: At the same time when piece measures 35 cm dec for V-neck towards mid front – see Decreasing tip: 1 st on every 1.5 cm a total of 21-21-22-22-23-23 times. Armhole: At the same time when piece measures 49-50-51-52-53-54 cm work 4 rows garter st on the outermost 8-8-10-10-12-12 sts at side and dec to shape the armhole as described for back piece. Inc for shoulder as described for back piece. After all dec and inc are complete = 26-27-27-28-30-30 sts left on shoulder. Cast off when piece measures 70-72-74-76-78-80 cm. Left front piece: Cast on and work like right front piece, but mirrored. Assembly: Sew shoulder seams and sew side seam inside 1 edge st. Crochet border/buttonhole: Crochet a border round the opening (not along bottom edge) on crochet hook size 4 mm as follows: 1 dc in each st. After approx 35 cm (by beg of V-neck) on right front piece crochet 8 ch and skip approx 1 cm for buttonhole. Sew on button approx 9 sts in from mid front by beg of V-neck on left front piece. |
|
|
|
|
Have you made this or any other of our designs? Tag your pictures in social media with #dropsdesign so we can see them! Do you need help with this pattern?You'll find tutorial videos, a Comments/Questions area and more by visiting the pattern on garnstudio.com. © 1982-2024 DROPS Design A/S. We reserve all rights. This document, including all its sub-sections, has copyrights. Read more about what you can do with our patterns at the bottom of each pattern on our site. |


With over 40 years in knitting and crochet design, DROPS Design offers one of the most extensive collections of free patterns on the internet - translated to 17 languages. As of today we count 304 catalogues and 11422 patterns - 11422 of which are translated into English (UK/cm).
We work hard to bring you the best knitting and crochet have to offer, inspiration and advice as well as great quality yarns at incredible prices! Would you like to use our patterns for other than personal use? You can read what you are allowed to do in the Copyright text at the bottom of all our patterns. Happy crafting!
Comments / Questions (11)
Hallo! Ich stricke die Weste in M. Beim Rückenteil soll nach dem Bündchen glatt rechts gestrickt werden und dann sollen nach 16 cm die Abnahmen begonnen werden. Zählt bei den 16cm das Bündchen mit oder messe ich ab dem glatt rechts gestrickten Teil? Viele Grüße!
01.05.2023 - 14:57DROPS Design answered:
Liebe Ute, die 16 cm messen Sie ab ganz unten, dh mit Bündchen und 2 cm nach Bündchen. Viel Spaß beim stricken!
02.05.2023 - 09:31\"Tipp zum Aufnehmen (gilt für das Aufnehmen an der Schulter):\r\nInnerhalb von 4 M. Krausrippe aufnehmen:\"\r\nDie aufgenommene Masche soll glatt weitergestrickt werden, wenn das innerhalb der 4 Krausrippenmaschen geschieht, wird das Maschenbild doch verkehrt (z.B. 2 Krausrippen, 1 M. glatt, 2 Krausrippen)? Das ist doch falsch, oder?
27.12.2021 - 20:49DROPS Design answered:
Liebe Anja, es wird nach den ersten 4 KrausrippenMaschen am Anfang der Hinreihe (= rechte Schulter/Rückenteil) zugenommen und nach den letzten 4 KrausrippenMaschen am Ende der Hinreihe (= linke Schulter/Rückenteil) zugenommen - dh Sie stricken immer Glatt rechts mit 4 Maschen in Krausrippe gegen Ärmelloch. Viel Spaß beim stricken!
03.01.2022 - 09:15Ich möchte Bomull-Lin durch Cotton Light ersetzen, finde aber keinen Umrechnungsfaktor für diese 2 Garne. Habe Sie eine Idee?
21.11.2021 - 14:28DROPS Design answered:
Liebe Anja, also Bomull-Lin gehört der Garngruppe C und Cotton Light der Garngruppe B, am besten benutzen Sie dann Paris oder DROPS Loves You 8 z.B. Hier lesen Sie mehr. Viel Spaß beim stricken!
22.11.2021 - 08:25Ina wrote:
Good day, on the back section, after the rib is done, the pattern says decrease stitches . According to my size I need to decrease 18 stitches. Do I do that all at once on one side or ??? Pattern is a bit unclear . Thanks
25.08.2017 - 18:00DROPS Design answered:
Dear Ina, after the rib section, you've to decrease all the sections with 5 purl stitches to 4 purl stitches. Happy knitting!
25.08.2017 - 22:05Bonjour, Est-il possible d'utiliser une aiguille circulaire plutôt que 4 aiguilles ? Merci d'avance
26.09.2016 - 15:15DROPS Design answered:
Bonjour Nathalie, on n'utilise ici pas d'aiguilles doubles pointes, seulement une aiguille circulaire (en 4 pour les côtes et en 4,5 pour le jersey), et on tricote chaque pièce en allers et retours (cf vidéo ci-dessous). Bon tricot!
26.09.2016 - 15:30Maschenprobe Bomull-Lin 19 M/25 R = 10x10 cm: Bei Grösse M sind nach dem Bündchen beim Wechsel zu Nadel 4,5 noch 113 Maschen auf der Nadel = 59 cm! Zu Beginn sind es 149 M (mit Nadel 4) ergibt ca. 78 cm! Laut Diagramm sollte es bei Grösse M am Anfang nur 58 cm sein. Zudem wird auf der Bomull-Lin die Maschenprobe folgendermassen angegeben: 17 M/22 R = 10 cm mit der Nadel 5,5. Irgendwie stimmen für mich die Angaben überhaupt nicht. Ich wäre froh, wenn Sie mich aufklären könnten. Herzlichen Dank!
23.03.2016 - 13:43DROPS Design answered:
Liebe Karin, bei dieser Weste ist ein etwas kompakteres Maschenbild gewünscht, daher stricken wir mit Nadel 4.5 und einer Maschenprobe von 19 x 25 M statt mit 5.5 und 17x 22 M. Es wurde in der Schnittzeichnung berücksichtigt, dass sich das Bündchen etwas zusammenzieht – zudem wird die Maschenzahl fortlaufend reduziert.
23.03.2016 - 14:30I have 9 inches done of the back in size Large and have used 3 skiens - have 4 left and this will not finish the vest. My gauge swatch came out correct - why would this be?
17.11.2013 - 01:23DROPS Design answered:
Dear Mrs Zertuche, size L requires 500 g Bomull-Lin, which are 10 balls (50 g each ball). Happy knitting!
18.11.2013 - 10:51The diagramm is addes now. You do not surround the armhole. Just the 4 garter stiches knitted while kniting the pieces.
12.01.2012 - 09:511) I don't see the diagram! 2) How to surround the armhole? Is it enough explained, I should make it with the garter stich?
11.01.2012 - 17:54Hela mönstret har inte kommit med. Lyfter man första maskan i framkanten hela tiden blir det en snygg kant som inte drar sig.
11.01.2008 - 16:31