
Popular categories
Looking for a yarn?


|
|||||||
DROPS 104-39 |
|||||||
|
|
|||||||
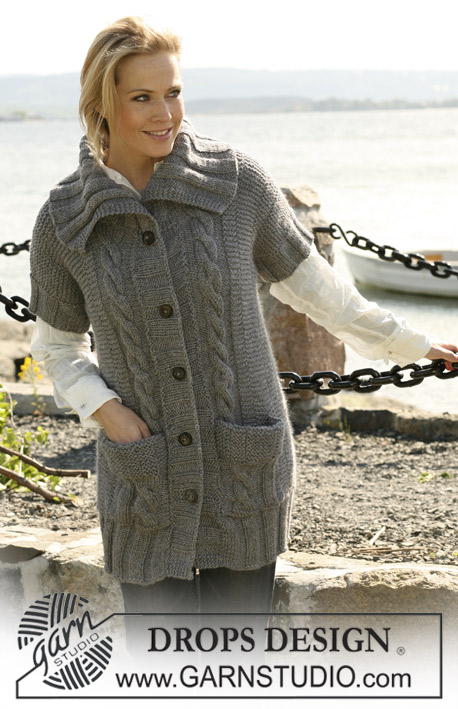
Textured DROPS jacket in ”Alaska”. Sizes: S - XXXL
DROPS 104-39 |
|||||||
|
Knitting tension: 17 sts x 22 rows stocking sts = 10 x 10 cm Garter st: Knit all rows. Moss stitch: 1st row: * K1, P1 *, repeat from *-*. 2nd row: K over P and P over K. Repeat 2nd row. Pattern: See diagram M.1. Diagram is seen from RS. Increasing tip (applies to collar): Inc within 1st edge sts as follows: YO, on next row K into back of YO (knit into back of sts by knitting into back part of sts in stead of front part). Knit all new sts in garter sts. Buttonhole: Cast off for buttonhole on right front band. 1 buttonhole = cast off 3rd and 4th sts from mid front. On next row cast on 2 new sts over cast off sts. Cast off for buttonhole when piece measures: Size S: 3, 12, 20, 29 and 38 cm. Size M: 3, 12, 21, 30 and 39 cm. Size L: 4, 12, 19, 26, 33 and 40 cm. Size XL: 4, 12, 19, 26, 33 and 41 cm. Size XXL: 4, 12, 19, 27, 34 and 42 cm. Size XXXL: 5, 12, 20, 27, 35 and 43 cm. Back and front pieces: Remember knitting tension! Knit piece back and forth on circular needles. Cast on 174-186-202-222-242-266 sts (incl 5 front band sts on each side) on circular needles size 5 mm with Alaska. Knit garter sts - see explanation above – until piece measures 9 cm. Remember to close off for button hole – see explanation above. Knit 1 row stocking sts at the same time insert 2 marking threads or stitch marker into piece as follows: Knit 46-49-53-58-63-69 sts, insert 1 marking thread or stitch marker, knit 82-88-96-106-116-128 sts, insert 1 marking thread or stitch marker and knit last 46-49-53-58-63-69 sts. Read entire next section before knitting commences: Knit M.1, but garter sts 5 outermost sts on each side. At the same time when piece measures 39-40-41-42-43-44 cm inc 1 st for collar - read Increasing tip as follows: on every other cm 11-12-11-12-11-12 times in total and on every cm 6-5-8-7-10-9 times in total – knit new sts and front edge sts in garter sts. At the same time when piece measures 39-40-41-42-43-44 cm inc 1 extra sts into front edge (i.e. stitch number is the same but number of sts on front edge is inc and number of sts in M.1 is reduced) on every other cm 14-14-15-15-16-16 times in total. At the same time continue M.1 and the garter sts front edges until piece measures approx 49-50-51-52-53-54 cm – adjust to 1 pattern repeat in height. Continue in stocking sts with WS out and garter sts on collar, at the same time cast off 3 sts on each side of each marking thread or stitch marker for armhole. Complete each piece separately. Back piece: = 76-82-90-100-110-122 sts. Cast off for armhole on each side on every other row as follows: 2 sts 2-2-3-5-7-9 times and 1 sts 0-2-3-3-3-5 times = 68-70-72-74-76-76 sts. When piece measures 55-56-57-58-59-60 cm complete piece in moss stitch - see explanation above. When piece measures 66-68-70-72-74-76 cm cast off middle 16-16-18-18-20-20 sts for neck. Continuing cast off 1 sts on next row at neckline = 25-26-26-27-27-27 sts left on each shoulder. Cast off when piece measures 68-70-72-74-76-78 cm. Left front piece: Knit same texture as back piece at the same time as casting off for armhole like back piece (NOTE! Continue inc for collar), but continue knitting front edge and new sts in garter sts. After inc and cast off there should be 56-57-60-61-64-64 sts on row. When piece measures 68-70-72-74-76-78 cm cast off the 25-26-26-27-27-27 outermost sts fro shoulder = 31-31-34-34-37-37 sts for collar. Insert 1 marking thread or stitch marker. Continue knitting garter sts on collar as follows: * 2 rows garter sts over all sts, 2 rows garter sts over outermost 20 sts towards mid front*, repeat from *-* for collar measures 5.5.-5.5.-6-6-6.5-6.5 cm from marking thread or stitch marker on shortest side. Cast off loosely. Right front piece: Knit like left piece but reversed. Sleeve: Cast on 44-46-48-50-52-54 sts (incl 1 edge sts on each side) on needles size 5 mm with Alaska. Knit garter st until piece measures 5-6-6-6-6-6 cm. Continue in stocking sts at the same time on 1st row stocking sts inc 1 sts on each side every 5.5 -4.5 -4 -3.5 3 -2.5 cm 8-9-10-11-12-13 times in total = 60-64-68-72-76-80 sts. At the same time when piece measures 20-21-22-23-24-25 cm knit 10 cm garter sts, then knit stocking sts until complete measurement. When piece measures 46-46-45-43-41-39 cm cast off 3 sts on each side to shape sleeve cap. Continuing cast off on every other row as follows: 2 sts 3 times, 1 st 1-2-3-5-7-10 times. Continuing cast off 2 sts on each side until piece measures 53-54-54-54-54-55 cm, then cast off 3 sts 1 time on each side. Cast off when piece measures approx 54-55-55-55-55-56 cm. Assembly: Sew shoulder seams and sew in sleeves. Sew collar tog mid back with mattress sts. Sew collar onto neckline back neck – avoid a thick seam by sewing in outermost seam. Crochet edge: Crochet an edge with crochet hook size 6 mm with Puddel around opening of jacket, (i.e. along one front band, around collar edge and down long the other front band) as follows: * 1 dc, 4 ch and skip approx 2.5 cm * repeat from *-* and finish with 1 dc. Sew in buttons. |
|||||||
Diagram explanations |
|||||||
|
|||||||

|
|||||||
|
Have you made this or any other of our designs? Tag your pictures in social media with #dropsdesign so we can see them! Do you need help with this pattern?You'll find tutorial videos, a Comments/Questions area and more by visiting the pattern on garnstudio.com. © 1982-2024 DROPS Design A/S. We reserve all rights. This document, including all its sub-sections, has copyrights. Read more about what you can do with our patterns at the bottom of each pattern on our site. |
|||||||


With over 40 years in knitting and crochet design, DROPS Design offers one of the most extensive collections of free patterns on the internet - translated to 17 languages. As of today we count 304 catalogues and 11422 patterns - 11422 of which are translated into English (UK/cm).
We work hard to bring you the best knitting and crochet have to offer, inspiration and advice as well as great quality yarns at incredible prices! Would you like to use our patterns for other than personal use? You can read what you are allowed to do in the Copyright text at the bottom of all our patterns. Happy crafting!
Comments / Questions (16)
Er wordt in dit patroon dubbel gemeerderd bij de hals . Moet dat niet eerst geminderd zijn en vervolgens voor de kraag zelf gemeerderd? en als je mindert is dan het rechter pand eerst samen gebreid minderen of een afhalen een breien dan overhalen? Op welke plek minder je dan ?
18.08.2022 - 15:27Förstår inte riktigt ökningar för kragen.ska man först öka varannan cm 11ggr och sedan varje cm 8ggr
13.06.2017 - 17:30Marilyn Mattfeld wrote:
Zohreh 25.11.2008 kl. 09:15: asked the question I need answered but I do not see a reply to her question.. I am confused about the increases also. please help!
14.05.2017 - 14:15DROPS Design answered:
Dear Mrs Mattfeld, this question was answered (has been now added as question/answer), let us know if you need more explanations. Happy knitting!
15.05.2017 - 09:30Hallo, Danke für die Antwort, aber mit den 6 Maschen habe ich verstanden. Ich habe 63 Maschen für das Vorderteil + 11 Maschen für den Kragen zugenommen, dass sind 74 Maschen. Dann nehme ich für den Armausschnitt insgesamt 20 Maschen ab, das macht unterm Strich 54 Maschen. Entschuldigung, aber ich habe es mit Stift und auf einem Blatt Papier stehen, passiert selten das ich mir solch eine Mühe mache. Lieben Gruß aus Herne
08.05.2014 - 21:58DROPS Design answered:
Liebe Monika, für den Kragen müssen Sie pro Vorderteil insgesamt 21 M zunehmen - 11x in jeder 2. R & 10x in jeder R. Von Anfang an gerechnet: 242 M Anschlag + 2x 21 M Kragenzunahme - 2x 6 M Armausschnitt - 110 M Rückenteil = 162 M für beide Vorderteile = 81 M pro Vorderteil nach allen Kragenzunahmen - 17 M Armausschnitt (7x 2 M + 3x 1 M) = 64 M.
08.05.2014 - 22:24Hallo Liebes Drops Team, ich stricke zur Zeit diese Jacke in XXL, leider ist mir bei den Vorderteilen ein Fehler aufgefallen, vielleicht wurde übersehen das auch bei den Vorderteilen für den Armausschnitt 7 x 2 Maschen abgenommen werden. 1 x 3 Maschen, 7 x 2 Maschen und 3 x 1 Masche sind 20 Maschen, es bleiben dann 54 Maschen übrig. Liebe Grüße aus Herne
08.05.2014 - 13:18DROPS Design answered:
Liebe Monika, es war tatsächlich ein Fehler in der Anleitung (gerade behoben), aber an anderer Stelle - Sie müssen 6 M pro Armausschnitt abketten, nicht 3. Es ergeben sich, einschl. der M für den Kragen, die noch nicht komplett zugenommen wurden, theoretisch 81 M pro Vorderteil. Wenn Sie die Armausschnitte dann arbeiten, d.h. dann noch 7x 2 M und 3x 1 M abketten, kommen Sie nach Abschluss aller Kragenzunahmen auf 64 M (81 M - 17 M). Weiterhin gutes Gelingen!
08.05.2014 - 19:19Je crois que c'est une aiguille circulaire n° 5 (et pas n° 9) ?
18.11.2013 - 11:40DROPS Design answered:
Bonjour Madame Gervais, vous avez tout à fait raison, la taille d'aiguille a été modifiée sous les fournitures. Bon tricot!
18.11.2013 - 13:37Bonjour, Quelle quantité pour la taille XXXL ? il doit manquer un chiffre, mais lequel ?
24.03.2013 - 17:40Trude answered:
1250 g
24.03.2013 - 19:44Inc first on every other cm = 2 cm between inc, on every cm = 1 cm between inc.
25.11.2008 - 17:04Zohreh wrote:
Hi I have a question about increas for collar.in the pattern you said: on over other cm 11-12-11-12-11-12 times in total and on every cm 6-5-8-7-10-9 times in total I don't understan the meaning of on over other / on every cm. please more explain this part.
25.11.2008 - 09:15DROPS Design answered:
Dear Mrs Zoreh, inc as follows: work *an inc row, work 2 cm* repeat from *-* the number of times stated for your size, after the last inc, *work 1 cm, work an inc row* repeat from *-*. Happy knitting!
16.05.2017 - 16:27Hej Sanna. Ifølge opskriften skal ærmekuppelen måle 17 cm i den største størrelse. Hvis du strikker løsere end hvad vi anbefaler i opskriften eller hvis du strikker i et andet garn en hvad vi anbefaler i opskriften, så vil din ærmekuppel blive for stor inden du får lukket alle maskerne af... Du kan altid få hjælp med opskriften hos vore forhandlere hvis du har købt garnet der. God fornøjelse!
27.10.2008 - 09:26