
Popular categories
Looking for a yarn?


|
||||||||||||||||
DROPS 103-34 |
||||||||||||||||
|
|
||||||||||||||||
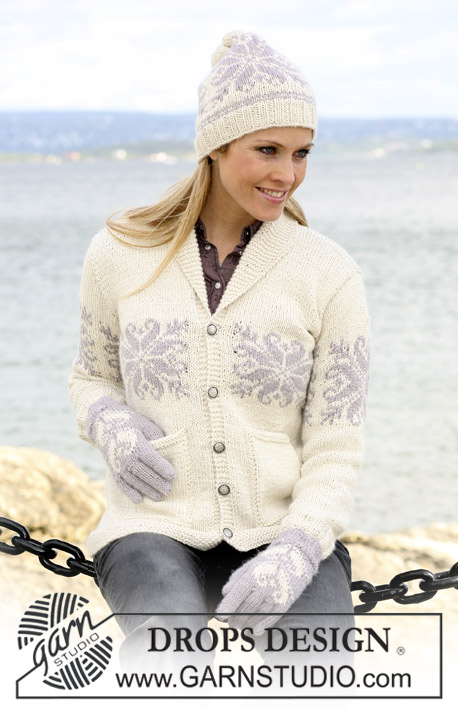
DROPS Blouse with short sleeves knitted in 2 directions with 2 threads ”Alpaca”. Size S to XXXL
DROPS 103-34 |
||||||||||||||||
|
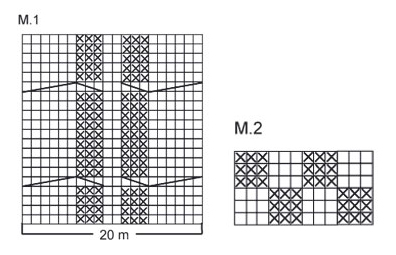
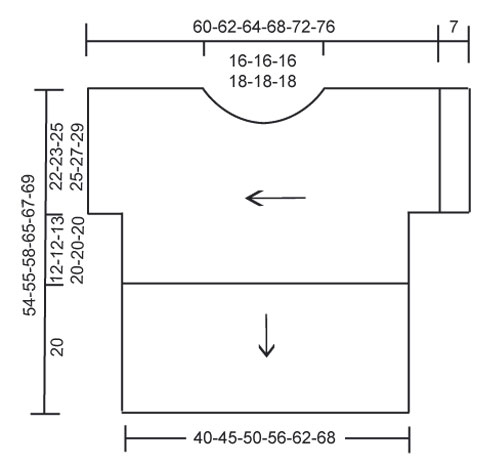
Knitting tension: 17 sts x 22 rows with 2 threads of Alpaca in stocking sts = 10 x 10 cm Pattern: See diagrams M.1 og M.2. For the 3 smallest sizes there are only 2 cables (= M.1), along the back and front pieces and for the 3 largest size there are 3 cables. The diagram are shown from the RS. Rib: * K3, P3 *, repeat from *-* Split the work into 2 pieces: First the top piece knitted sideways from left sleeve to right sleeve. Knit back and forth on circular needles, because of the number of stitches. Then sew the top piece tog. at the sides and pick up sts and knit down to complete the blouse. Top piece: Cast on 91-95-103-103-109-115 sts (incl. 1 edge st each side) on circular needles size 5mm with 2 threads of Alpaca. P the first row from the WS. Knit the next row as follows: Size S: 1 edge st, P4 , M.1, P4, K2, P4, M.2 over 21 sts, P4, K2, P4, M.1, P4 and 1 edge st. Size M: 1 edge st, K2, P4, M.1, P4, K2, P4, M.2 over 21 sts, P4, K2, P4, M.1, P4, K2 and 1 edge st. Size L and XL: 1 edge st, P4, K2, P4, M.1, P4, K2, P4, M.2 over 21 sts, P4, K2, P4, M.1, P4, K2, P4 and 1 edge st. Size XXL: 1 edge st, P4, K2, P4, M.1, P4, K2, P4, M.2 over 27 sts, P4, K2, P4, M.1, P4, K2, P4 and 1 edge st. Size XXXL: 1 edge st, P4, K2, P4, M.1, P4, K2, P4, M.2 over 33 sts, P4, K2, P4, M.1, P4 , K2, P4 and 1 edge st. All sizes: Continue pattern. At the same time when the piece measures 8-7-5-4-3-2 cm inc. for sleeves each side on every other row: 2 sts 2 times and 26-26-26-46-46-46 sts 1 time = 151-155-163-203-209-215 sts. Incorporate new sts into the pattern as going along, so after all inc. the pattern looks as follows from the RS: Size S: 1 edge st, P4, M.1, P4, K2, the next 89 sts as knitted before, then K2, P4, M.1, P4 and 1 edge st. Size M: 1 edge st, K2, P4, M.1, P4, the next 93 sts knitted as before, then P4, M.1, P4, K2 and 1 edge st. Size L: 1 edge st, P4, K2, P4, M.1, the next 101 sts knitted as before, then M.1, P4, K2, P4 and 1 edge st. Size XL: 1 edge st, M.1, P4, K2, P4, M.1, the next 101 sts knitted as before, then M.1, P4, K2, P4, M.1 and 1 edge st. Size XXL: 1 edge st, M.1, P4, K2, P4, M.1, the next 107 sts knitted as before, then M.1, P4, K2, P4, M.1 and 1 edge st. Size XXXL: 1 edge st, M.1, P4, K2, P4, M.1, the next 113 sts knitted as before, then M.1, P4, K2, P4, M.1, and 1 edge st. All sizes: Continue this pattern. When the piece measures 22-23-24-25-27-29 cm put 80-82-86-106-109-112 sts at the left hand side (= front piece) on thread no. 1 (or a stitch holder no. 1) = 71-73-77-97-100-103 sts left on row (= back piece). Continue the pattern as knitted before until the piece measures 38-39-40-43-45-47 cm. Put remaining sts on thread no. 2 (or stitch holder no. 2). Put the bottom 74-76-80-100-103-106 sts from thread no. 1 back on needle (keep the remaining 6 sts on the thread for the neck shaping). Continue the pattern– at the same time cast off towards the neck at the right side on every other row: 3 sts 2 times, 2 sts 2 times and 1 st 1 time = 63-65-69-89-92-95 sts. Continue the pattern. When the piece measures 34-35-36-39-41-43 cm inc. for the neck at the right side on every other row: 1 st1 time, 2 sts 2 times and 3 sts 2 times, then cast on 6 new sts = 80-82-86-106-109-112 m. Put sts from thread no. 2 back on needle = 151-155-163-203-209-215 sts. Make sure you have the same number of rows each side of the neck so the pattern fits when the pieces are reconnected! Continue the pattern over all sts as earlier. When the piece measures 49-52-56-61-66-71 cm cast off each side on every other row: 26-26-26-46-46-46 sts 1 time and 2 sts 2 times = 91-95-103-103-109-115 sts. Continue the pattern with 1 edge st each side . Cast off when the piece measures approx. 60-62-64-68-72-76 cm – make sure the work have the same width each side of the neck. Bend the top piece at shoulder and sew underneath the sleeve and the side seams inside 1 edge st and the casting on /casting off edge. Bottom part: Knit round on circular needles!. Pick up 144-162-180-204-228-246 sts along the bottom edge of the top piece inside 1 edge st. on circular needles size 5 mm with 2 threads of Alpaca . P 1 round and K 1 round. Continue with Rib – see explanation above- for 20 cm . Cast off loosely with K over K and P over P. Neck: Pick up 84-90-90-96-96-102 sts (incl the sts from the threads or stitch holders) around the neck on a small circular needle size 5 mm with 2 threads of Alpaca. P 1 round and K 1 round. Continue with Rib for 14-14-15-15-16-16 cm. Cast off loosely with K over K and P over P. Sleeve border: Pick up 84-84-90-90-96-104 sts around the armholes on a small circular needles size 5 mm with 2 threads of Alpaca. P 1 round and K 1 round. Continue with Rib for 7 cm. Cast off loosely with K over K and P over P. Ribbon: Knit back and forth on small circular needle. Cast on 6 sts on a small circular needle size 5 mm with 2 threads of Alpaca Knit as follows: * K1, Put the threads of yarn at the front of the work, slip 1 st as if to P, put the threads of yarn behind the work again *, repeat from *-* until finish row. Turn and repeat from *-* on all rows. Cast off when the Ribbon measures approx. 230-250-270-290-310-330 cm. Tigh the ribbon around the waist 2 times. |
||||||||||||||||
Diagram explanations |
||||||||||||||||
|
||||||||||||||||
|
||||||||||||||||
|
||||||||||||||||
|
Have you made this or any other of our designs? Tag your pictures in social media with #dropsdesign so we can see them! Do you need help with this pattern?You'll find tutorial videos, a Comments/Questions area and more by visiting the pattern on garnstudio.com. © 1982-2024 DROPS Design A/S. We reserve all rights. This document, including all its sub-sections, has copyrights. Read more about what you can do with our patterns at the bottom of each pattern on our site. |
||||||||||||||||


With over 40 years in knitting and crochet design, DROPS Design offers one of the most extensive collections of free patterns on the internet - translated to 17 languages. As of today we count 304 catalogues and 11422 patterns - 11422 of which are translated into English (UK/cm).
We work hard to bring you the best knitting and crochet have to offer, inspiration and advice as well as great quality yarns at incredible prices! Would you like to use our patterns for other than personal use? You can read what you are allowed to do in the Copyright text at the bottom of all our patterns. Happy crafting!
Comments / Questions (35)
En ymmärrä tätä ohjeen kohtaa lainkaan, tarkoittaako tuo 26 silmukan lisäys aina vain toiseen reunaan ja 2x2silmukkaan toiseen reunaan? : Samanaikaisesti kun työn korkeus on 8-7-5-4-3-2 cm, lisää kumpaankin reunaan hihoja varten joka 2. krs näin: 2 x 2 s ja 1 x 26-26-26-46-46-46 s = 151-155-163-203-209-215 s. Lisätyillä s:illa neulotaan juoksevasti mallineuletta siten, että lisäysten jälkeen oikealta puolelta neulotaan näin.
26.12.2023 - 22:54DROPS Design answered:
Hei, työn kumpaankin reunaan lisätään aluksi 2 silmukkaa 2 kertaa (eli kumpaankin reunaan lisätään yhteensä 4 silmukkaa) ja sitten kumpaankin reunaan lisätään 26-26-26-46-46-46 silmukkaa.
02.01.2024 - 12:39Excusez moi on a montés les M à 8 cm et non à 22 cm.
04.09.2019 - 07:51DROPS Design answered:
Tout à fait - correction faite, merci pour votre retour!
04.09.2019 - 09:11Bonjour. J'en suis au 49 cm de hauteur totale ou il faut rabattre les M qu'on a montés à 22 cm (pour la taille s). On a montés 26 M 1 fois puis 2 fois 2 M et maintenant il faut rabattre 26 fois 1 m puis 2 fois 2 M. Est ce une erreur ou pas. ? Merci de votre aide
04.09.2019 - 07:49DROPS Design answered:
Bonjour Sylvie, on va effectivement monter 1 x 26 m et 2 x 2 m, la correction a été faite, merci. Bon tricot!
04.09.2019 - 09:10Bonjour. Merci infiniment pour votre réponse mais les diminutions de l'encolure doivent etre faites après les 6 m laissées en attente
02.09.2019 - 10:48DROPS Design answered:
Bonjour Sylvie, tout à fait, ces 6 mailles seront reprises pour l'encolure, on les met d'abord en attente puis on continue en rabattant pour l'encolure tous les 2 rangs. On va ensuite augmenter pour l'encolure en sens inverse, en terminant par monter 6 m (pour que l'encolure soit symétrique). Bon tricot!
02.09.2019 - 11:39Bonjour. Je suis coincée au niveau des 80 M aux quelles on garde 6 M. Doit on faire les diminutions de l'encolure après les 6 M gardées en attente et quand reprendre ces 6 M pour continuer. Merci de m'aider
01.09.2019 - 10:56DROPS Design answered:
Bonjour Sylvie, les 6 mailles mises en attente seront reprises lorsqu'on fera le col - cf ENCOLURE. Bon tricot!
02.09.2019 - 10:27Bonjour. De quel côté doit on laisser les 6 m pour l'encolure. Merci
18.04.2019 - 08:15DROPS Design answered:
Bonjour Sylvie. Pour l’encolure, vous laissez sur le fil les 6 mailles à la droite, les mailles les plus proches aux épaules. Bon tricot!
18.04.2019 - 16:24Bonjour. A 22 cm de haut total je dois mettre 80 m a gauche en attente et je dois travailler sur les 71 m restant. A 38 cm il faut reprendre 74 m et les tricoter en gardant 6 m du fil. Je ne comprends pas on en laisse 71 m de côté et on reprend 74 m en laissant les m restantes en attente. Quelles sont les 6 m laissées pour l'encolure ? Merci de votre aide
16.04.2019 - 19:52DROPS Design answered:
Bonjour Sylvie. Vous mettez en attente les 71 m sur l’arrêt mailles n.2. Puis vous reprenez le 80 m mises sur l’arrêt mailles n.1, en gardant 6 m pour l’encolure. Vous tricotez donc sur 74 mailles. Bon tricot.
16.04.2019 - 21:54Beste drops. Ik brei maat xl en kom niet uit de wiskunde voor de mouw. Ik moet de meerderingen doen voor ik het breisel op deel. Dan heb ik vlgs het patroon 25 -4 cm om 2 x 2 en 46 x 1 steken te meerderen in elke tweede naald. 21 cm x 22 nld = ca 46 nld, meerderen in elke tweede nld is 23 nld om 48 keer te meerderen? Of moet het patroon zeggen, meerderen in elke naald?
22.11.2014 - 14:08DROPS Design answered:
Hoi Tessa. Je leest het verkeerd. Je meerdert 2 keer 2 st en 1 keer 46 st aan beide zijkanten - niet 46 keer 1 st.
27.11.2014 - 15:58Hi.i am working with this lovely pattern and i can not understand how to inc for sleeves?? in the first of the row with new yarn??start with right or wrong row to be the sleeves and body together in the right side>>>> thank you
18.03.2014 - 16:35DROPS Design answered:
Dear Meme, you cast on new sts for sleeve at the end of each row each side as stated, as shown in the video below. Happy knitting!
18.03.2014 - 17:36Thanks for the quick answer. The video was really helpful.
09.05.2012 - 09:43