
Popular categories
Looking for a yarn?


|
|
Silver Haze |
|
 |
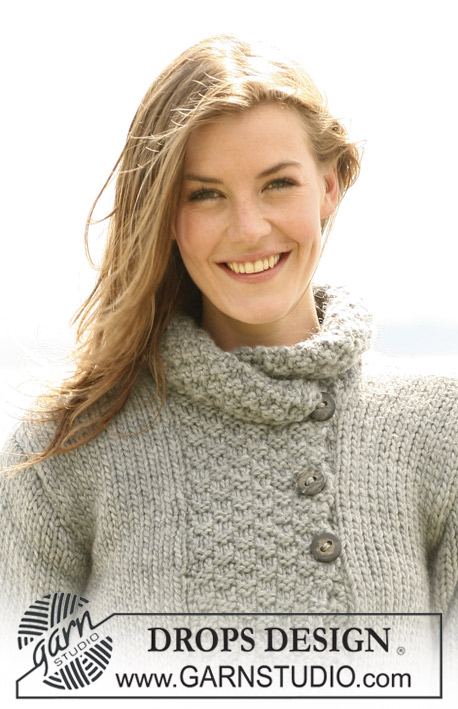 |
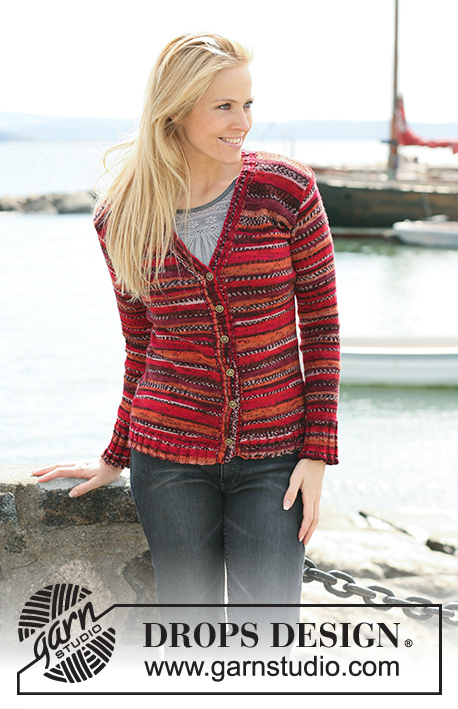
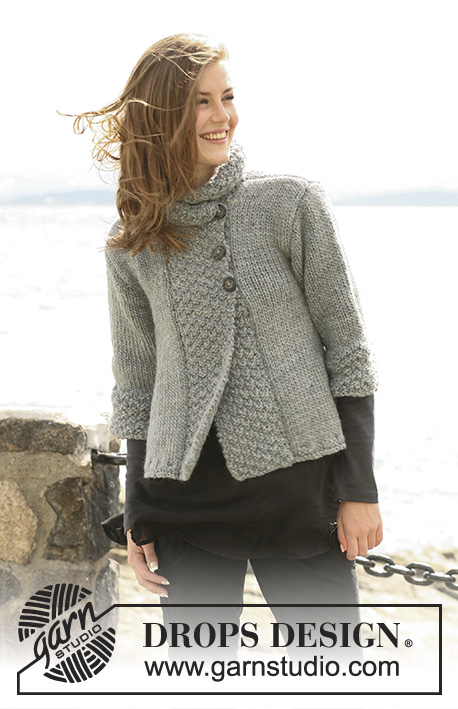
DROPS jacket in ”Snow”, "Andes" or ”Nepal” with A-shape and ¾-long or long sleeves. Size S to XXXL
DROPS 103-1 |
|
|
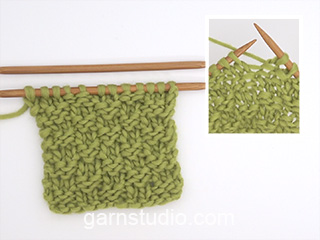
General comment: The double moss sts at the front will pull a little when knitting, but will stretch out when the garment is finish. Knitting tension: 11 sts x 15 rows in stocking sts = 10 x 10 cm. Double moss sts: 1st row: * P2, K2 *, repeat from *-*. 2nd row: P over P and K over K. 3rd row: * K2, P2 *, repeat from *-* 4th row: K over K and P over P. Repeat row 1-4. Rib: * K2, P2 *, repeat from *-*. Garter sts: Knit back and forth on all rows. Button hole: Cast off for button hole at the right front piece. 1 button hole = Cast of the 4th st from the edge, on the returning row cast on a new st at the same place. Cast off for button hole when the piece measures: Size S: 33, 40 and 47 cm. Size M: 35, 42 and 49 cm. Size L: 37, 44 and 51 cm. Size XL: 38, 45 and 52 cm. Size XXL: 38, 46 and 54 cm. Size XXXL: 38, 47 and 56 cm. Back piece: Knit back and forth! Cast on 64-68-72-80-84-88 sts (incl. 1 edge st each side) on needle size 8 mm with Snow. Knit 2 rows of garter sts, and then 2 rows of Rib with 1 edge st and 2 K sts each side (seen from the RS)– see explanation above. Continue in stocking sts. Remember the knitting tension! When the piece measures 5 cm cast off 1 st each side on every 3½-3½-4½-4-5-5 cm a total of 8-8-7-8-7-7 times = 48-52-58-64-70-74 sts. When the piece measures 35-36-37-38-39-40 cm cast off for armholes each side on every other row: 3 sts 1 time, 2 sts 0-0-1-2-3-3 times and 1 st 1-2-3-3-3-4 times = 40-42-42-44-46-48 sts left. When the piece measures 51-53-55-57-59-61 cm cast off the mid 12-12-12-14-14-14 sts for the neck. On the next row cast off 1 more st towards the neck = 13-14-14-14-15-16 sts left for each shoulder. Cast off when the piece measures 54-56-58-60-62-64 cm. Left front piece: Cast on 39-41-43-49-51-53 sts (incl. 1 edge st at the side) on needle size 8 mm with Snow. Knit 2 rows of garter sts and then 2 rows of Rib with 1 edge st and 2 P sts at the side (seen from the RS). Continue in stocking sts and 14-14-14-16-16-16 sts at the mid front in Double moss sts – see explanation above! When the piece measures 5 cm cast off at the side as done for the back piece = 31-33-36-41-44-46 sts. When the piece measures 35-36-37-38-39-40 cm cast off for the armhole at the side as done for the back piece = 27-28-28-31-32-33 sts. When the piece measures 49-51-53-54-56-58 cm cast off 10 sts at the mid front for the neck. Insert 1 MT (marking thread) after the cast off sts. Then cast off for the neck on every other row: 2 sts 2-2-2-3-3-3 times and 1 st 0-0-0-1-1-1 times = 13-14-14-14-15-16 sts left for the shoulder. Cast off remaining sts when the piece measures 54-56-58-60-62-64 cm. Right front piece: Cast on and knit as left front but reverse. In addition remember to cast off for the buttonholes at the front edge – see explanation above. Sleeve: The numbers before ( )apply for the ¾-long sleeves and the numbers in the ( ) applies for the long sleeves. Cast on 34-34-34-38-38-38 sts (incl. 1 edge st each side) on needle size 8 mm with Snow. Knit in double moss sts – see explanation above – with 1 edge st each side. When the piece measures 10 cm continue in stocking sts. At the same time when the piece measures 11 (25) cm inc. 1 st each side on every 9-6-4½-6-4-2½ cm a total off 3-4-5-4-5-7 times = 40-42-44-46-48-52 sts. When the piece measures 34-33-32-31-29-28 (49-48-47-46-44-43) cm cast off for the sleeve cap each side on every other row: 3 sts 1 time, 2 sts 1 time and 1 sts 2-3-4-4-6-7 times, continue to cast off 2 sts each side until the piece measures 40 (55) cm, then cast off 3 sts each side 1 time and cast off remaining sts. The piece measures approx. 42 (57) cm. Assembly: Sew the shoulder seams Collar: Pick up approx. 24 to 28 sts in between the MT at the neck line (i.e do not pick up sts in the outer most 10 sts each side at the mid front). Knit 2 rows of garter sts – on the last row inc. 10 sts evenly distributed = 34-38 sts. Continue in Double moss sts with 1 garter sts each side. At the same time inc. 2 sts each side as follows: To inc. knit 2 sts in the outer most st, then make a yo which should be twisted on the returning row –incorporate new sts into pattern as going along. Inc 2 sts at the beg. of row a total of 6 times each side = 24 extra sts = a total of 58-62 sts. Cast off when the collar measures 12 cm mid back. Sew the collar tight to the front pieces each side in the outer part of the edge, i.e. new sts are sewn to the 10 cast off sts each side. Sew the arm and the side seams inside 1 edge st. Sew on the buttons. _________________________________________________________________ NEPAL Size: S – M – L – XL – XXL - XXXL Materials: DROPS NEPAL from Garnstudio ¾-long sleeves: 600-650-750-800-900-1000 g, clr. 517, medium grey Long sleeves: 700-750-800-900-1000-1050 g, clr. 517, medium grey. DROPS pointed needles size 4.5 mm – or the size needed to obtain the correct knitting tension. DROPS Buffalohorn buttons no. 536: 3 pcs. Knitting tension: 17 sts x 22 rows in stocking sts = 10 x 10 cm Double moss sts: 1st row: * P2, K2 *, repeat from *-*. 2nd row: P over P and K over K. 3rd row: * K2, P2 *, repeat from *-* 4th row: K over K and P over P. Repeat row 1-4. Rib: * K2, P2 *, repeat from *-*. Garter sts: Knit back and forth on all rows. Button hole: Cast off for button hole at the right front piece. 1 button hole = Cast of the 5th and 6th stt from the edge on the returning row cast on 2 new sts at the same place. Cast off for button hole when the piece measures: Size S: 33, 40 and 47 cm. Size M: 35, 42 and 49 cm. Size L: 37, 44 and 51 cm. Size XL: 38, 45 and 52 cm. Size XXL: 38, 46 and 54 cm. Size XXXL: 38, 47 and 56 cm. Back piece: Knit back and forth! Cast on 96-104-112-124-132-136 sts (incl. 1 edge st each side) on needle size 4.5 mm with Nepal. Knit 2 rows of garter sts, and then 2 rows of Rib with 1 edge st and 2 K sts each side (seen from the RS)– see explanation above. Continue in stocking sts. Remember the knitting tension! When the piece measures 5 cm cast off 1 st each side on every 2½-2½-2½-2½-2½-3 cm a total of 11-12-12-13-12-11 times = 74-80-88-98-108-114 sts. When the piece measures 35-36-37-38-39-40 cm cast off for armholes each side on every other row: 3 sts 1-1-1-2-2-2 times, 2 sts 0-1-2-3-4-5 times and 1 st 3-3-4-3-4-4 times = 62-64-66-68-72-74 sts left. When the piece measures 51-53-55-57-59-61 cm cast off the mid 20-20-20-24-24-24 sts for the neck. On the next row cast off 1 more st towards the neck = 20-21-22-21-23-24 sts left for each shoulder. Cast off when the piece measures 54-56-58-60-62-64 cm. Left front piece: Cast on 59-63-67-75-79-81 sts (incl. 1 edge st at the side) on needle size 4.5 mm with Nepal. Knit 2 rows of garter sts and then 2 rows of Rib with 1 edge st and 2 P sts at the side (seen from the RS). Continue in stocking sts and 22-22-22-26-26-26 sts at the mid front in Double moss sts – see explanation above! When the piece measures 5 cm cast off at the side as done for the back piece = 48-51-55-62-67-70 sts. When the piece measures 35-36-37-38-39-40 cm cast off for the armhole at the side as done for the back piece = 42-43-44-47-49-50 sts. When the piece measures 49-51-53-54-56-58 cm cast off 16 sts at the mid front for the neck. Insert 1 MT (marking thread) after the cast off sts. Then cast off for the neck on every other row: 2 sts 2-2-2-4-4-4 times and 1 st 2 times = 20-21-22-21-23-24 sts left for the shoulder. Cast off remaining sts when the piece measures 54-56-58-60-62-64 cm. Right front piece: Cast on and knit as left front but reverse. In addition remember to cast off for the buttonholes at the front edge – see explanation above. Sleeve: The numbers before ( )apply for the ¾-long sleeves and the numbers in the ( ) applies for the long sleeves. Cast on 50-50-54-54-58-58 sts (incl. 1 edge st each side) on needle size 4.5 mm with Nepal. Knit in double moss sts– see explanation above – with 1 edge st each side. When the piece measures 10 cm continue in stocking sts. At the same time when the piece measures 11 (25) cm inc. 1 st each side on every 5-3-3-2-2-1½ cm a total of 5-7-7-9-9-11 times 60-64-68-72-76-80 sts. When the piece measures 34-33-32-31-29-28 (49-48-47-46-44-43) cm cast off for the sleeve cap each side on every other row: 3 sts 1 time, 2 sts 3 time and 1 sts 1-2-3-4-6-7 times, continue to cast off 2 sts each side until the piece measures 41 (56) cm, then cast off 3 sts each side 1 time and cast off remaining sts. The piece measures approx. 42 (57) cm. Assembly: Sew the shoulder seams. Collar: Pick up approx. 36 to 42 sts in between the MT at the neck line (i.e do not pick up sts in the outer most 16 sts each side at the mid front). Knit 2 rows of garter sts – on the last row inc. 12 sts evenly distributed = 48-54 sts. Continue in Double moss sts with 1 garter sts each side. At the same time inc. 2 sts each side as follows: To inc. knit 2 sts in the outer most st, then make a yo which should be twisted on the returning row –incorporate new sts into pattern as going along. Inc 2 sts at the beg. of row a total of 9 times each side = 36 extra sts = a total of 84-90 sts. Cast off when the collar measures 12 cm mid back. Sew the collar tight to the front pieces each side in the outer part of the edge, i.e. new sts are sewn to the 16 cast off sts each side. Sew the arm and the side seams inside 1 edge st. Sew on the buttons. |
|
|
|
|
Have you made this or any other of our designs? Tag your pictures in social media with #dropsdesign so we can see them! Do you need help with this pattern?You'll find tutorial videos, a Comments/Questions area and more by visiting the pattern on garnstudio.com. © 1982-2024 DROPS Design A/S. We reserve all rights. This document, including all its sub-sections, has copyrights. Read more about what you can do with our patterns at the bottom of each pattern on our site. |
|


With over 40 years in knitting and crochet design, DROPS Design offers one of the most extensive collections of free patterns on the internet - translated to 17 languages. As of today we count 304 catalogues and 11422 patterns - 11422 of which are translated into English (UK/cm).
We work hard to bring you the best knitting and crochet have to offer, inspiration and advice as well as great quality yarns at incredible prices! Would you like to use our patterns for other than personal use? You can read what you are allowed to do in the Copyright text at the bottom of all our patterns. Happy crafting!
Comments / Questions (275)
Thank you for answering my question and clarifying things for me. Kind Regards
23.07.2023 - 20:58Hello, I am having trouble with the instructions for the sleeves. I have completed the decreases which are the same as Back but then patterns says ‘Continue to bind off 2 sts each side’ which does not make sense as the last decrease I did was 1 st each side. Also there is no stitch count in these instructions compared to other sections. Any help would be great. Thank you.
21.07.2023 - 11:49DROPS Design answered:
Dear Angela, it means that, after casting off 1 stitch the specified amount of times indicated you will continue by casting off 2 stitches on each side until the piece reaches the desired measurements (to obtain this specific sleeve cup curved shape). Since the amount of stitches is not relevant here (you will cast off all stitches right after reaching the desired length) we don't indicate the remaining stitches. After all, these remaining stitches may vary depending on the gauge of your work and it will not matter how many you have left as long as you reach the indicated length. Happy knitting!
23.07.2023 - 19:17Muito obrigada pela vossa excelente explicação. Já fiz e ficou lindo
20.10.2022 - 09:20Ola, ao fazer a gola deste modelo posso levantar as malhas a toda volta do decote em vez de ter fazer aumentos e depois coser? Qual a diferença? Obrigada
16.10.2022 - 23:33DROPS Design answered:
Boa tarde, As malhas , no modelo, são levantadas para formar a gola. Pode levantar sem fazer os aumentos, mas não terá o mesmo feitio. Os aumentos vão enviesar a gola para que possa ficar como na foto ao ser dobrada. Sem os aumentos, há a possibilidade de a gola, ao ser dobrada, ficar estreita. Bons tricôs!
18.10.2022 - 15:47Vedr. drops 103-1 Nepal Ærme: …….. Når arb måler 34-33-32-29-28(49-48-47-46-44-43) Skal det ikke være…………. Når arb måler 28-29-32-33-34(43-44-46-47-48-49 Med venlig hilsen Karen Christensen
12.10.2022 - 17:15DROPS Design answered:
Hei Karen. Nei, det er riktig slik det står (det er kortere mål i de større størrelsene pga bredere skuldervidde og lengre ermetopp). mvh DROPS Design
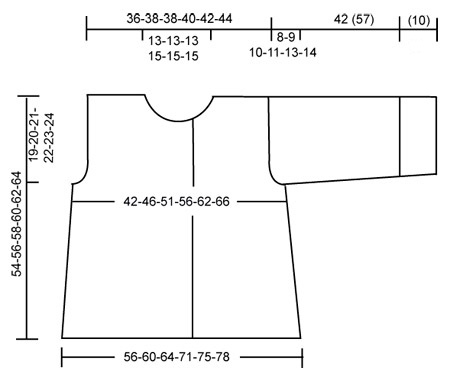
17.10.2022 - 13:12No vosso diagrama os números são n. de malhas ou cm e na vertical são voltas? Não consigo chegar a uma conclusão. Obrigada
02.10.2022 - 22:23DROPS Design answered:
Bom dia, Todos os números indicados no diagrama são em cm tanto em largura como em altura. Bons tricôs!
03.10.2022 - 10:09Est-ce que je peux prendre une autre sorte de laine moyenne pour faire ce chandail? Il est tellement beau
29.04.2022 - 03:33DROPS Design answered:
Bonjour Mme Normandeau, les explications de ce modèle sont disponibles en 2 versions: Snow/Andes soit 11 m x 15 rangs jersey = 10 x 10 cm soit la version Nepal (plus bas dans la page) 17 m x22 rangs jersey = 10 x 10 cm. Bon tricot!
29.04.2022 - 08:33Hi igjen. Am working on the collar and I have a question. The collar is not yet 12 cm and it seems like it is going to be longer than the peice it is going to be sewn to. Should I knit 12 cm anyways and stretch to sew together. Or should I cast off when the collar is the correct length to see. That is the lengths are the same. Not sure how to end this .Thanks. S
27.01.2022 - 20:23DROPS Design answered:
Dear Sharon, cast off stitches on collar when peice measures 12 cm on mid back, then sew the new stitches increased on each side along the 16 sts cast off on each front piece. Happy knitting!
28.01.2022 - 08:50Hi! Thanks for your response, but it is impossible to pick up 36 or 42 sts. If i do there er large gaps. Had to pick up more sts and decreased. the YO is not the problem its the amount of stitches to pic up.
24.01.2022 - 08:18DROPS Design answered:
Dear Sharon, remember that you don't have to pick up sts along the 16 sts on each front piece; this mean just pick up 8 sts on each front piece + 24 sts on neckline back piece = 42 sts. Should you get more/less sts, you can then adjust on first row. Happy knitting!
24.01.2022 - 10:25Hi, am picking for the collar on the largest size of the Nepal version. My question is how do i pick up so there er no large gaps between the picked up stitches. I tried twice and ripped put because there were too many stitches and when i tried to pick up 42 stitches there were large gaps between stitches as mentioned. So how do I solve this problem.
23.01.2022 - 00:16DROPS Design answered:
Hi Sharon, If you get large gaps between the stitches, when you first work the knitted-up stitches, work them twisted (i.e. in the back loop). This should avoid holes. Happy knitting!
24.01.2022 - 08:05