
Popular categories
Looking for a yarn?


|
|
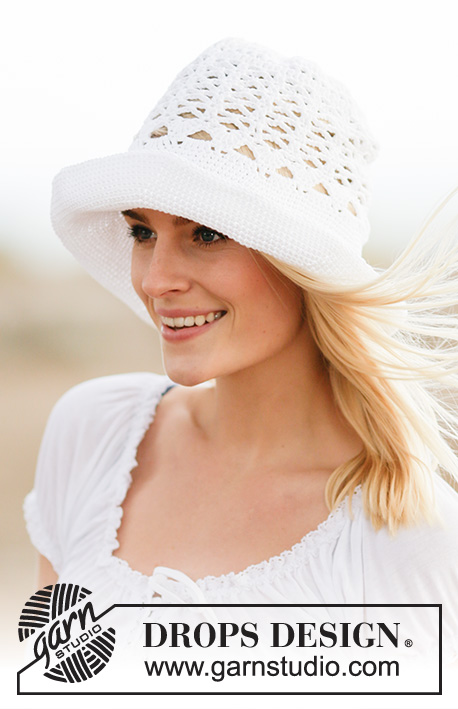
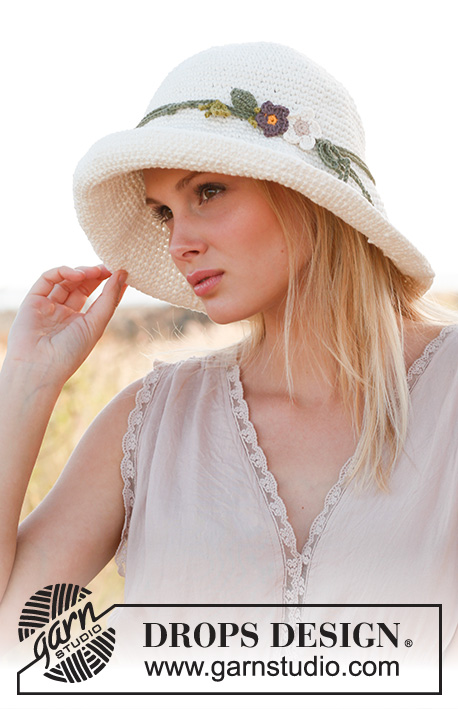
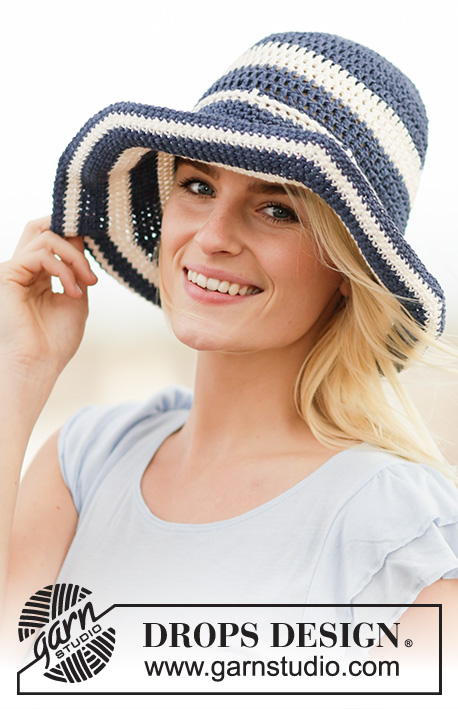
Summer Stripes |
|
 |
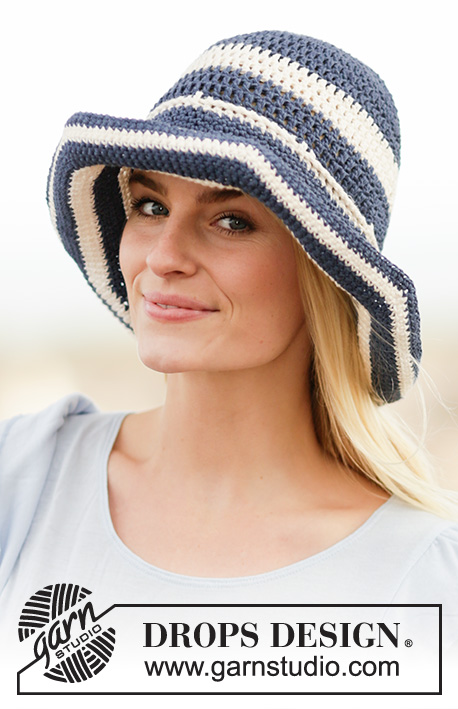 |
Crochet DROPS hat with stripes in "Bomull-Lin" or "Paris".
DROPS 162-31 |
|
|
CROCHET INFO: Replace first tr at beg of every tr round with 3 ch. Finish every round with 1 sl st in ch from beg of round. STRIPES-1: ROUND 1-3: Dark blue/dark wash ROUND 4-6: Off white ROUND 7-9: Dark blue/dark wash ROUND 10: Off white S/M is done, continue with 1 round dark blue/dark wash in L/XL. STRIPES-2: ROUND 1-4: Dark blue/dark wash ROUND 5-7: Off white ROUND 8-11: Dark blue/dark wash ROUND 12-14: Off white ROUND 15-18: Dark blue/dark wash ROUND 19-20: Off white ROUND 21-22: Dark blue/dark wash ---------------------------------------------------------- HAT: Crochet 5-5 ch on hook size 4.5 mm with dark blue/dark wash and form a ring with 1 sl st. ROUND 1: Work 12-12 tr in ring – read CROCHET INFO. ROUND 2: Work 2 tr in every tr = 24-24 tr. ROUND 3: Work * 2 tr in next tr, 1 tr in the next tr *, repeat from *-* the entire round = 36-36 tr. ROUND 4: Work * 2 tr in first tr, 1 tr in each of the next 2 tr *, repeat from *-* the entire round = 48-48 tr. REMEMBER THE CROCHET TENSION! ROUND 5: Work * 2 tr in first tr, 1 tr in each of the next 3 tr *, repeat from *-* the entire round = 60-60 tr. ROUND 6: Work * 2 tr in first tr, 1 tr in each of the next 4 tr *, repeat from *-* the entire round = 72-72 tr. S/M is now done, continue as follows in M/L: ROUND 7: Work * 2 tr in first tr, 1 tr in each of the next 5 tr *, repeat from *-* the entire round = 84 tr. BOTH SIZES: Continue with 1 tr in every tr, AT THE SAME TIME work STRIPES-1 - see explanation above. When stripes-1 has been done and piece measures approx. 17-18 cm, continue as follows: Now work a brim in dc and STRIPES-2 - see explanation above. ROUND 1: Work * 2 dc in first tr, 1 dc in each of the next 11-14 tr *, repeat from *-* the entire round = 78-90 dc. ROUND 2: Work * 2 dc in first dc, 1 dc in each of the next 12-15 dc *, repeat from *-* the entire round = 84-96 dc. ROUND 3: Work 1 dc in each dc = 84-96 dc. ROUND 4: Work * 2 dc in first dc, 1 dc in each of the next 13-16 dc *, repeat from *-* the entire round = 90-102 dc. ROUND 5: Work * 2 dc in first dc, 1 dc in each of the next 14-17 dc *, repeat from *-* the entire round = 96-108 dc. ROUND 6: Work 1 dc in every dc = 96-108 dc. ROUND 7: Work * 2 dc in first dc, 1 dc in each of the next 15-18 dc *, repeat from *-* the entire round = 102-114 dc. ROUND 8: Work * 2 dc in first dc, 1 dc in each of the next 16-19 dc *, repeat from *-* the entire round = 108-120 dc. ROUND 9: Work 1 dc in every dc = 108-120 dc. ROUND 10: Work * 2 dc in first dc, 1 dc in each of the next 17-20 dc *, repeat from *-* the entire round = 114-126 dc. ROUND 11: Work * 2 dc in first dc, 1 dc in each of the next 18-21 dc *, repeat from *-* the entire round = 120-132 dc. ROUND 12: Work 1 dc in every dc = 120-132 dc. ROUND 13: Work * 2 dc in first dc, 1 dc in each of the next 19-22 dc *, repeat from *-* the entire round = 126-138 dc. ROUND 14: Work * 2 dc in first dc, 1 dc in each of the next 20-23 dc *, repeat from *-* the entire round = 132-144 dc. ROUND 15: Work 1 dc in every dc = 132-144 dc. ROUND 16: Work * 2 dc in first dc, 1 dc in each of the next 21-24 dc *, repeat from *-* the entire round = 138-150 dc. ROUND 17: Work * 2 dc in first dc, 1 dc in each of the next 22-25 dc *, repeat from *-* the entire round = 144-156 dc. ROUND 18: Work 1 dc in every dc = 144-156 dc. ROUND 19: Work * 2 dc in first dc, 1 dc in each of the next 23-26 dc *, repeat from *-* the entire round = 150-162 dc. ROUND 20: Work * 2 dc in first dc, 1 dc in each of the next 24-27 dc *, repeat from *-* the entire round = 156-168 dc. ROUND 21: Work 1 dc in every dc = 156-168 dc. ROUND 22: Work * 2 dc in first dc, 1 dc in each of the next 25-28 dc *, repeat from *-* the entire round = 162-174 dc. Brim measures approx. 12 cm. TWINED STRING: Cut 2 lengths of 3 metres each with off white. Twine the strands tog until they resist, fold the string double so that it twines again. Make a knot at each end. Thread the string in last stripe before brim. Thread the string under a tr for approx. every 10 tr on this round. Tie a double knot or a bow. |
|
|
Have you made this or any other of our designs? Tag your pictures in social media with #dropsdesign so we can see them! Do you need help with this pattern?You'll find tutorial videos, a Comments/Questions area and more by visiting the pattern on garnstudio.com. © 1982-2024 DROPS Design A/S. We reserve all rights. This document, including all its sub-sections, has copyrights. Read more about what you can do with our patterns at the bottom of each pattern on our site. |
|


With over 40 years in knitting and crochet design, DROPS Design offers one of the most extensive collections of free patterns on the internet - translated to 17 languages. As of today we count 304 catalogues and 11422 patterns - 11422 of which are translated into English (UK/cm).
We work hard to bring you the best knitting and crochet have to offer, inspiration and advice as well as great quality yarns at incredible prices! Would you like to use our patterns for other than personal use? You can read what you are allowed to do in the Copyright text at the bottom of all our patterns. Happy crafting!
Comments / Questions (22)
Bonjour Je souhaite connaître l'astuce afin que les bordures du chapeau restent droites et rigides car celui que j'ai confectionné tombe sur les côtés. Merci pour votre réponse. Catherine Ricci
26.03.2024 - 14:54DROPS Design answered:
Bonjour Mme Ricci, vous pouvez utiliser la technique utilisée dans cette vidéo. Bon crochet!
02.04.2024 - 10:29No entiendo cómo se coloca el cordón en el modelo de sombrero SUMMER STRIPES. Es para atarse el sombrero o es como adorno?
18.12.2023 - 18:56On the pattern it says ch 5-5 and row 1 12-12 dc. Should I be using 2 strands of drops Paris ? I have purchased recommended amount but there seems to be lots of yarn. Thanks
30.06.2023 - 06:46DROPS Design answered:
Dear Dawn, remember to check and keep your tension, you should have 12 tr (UK-English) / dc (US-English) and 9 rows = 10 x10 cm. Work with only 1 strand Paris. Happy crocheting!
30.06.2023 - 07:59Beginnende haakster ben ik, wat wordt hiermee bedoeld: INFORMATIE VOOR HET HAKEN: Vervang het eerste stk aan het begin van elke stk-toer door 3 l. Eindig elke toer met 1 hv in de l aan het begin van de toer. Ik snap 3 I niet! Dank alvast, groetjes Marian
04.04.2021 - 18:02I am a little uncertain about the brim. I need to go back and alter my hat a little as it is a bit too deep - I had to alter my crochet hook size to get the tension in stitches but obviously my rows were out. The brim seems to flop rather a lot? So I was wondering if, when I re-do it, whether I should maybe do htr instead of tr and maybe drop a hook size when I do the brim, as well as changing to a dc? Any thoughts more than welcome. I am very new to crochet so not very competent!!
22.10.2016 - 12:17DROPS Design answered:
Dear Mrs Thomas, remember to always check and keep correct tension, you can also use a smaller crochet hook to get a firmer texture, or/and lightly starch the brim a bit to get it be as you would like it to. Happy crocheting!
24.10.2016 - 09:34Bardzo dziękuję za porady. Kapelusz jest już gotowy i jestem zachwycona wzorem - jest łatwy do wykonania, idealny dla początkujących, a uzyskany kapelusz - naprawdę ładny.
04.07.2016 - 09:18Mam jeszcze dwa pytania, tym razem dotyczące sznureczka. W jakim celu się go wstawia? I czy należy go wstawiać w taki sposób, aby większa jego część była z góry czy z dołu? Z góry dziękuję za odpowiedź i pozdrawiam serdecznie :)
28.06.2016 - 08:58DROPS Design answered:
Sznureczek jest po to aby lepiej dopasować kapelusz, pełni też funkcję dekoracyjną. Zacząć przeciągać od środka tyłu, ponad rondem i tam zakończymy. Wiązanie jest z tyłu. Pozdrawiamy
28.06.2016 - 21:54I repeat my question in a more popular language ;-) : 72 dc in STRIPES1 part makes about 45 cm not 54 cm. Isn't the hat going to be too small if I follow the pattern? TIA for the answer.
08.06.2016 - 08:44DROPS Design answered:
We wzorze w tym miejscu nie ma oczek ścisłych (dc), ale słupki (tr) i robótka będzie bardziej rozciągliwa. Dzięki temu kapelusz nie będzie spadał i nie będzie również za mały. POWODZENIA
08.06.2016 - 12:46Witam :). Mam wątpliwości co do części przerabianej jako PASKI 1 - przecież 72 słupki przerabiane tak, jak przy wykonywaniu próbki dadzą mi około 45 cm obwodu, a nie 54-56 cm... Czy kapelusz przerobiony dokładnie wg opisu nie wyjdzie za mały? Pozdrawiam i z góry dziękuję za odpowiedź. Joanna
07.06.2016 - 12:56DROPS Design answered:
Robótka przerabiana słupkami będzie bardziej rozciągliwa. Dzięki temu kapelusz nie będzie spadał. POWODZENIA
08.06.2016 - 12:47Ik zie net dat Yulla Olsen hetzelfde commentaar had. Ik moest overigens net als zij haak 3,5 gebruiken. Misschien moeten jullie het commentaar wat serieuzer nemen.
04.06.2016 - 19:58