
Popular categories
Looking for a yarn?


|
||||||||||||||||||||||
Mykonos |
||||||||||||||||||||||
 |
 |
|||||||||||||||||||||
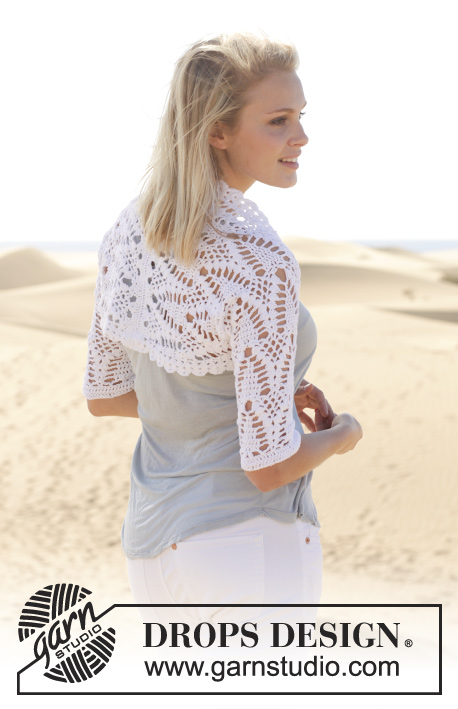
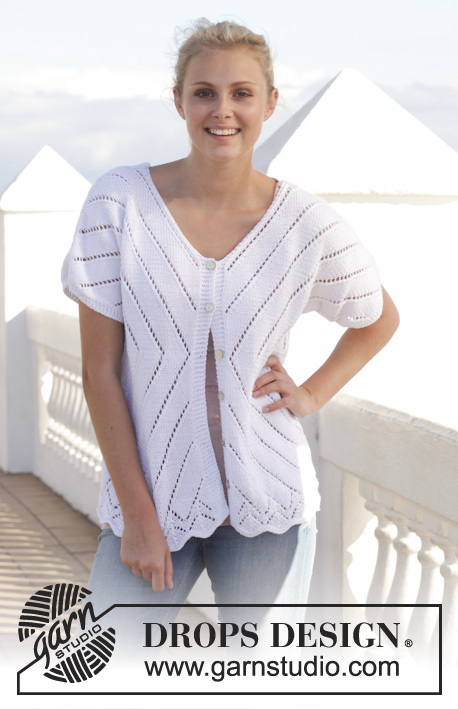
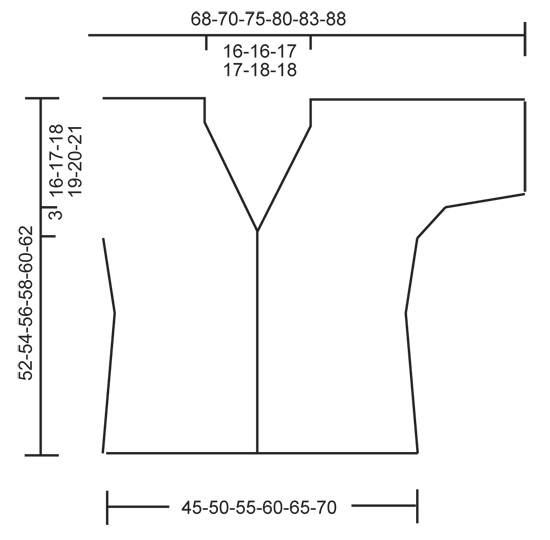
Knitted DROPS jacket with lace pattern in ”Muskat”. Size: S - XXXL.
DROPS 152-22 |
||||||||||||||||||||||
|
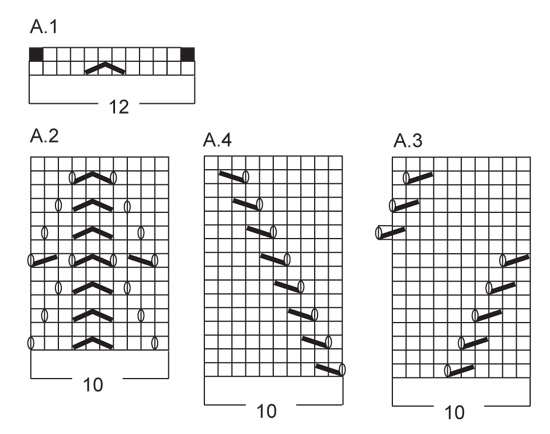
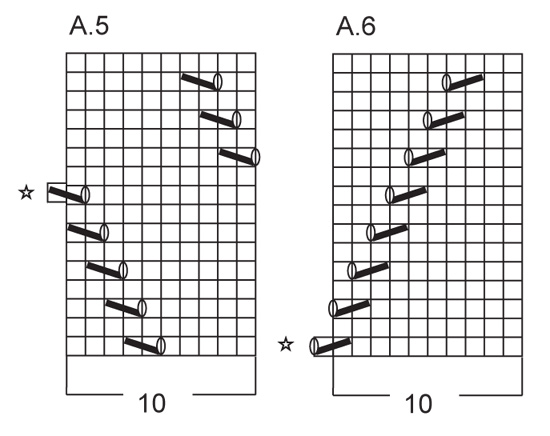
KNITTING TIP: When neck dec beg, continue eyelet rows that have been started, but do not beg new eyelet rows. NOTE! Adjust to not dec for neck on the first 4 rows of diagram A.4/A.6. GARTER ST (back and forth on needle): K all rows. 1 ridge = 2 rows K. PATTERN: See diagrams A.1-A.6. The diagrams show all rows in pattern seen from RS. NOTE: Diagrams do not fit vertically when repeated, but continue eyelet rows as before, AT THE SAME TIME beg a new eyelet row every 16th row. When A.4 and A.6 meet mid back, work 1 hole more in A.6, but do not work in A.4 (i.e. there is 1 hole in the middle between A.4 and A.6). DECREASE TIP (applies to neck dec): Dec inside 2 sts in garter st. All dec are done from RS! Dec as follows before 2 sts: Start 2 sts before and K 2 tog. Dec as follows after 2 sts: Slip 1 st as if to K, K 1, psso. BUTTONHOLES: Dec for buttonholes on right band. 1 buttonhole = K tog second and third st from edge and make 1 YO. Dec for buttonholes when piece measures (measured in the side where piece is shortest): SIZE S: 7, 13, 19, 25, 31 and 37 cm. SIZE M: 9, 15, 21, 27, 33 and 39 cm. SIZE L: 4, 10, 16, 22, 28, 34 and 40 cm SIZE XL: 6, 12, 18, 24, 30, 36 and 42 cm SIZE XXL: 7, 13, 19, 25, 31, 37 and 43 cm SIZE XXL: 9, 15, 21, 27, 33, 39 and 45 cm ---------------------------------------------------------- BODY: Worked back and forth on circular needle from mid front. Cast on 229-253-277-301-325-349 sts (incl 6 band sts in each side towards mid front) on circular needle size 4 mm with Muskat. Work 1 ridge in GARTER ST - see explanation above. Work 6 band sts in each side in garter st until finished measurements. Continue as follows: K 6 (= band), A.1 (= 12 sts) 18-20-22-24-26-28 times total in width, then 1 st in stocking st (work like this so that both sides are the same) and K 6 (= band). REMEMBER THE KNITTING TENSION! When A.1 has been worked 1 time vertically, there are 193-213-233-253-273-293 sts on needle. Then work A.2 (= 10 sts) over A.1 1 time vertically, finish row with 1st st in A.2 before the last 6 K sts (so that pattern is the same in each side towards bands at the front). Remember BUTTONHOLES on right band - see explanation above. Then work 6 sts in garter st (= band), A.3 (= 10 sts) over A.2 9-10-11-12-13-14 times in total in width (= mid back), then work A.5 (= 10 sts) over A.2 9-10-11-12-13-14 times in total in width, then 1 st in stocking st, finish with 6 sts in garter st (= band). Pattern A.3/A.5 is displaced towards the 6 band sts in each side worked in garter st until finished measurements. NOTE: Work 9th row in A.5 as follows: Work pattern and in garter st as before until 8 sts remain, 1 YO, slip 1 st, K 1, psso – see diagram, finish with 6 sts in garter st (= band). Continue pattern until piece measures 13 cm. On next row from RS dec in A.3 as follows: Instead of K 2 tog as shown in diagram, K 3 tog (= 1 st dec) on every other vertical eyelet row (i.e. every other repetition of A.3), on same row dec on every other vertical eyelet row in A.5 as follows: Instead of "slip 1 st, work 1 st, psso", work as follows: Slip 1 st, K 2 tog, psso (= 9-10-11-12-13-14 sts dec in total). Repeat dec 1 more time in the remaining vertical eyelet rows when piece measures 15 cm (= 18-20-22-24-26-28 sts dec in total) = 175-193-211-229-247-265 sts remain on needle. NOTE: Dec only 1 st in every repetition (i.e. 1 repetition = 9 sts). Continue with pattern on every other row until piece measures 23 cm. On next row from RS inc in A.3 and A.5 as follows: Instead of K 2 tog as shown in diagram, work first row from RS as follows: K until YO, 1 YO (YO = inc st), K after YO, continue to work as before. Repeat inc on every other vertical eyelet row (= 9-10-11-12-13-14 sts inc). Repeat inc on the remaining vertical eyelet row when piece measures 25 cm = 193-213-233-253-273-293 sts on needle. NOTE: Inc only 1 st in every repetition (i.e. 1 repetition = 10 sts). AT THE SAME TIME when piece measures 25 cm (adjust to work 1 whole repetition of A.3/A.5), work A.4 over A.3 and A.6 over A.5. Pattern is displaced and worked until finished measurements. NOTE: Work 1st row in A.6 as follows: Work pattern and in garter st as before until 8 sts remain, K 2 tog, 1 YO – see diagram, finish with 6 sts in garter st (= band). When piece measures 33-34-35-36-37-38 cm, divide the piece, finish front and back piece separately as follows: Slip the first 51-56-61-66-71-76 sts (= right front piece) and the last 52-57-62-67-72-77 sts (= left front piece) on a stitch holder (NOTE: There is 1 st more on left front piece so that pattern is the same in both sides), cut the yarn, then work only over the middle 90-100-110-120-130-140 sts (= back piece). BACK PIECE: Continue pattern as before AT THE SAME TIME cast on new sts for sleeves in each side of piece at the end of every row as follows: cast on 4 sts 2 times in total in each side, then 9-8-8-8-7-7 sts 2 times in total in each side = 142-148-158-168-174-184 sts on needle. Work inc sts in pattern and when all sts have been inc, work 4 sts in garter st in each side of piece for sleeve edges. Continue lace pattern as before. When piece measures 38-40-41-43-44-46 cm - see KNITTING TIP above, work 2 ridges in garter st over the middle 4 sts (= 69-72-77-82-85-90 sts on each side), work the other sts as before. Then continue working in garter st over the 4 sts and pattern as before, AT THE SAME TIME divide the piece for v-neck and finish each shoulder separately (= 71-74-79-84-87-92 sts on each shoulder). Continue to work in garter st over the 2 outermost sts towards the neck, AT THE SAME TIME on next row from RS dec 1 st for neck inside the 2 sts in garter st - read DECREASE TIP, repeat dec on every row from RS 16-16-17-17-18-18 more times (= 17-17-18-18-19-19 times in total) = 54-57-61-66-68-73 sts remain on the shoulder. Work until piece measures 51-53-55-57-59-61 cm. Work 1 ridge in garter st over all sts. Cast off. Piece measures approx. 52-54-56-58-60-62 cm. RIGHT FRONT PIECE: = 51-56-61-66-71-76 sts. Now cast on new sts for sleeve at the end of every row from RS as follows: cast on 4 sts 2 times in total, then 9-8-8-8-7-7 sts 2 times in total = 77-80-85-90-93-98 sts on row (NOTE: There is 1 st more on left front piece, i.e. after inc there are 78-81-86-91-94-99 sts on needle). Work inc sts in pattern and when all sts have been inc, work the last 4 sts in garter st for sleeve edge. Continue lace pattern as before. REMEMBER BUTTONHOLES! When piece measures 38-40-41-43-44-46 cm – see KNITTING TIP above - cast off the 4 band sts at beg of next row from RS = 73-76-81-86-89-94 sts remain on needle. Continue to work in garter st over the 2 outermost band sts towards the neck and pattern as before, AT THE SAME TIME on next row from RS dec 1 st for neck inside the 2 band sts - read DECREASE TIP, repeat dec on every row from RS 19-19-20-20-21-21 times = 54-57-61-66-68-73 sts remain on the shoulder. Work until piece measures 51-53-55-57-59-61 cm. Work 1 ridge in garter st over all sts. Cast off. Piece measures approx. 52-54-56-58-60-62 cm. LEFT FRONT PIECE: Work as right front piece but reversed. When casting off for neck, cast off the outermost 4 band sts at beg of next row from WS, work 2 sts in garter st, P the next 2 sts in stocking st tog (i.e. same no of sts on right and left front piece). Then work as right front piece. ASSEMBLY: Sew shoulder seams and underarm seams. Sew the buttons on to left front piece. |
||||||||||||||||||||||
Diagram explanations |
||||||||||||||||||||||
|
||||||||||||||||||||||
|
||||||||||||||||||||||
|
||||||||||||||||||||||
|
||||||||||||||||||||||
|
Have you made this or any other of our designs? Tag your pictures in social media with #dropsdesign so we can see them! Do you need help with this pattern?You'll find tutorial videos, a Comments/Questions area and more by visiting the pattern on garnstudio.com. © 1982-2024 DROPS Design A/S. We reserve all rights. This document, including all its sub-sections, has copyrights. Read more about what you can do with our patterns at the bottom of each pattern on our site. |
||||||||||||||||||||||


With over 40 years in knitting and crochet design, DROPS Design offers one of the most extensive collections of free patterns on the internet - translated to 17 languages. As of today we count 304 catalogues and 11422 patterns - 11422 of which are translated into English (UK/cm).
We work hard to bring you the best knitting and crochet have to offer, inspiration and advice as well as great quality yarns at incredible prices! Would you like to use our patterns for other than personal use? You can read what you are allowed to do in the Copyright text at the bottom of all our patterns. Happy crafting!
Comments / Questions (49)
Bonjour, J'ai fait A.3 et A.5 une fois en hauteur et je suis à 10cm. Comment continuer le motif pour arriver à 13cm et pour continuer à suivre les explication. Une fois les 16 rangs terminer comment doit-on continuer le motif pour la suite du gilet? Merci d'avance.
19.07.2023 - 10:45DROPS Design answered:
Bonjour Mme Mathieu, continuez les point ajourés pour continuer les diagonales (si vous n'avez pas suffisamment de mailles pour tricoter les 2 m ens, 1 jeté, tricotez 1 m end). Bon tricot!
27.07.2023 - 11:21Förstår inte varv 9 på mönster A3 och A5, ska det vara 9 maskor mellan varje omtag och ihoptagning? Omtagen stämmer inte.
01.08.2019 - 08:55DROPS Design answered:
Hej Inga-Siv, du stickar hela tiden 8 räta maskor mellan varje omtag och ihoptagning, både i A.3 och A.5. Lycka till
01.08.2019 - 14:57Ik vind dit een supermooi model, maar ik brei absoluut niet graag met rondbreinaald. Is de uitleg voor dit model niet beschikbaar op de traditionele manier, ttz rug +2 voorstukken ? Of hebt u een ander vergelijkbaar model op de traditionele manier ? Alvast hartelijke dank.
05.03.2019 - 17:20DROPS Design answered:
Dag Diane,
Vanwege het kantpatroon dat doorloopt op over de zijnaad is dit patroon helaas is allen geschikt om met de rondbreinaald te breien.
07.03.2019 - 22:25Good evening. I accidently asked this question in the comment section so I will attempt to ask it here. I'm a little confused as to what to do on row 9 section A5. it's showing an 11sts pattern instead of the usual 10 sts. If I do this the pattern gets moved to the left an extra st at each repetition and distorts the pattern. can you please advise me on how to work this specific row and where to add the extra stitch... Thank you
07.07.2018 - 06:34DROPS Design answered:
Dear Natalie, the lace pattern is going diagonnaly so that on row 9 you will knit together the last st each repeat with the first st next repeat and at the end of row tog with the last stitch in stocking st so that pattern looks symetrical on both sides - see "star" under diagram key. Happy knitting!
09.07.2018 - 07:45Ok so i'm stuck on row 9 of A5. If i knit 9 sts befoe the yo slip k psso i end up out of pattern and distorting the pattern to the right. Please clarify or attempt to guide me as to what I am doing wrong.
06.07.2018 - 18:34Christine wrote:
Hello. When the decrease starts at A3/A5 pattern at 13cm, I note the pattern repetition is then reduced to 9 stitches. I’m confused as the pattern illustrated for A3/A5 and then A4/A6 has a pattern repetition of 10 stitches. If we are reducing to 9, what stitch do we ignore in the repetition ??
31.03.2018 - 13:51Habe Problem mit dem Muster A3/A5 Reihe 11: in der Rückenmitte endet A3 mit 2 rechts zusammenstricken und 1 Umschlag. Dann geht es weiter mit A5: 1 Umschlag, 1 abheben, 1 rechts, abgehobene Masche überziehen. Das heißt, es gibt 2 Umschläge nebeneinander, ist das richtig?
03.02.2018 - 20:39DROPS Design answered:
Liebe Gisela, wiederholen Sie die Diagramme mit den korrekten Maschenanzahl inzwischen, dann sollen nur 1 Umschlag in der Mitte vom Rückenteil sein - gerne können Sie Markierungsfaden zwischen jedem Rapport einsetzen. Viel Spaß beim stricken!
05.02.2018 - 13:18Jeg forstår ikke overgangen mellom A3 og A5 på pinne 11. Her skal man starte ny hullmønsterrekke, men er det meningen å lage dobbelt kast? Og det blir bare 7 rettmasker mellom hullmønsterrekkene i første A5 rapport - dette vil jo synes godt etterhvert.
20.05.2017 - 20:31DROPS Design answered:
Hei Marita. Hvis du strikker etter diagrammene så får du automatisk 9 masker glattstrik mellom hver hullrekke, hvis du er usikker på hvor diagrammet starter og slutter i ditt arbeid, så sett gjerne noen merketråde. God fornøyelse!
24.05.2017 - 16:18SIrina wrote:
Continuing: ... because the next row of the diagram A1 has in the middle of it : slip 1 as if to k, k 2 together, psso, so I believe this row needs to be knitted not purled, so the first row needs to be purled?
12.05.2016 - 13:24DROPS Design answered:
Dear Slrina, see answer below. Happy knitting!
12.05.2016 - 17:51SIrina wrote:
Hello! What do I do with the st that is not there from the diagram A1? Do I slip it? Do I knit it? And another question: When I start diagram A1 do I k in the first row(is it the front of the work) or do I purl the row? I am wondering because the next row of the diagram has in the middle of the diagram
12.05.2016 - 13:20DROPS Design answered:
Dear Slrina, start reading diagrams from the bottom corner on the right side towards the left from RS and from the left towards the right from WS - read more here. This mean, you are working each repeat of M.1 over 12 sts, dec 2 sts in each repeat, on 2nd row, you will have only 10 sts left in each repeat (= row 2 in M1 is worked from WS = P all sts). Happy knitting!
12.05.2016 - 17:51