
Popular categories
Looking for a yarn?


|
||||||||||||||||||||||
Olivia |
||||||||||||||||||||||
 |
 |
|||||||||||||||||||||
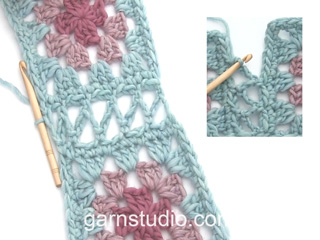
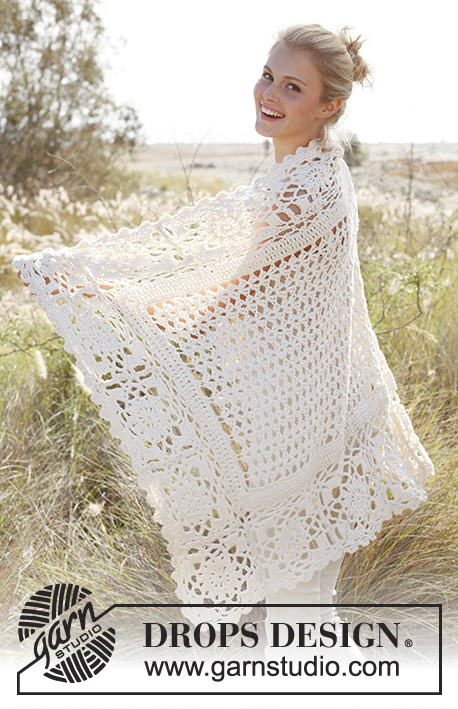
Crochet DROPS blanket with squares and fan pattern in ”Big Merino”.
DROPS 146-35 |
||||||||||||||||||||||
|
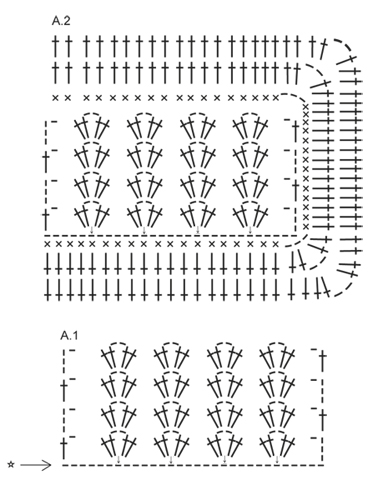
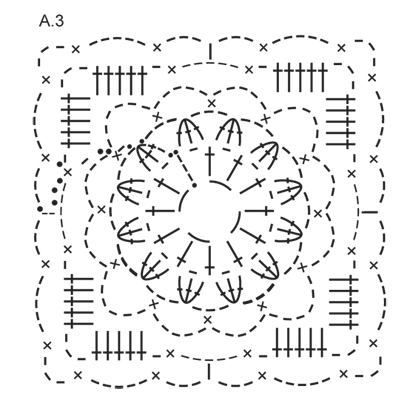
3 TR WORKED TOG AT BEG OF ROUND: 3 ch, work next tr in same ch but wait with last YO and pull through, work 1 tr more in same ch but now pull last YO through all 3 sts on hook. 3 TR WORKED TOG: Work 1 tr in ch but wait with last YO and pull through, work 1 tr more in same ch but wait with last YO and pull through, work last tr in same ch but now pull last YO through all 4 sts on hook. ---------------------------------------------------------- BLANKET: Beg by working the centre of the blanket in fan pattern (A.1) as explained below. Then work squares which are assembled into a frame around the centre of blanket. It is important to keep the crochet tension on both fan pattern and the crochet squares so that the 2 parts fit tog when assembled. CENTRE OF BLANKET: Crochet 70 (118) ch on hook size 6 mm with Big Merino. Then work according to diagram A.1, i.e. work as follows: ROW 1: Work 2 tr in 10th ch from hook, 2 ch, 2 tr in same ch, * skip 5 ch, in next ch work 2 tr + 2 ch + 2 tr *, repeat from *-* 9 (17) times in total, work 1 ch, skip 5 ch and finish with 1 tr in last ch, turn piece = 10 (18) tr-groups on row. ROW 2: 4 ch (= 1 tr + 1 ch), in every ch-loop in the middle of every tr-group work 2 tr + 2 ch + 2 tr, finish row with 1 ch and 1 tr in 3rd ch from beg of previous row. Repeat 2nd row back and forth until piece measures approx. 72 (104) cm. Blanket now measures 40 (72) cm in breadth and 72 (104) cm vertically. EDGE AROUND THE CENTRE OF BLANKET: ROUND 1: Beg from RS and work dc around the blanket as shown in A.2 – i.e. along ch-row at beg of blanket work 3 dc in every ch-loop (i.e. between every tr-group) and work 1 dc at the bottom of every tr-group, in every corner on blanket work 2 dc + 3 ch + 2 dc, up along each side on blanket work 3 dc in every tr and at the top of blanket (i.e. along last row) work 2 dc in every ch-loop and 2 dc between every tr-group. ROUND 2: Turn piece, work 3 ch (= 1 tr), then work 1 tr in every dc and in ch-loops in every corner work 2 tr + 2 ch + 2 tr, finish round with 1 sl st in 3rd ch from beg of round. ROUND 3: Work as 2nd round but work 1 tr in every tr (instead of 1 tr in every dc). Blanket now measures 48 (80) cm in breadth and 80 (112) cm vertically. CROCHET SQUARE: Work 4 ch on hook size 6 mm with Big Merino and form a ring with 1 sl st in 1st ch. Then work according to diagram A.3, i.e. work as follows: ROUND 1: Work 4 ch (= 1 tr + 1 ch), * 1 tr in ch-ring, 1 ch *, repeat from *-* a total of 11 times, finish with 1 sl st in 3rd ch from beg of round = 12 tr with 1 ch between each. ROUND 2: 1 sl st in first ch, work 3 TR TOG AT BEG OF ROUND – see explanation above, * 3 ch, 3 TR TOG in next ch – see explanation above *, repeat from *-* a total of 11 times and finish with 3 ch and 1 sl st at the top of first tr-group = 12 tr-groups with 3 ch between every tr-group. ROUND 3: 1 sl st in first ch-loop, 1 ch, 1 dc in same ch-loop, * 5 ch, 1 dc in next ch-loop, 5 ch, 1 dc in next ch-loop, 6 ch, 1 dc in next ch-loop *, repeat from *-* a total of 4 times but finish last repetition with 1 sl st in first dc from beg of round (instead of 1 dc in next ch-loop). ROUND 4: Work 1 sl st in first ch-loop, 1 ch, 1 dc in same ch-loop, * 5 ch, 1 dc in next ch-loop, 1 ch, in next ch-loop (ch-loop with 6 ch) work 5 tr + 3 ch + 5 tr (= corner), 1 ch, 1 dc in next ch-loop *, repeat from *-* a total of 4 times but finish last repetition with 1 sl st in first dc at beg of round (instead of 1 dc in next ch-loop). ROUND 5: Work sl sts until the middle of first ch-loop (ch-loop with 5 ch), work 5 ch (= 1 htr + 3 ch), * 1 dc in ch before tr-group, 5 ch, 1 dc in ch-loop in the corner, 3 ch, 1 dc in same ch-loop, 5 ch, 1 dc in ch-loop after next tr-group, 3 ch, 1 htr in next ch-loop, 3 ch *, repeat from *-* a total of 4 times but finish last repetition with 1 sl st in 2nd ch from beg of round (instead of 1 htr in next ch-loop, 3 ch). Cut and fasten the threads, square measures 16 x 16 cm. Work a total of 20 (28) squares. ASSEMBLY: Place the squares with 5 (7) squares in breadth and 7 (9) squares in height. Place 2 squares tog WS against WS and work tog as follows (work around the outer edge on both squares at the same time): 1 dc in ch-loop in the corner on squares, 1 ch, 1 dc in next ch-loop, 1 ch, 1 dc in same ch-loop, 1 ch, 1 dc in same ch-loop, * 1 ch, 1 dc in next ch-loop, 1 ch, 1 dc in same ch-loop *, repeat from *-* 1 more time, 1 ch, 1 dc in next ch-loop, 1 ch, 1 dc in same ch-loop, 1 ch, 1 dc in same ch-loop, 1 ch, 1 dc in ch-loop in the corner. Cut and fasten the thread. Crochet the other squares tog the same way. Now work the centre of blanket tog with the frame as follows (place the 2 parts flat while assembling so that the distance between the assembly points can be adjusted): Beg with 1 dc in ch-loop in the corner on frame, work 1 ch, 1 dc in ch-loop in the corner on the centre of blanket, * 3 ch, 1 dc in next ch-loop on frame, 1 ch, skip approx. 3 tr on the centre of blanket, 1 dc in next tr *, repeat from *-* around the entire blanket – make sure that the crochet tog is nice and even. LACE EDGE AROUND THE BLANKET: Work a finishing edge around the entire blanket as follows: 1 dc in any ch-loop, * 4 ch, 1 tr in third ch from hook, 1 dtr in fourth ch from hook, skip approx. 3-3½ cm on blanket, 1 dc in next ch-loop *, repeat from *-* around the entire blanket – NOTE: Adjust so that one whole loop is in every corner and finish round with 1 sl st in first ch from beg of round. |
||||||||||||||||||||||
Diagram explanations |
||||||||||||||||||||||
|
||||||||||||||||||||||
|
||||||||||||||||||||||
|
||||||||||||||||||||||
|
Have you made this or any other of our designs? Tag your pictures in social media with #dropsdesign so we can see them! Do you need help with this pattern?You'll find tutorial videos, a Comments/Questions area and more by visiting the pattern on garnstudio.com. © 1982-2024 DROPS Design A/S. We reserve all rights. This document, including all its sub-sections, has copyrights. Read more about what you can do with our patterns at the bottom of each pattern on our site. |
||||||||||||||||||||||


With over 40 years in knitting and crochet design, DROPS Design offers one of the most extensive collections of free patterns on the internet - translated to 17 languages. As of today we count 304 catalogues and 11422 patterns - 11422 of which are translated into English (UK/cm).
We work hard to bring you the best knitting and crochet have to offer, inspiration and advice as well as great quality yarns at incredible prices! Would you like to use our patterns for other than personal use? You can read what you are allowed to do in the Copyright text at the bottom of all our patterns. Happy crafting!
Comments / Questions (73)
Joining the squares together. I follow the directions, but instead of a smooth seam, it’s more lumpy. Is that normal, or am I doing something wrong?
21.11.2020 - 20:20DROPS Design answered:
Dear Mrs Hamilton, sorry for late answer - squares should be nicely flat, you can block them if necessary. Remember also to make the chain stitches on the last round as width as a sc/dc is wide to avoid that the last round tighten piece. Happy crocheting!
26.04.2021 - 13:38Very pretty and easy to understand, feminine, keep up the good work
14.05.2020 - 01:13Is er een complete videotutorial van de gehaakte sokken van Milla ? Heeeeel graag. Mvg, Kelly
12.10.2019 - 04:29Witam Chciałabym z tego wzoru zrobić obrus z kordonka na stół. Może macie jakieś rady co do szydełka i do nitki ( bo może nie kordonek ?) Proszę także wyjaśnić legendę, ( nie potrafię czytać ze schematów- to moja pierwsza praca) 1 oz - ?? 1 oł -oczko 1 oś - ??? 1 psł - półsłópek 1 sł - słupek
26.10.2018 - 10:48DROPS Design answered:
Witaj Anno! Jeśli chcesz użyć kordonka, to na etykiecie będzie informacja jakiego szydełka użyć. Jeśli to miałby być obrus, ja osobiście wybrałabym DROPS Lace, cieniutka mieszanka alpaki i jedwabiu, bardzo wydajna, do końca roku z 30% zniżki :) Szydełko 3,5-4. Skróty: oz oczko zamykające, oł oczko łańcuszka, oś oczko ścisłe, psł półsłupek, sł słupek. Powodzenia!
28.10.2018 - 10:05Maryam wrote:
Hi...thanks for sharing...can I ask how many rows of fan should I crochet for both smal and large size blanket ...since I used this pattern to crochet a table cloth with different yarn...so confused plz help me
26.09.2016 - 11:54DROPS Design answered:
Dear Maryam, center of blanket should measure 72 (104) cm height, ie crochet fan until you get these measurements - adjust to the lenght you'd like to - we are not able to adjust each pattern to each individual request, for any further personnal assistance you are welcome to contact the store where you bought your yarn. Happy crocheting!
26.09.2016 - 13:10How many squares do I have to make for small blanket, I can't find it on the directions. Thank you
04.06.2016 - 01:01DROPS Design answered:
Dear Reina, you will work a total of 20 squares for the small blanket - see at the end of section "Crochet Square". Happy crocheting!
06.06.2016 - 08:54Can you tell me how many single crochet are down the side of the length of 41". Or how many double crochet down the 41". It seems to ruffle putting one in every single crochet. I do wish you would include stitch counts in patterns. Thank you
23.05.2016 - 21:55DROPS Design answered:
Dear Mrs Hembree, On first row, you crochet 3 sc in each dc (each 3 ch replacing 1st dc) along both long sides in the beg/end of rows. On 2nd row, work then 1 dc in each sc + 2 dc, 3 ch, 2 dc in each corner. Number of sts may vary with your tension in height (number of rows worked in A.1). Happy crocheting!
24.05.2016 - 08:52Hei! Hvor mye garn går det med til 1 rute? Jeg tenkte å lage min egen vri på teppet, kun med ruter. Jeg ser på de ulike garnalternativene og stusser over at det er forskjell på pinnetykkelsene. Da blir vel resultatet feil ift oppskriften? Jeg vurderer å bruke Vivaldi som har pinne størrelse 4. Mvh Ingunn
16.11.2015 - 15:09Debbie Brits wrote:
Hi, could you perhaps tell me how many times to repeat row 2, for the centre of the blanket, to have a 104cm vertically length? Thank you!
06.09.2015 - 13:46DROPS Design answered:
Dear Mrs Brits, this may vary with your tension in height, just repeat row 2 until work measures 104 cm in total. Happy crocheting!
07.09.2015 - 11:22Beautiful pattern. I made this for my new grandniece. It's the loveliest baby blanket I have ever crocheted.
23.07.2015 - 15:04