
Popular categories
Looking for a yarn?


|
|||||||||||||||||||||||||
Mint Star |
|||||||||||||||||||||||||
|
|
|||||||||||||||||||||||||
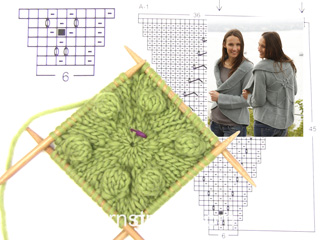
Knitted DROPS jacket worked in a circle in ”Nepal”. Size: S - XXXL.
DROPS 142-15 |
|||||||||||||||||||||||||
|
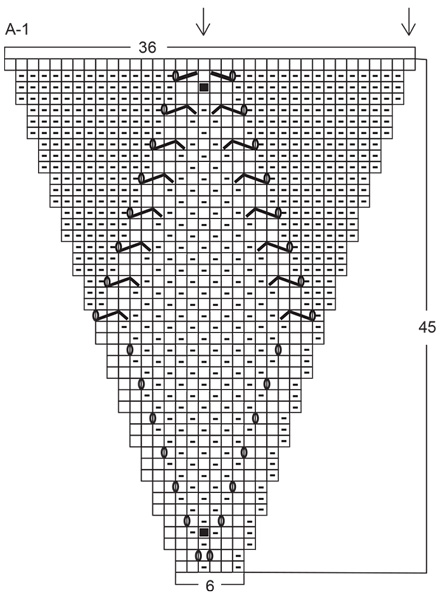
PATTERN: See diagram A-1. Diagram shows all rows in pattern from RS. MOSS ST: ROUND 1: * K 1, P 1 *, repeat from *-*. ROUND 2: K over P and P over K. Repeat 2nd round. GARTER ST (back and forth on needle): K all rows. 1 ridge = 2 rows K. INCREASE TIP (applies when diagram A-1 has been worked): Inc 1 st at every marker on every inc (i.e. 12 sts inc per round) – inc before all markers the first time, second time after all markers etc. alternately upwards - inc by making 1 YO - on next round work YO twisted to avoid holes. ---------------------------------------------------------- JACKET: Worked in the round in a circle from mid back. Work on double pointed needles when inc, switch to a longer circular needle when needed. Cast on 12 sts with Nepal and distribute them on 4 double pointed needles size 5 mm. Insert 1 marker in first st on round = mid up towards neck. K 1 round while at the same time working 2 sts in all sts = 24 sts. K 1 round without inc. On next round, work as follows: * K 1, K 2 in next st *, repeat from *-* = 36 sts. Then work according to diagram A-1 (= 6 repetitions in the round). REMEMBER THE KNITTING TENSION! When A-1 has been worked, there are 216 sts on needle and piece measures approx. 20 cm from the centre and outwards. Insert 1 marker in first st (= mid up towards to neck), and then 1 marker in every 18th st the entire round (see arrows in diagram for where markers are placed) = 12 markers 17 sts apart. READ ALL OF THE FOLLOWING SECTION BEFORE CONTINUING! Continue in stocking st over all sts – AT THE SAME TIME on 3rd round, inc 1 st at all markers – SEE INCREASE TIP! Repeat inc every 3rd round. AT THE SAME TIME when inc have been done 1-3-5 times (= 228-252-276 sts on round), cast off for shoulders and armholes on next round as follows: Cast off the first 28-30-33 sts for neck/shoulder, insert 1 marker (use another colour than the other inc markers in piece, these markers are only used when collar is sewn to shoulder), cast off the next 32-35-39 sts for armhole, work 109-123-133 sts (= down the back), cast off the next 32-35-39 sts for armhole, insert 1 marker and cast off the last 27-29-32 sts for shoulder/neck, cut the thread. Cast on 32-35-39 sts on circular needle size 5 mm, then work on the 109-123-133 sts on needle from WS and finally cast on 32-35-39 sts in the other side = 173-193-211 sts. Then work piece back and forth on needle in stocking st – insert markers for inc in the new sts cast on to match the markers in the sts cast off for armholes. Continue inc at every marker every 3rd row as before – AT THE SAME TIME slip 2 sts at end of every row on a stitch holder without working them first. When piece measures approx. 26-29-32 cm from the centre and outwards, slip the middle 67-71-77 sts on a stitch holder (= at the bottom of back piece). NOW MEASURE PIECE FROM HERE! Finish each front piece separately. FRONT PIECE: Continue in stocking st and with inc as before over the remaining sts on needle – at the same time slip 2 sts at end of every row on to stitch holders in each side (towards bottom edge slip sts on to same stitch holder as where the 67-71-77 sts at the bottom of back piece are) until 10-15-21 cm have been worked on front piece. Slip the remaining sts on to 1 of the stitch holders. Work the other front piece the same way. EDGE: K all sts from RS back on to circular needle size 5 mm - between every time sts where slipped on stitch holders in each side get the thread and twist it before slipping it on needle (i.e. between every other st, to avoid holes in the transitions), in addition inc evenly so that there are 308-356-404 sts in total on needle. K 1 row from WS at the same time insert 17 markers in the piece as follows: Work 2 sts, insert 1 marker, * work 19-22-25 sts, insert 1 marker *, repeat from *-* until 2 sts remain after last marker, work these. K 1 row from RS. Work next row as follows (from WS): 1 st in GARTER ST – see explanation above, * K 2 (i.e. 1 st on each side of marker is worked K), 17-20-23 sts in moss st *, repeat from *-* 3 more times, ** P 2 (i.e. 1 st on each side of marker is worked P), 17-20-23 sts in moss st **, repeat from **-** 7 more times, P 2, *** 17-20-23 sts in moss st, K 2 ***, repeat from ***-*** 3 more times, finish with 1 st in garter st. On next row from RS P 1 st on each side of the first 4 and last 4 markers, and K 1 st on each side of the other 9 markers – AT THE SAME TIME on this row, inc 1 st on each side of the last 4 and first 4 markers – inc on each side of the 2 P sts by making 1 YO which is worked twisted in moss st on next row. Continue inc every 6th row until finished measurements. When edge measures 13-15-17 cm, work short rows in one side towards mid back for collar. Work as follows (work and inc as before with moss st and stocking st - beg mid back): Work 36-38-40 sts, turn and work back, work 34-36-38 sts, turn and work back, work 32-34-36 sts, turn and work back, continue like this by working 2 sts less a total of 10-11-12 times, then work 3 sts less a total of 5 times, cut the thread and work the same way in the other side. Then K 1 row over all sts before loosely casting off with K. SLEEVE: Worked in the round on double pointed needles. Cast on 42-44-48 sts on double pointed needles size 5 mm with Nepal. Insert 1 marker at beg of round = mid under sleeve. P 1 round and K 1 round. Continue with MOSS ST - see explanation above. When piece measures 12 cm, K 1 round and P 1 round, continue in stocking st until finished measurements. At the same time when piece measures 15 cm, inc 1 st on each side of marker mid under sleeve. Repeat inc every 5-4-3 cm 6-8-10 more times = 56-62-70 sts. When piece measures 49 cm, cast off 6 sts mid under sleeve and work back and forth until finished measurements. Then cast off for sleeve cap at beg of every row in each side: 2 sts 2 times and 1 st 5 times, then cast off 2 sts in each side until piece measures 58 cm, then cast off 3 sts 1 time in each side. Cast off the remaining sts, sleeve measures approx. 59 cm. ASSEMBLY: Sew one collar part to half the shoulder/neck at the back and sew the other collar part to the other half of the shoulder/neck – beg at the marker inserted between armhole and shoulder and pull the collar somewhat when sewing it on, use what is needed of the collar vertically to make the collar parts come tog mid back, then sew the rest of the 2 collar parts tog edge to edge towards each other – see arrows in measurement chart. Sew in sleeves. Close the jacket with a pin or brooch. |
|||||||||||||||||||||||||
Diagram explanations |
|||||||||||||||||||||||||
|
|||||||||||||||||||||||||
|
|||||||||||||||||||||||||

|
|||||||||||||||||||||||||
|
Have you made this or any other of our designs? Tag your pictures in social media with #dropsdesign so we can see them! Do you need help with this pattern?You'll find tutorial videos, a Comments/Questions area and more by visiting the pattern on garnstudio.com. © 1982-2024 DROPS Design A/S. We reserve all rights. This document, including all its sub-sections, has copyrights. Read more about what you can do with our patterns at the bottom of each pattern on our site. |
|||||||||||||||||||||||||


With over 40 years in knitting and crochet design, DROPS Design offers one of the most extensive collections of free patterns on the internet - translated to 17 languages. As of today we count 304 catalogues and 11422 patterns - 11422 of which are translated into English (UK/cm).
We work hard to bring you the best knitting and crochet have to offer, inspiration and advice as well as great quality yarns at incredible prices! Would you like to use our patterns for other than personal use? You can read what you are allowed to do in the Copyright text at the bottom of all our patterns. Happy crafting!
Comments / Questions (85)
Is het mogelijk om na het rugpand de rest in stukken te breien met 2 naalden in plaats van een rondbreinaald, en naderhand alles samen te naaien .ik heb de mouwen met 2 naalden gebreid.Ik heb dit patroon eerder geprobeerd maar is toen niet gelukt.gr. Marian
11.04.2024 - 21:27DROPS Design answered:
Dag M Vasseur,
Daarvoor is dit patroon niet zo geschikt omdat je te veel steken op de naald hebt staan en dat past niet op rechte naalden.
15.04.2024 - 21:33Ich verstehe diesen Abschnitt der Anleitung nicht:GLEICHZEITIG nach 1-3-5 Zunahme-Rd (= 228-252-276 M) für die Schultern und die Armausschnitte wie folgt arbeiten heißt das, das ich nach der 1.Zunahmerunde die Schultern abkette, nach der 3.Zunahmerunde den Armausschnitt und dann nach 5.Runde M aufnehme??
01.02.2022 - 15:26DROPS Design answered:
Liebe Kerstin, die Zunahmen werden in jede 3. Runde gestrickt; wenn Sie die 1. Größe stricken, werden die Armausschnitt stricken, wenn die Zunahmen 1 Mal gestrickt sind (= 228 M), für die 2. Größe wird es wenn die Zunahmen 3 Mal gestrickt sind (= 252 M) und in die 3. Größe wenn die Zunahmen 5 Mal gestrickt sind (= 276 Maschen). Viel Spaß beim stricken!
01.02.2022 - 16:37Bonjour, Je ne comprends pas d'où viennent les mailles du DEVANT. Juste avant, j'ai fini avec 60m+71m sur arrêt de mailles+60m, qui constituent le bas de la veste. Dois-je remonter des mailles ou relever des mailles? Merci
25.04.2021 - 22:39DROPS Design answered:
Bonjour Nanette, si vous avez terminé avec 60 m pour 1 devant, 71 m en attente pour le bas du dos et 60 m pour l'autre devant, vous tricotez maintenant les 60 m d'un des devants seulement, en continuant à mettre 2 m en attente de chaque côté (en haut, côté encolure comme avant, mais maintenant, côté dos également) jusqu'à ce que vous ayez tricoté 15 cm depuis que vous avez glissé les mailles du dos (mettez un marqueur au milieu de vos 60 m et laissez ce marqueur en place pour bien pouvoir mesurer à partir de ce rang). Mettez vos mailles en attente et tricotez l'autre devant de la même façon. Bon tricot!
26.04.2021 - 09:11Bonjour, Je ne comprends pas les dimensions du patron: pour la taille S/M par exemple, au total, cela correspond à 90cm; si on ajoute les différentes parties, on obtient: 10+14+52+14+10=100cm. Ai-je fait une erreur de calcul? Et quel est la bonne dimension ? Merci
08.04.2021 - 20:19"GLEICHZEITIG am Ende jeder R je 2 M stilllegen ohne sie zuerst zu stricken. " Bedeutet dies, ich lege die vorher neu aufgenommenen Maschen am Ende jeder Runde gleich wieder still? Dann hab ich zu beiden Seiten des Strickabschnitts stillgelegte Maschen hängen? Kommt mir komisch vor...
27.01.2020 - 17:01DROPS Design answered:
Liebe Nicole, ja genauso sollen Sie es stricken, jetzt braucht man ein oval-Form, und das bekomment man beim stillegen Maschen am Ende jeder Reihe - siehe auch Maßskizze. Viel Spaß beim stricken!
28.01.2020 - 10:26Donna wrote:
How do you twist the stitches when knitting the slipped stitches from the holder? I have done short rows before but that was by wrapping the stitch.
10.10.2016 - 16:08DROPS Design answered:
Dear Donna, when picking up the sts, place it on the needle so that it will be twisted, ie you will be able to work it in the front loop of st whithout creating a hole on next round. Happy knitting!
10.10.2016 - 16:47Elizabeth Fletcher wrote:
Pattern numberDrops 14215. What size is S M L XL I ware a size 14 in cardigans but a 12 in tee shirts. That is English sizing, should I knit a S M L XL. I have completed pattern A1. The length of my back neck to waist is 18 inches, or 46 cm. Thank you for your help. Elizabeth.
20.03.2016 - 16:26DROPS Design answered:
Dear Mrs Fletcher, you will find at the end of the pattern a measurement chart with all finished measurements for each size taken flat from side to side - in cm (convert here into inch) - Compare these to a similar garment you have and like the shape to find out the matching size. Read more about sizing here. Happy knitting!
21.03.2016 - 10:23Anne Turner wrote:
I am now on to the Short Rows part. I am working with the right side first - - beginning with the right side of work facing me? The pattern says break off wool then work other side whilst you have said in a previous comment work across sts to other side ??? Am I now to start left hand side from the edge - this will mean starting on the wrong side of work for the short rows ?
13.01.2016 - 16:03DROPS Design answered:
Dear Mrs Turner, the short rows start on mid of back piece, 1st row = from RS, when short rows are done, cut the yarn and work short rows the same way on the other side of mid of back piece, starting now from WS, on mid on back piece. Happy knitting!
13.01.2016 - 17:11...Das Feld reichte nicht aus... Was passiert mit diesen als erstes still gelegten Maschen (Richtung Schulter-oben)? werden diese für den Rand mit aufgefasst? Wozu ist dann diese entstandene Lücke da? Wird diese dann später beim zusammen nähen geschlossen?! vielen Dank für die Hilfe
11.11.2015 - 20:51DROPS Design answered:
Siehe Antwort auf Ihre erste Frage.
11.03.2016 - 10:45Guten Abend! Ich habe zu den still gelegten Maschen eine Frage... Ich habe jetzte beide Vorderteile fertig gestrickt und nehme alle Maschen wieder auf eine Nadel (mit den still gelegten Maschen und Querfädenzunahmen); wenn ich jedoch auch die Maschen auf die Nadel nehme, welche ich als erstes in Richtung Schulter still gelegt habe entsteht doch eine Lücke( bei mir ungefähr 5cm.)
11.11.2015 - 20:48DROPS Design answered:
Hallo, wir haben Ihre Frage im Team diskutiert und hoffen, dass wir es richtig verstanden haben. Bezieht es sich auf die stillgelegten Maschen, wenn Sie die verkürzten Reihen stricken? Diese Maschen werden (siehe FERTIGSTELLEN) dann mit dem Kragen zusammengenäht, es sollte also keine Lücke entstehen. Hilft Ihnen die Schnittzeichnung unten an der Anleitung weiter?
11.03.2016 - 10:44