
Popular categories
Looking for a yarn?


|
|||||||||||||||||||
Sand Waves |
|||||||||||||||||||
|
|
|||||||||||||||||||
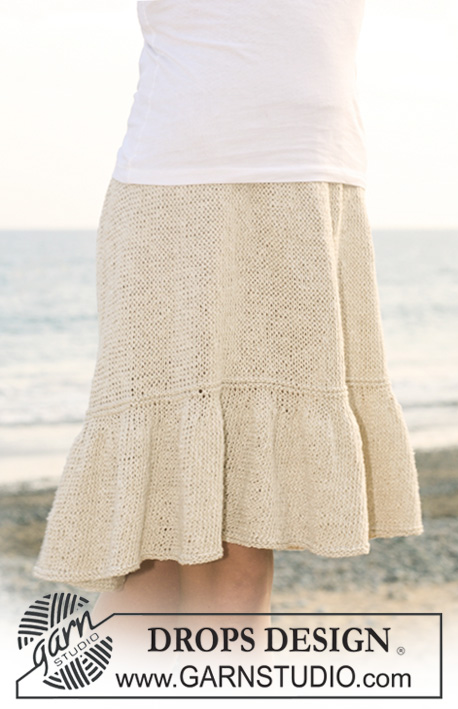
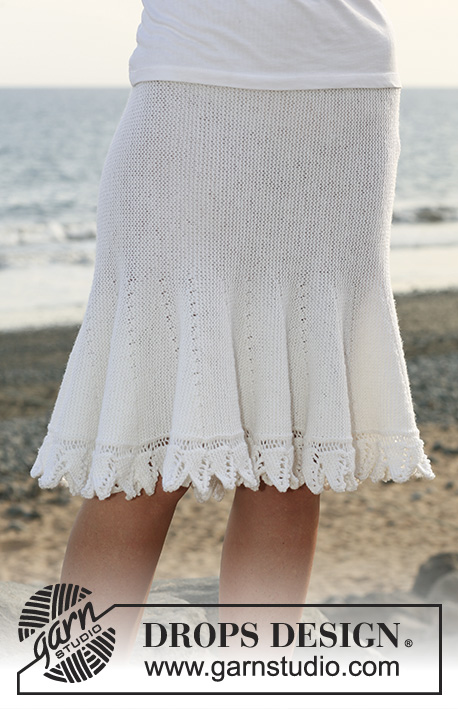
Knitted DROPS skirt with lace pattern in ”Muskat”. Size S - XXXL.
DROPS 118-14 |
|||||||||||||||||||
|
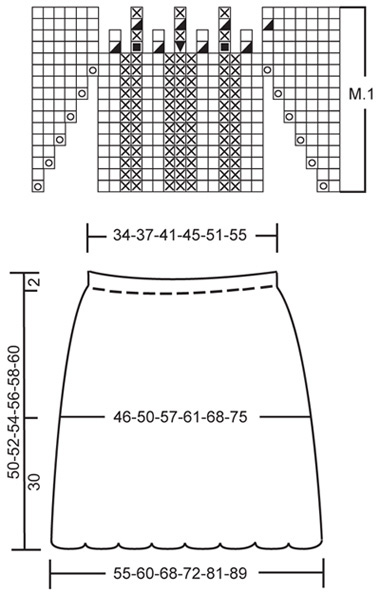
PATTERN: See diagram M.1. Diagram shows the pattern from RS. NOTE: Skip gaps in diagram and next st after gap is next st on round. DECREASING TIP: Dec 1 st to the right and to the left of all markers alternately, i.e. on first round with decreases dec on the right side of markers and on second round with decreases dec on the left side of markers. Dec as follows BEFORE marker (= right side), beg 2 sts before marker: slip 1 st as if to K, K1, psso. Dec as follows AFTER marker (= left side): K2 tog. --------------------------------------------------------- --------------------------------------------------------- SKIRT: Worked in the round from bottom edge towards the waist. LOOSELY cast on 208-224-256-272-304-336 sts on circular needle size 4 mm with Muskat. K 1 round, P 1 round and continue in M.1. REMEMBER THE KNITTING TENSION! After 5 vertical repeats of M.1 (piece measures approx 30 cm) work next round as follows: * K2 tog, K14 *, repeat from *-* across the round = 195-210-240-255-285-315 sts on needle. Now insert 6 markers in piece as follows: * 1 marker after 32-35-40-42-47-52 sts, 1 marker after 33-35-40-43-48-53 sts *, repeat from *-* a total of 3 times, last marker will now be at beg of round. Now continue in stocking st. AT THE SAME TIME on round 6 in stocking st dec 1 st by all markers – See DECREASING TIP (= 6 dec sts per round). Repeat the dec on every 6th round a total of 6-7-7-9-10-10 times and then on every 4th round a total of 3-2-4-2-2-4 times = 141-156-174-189-213-231 sts. When piece measures 50-52-54-56-58-60 cm P 1 round (= folding edge) and then work 2 cm stocking st, cast off loosely. ASSEMBLY: Fold waist double towards WS and fasten, leave a small opening and thread the elastic through. |
|||||||||||||||||||
Diagram explanations |
|||||||||||||||||||
|
|||||||||||||||||||
|
|||||||||||||||||||
|
Have you made this or any other of our designs? Tag your pictures in social media with #dropsdesign so we can see them! Do you need help with this pattern?You'll find tutorial videos, a Comments/Questions area and more by visiting the pattern on garnstudio.com. © 1982-2024 DROPS Design A/S. We reserve all rights. This document, including all its sub-sections, has copyrights. Read more about what you can do with our patterns at the bottom of each pattern on our site. |
|||||||||||||||||||


With over 40 years in knitting and crochet design, DROPS Design offers one of the most extensive collections of free patterns on the internet - translated to 17 languages. As of today we count 304 catalogues and 11422 patterns - 11422 of which are translated into English (UK/cm).
We work hard to bring you the best knitting and crochet have to offer, inspiration and advice as well as great quality yarns at incredible prices! Would you like to use our patterns for other than personal use? You can read what you are allowed to do in the Copyright text at the bottom of all our patterns. Happy crafting!
Comments / Questions (39)
Do I need 24 or 32 in circular needles? It says both but I doesn't look like we need to switch them out I'm the pattern.
12.08.2023 - 07:50DROPS Design answered:
Dear Nina, you will need both, starting with the longer one then changing to the shorter one when there are not enough stitches fitting the longer one. Happy knitting!
14.08.2023 - 09:06Gracias por compartir tu bello trabajo me encantaron las faldas e intentare tejer alguna
21.02.2022 - 01:18Bonjour ! je ne comprends pas bien les explications du diagramme M1 c\'est bien sur 21 m ? et quand ils n\'y a pas de mailles c\'est quoi ? Et pour réaliser la jupe \r\n donc je devrais faire autant de dessin M1 par exemple sur 224 mailles ? Merci de m\'aider S V PL Si vous pouvez me donner des conseils supplémentaires ? Merci d\'avance Francine
29.11.2020 - 22:29DROPS Design answered:
Bonjour Mme Schultz, le diagramme M.1 se tricote sur 16 mailles, au 1er rang, vous tricoterez ainsi: 1 m end, 1 jeté, 2 m end, 2 m env, 2 m end, 3 m env, 2 m end, 2 m env, 2 m end, 1 jeté = vous avez augmenté 2 m = 18 m. Il y a des espaces dans le diagramme car au début, on a moins de mailles, quand tous les jetés sont faits, on aura 28 m, et on diminue ensuite au milieu de M.1, raison pour laquelle il y a de nouveau des espaces. Retrouvez ici comment lire un diagramme. Bon tricot!
30.11.2020 - 10:23Direction do not say to join and knit in the round II outdoors think when you are done there would be no seam to sew. Am anxious to start pattern so please answer asap. Thank you. This is my correct e-mail
26.05.2020 - 22:18DROPS Design answered:
Dear Mrs Carattini-Thom, the skirt is worked in the round from bottom edge towards the waist, this means after casting on the sts, join in the round, insert a marker to mark the beg/end of rounds and knit 1 round, purl 1 round. Happy knitting!
27.05.2020 - 09:14I dont understand gaps in the knitting pattern between 1YO and K. Do we need to feel with K.
10.01.2020 - 03:15DROPS Design answered:
Dear Oksana, just do not take the gaps in consideration and work all stitches as there were no gab, ie on row 1 in M.1 simply work: K1, YO, K2, P2, K2, P3, K2, P2, K2, YO. The new stitches increased with the yarn overs will then be added on next row until all stitches have been worked. At the end of M.1 just work following the symbols (decreases) and work the remaining squares are shown (either K or P). Happy knitting!
10.01.2020 - 09:22I do not know how to read charts. Would love to make this skirt. Where can I find the written pattern instead of the chart
04.02.2019 - 21:11DROPS Design answered:
Dear Mrs Jayanti, we only have diagram to this pattern: start reading diagram from the bottom corner on the right side towards the left on every round - see diagram key, eg on 1st row you will work: K1, YO, K2, P2, K2, P3, K2, P2, K2, YO. Happy knitting!
05.02.2019 - 09:39This pattern is very beautiful. I want to knit one for winter or fall, can I use another yarn instead of cotton? Like alpaca or merino?
30.07.2018 - 19:48DROPS Design answered:
Dear Xiaoling, of course you can knit this skirt from another, similar weight yarn. See yarn group B for alternatives. However, instead of the pure alpaca yarns, mixtures would give you results with longer life. The Cotton Merino, the Lima or the Karisma would be perfect for this skirt. Happy Knitting!
31.07.2018 - 08:11Buongiorno Staff di Garn.Perdonate se Vi disturbo ancora,ma dall'ingrandimento della foto del motivo a ventagli risulterebbero 5 gettati,per un totale di 14 giri.Nella spiegazione del motivo invece risulterebbero 6 gettati per un totale di 16 giri.Sbaglio?Grazie del tempo che vorrete dedicarmi.Complimenti e buon fine settimana.Grazie,Rita.
04.05.2018 - 13:34DROPS Design answered:
Buongiorno Mariarita. Dalla fotografia non è sempre evidente in modo chiaro, ma i gettati sono 6 per un totale di 16 giri, come indicato nel diagramma. Buon lavoro!
04.05.2018 - 14:00Buonasera Staff di Garn.Avrei una perplessità rispetto allo schema M.1.Nel ferro di andata,seguo la legenda,ma nel ferro di ritorno (rovescio)lavoro le maglie come si presentano (quindi un dir. lo lavoro al rov.,un rov. lo lavoro al dir.,un gettato lo lavoro a rovescio).Forse non so leggere lo schema,salto qualche passaggio,commetto qualche errore?Grazie per la cortese risposta.Buon lavoro.Rita
03.05.2018 - 15:25DROPS Design answered:
Buongiorno Mariarita. Per lavorare avanti e indietro, è corretto come ha scritto. Dove trova i quadrati bianchi, il risultato è maglia rasata; dove trova le "x", il risultato è maglia rasata rovescio; i gettati, sul rovescio del lavoro, vengono lavorati a rovescio. Ci riscriva se ancora in difficoltà. Buon lavoro!
03.05.2018 - 15:54I see there have been a couple other knitters questioning why the first round ends with a half repeat; however there has not been any answer. So, I'll ask again, why does the first round not end with a yarn over, and then to restart the chart pattern with K and yarn over????
04.01.2018 - 22:49DROPS Design answered:
Dear Mrs Oblas, the number of sts is divisible by 16 in each size, so that you will repeat the 16 sts in M.1 a total of 13 to 21 times depending on your size. Happy knitting!
05.01.2018 - 09:14